Prefer a Video? Contact us today for access to all our Video documentation!
The advantages of certificate-based authentication become quickly apparent after users complete the simple onboarding software. By eliminating the need for credentials, users no longer grapple with password change policies or cumbersome authentication processes.
Managed devices can also be easily outfitted with certificates using SCEP Gateway to distribute with no end user interaction. Additionally, applying server certificate validation guarantees that users won’t fall victim to a Man-In-The-Middle attack.
The improvements to your networks security and user experience begins after upgrading to certificate-based authentication with your Cisco ISE RADIUS.
An overview of the configuration process is as follows:
- Configuring SecureW2 PKI Services
- Configuring and managing a PKI is difficult. This is why we designed our PKI Services to be completely turnkey. Everything that’s required for EAP-TLS (Certificate Authorities, CRL, Management Software, etc.) is created using our simple Getting Started Wizard.
- Configuring the RADIUS Server
- Integrating SecureW2 PKI Services with a RADIUS Server
- Our PKI services integrate seamlessly with all major RADIUS servers. We can work with your existing infrastructure to make implementation simple and painless. No RADIUS infrastructure? No problem! SecureW2 comes built-in with our Cloud RADIUS. Click here to read more about our RADIUS Solutions.
- Integrating SecureW2 PKI Services with a RADIUS Server
- Core Provider Integration
- SecureW2 Integrates with every major LDAP and SAML Core Provider to authenticate users and enroll them for certificates. Below are some of our integration guides detailing how SecureW2 integrates with Core Providers:
- SecureW2 Integrates with every major LDAP and SAML Core Provider to authenticate users and enroll them for certificates. Below are some of our integration guides detailing how SecureW2 integrates with Core Providers:
- Getting Users Enrolled for Certificates
- Set up an Onboarding SSID for BYOD Self-Service Certificate Enrollment
- Users can easily enroll themselves for certificates and get their devices configured for secure network access using the JoinNow Suite, our Best-In-Class Onboarding Software. They can use it to set up their devices from the comfort of their own home, or you can configure an Open SSID to redirect users to the JoinNow Onboarding Solution to ensure the enrollment process goes off without a hitch.
- Using Gateway APIs to Auto-Enroll Managed Devices for Certificates
- Rather than manually enrolling every managed device for a certificate, use our Managed Device Gateway APIs to automatically enroll all your managed devices for machine and/or user certificates using any major MDM software.
- Set up an Onboarding SSID for BYOD Self-Service Certificate Enrollment
- Log in to the JoinNow Management Portal.
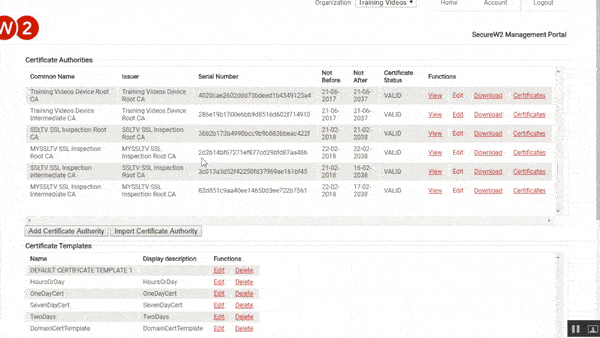
- Navigate to the Dynamic PKI > Certificate Authorities.
- Download the root and intermediate certificates associated with your network profile from the Certificate Authorities list.
- Once the certificates are downloaded, navigate to the Cisco ISE page.
- Click Administration on the menu bar and click Certificates.
- From there, click Trusted Certificates under Certificate Management.
- Click Import and add the root and intermediate certificates.
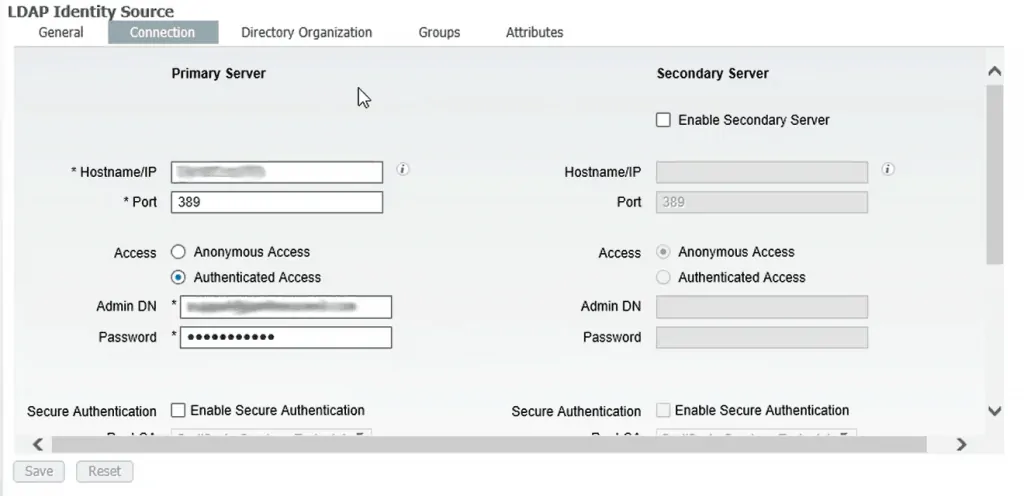
- Go to Administration on the menu bar and under Identity Management, click External Identity Sources.
- Create a new Identity Source within the LDAP folder.
- Under General, enter a Name, Description, and set the Schema as Active Directory.
- Under Connection, enter the Server’s IP address under Hostname/IP, 389 for the Port, select Authenticated Access, and input the server’s credentials under Admin DN and Password.

- Start by navigating to Policy on the menu bar, and then click Authentication. By default, a set of authentication policies is available.
- Delete the set of default policies.
- Create a new policy and assign it a name. In this guide, the policy is named “WirelessDot1x”.
- Click the plus (+) icon next to the If dialog box.
a. You can add the attributes that you want to include in the authentication policy. - Ensure that under Condition Name, both Wireless_802.1X and Wired_802.1X are added and that the dialog box with the options AND / OR is set to “OR”.
- The Allow Protocols option should be set to Default Network Access.

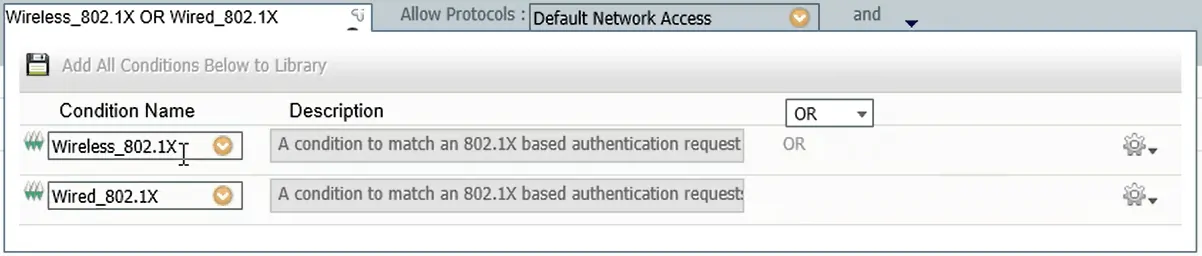
The condition must be set to ‘OR’ because ‘AND’ indicates that it must satisfy both the wireless and wired conditions. It should be set to ‘OR’ because it is not valid to make connection attempts always from wired and wireless devices.
After confirming that Default Network Access is set, we need to determine how it was calibrated. To find this:
- Go to the menu bar, and under the Results tab, click Policy.
- In the drop-down menu that appears, open Conditions in a new tab.
- On the left side, click the drop-down arrow next to Authentication and then the similar arrow next to Allowed Protocols.
- From here, click Default Network Access.
- Under the Policy drop-down menu, click Authorization and create a new rule.
- For Rule Name, enter “Wireless TLS”.
- Set the If condition to Any.
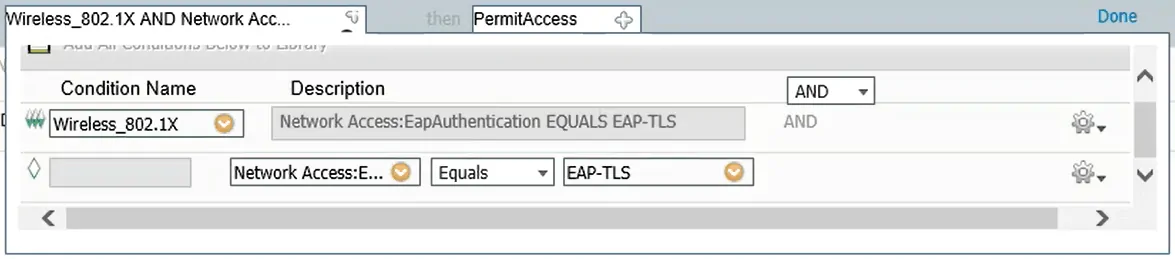
- For the following condition, click the (+) plus sign and confirm that it is configured as an AND condition.
- Set the Condition Name to Wireless 802.1X.
- Click the Settings icon on the right side to create conditions so that the Description reads Network Access: EAP Authentication EQUALS EAP-TLS.
- Set the Permissions to PermitAccess and click Done.

Here, you can set up an identity lookup by creating a couple more AND clauses and conditions. It would read along the lines of “users will be accepted only if they are set up for EAP-TLS, AND only if the user is from the Active Directory, AND only if the user from the Active Directory is marked ‘ACTIVE’.
PermitAccess tells ISE to send an ACCESS_ACCEPT response. You can see how it’s configured by doing the following:
- Navigate to the Cisco ISE page that you opened for the Authentication Policy, and click Conditions in the left pane.
- Click Authorization and then click Compound Conditions.
- Under Name, click Wireless_802.1X.
- Based on the condition, you can see that it requires EAP authentication for a secure connection.
- Next to Conditions, click Results.
- From here, click Authorization, then Authorization Profiles, and finally click PermitAccess. You can see that the Access Type is set to ACCESS_ACCEPT.
If you go back to the SecureW2 Management Portal, you can click Edit by the profile we just evaluated, and you’ll see that a RADIUS server certificate has not been added. Using a RADIUS server certificate is integral to preventing MITM attacks. To add a RADIUS server certificate:
- Navigate to the Cisco ISE page and click Certificates in the drop-down menu for Administration.
- Click System Certificates, and click Import to import the server certificate.
- Select the certificate by clicking the small box next to it and then clicking Edit above.
- Select the option you want to use the certificate for under Usage, and then click EAP Authentication.
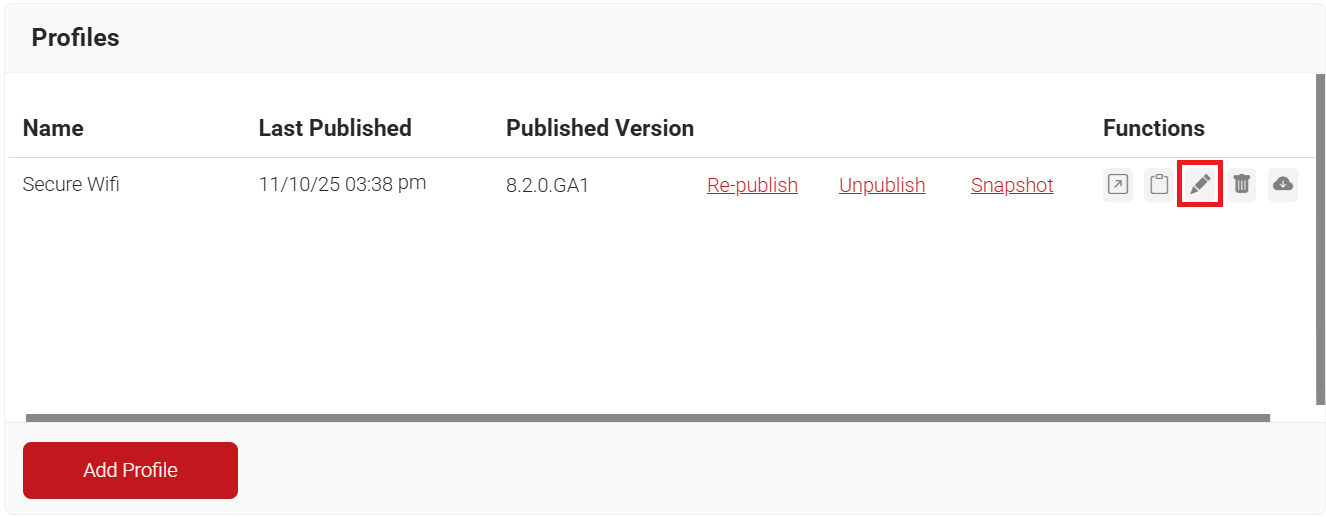
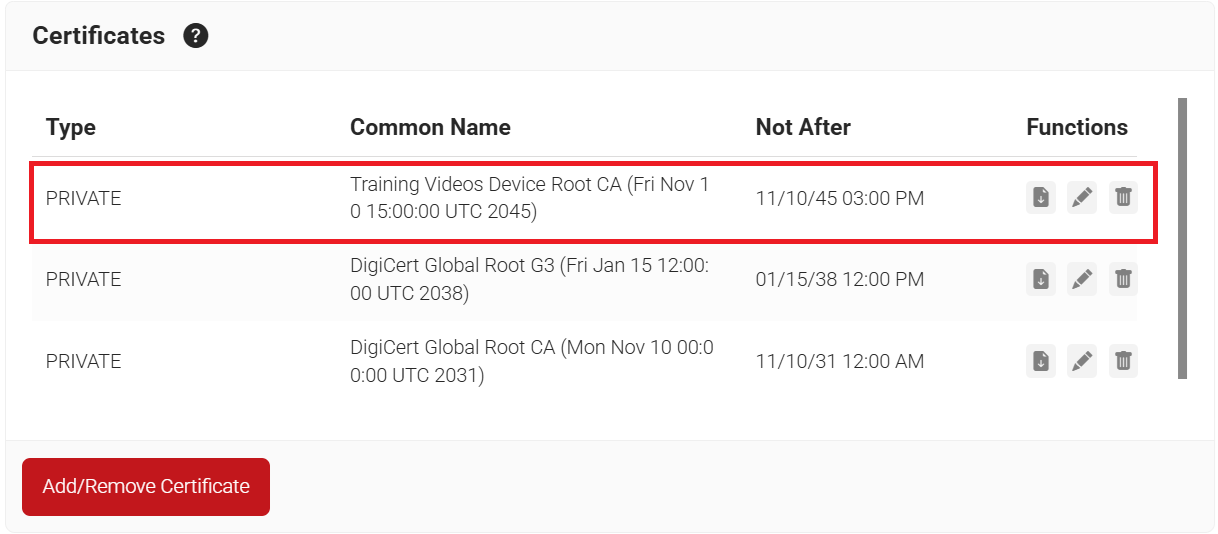
- From the JoinNow Management Portal, navigate to Device Onboarding > Profiles, select the network profile that you created earlier, and then click Edit.

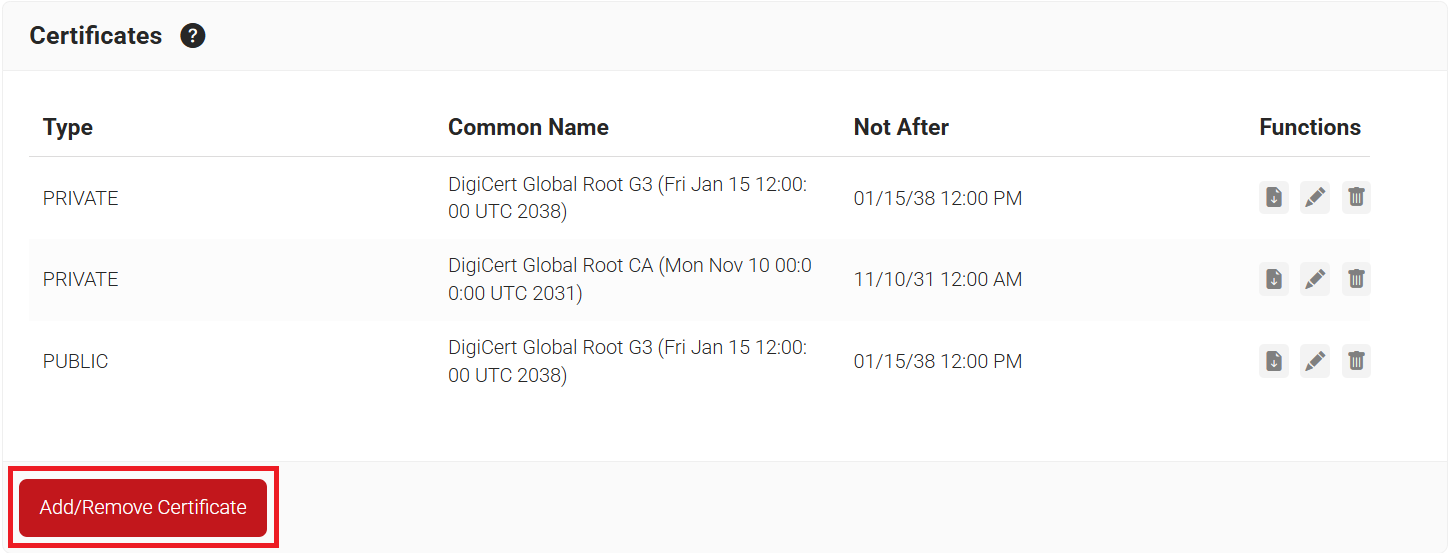
- Scroll down to the Certificates section.
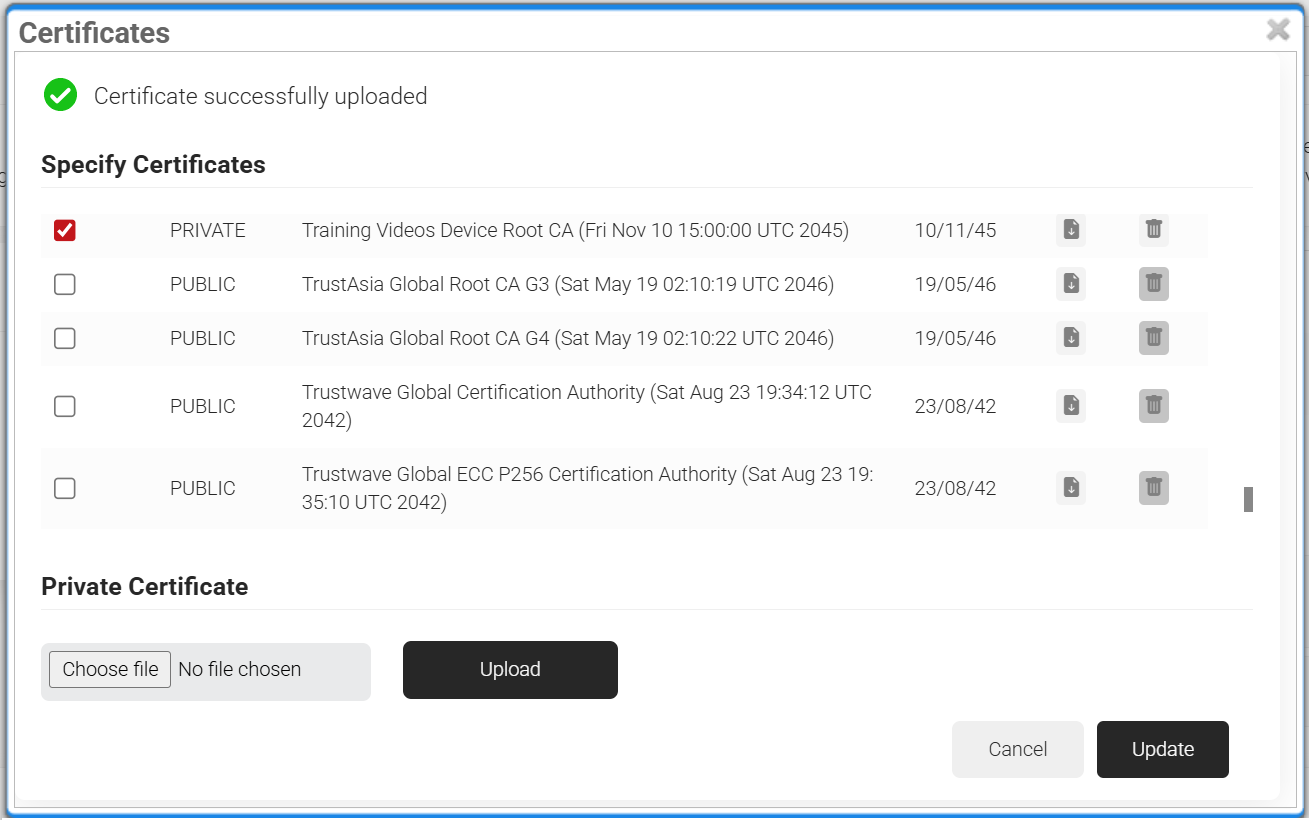
- Click the Add/Remove Certificate button.

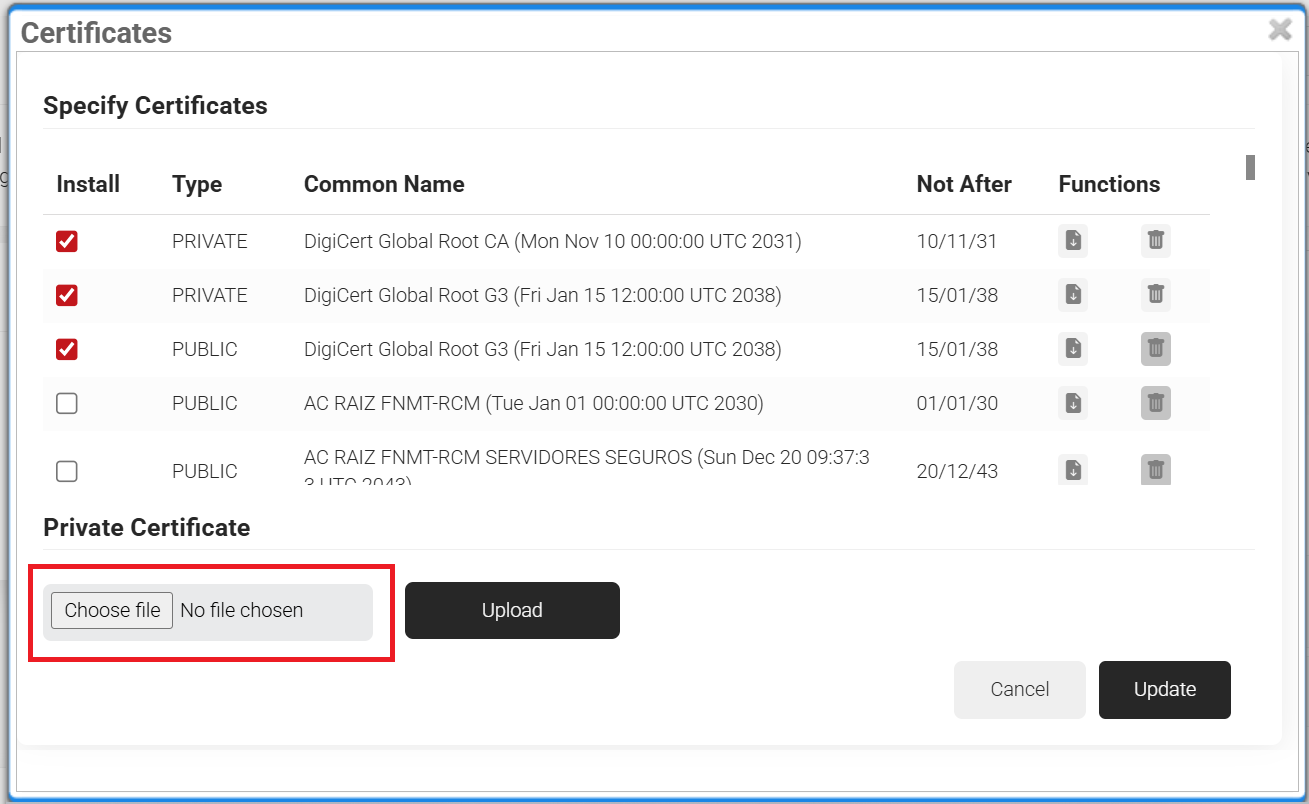
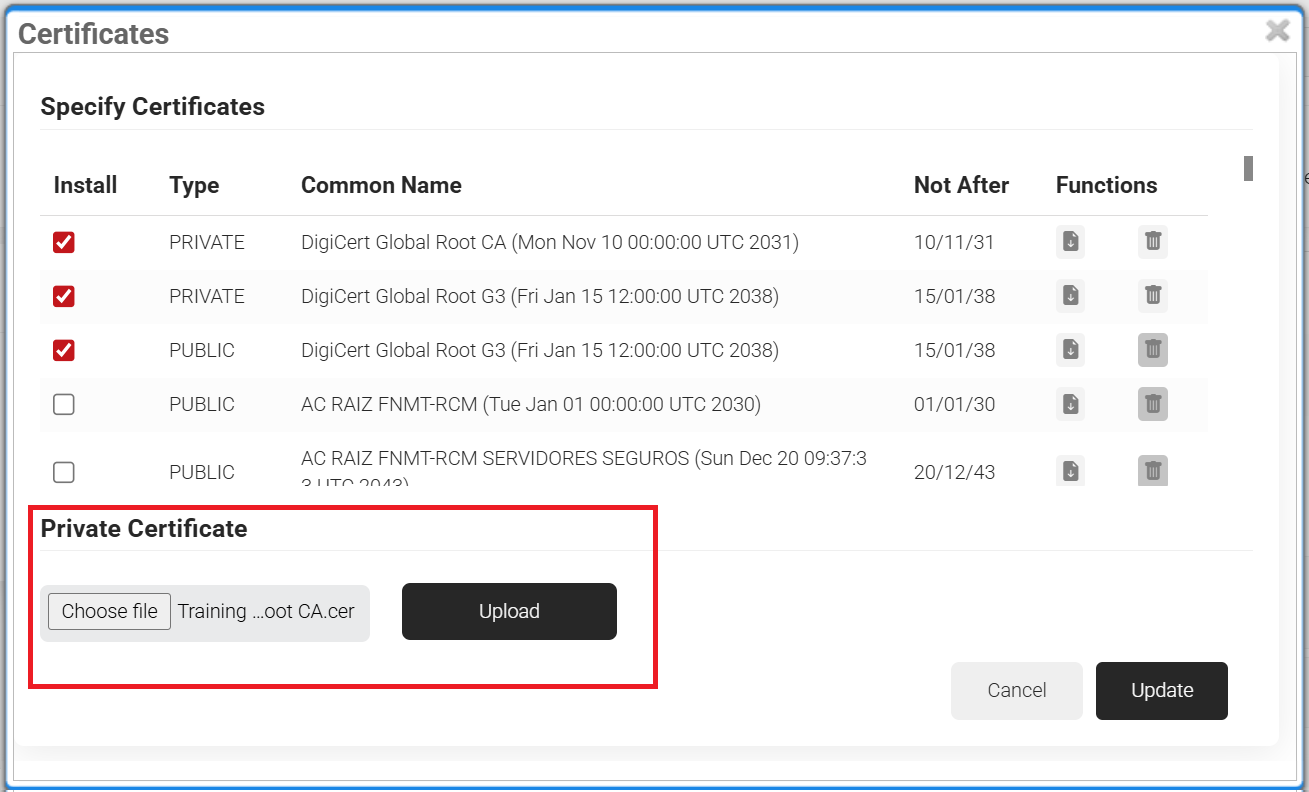
- In the Certificates pop-up window, click Choose File (the file created in the Adding the SecureW2 Root and Intermediate CAs to the ISE Trust List section), and then click Upload to upload the certificate.


- Select the recently uploaded certificate and click Update.


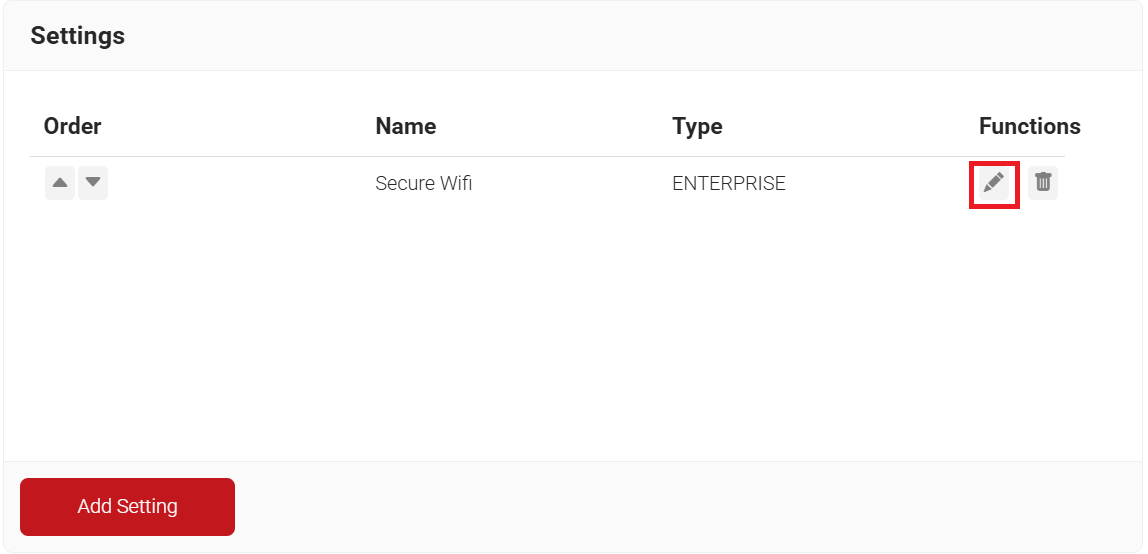
- Scroll down to the Settings section and click Edit.

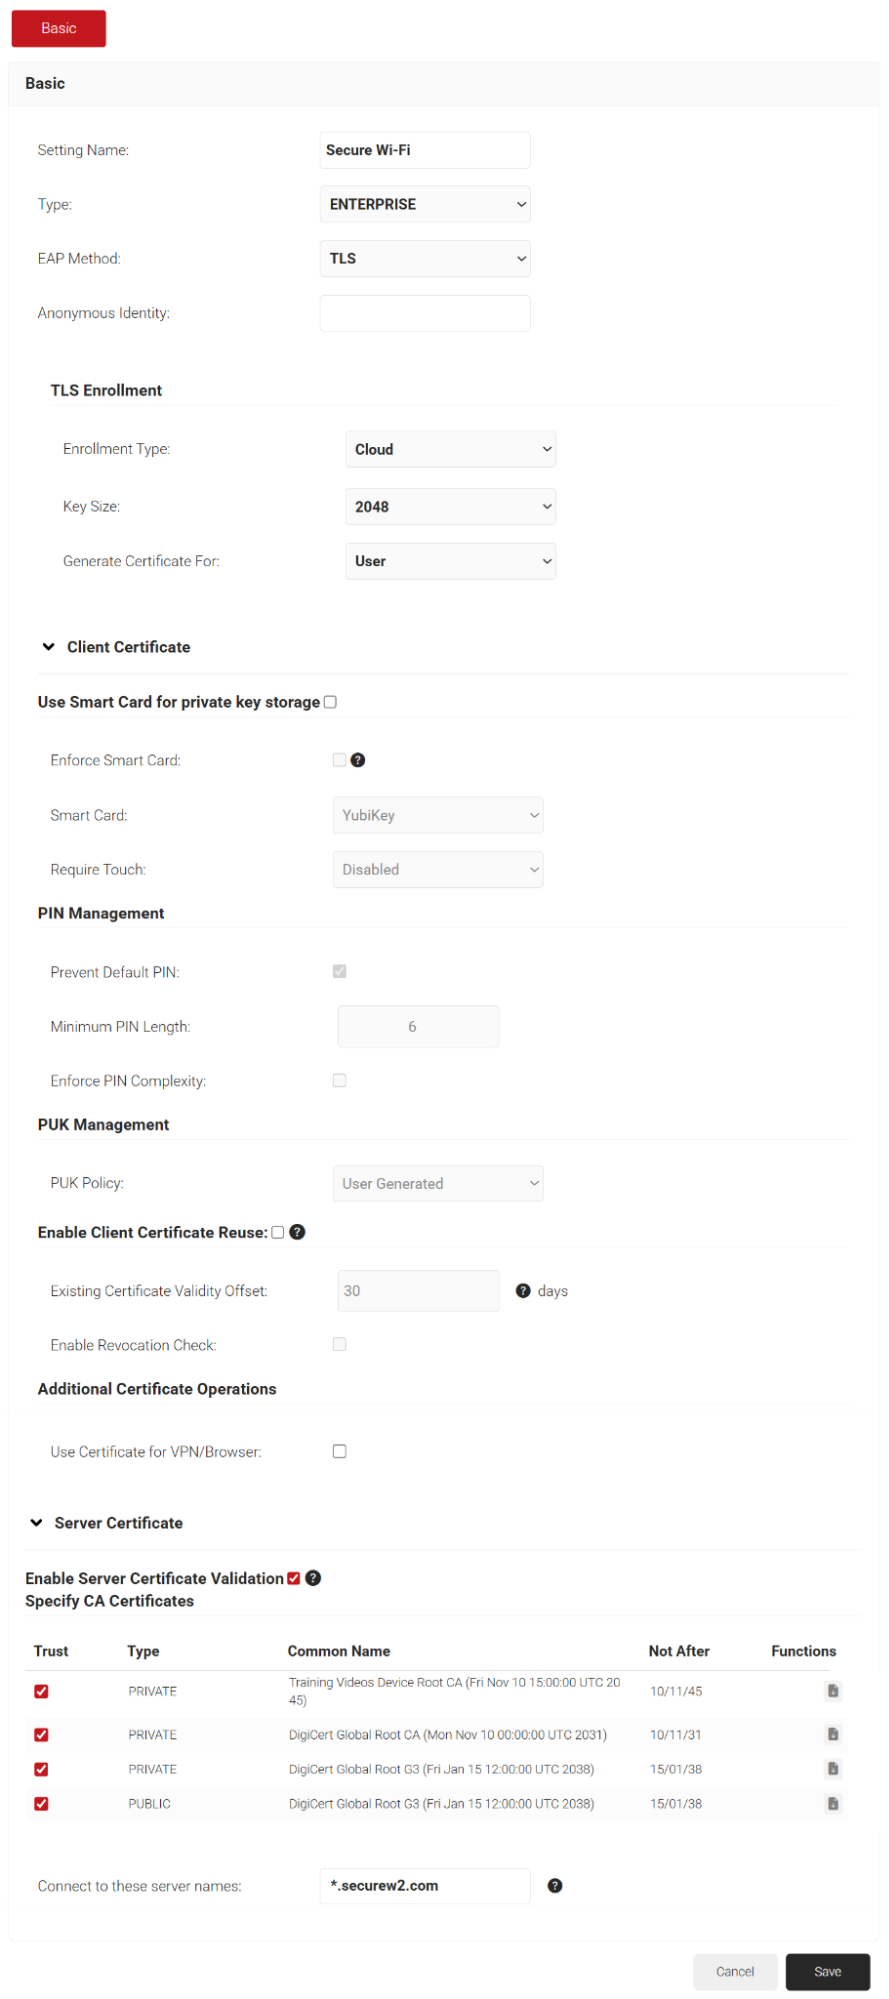
- This will take you to a page where you can enable server validation.
- Check Enable Server Certificate Validation.
- Select the Trust checkbox next to the certificate.
- Enter the domain name in which the certificate was issued in the Connect to these server names field.