To register a new application in Azure, perform the following steps:
- Log in to the Microsoft Azure portal.
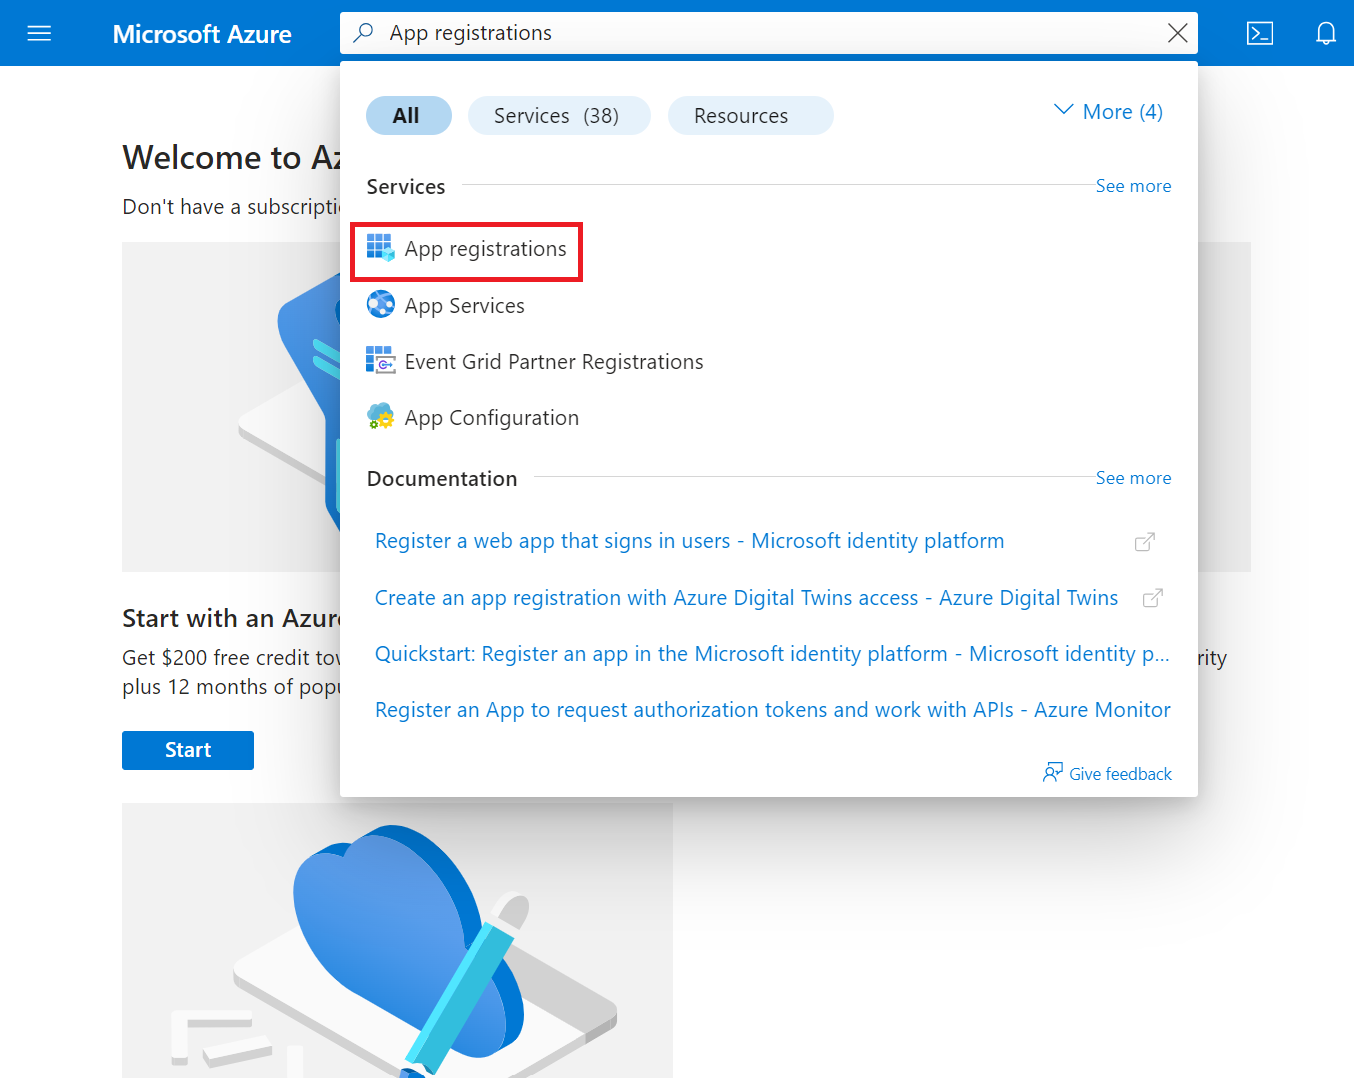
- Type App registrations in the search box and click App registrations.

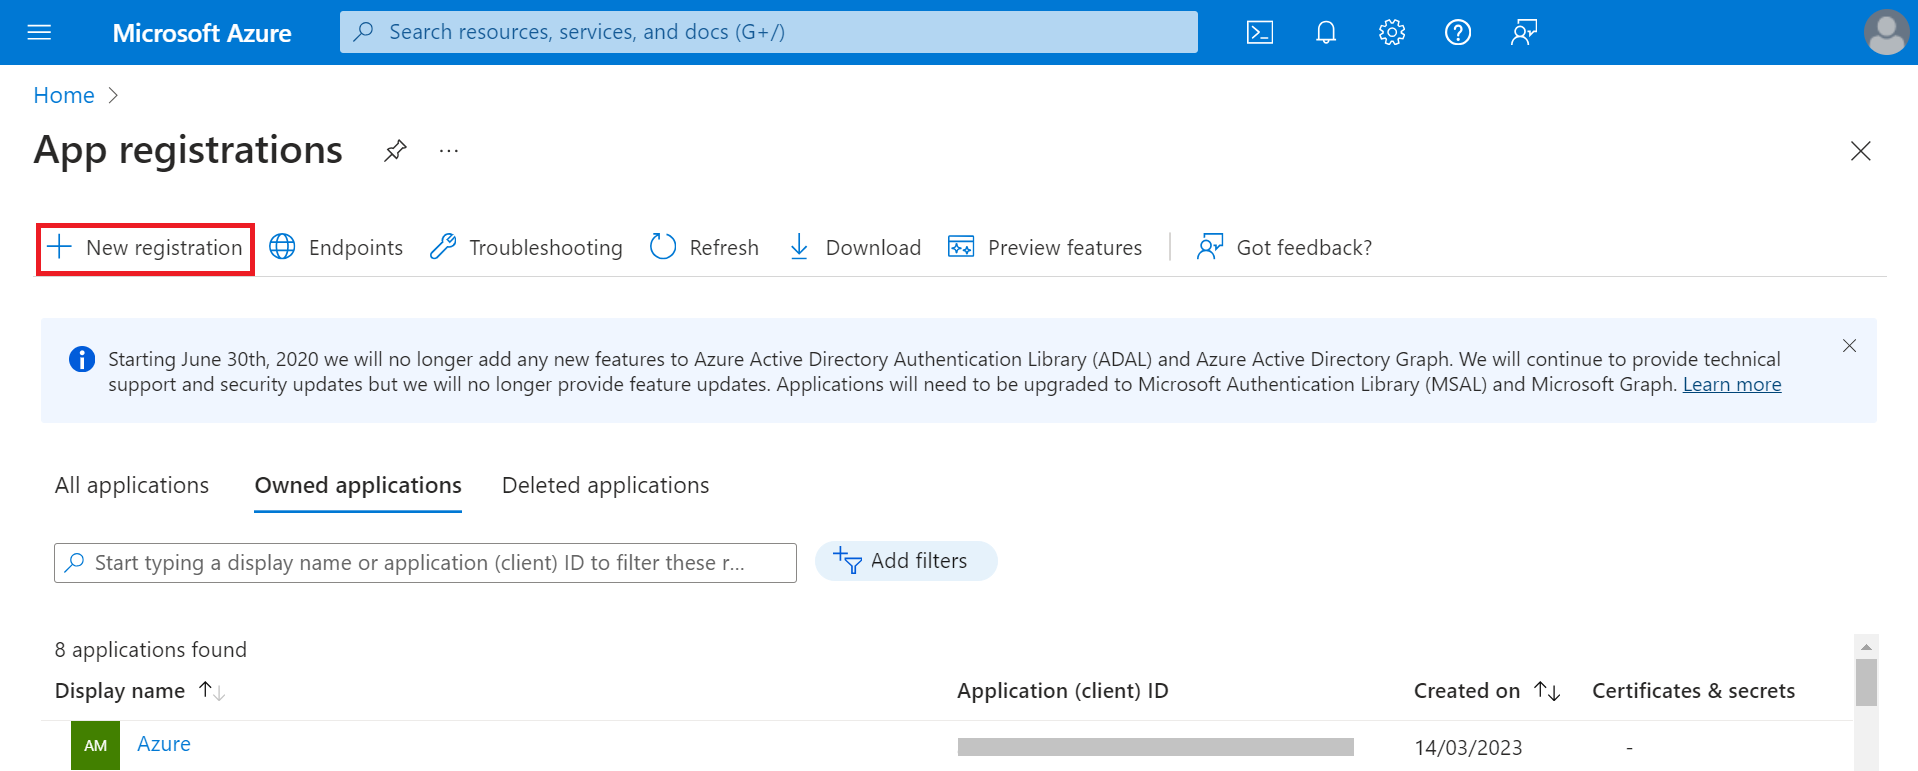
- On the App registrations page, click New registration.

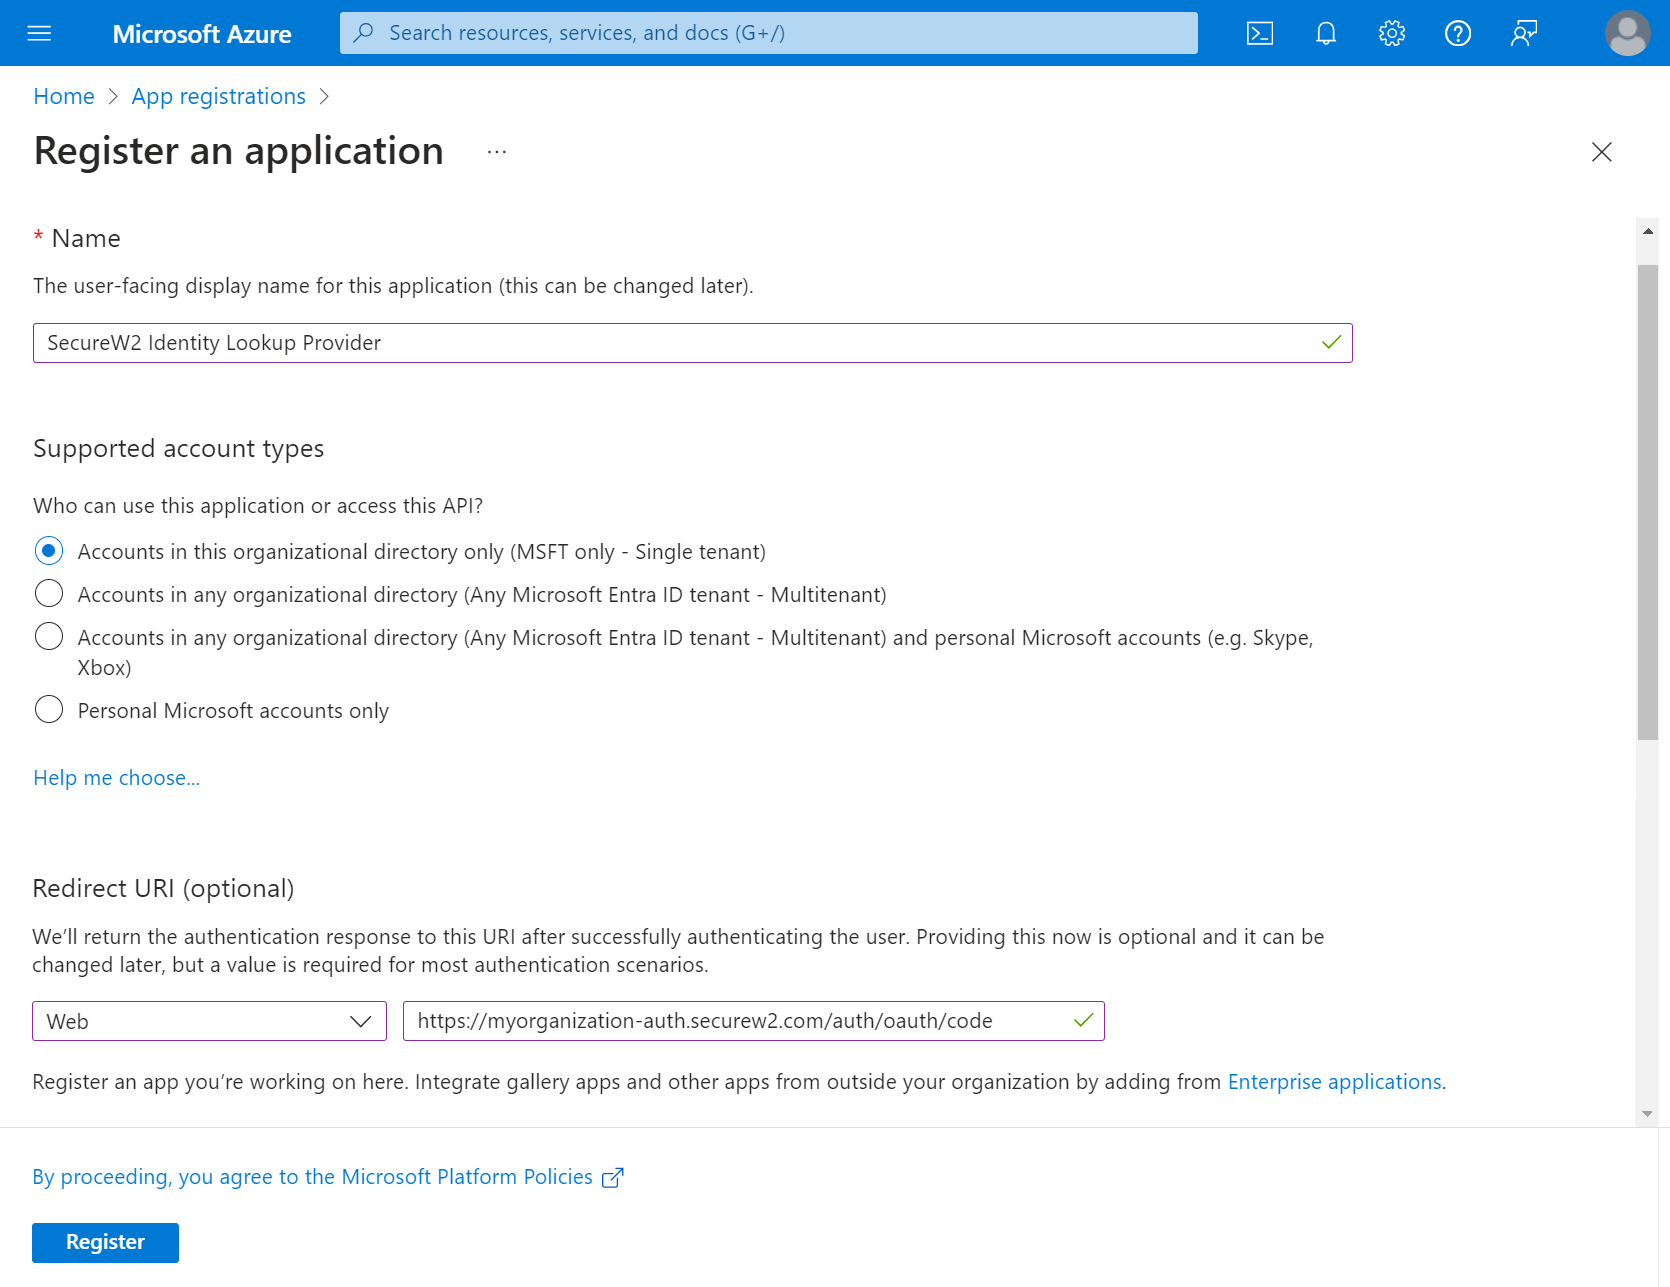
- On the Register an application page, enter the name of the application in the Name field.
- In the Supported account types section, specify who can use the application by selecting any one of the following options:
- Accounts in this organizational directory only (MSFT only – Single tenant)
- Accounts in any organizational directory (Any Microsoft Entra ID tenant– Multitenant)
- Accounts in any organizational directory (Any Microsoft Entra ID tenant– Multitenant) and personal Microsoft accounts (e.g., Skype, Xbox)
- Personal Microsoft accounts only
- In the Redirect URI (optional) section, from the Select a platform drop-down list, select Web and in the URL field, enter a unique SecureW2 Organization URL such as https://myorganization-auth.securew2.com/auth/oauth/code

- Click Register. The following screen is displayed.

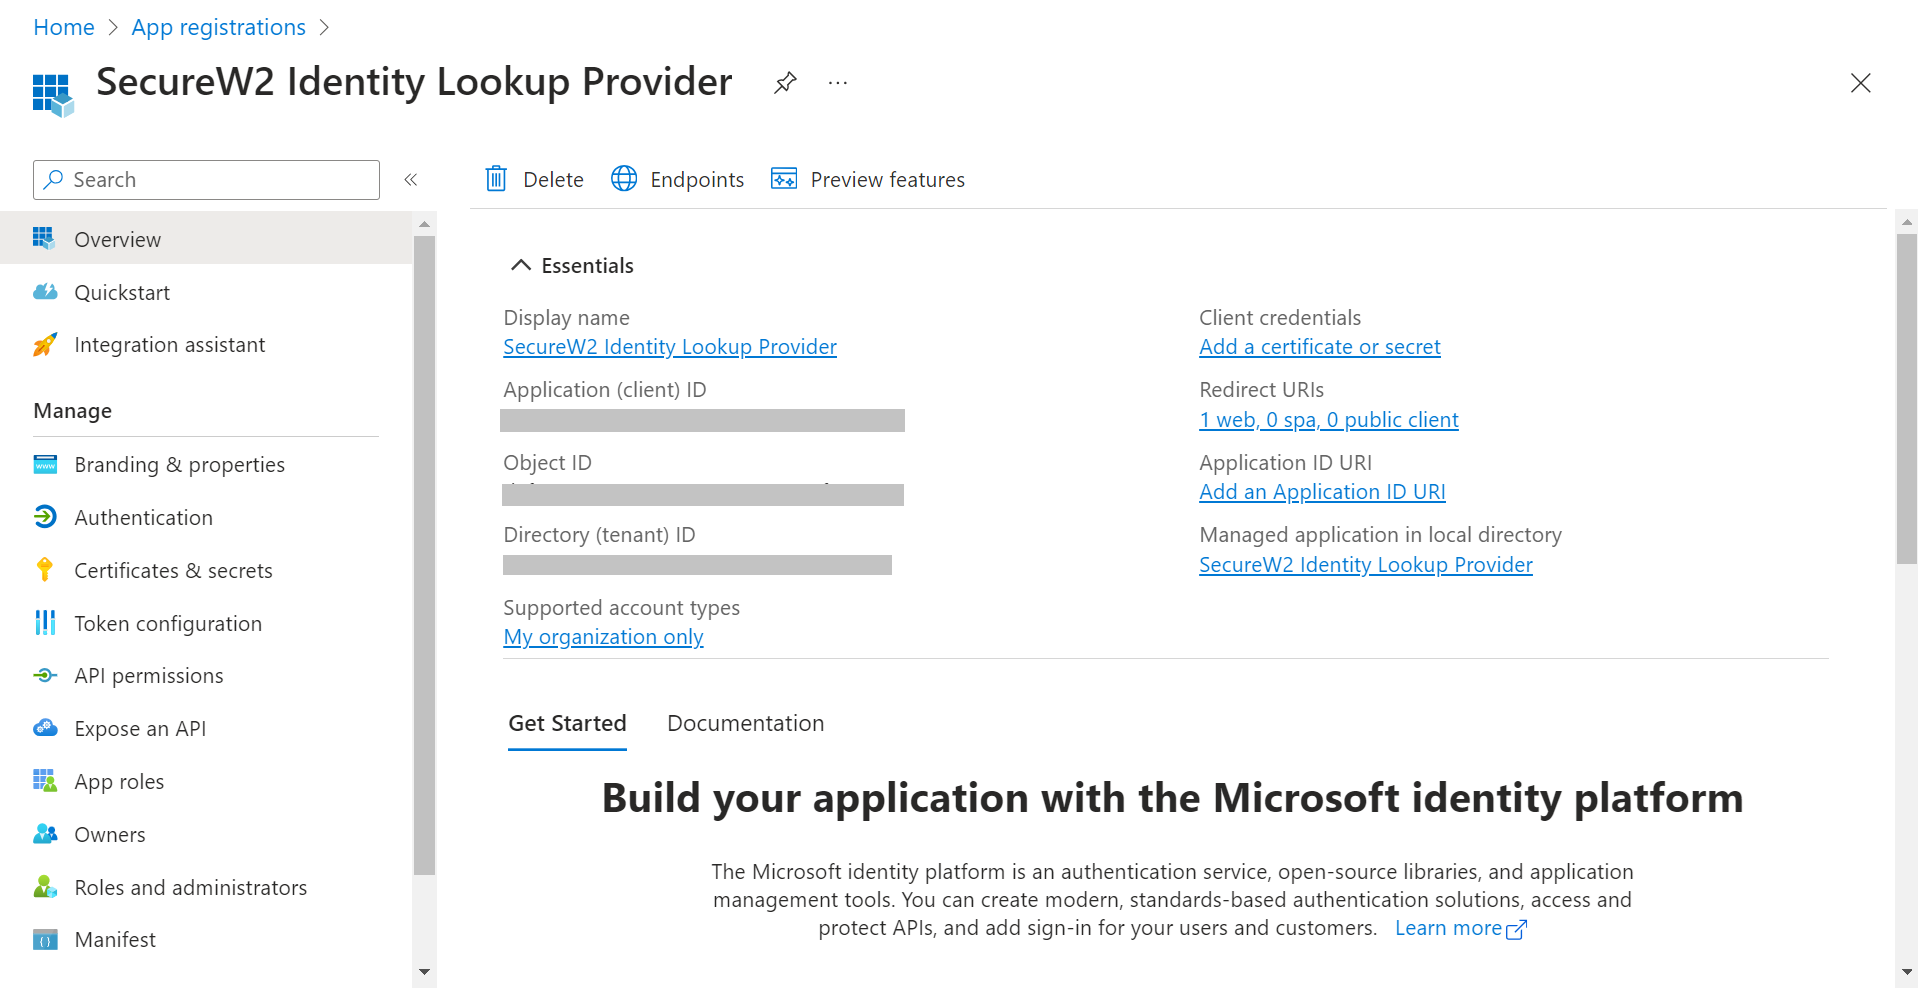
- Copy the Application (client) ID, Object ID, and Directory (tenant) ID values to your console.
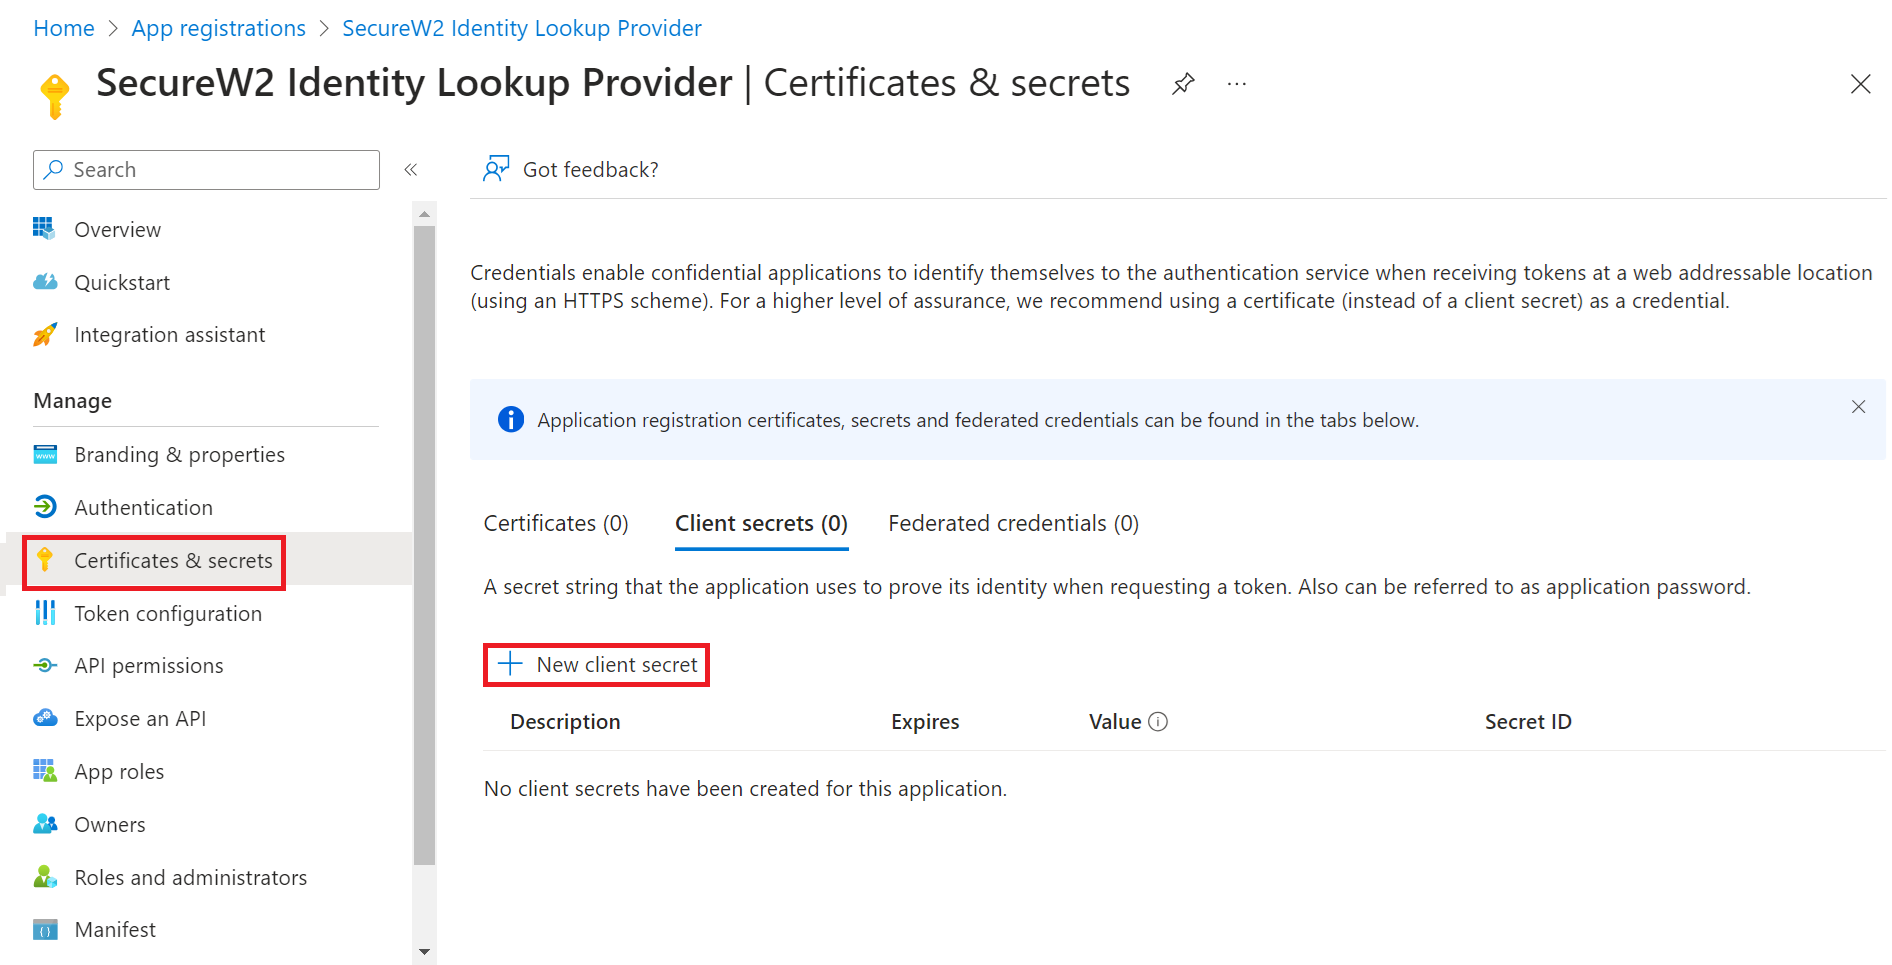
To create a client secret, perform the following steps:
- On the left pane, go to Manage and click Certificates & secrets.
- Click New client secret.

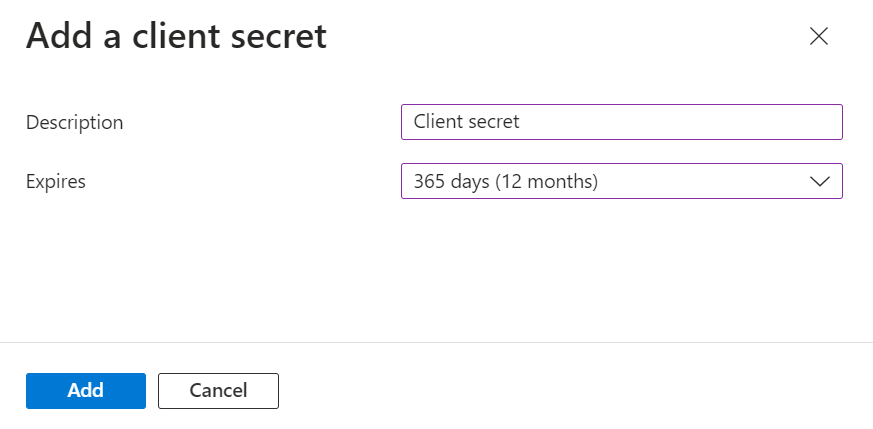
- In the Add a client secret pop-up window, enter a description for the client secret in the Description field.
- From the Expires drop-down list, select the expiration date of the client secret.

- Click Add.
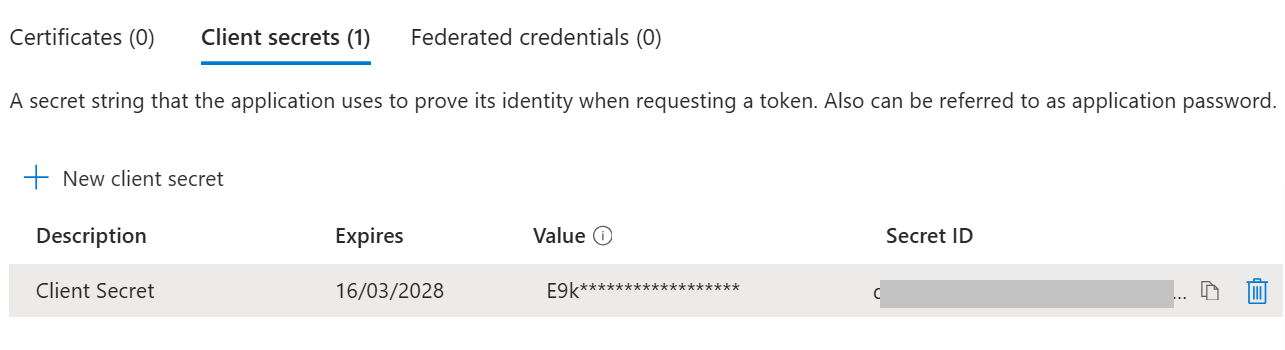
- The client’s secret is displayed under the Value column. Copy the client secret and expiration date to a text editor.

NOTE: Ensure you properly save the client secret in your console, as it is non-recoverable.
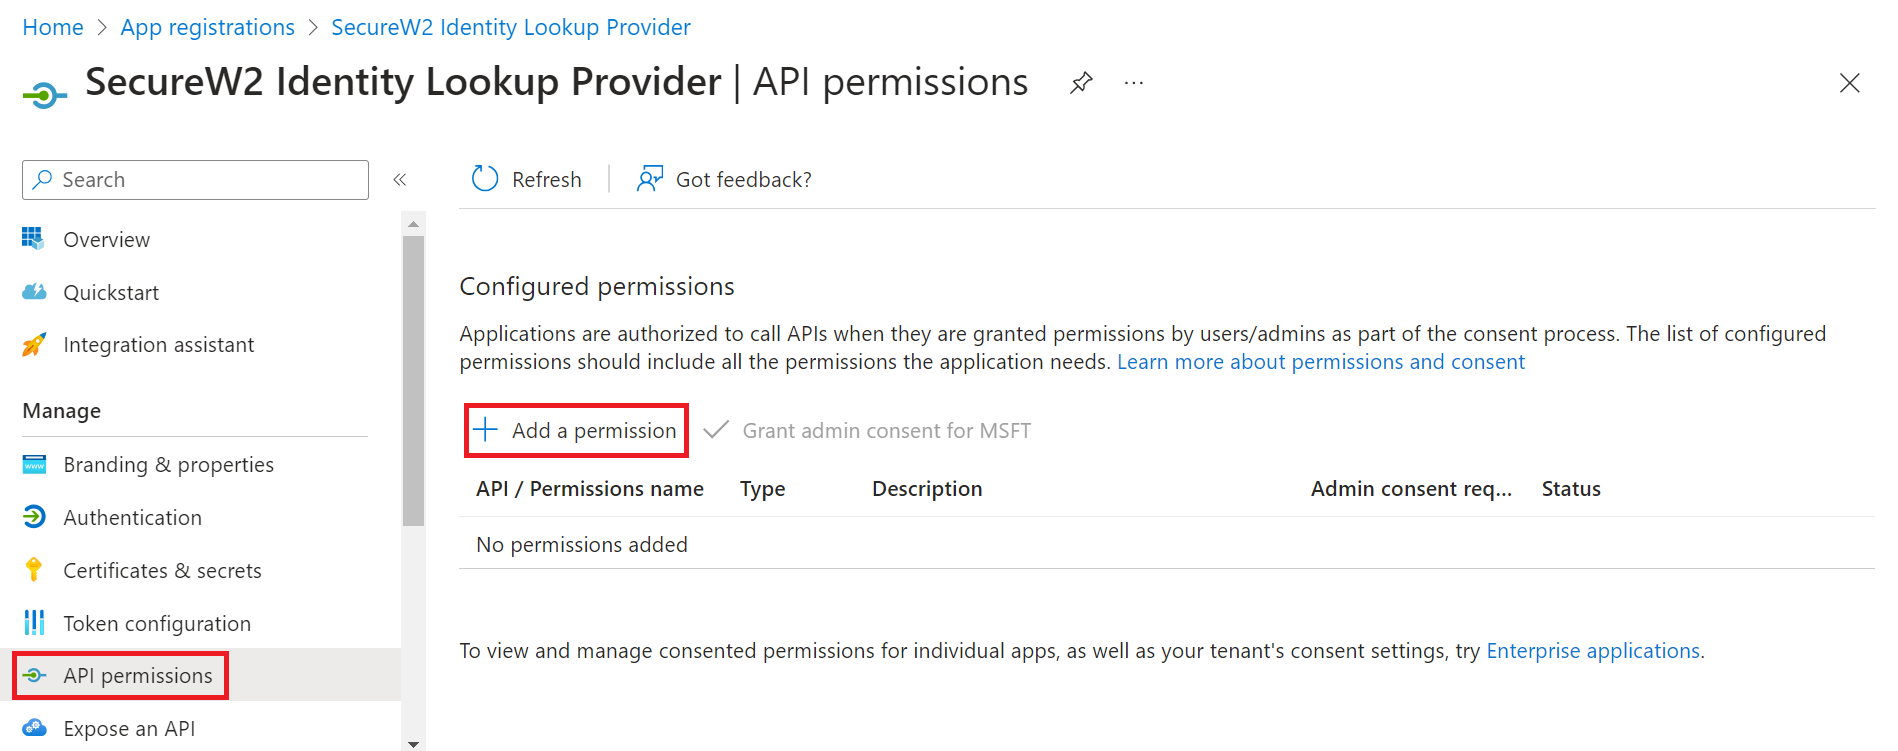
Finally, provide this application permission to access the data in our Entra ID.
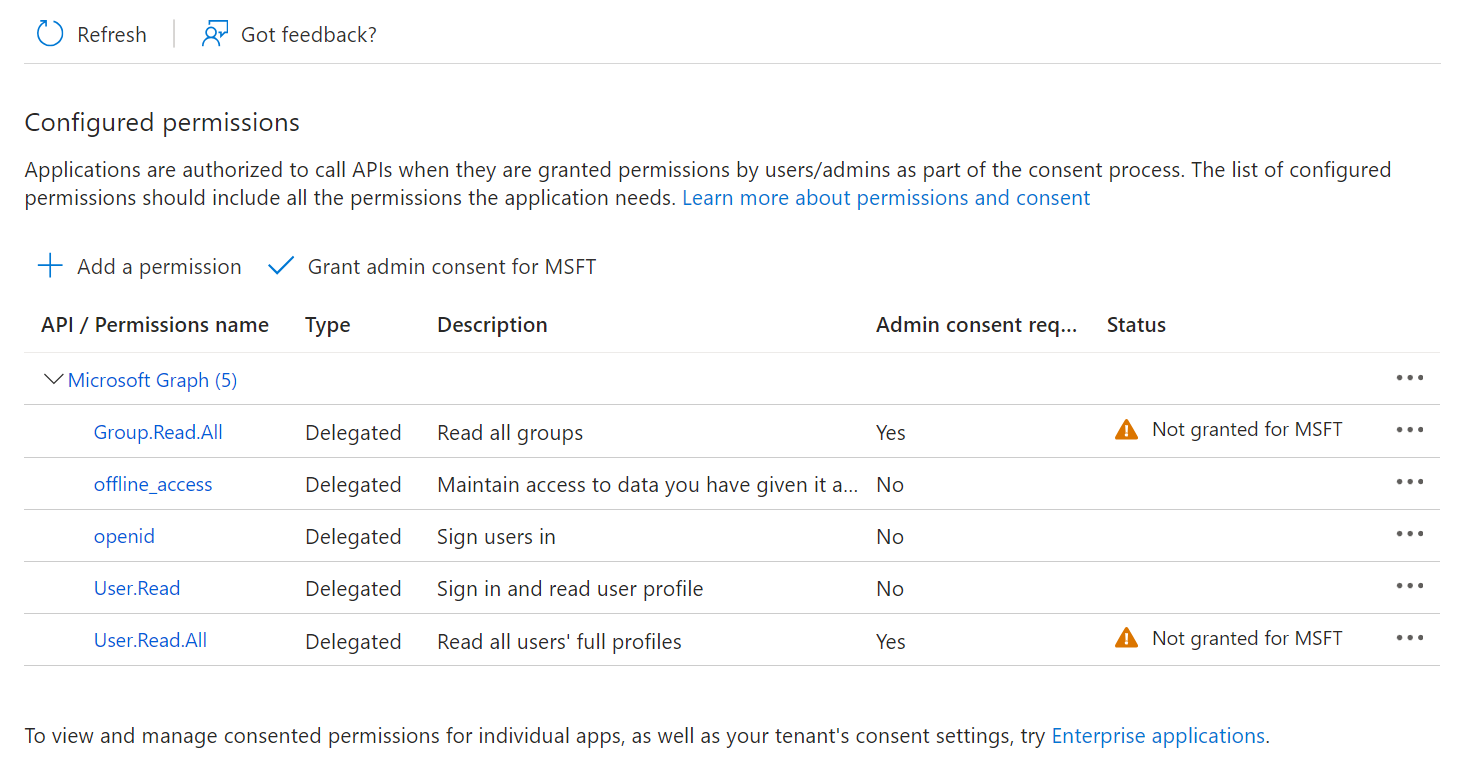
- On the left pane, go to Manage and click API permissions.
- Click Add a permission.

- After adding the permissions, the configured APIs are displayed under the Configured permissions section.

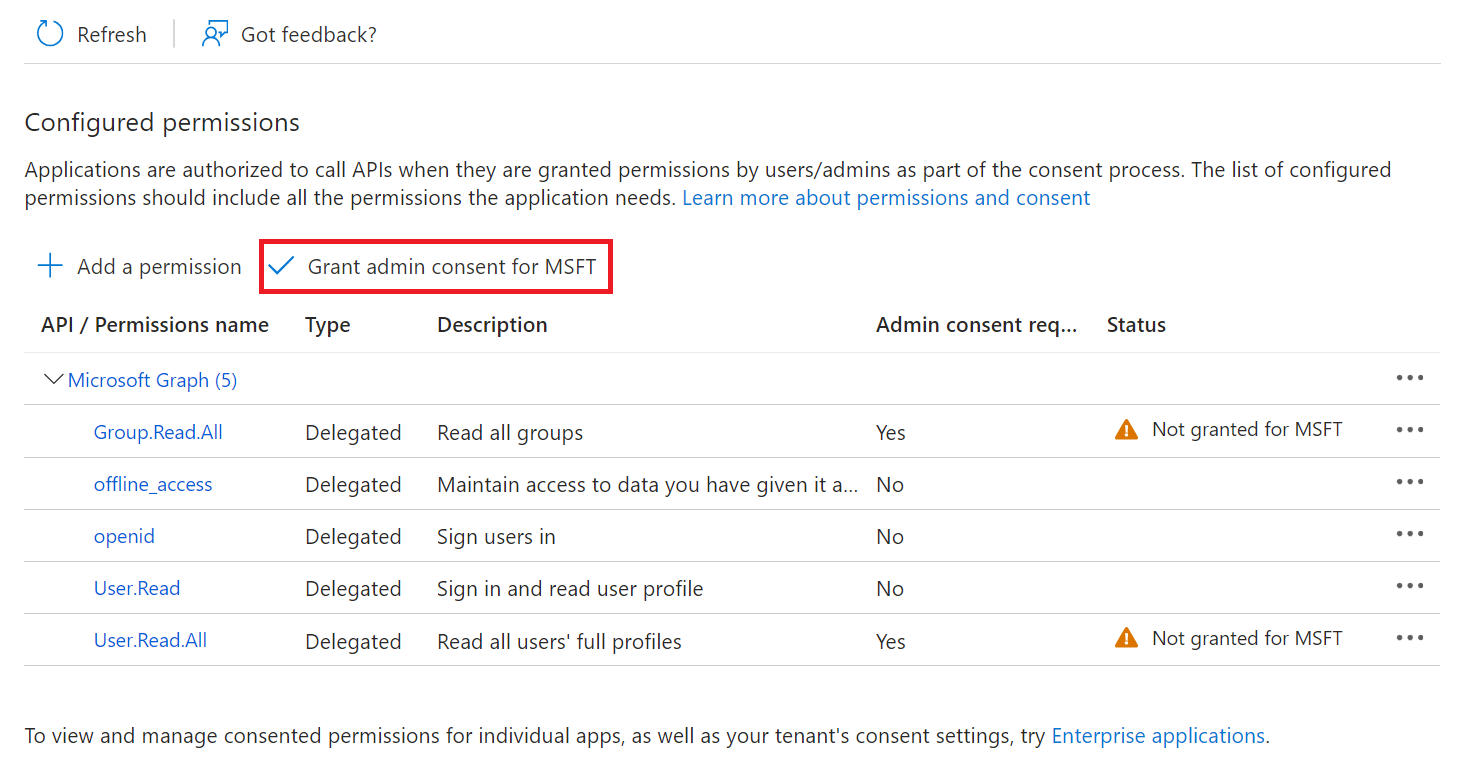
- Click Grant admin consent for {your organization} to grant consent for the requested permissions.
- In the Grant admin consent confirmation pop-up window, click Yes.

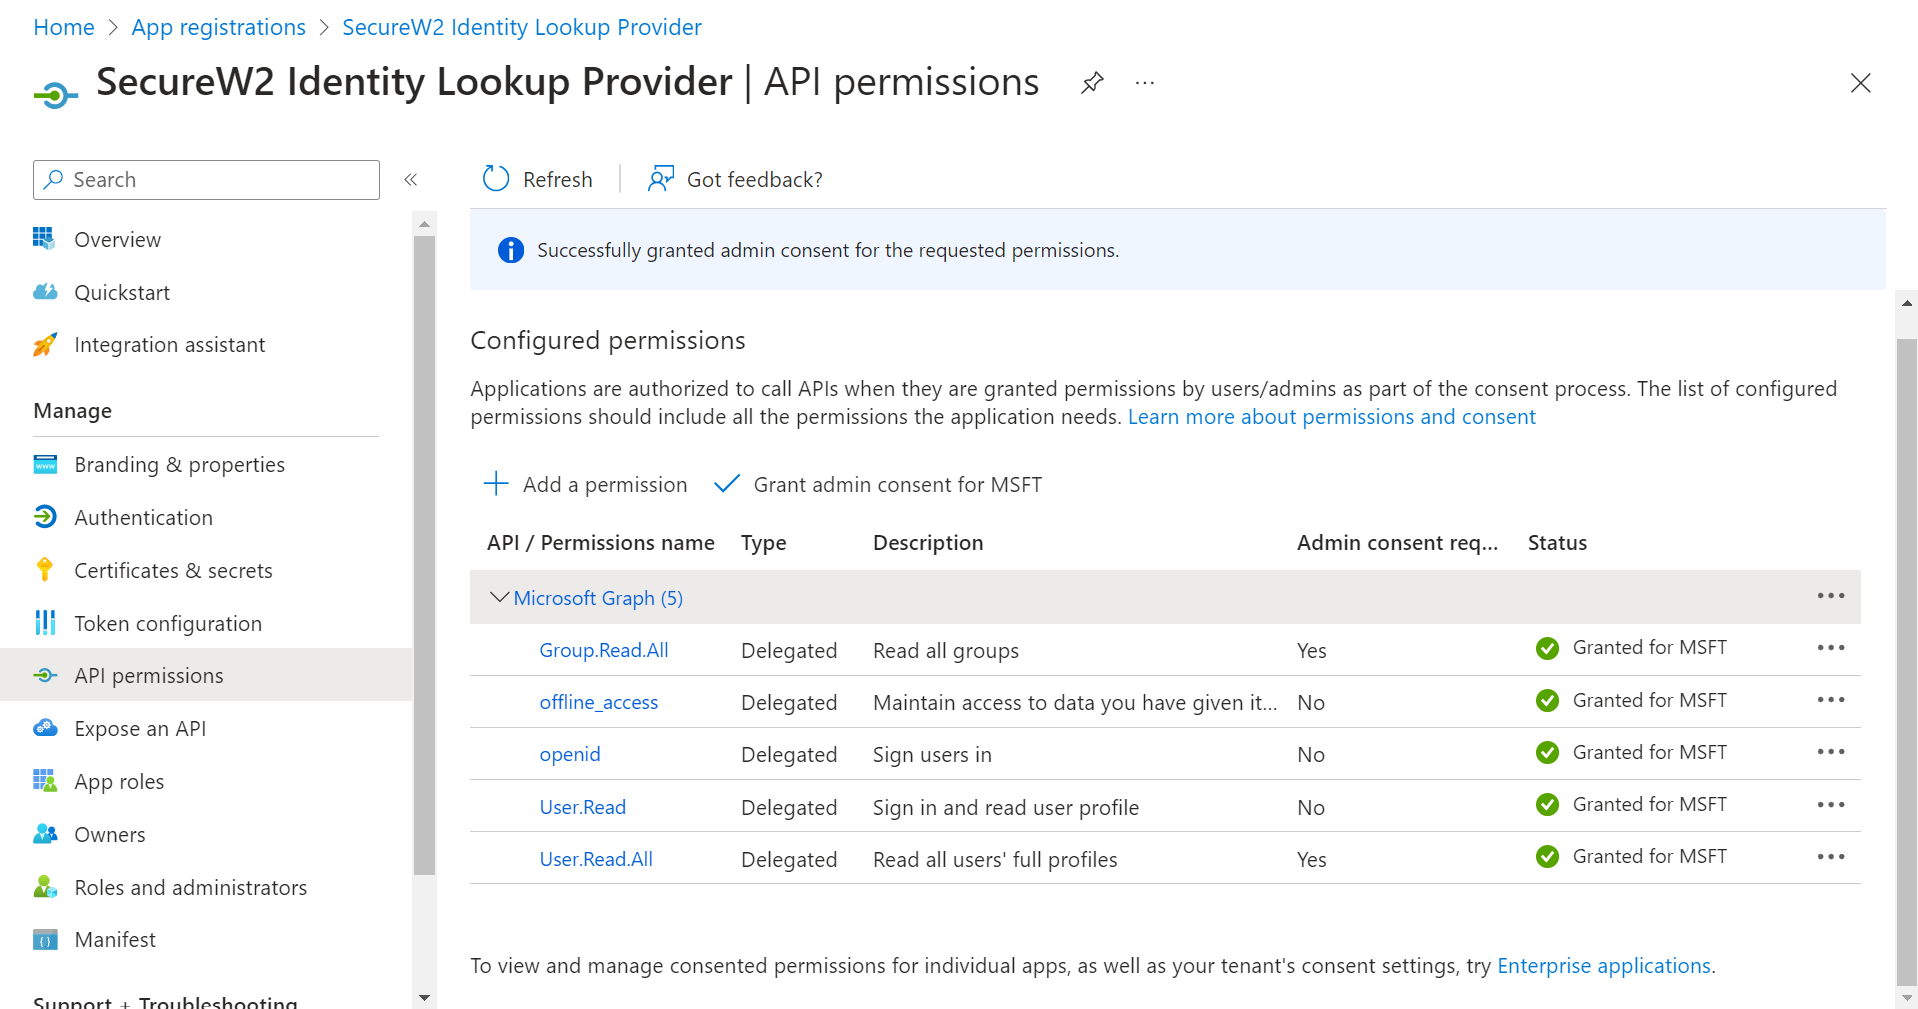
- The configured APIs are granted consent, and the following screen is displayed.


The Getting Started Wizard creates everything you need for 802.1x. It generates a RADIUS Server, Network Profiles, a Landing Page for Device Onboarding, and all the default network settings you will need.
NOTE: If you have already configured the JoinNow Management Portal for your network, you may skip this step.
- Log in to the JoinNow Management Portal.
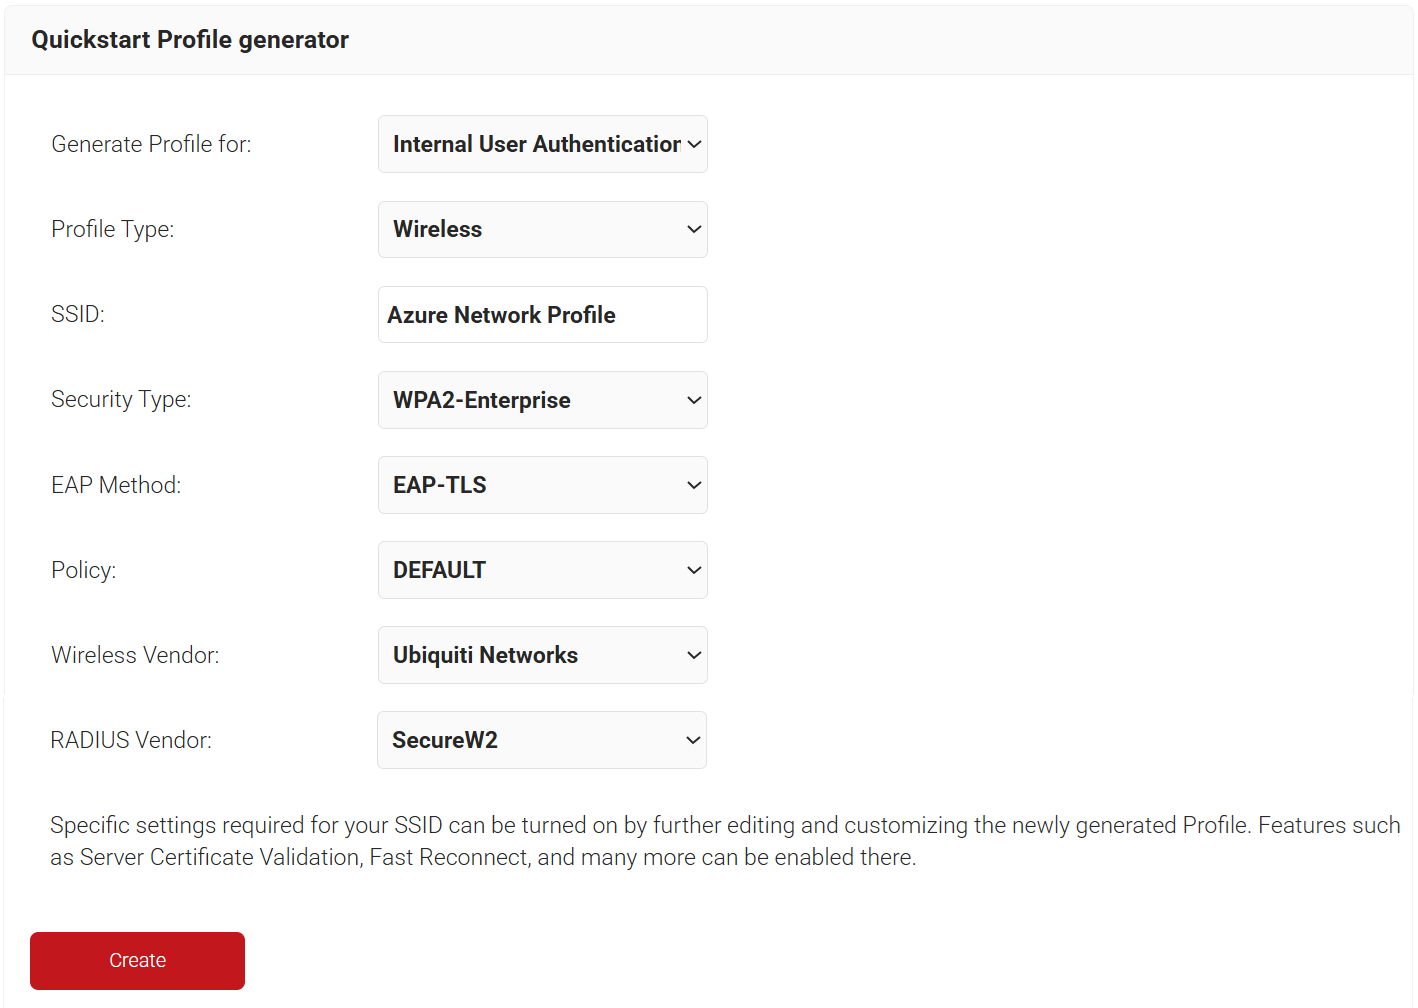
- Navigate to Device Onboarding > Getting Started.
- On the Quickstart Network Profile generator page, from the Generate Profile for drop-down list, select Internal User Authentication
- From the Profile Type drop-down list, select Wireless.
- In the SSID text box, enter a suitable name for the SSID.
- From the Security Type drop-down list, select WPA2-Enterprise.
- From the EAP Method drop-down list, select EAP-TLS.
- From the Policy drop-down list, retain DEFAULT.
- From the Wireless Vendor drop-down list, select a vendor.
- From the RADIUS Vendor drop-down list, select a RADIUS vendor.

- Click Create. The Getting Started wizard typically takes 60-90 seconds to create the profile.
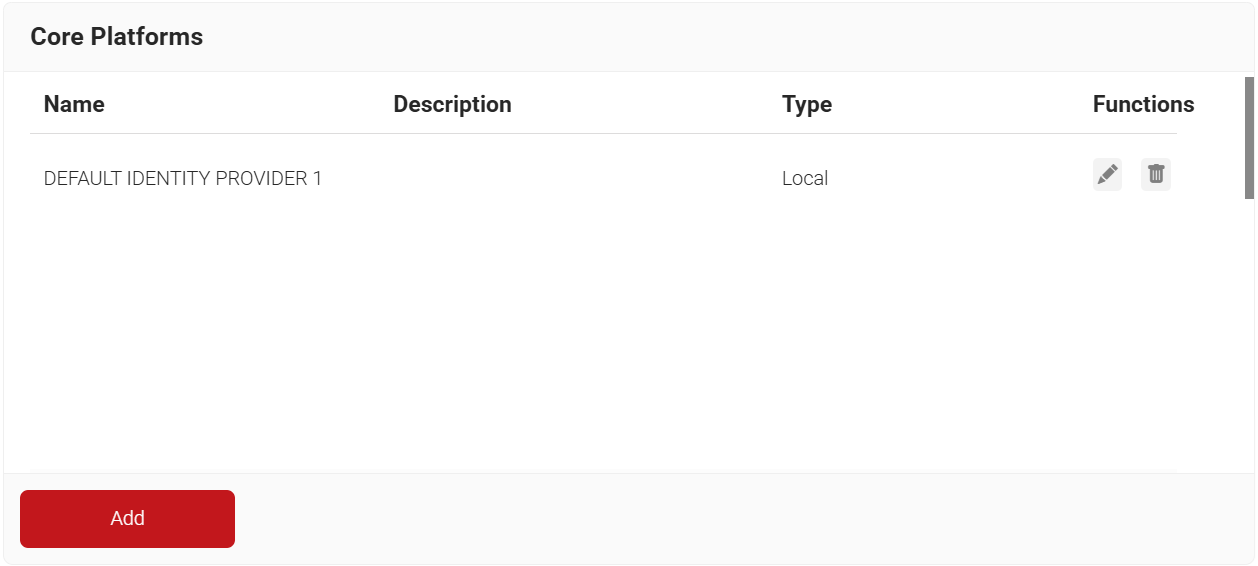
To create an Entra ID Signal Source, perform the following steps:
- Navigate to Integration Hub > Core Platforms.
- Click Add.

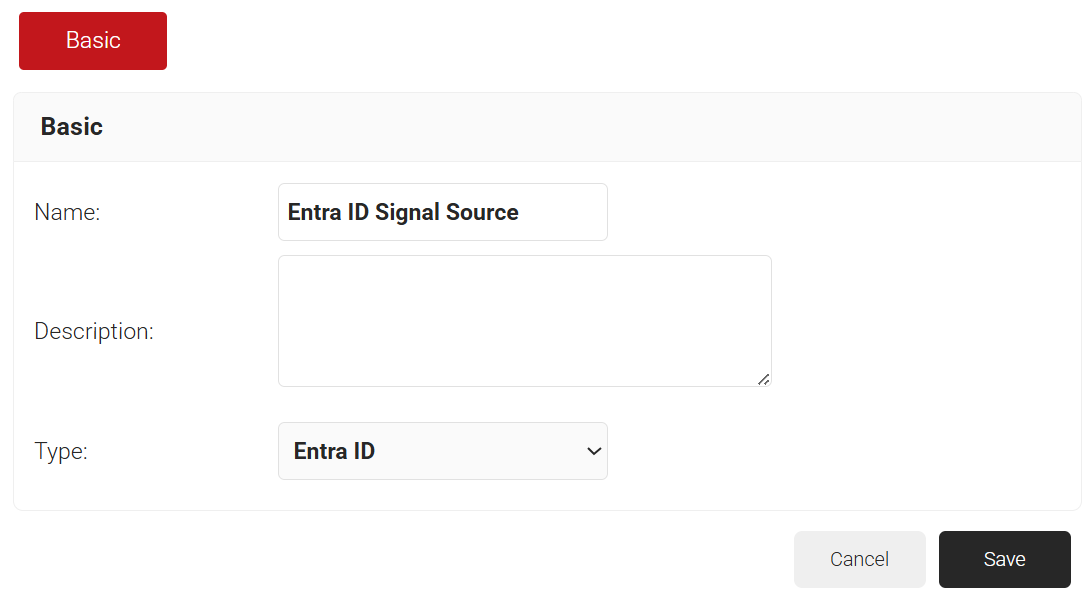
- In the Name field, enter the name of the signal source.
- In the Description field, enter a suitable description for the signal source.
- From the Type drop-down list, select Entra ID.

- Click Save.
- The page refreshes and displays the Configuration, Attribute Mapping, and Groups tabs.
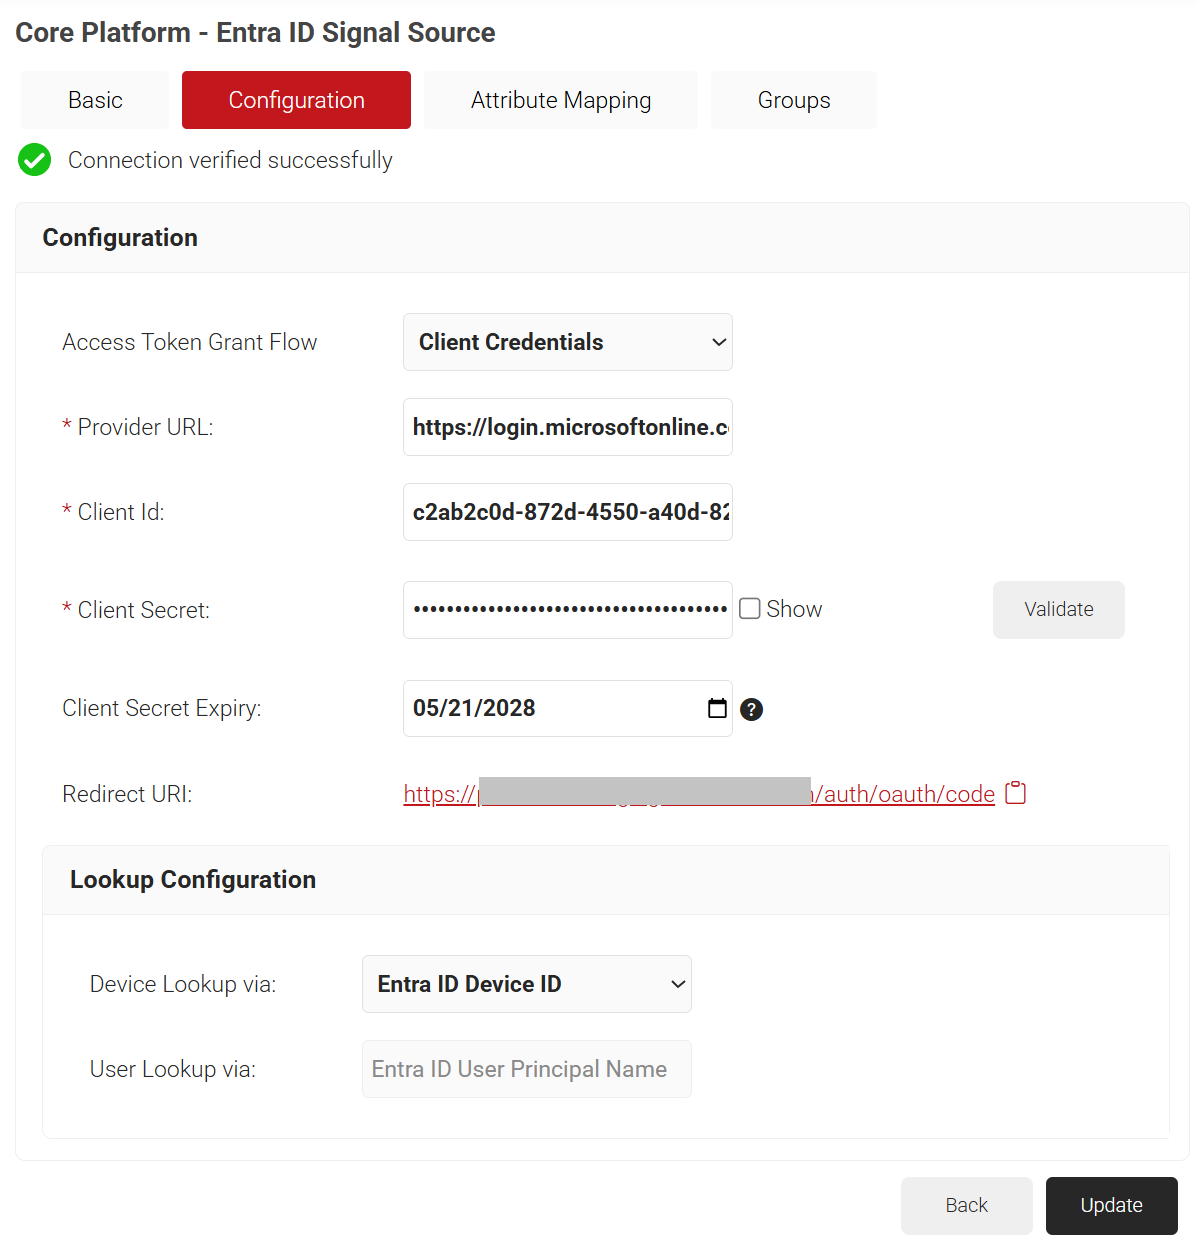
- Click the Configuration tab.
- Under the Configuration section, provide the following information.
- From the Access Token Grant Flow drop-down list, select one of the following options.
- Client Credentials – The Client Credentials option doesn’t require frequent authorization of token updates from the Azure portal. This is the recommended method.
- Authorization Code – The Authorization Code option requires authorization of token updates from the Azure Portal every 90 days.
- In the Provider URL field, enter the URL you created earlier using the Directory (tenant) ID: https://login.microsoftonline.com/{Directory (tenant) ID}. This should look like this:
https://login.microsoftonline.com/561bc66f-1d86-4244-8bc4-5eb12cba45ac - In the Client Id field, enter the Application (client) ID that you retrieved from Azure Portal earlier (refer to the Registering a New App section).
- In the Client Secret field, enter the Client secret you generated in Azure Portal earlier (refer to the Creating a Client Secret section).
- In the Validity Period field, select the client secret’s expiry date.
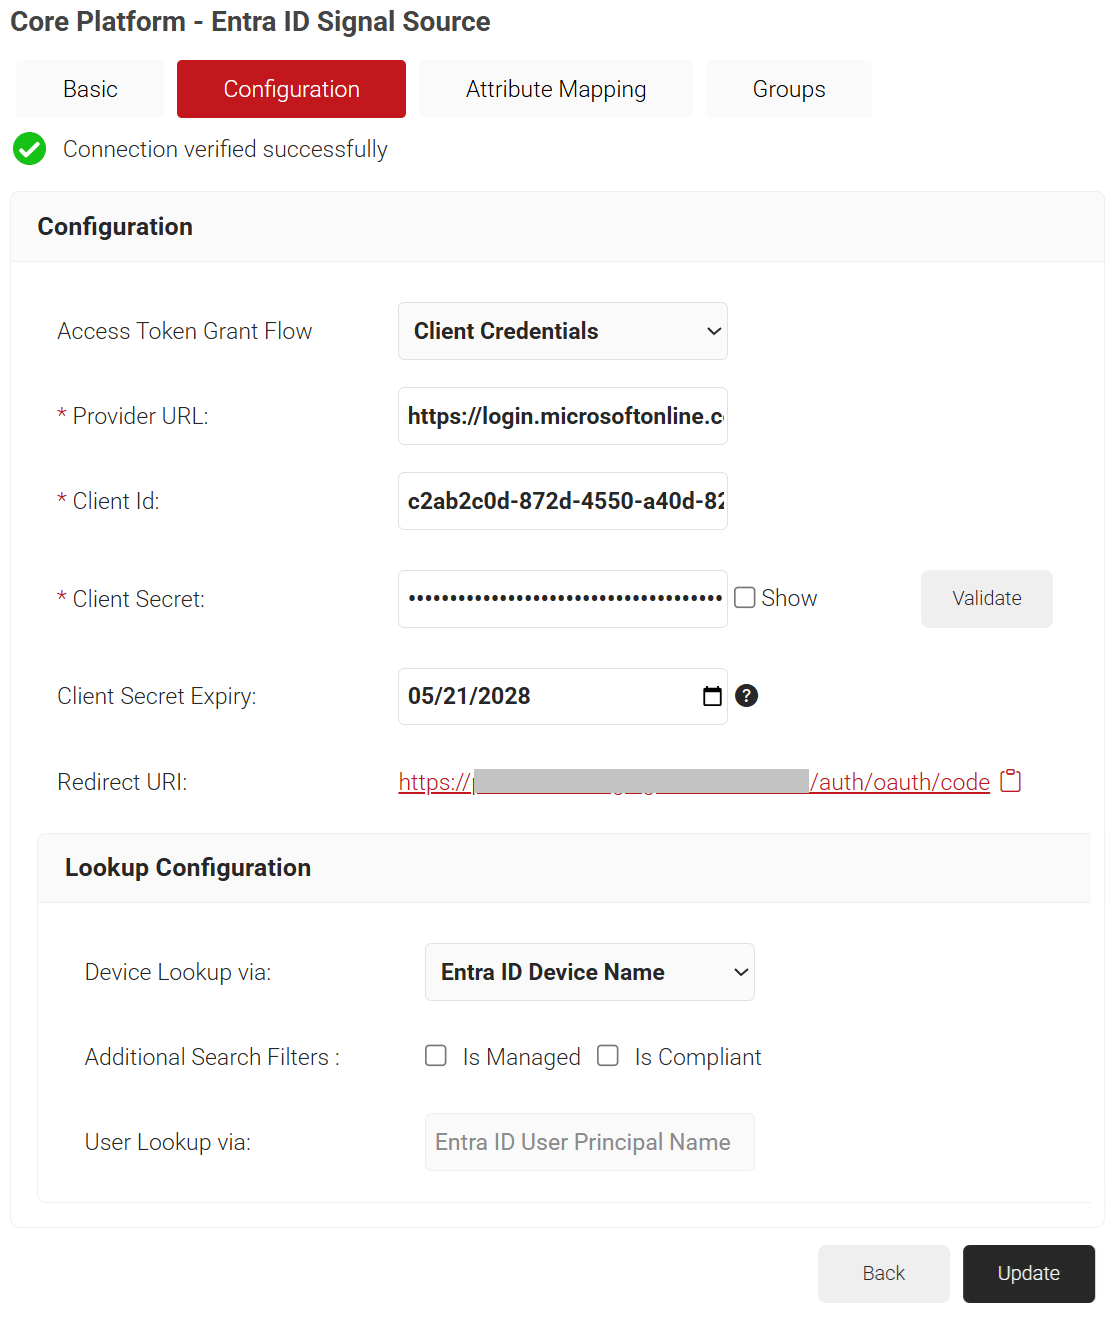
- Under the Lookup Configuration section, from Device Lookup via drop-down list, select the required device lookup attribute from the options listed below:
- Entra ID Device ID – Lookup is performed using Entra ID.

- Entra ID Name – Lookup is performed using device name. For Additional Search Filters, check the required check-box for:
- Is Managed – checks if the device is managed
- Is Compliant – checks if the device is compliant

- Entra ID Device ID – Lookup is performed using Entra ID.
- Click Validate to check for a successful connection.
NOTE: The Validate button is available only for the Client Credentials Access Token Grant Flow, not the Authorization Code flow.
- From the Access Token Grant Flow drop-down list, select one of the following options.
The Lookup Attributes allow you to specify how to map a user’s identity from a Core Provider to the user in the JoinNow Management Portal.
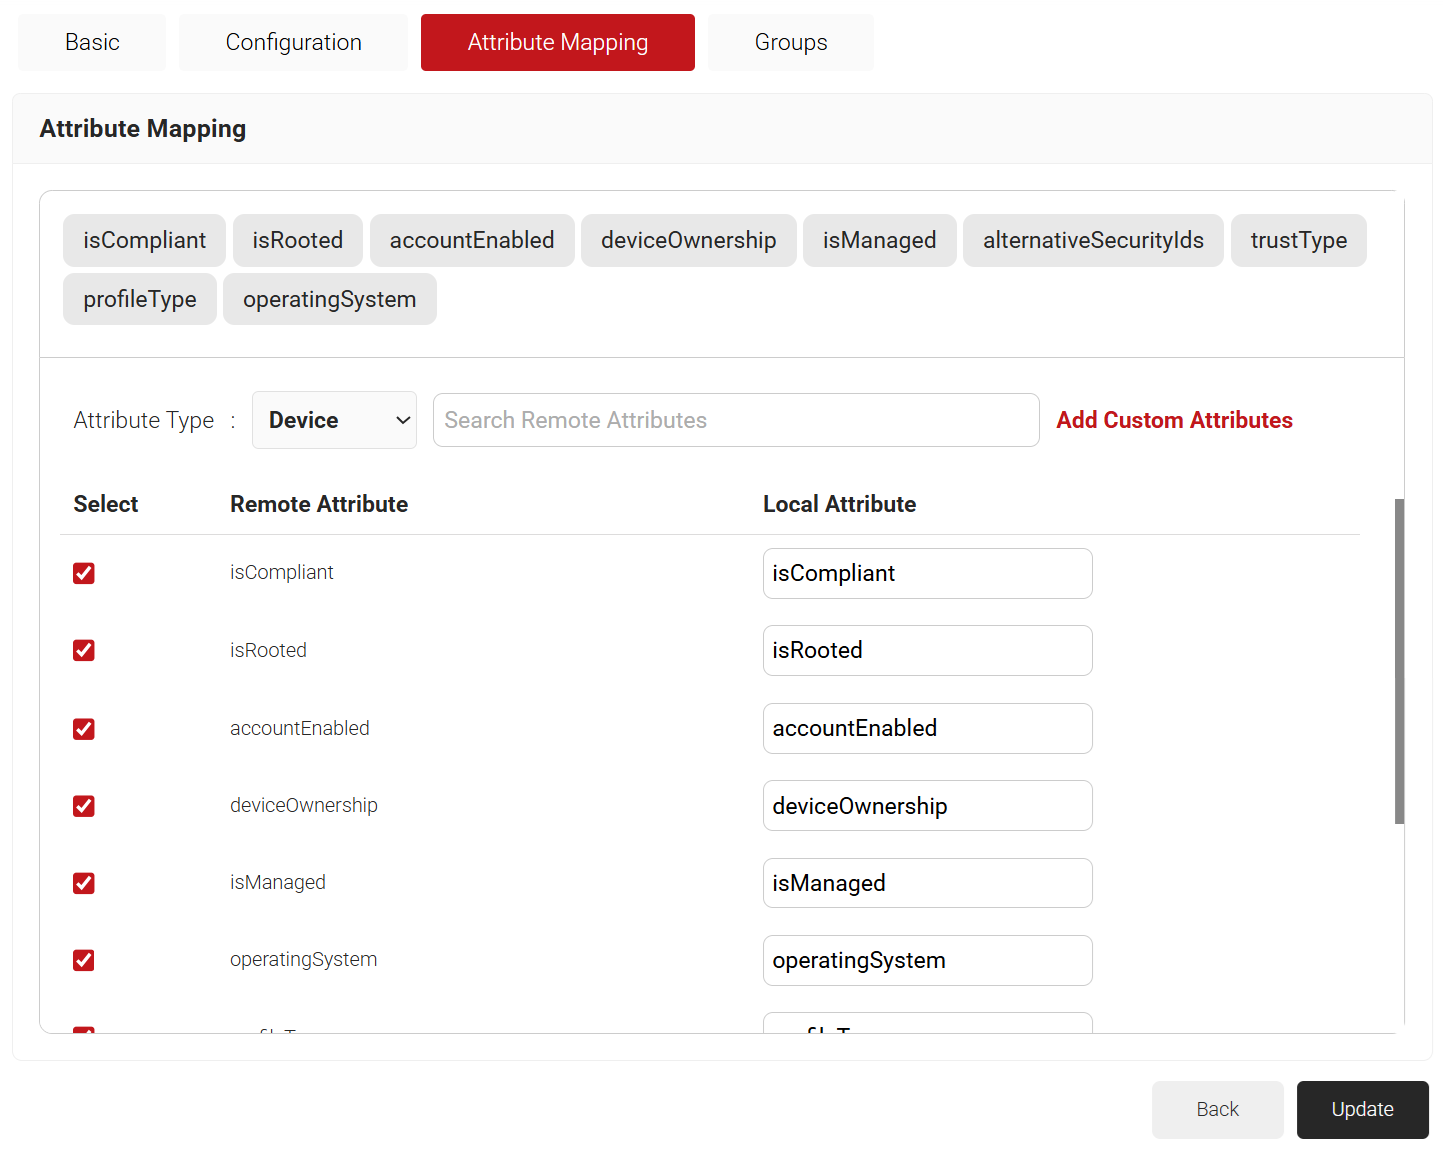
- Click the Attribute Mapping tab.
- From the Attribute Mapping Type drop-down, select the category to display the recommended attributes. The following are the attribute types offered by JoinNow for Entra ID Signal Source:
- Device
- User
- Custom
- Click Update after selecting the required attributes.

Attribute Description accountEnabled The accountEnabled attribute indicates whether the user account is enabled or disabled. If the account is enabled, the value is set to “True”; otherwise, it is “False. ” The default value is “True. ” The attribute supports the $filter with operators such as eq, ne, not, and in. Only callers who have the Global Administrator or Cloud Device Administrator role can set this attribute. alternativeSecurityIds The alternativeSecurityIds attribute indicates a single user identity or a collection of user identities from one or more external Core Platforms. This is a mandatory attribute and supports the $filter with operators such as eq, not, ge, and le. approximateLastSignInDateTime The approximateLastSignInDateTime attribute indicates the timestamp type in ISO 8601 format and UTC time for both date and time information. This is a read-only attribute and supports the $filter with operators such as eq, ne, not, ge, le, $orderBy, and eq on null values. complianceExpirationDateTime The complianceExpirationDateTime attribute indicates the timestamp when the device is no longer compliant. Using the ISO 8601 format, the timestamp type shows date and time information always in UTC time. This is a read-only attribute. createdDateTime The createdDateTime attribute indicates the creation date of the user object. This is a read-only attribute. deletedDateTime The deletedDateTime attribute indicates the date and time when the user object was deleted, or null if the object has not been deleted. deviceCategory The deviceCategory attribute is a user-defined attribute set by Intune. This attribute automatically adds devices to groups and makes device management easier. deviceId The deviceId attribute is the unique identifier that the Azure Device Registration Service assigns to the device when it registers. You can use this identifier as an alternate key to reference the device object. This attribute supports the $filter with these operators such as eq, ne, not, and startsWith. deviceMetadata A device metadata package contains multiple XML documents, each explaining the various components of the device attributes. deviceOwnership The deviceOwnership attribute indicates the device’s ownership. This attribute is set by Intune. Possible values are unknown, company, and personal. deviceVersion This attribute indicates the version of the device. displayName The displayName attribute indicates the display name for the device and supports the $filter with these operators such as eq, ne, not, ge, le, in, startsWith, $search, $orderBy, and eq on null values. This is a mandatory attribute. domainName The domainName attribute indicates the on-premises domain name for devices joined to a Hybrid Entra ID. This attribute is set by Intune. enrollmentProfileName The enrollmentProfileName attribute indicates the enrollment profile applied to the device. This attribute is set by Intune. Examples of enrollment profiles are Apple Device Enrollment Profile, Device Enrollment- Corporate device identifiers, and Windows Autopilot profile name. enrollmentType The enrollmentType attribute indicates the device’s enrollment type. This attribute is set by Intune. Possible values are unknown, userEnrollment, deviceEnrollmentManager, appleBulkWithUser, appleBulkWithoutUser, windowsAzureADJoin, windowsBulkUserless, windowsAutoEnrollment, windowsBulkAzureDomainJoin, and windowsCoManagement. extensionAttributes The device has 1-15 extension attributes. You cannot select the individual extension attributes and these attributes are stored in the cloud. You can set them when you create or update a device object in Entra ID and support the $filter with these operators such as eq, not, startsWith, and eq on null values. id The id attribute is the device’s unique identifier. It is inherited from directoryObject and is a key that cannot be null. This attribute is read-only and supports the $filter with operators such as eq, ne, not, and in. isCompliant The isCompliant property indicates whether the device is compliant with a Mobile Device Management (MDM) app. The value is “True” if the device is compliant or “False” if not. This can only be updated by Intune for any device OS type or by an approved MDM app for Windows OS devices. It supports the $filter with operators such as eq, ne, not, and in. isManaged The isManaged attribute indicates whether the device is managed by a Mobile Device Management (MDM) app. The value is “True” if the device is managed, or “False” if not. This can only be updated by Intune for any device OS type or by an approved MDM app for Windows OS devices and supports the $filter with operators such as eq, ne, not, and in. isRooted The isRooted attribute indicates whether the device is rooted if the value is “True“or jailbroken if the value is “False. ” This value can only be updated by Intune. managementType The managementType attribute indicates the device’s management channel. This attribute is set by Intune, and its value can be one of the following: eas, mdm, easMdm, intuneClient, easIntuneClient, configurationManagerClient, configurationManagerClientMdm, configurationManagerClientMdmEas, unknown, jamf, or googleCloudDevicePolicyController. manufacturer The manufacturer attribute specifies the device manufacturer. This is a read-only attribute. mdmAppId The mdmAppId attribute specifies the application ID that registers the device in MDM. This is a read-only attribute and supports the $filter with operators such as eq, ne, not, and startsWith. model The model attribute indicates the device model. This is a read-only attribute. onPremisesLastSyncDateTime The onPremisesLastSyncDateTime attribute indicates the last time that the object synchronized with the on-premises directory. The attribute uses the Timestamp type, which represents date and time information in UTC time and ISO 8601 format. For example, 2014-01-01T00:00:00Z is midnight UTC on January 1, 2014. This is a read-only attribute and supports the $filter with operators such as eq, ne, not, ge, le, and in. onPremisesSyncEnabled The onPremisesSyncEnabled attribute specifies whether the object synchronizes from an on-premises directory. The value is “True” if the object synchronizes from an on-premises directory, “False” if the object used to synchronize from an on-premises directory but no longer does, or “Null” if the object has never synchronized from an on-premises directory. The default value is “Null“. This is a read-only attribute and supports the $filter with operators such as eq, ne, not, in, and eq on null values. operatingSystem The operatingSystem attribute specifies the device’s operating system type. It is mandatory and supports the $filter with operators such as eq, ne, not, ge, le, startsWith, and eq on null values. operatingSystemVersion The operatingSystemVersion attribute specifies the device’s operating system version. It is mandatory and supports the $filter with operators such as eq, ne, not, ge, le, startsWith, and eq on null values. physicalIds The physicalIds attribute specifies the unique values that identify the device. This is a mandatory attribute and supports the $filter with these operators such eq, not, ge, le, startsWith, /$count eq 0, /$count ne 0. profileType The profileType attribute indicates the device profile type. The possible values are RegisteredDevice (default), SecureVM, Printer, Shared, or IoT. registrationDateTime The registrationDateTime attribute specifies the date and time that the device registered. The attribute uses the timestamp type, which represents date and time information in UTC time and ISO 8601 format. For example, 2014-01-01T00:00:00Z is midnight UTC on January 1, 2014. This is a mandatory read-only attribute. systemLabels The systemLabels attribute indicates the list of labels that the system applies to the device. This attribute supports the $filter with these operators such as /$count eq 0, /$count ne 0. trustType The trustType attribute specifies the trust type for the joined device. This is a read-only attribute and can have one of the following values: Workplace (for personal devices), AzureAd (for cloud-only joined devices), or ServerAd (for on-premises domain joined devices that are also joined to Entra ID). NOTE: The Entra ID Signal Source Lookup Attributes allow you to specify how to map a user’s identity from Entra ID to the user in the JoinNow Management Portal. You can select “User Defined” in the Remote Attribute filed and use any of the following attributes:
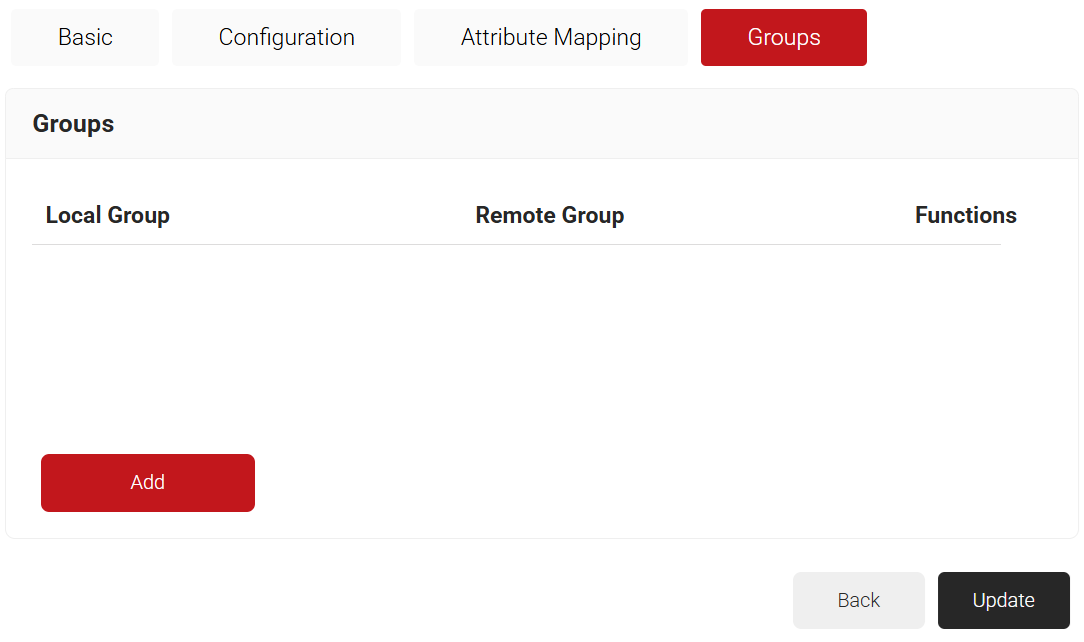
Finally, CloudRADIUS can perform a User Group Lookup, allowing you to create network access policies based on a user’s group membership.
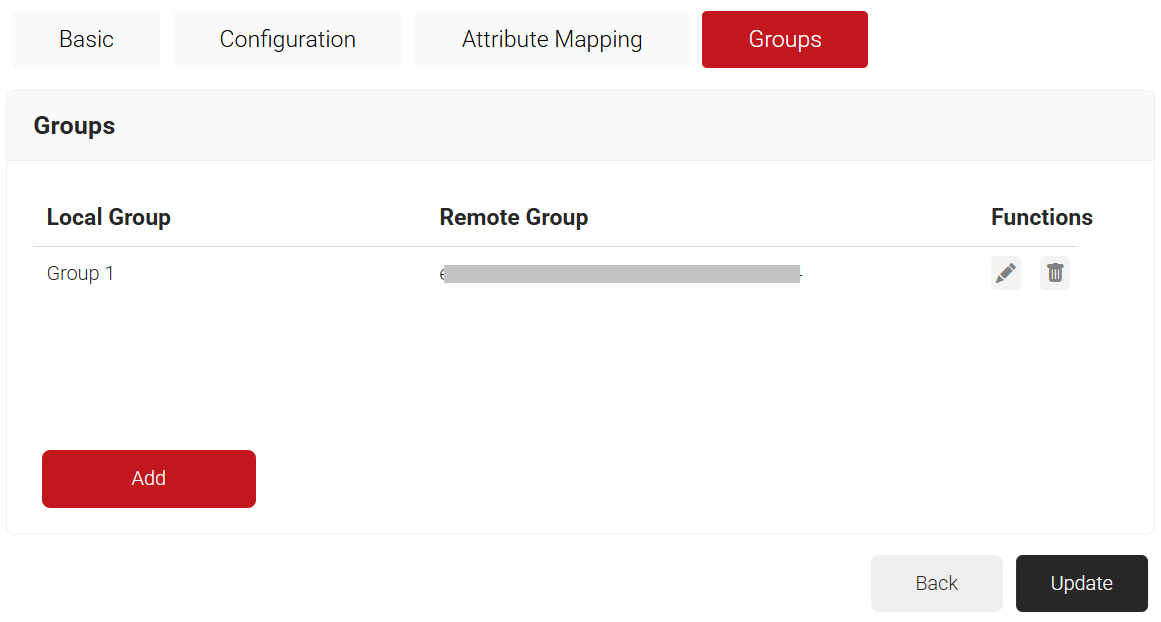
- Click the Groups tab.
- Click Add.

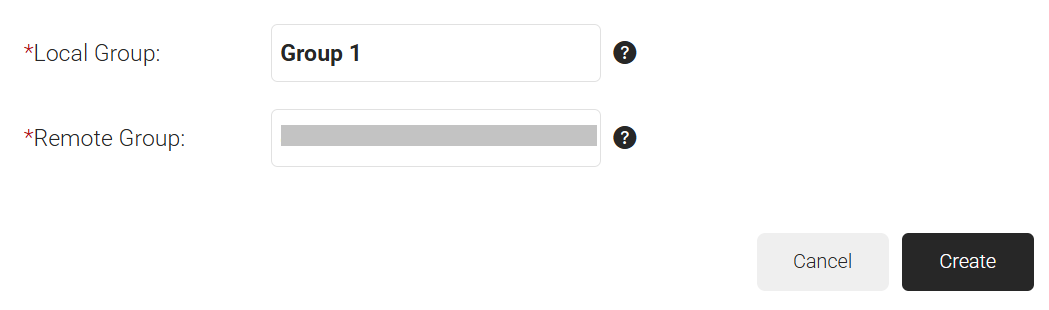
- On the displayed page, in the Local Group field, enter the group’s name. This group name can be used to configure network policies.
- In the Remote Group field, enter the Object ID that you retrieved from Azure Portal earlier (refer to the Registering a New App section).

- Click Create.

- Click Update.
- Repeat all the steps above as needed to create as many groups as required.
Lookup Policies are the ways to tie the new Core Platform to domains. Here, you create a condition that ties our domain to the new Core Platform created in the previous section.
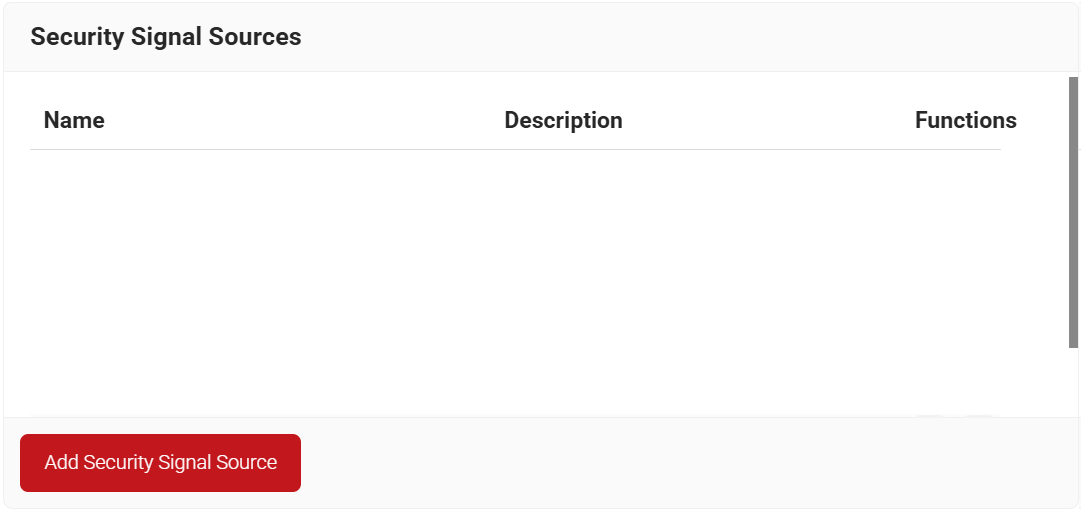
- Navigate to Policy Management > Security Signal Sources.
- Click Add Security Signal Source.

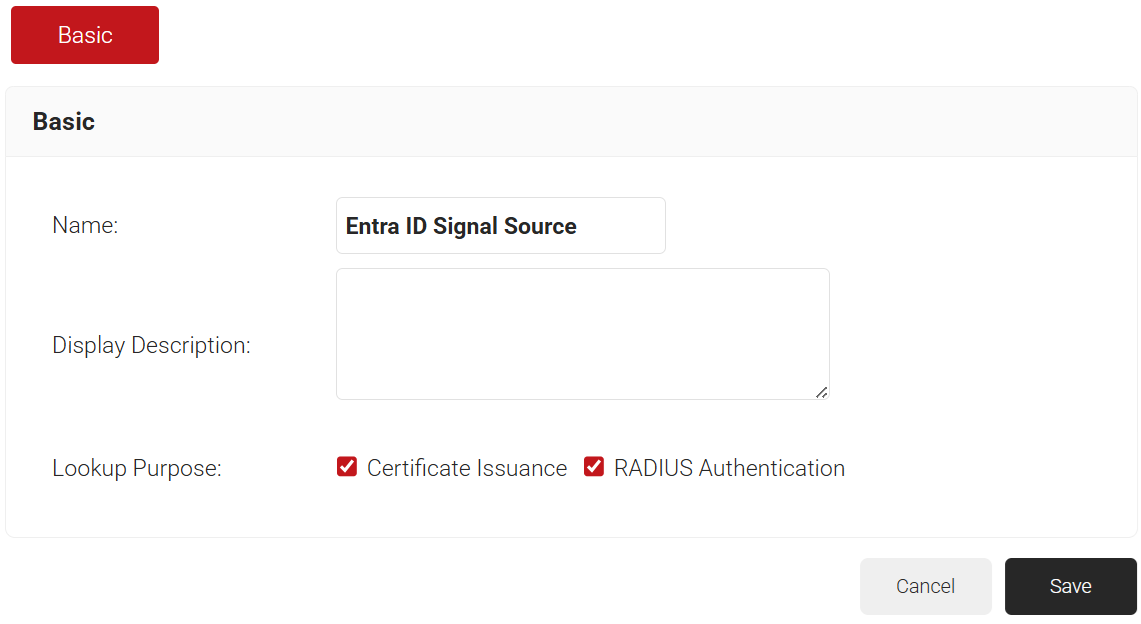
- In the Name field, enter the name of the Security Signal Source.
- In the Display Description field, enter a suitable description for the Security Signal Source.
- Lookup Purpose – Purpose of Account Lookup
- Certificate Issuance – To lookup the user/device account during Enrollment.
- RADIUS Authentication – To lookup the user/device account during RADIUS Authentication.

- Click Save.
- The page refreshes and displays the Conditions and Settings tabs.
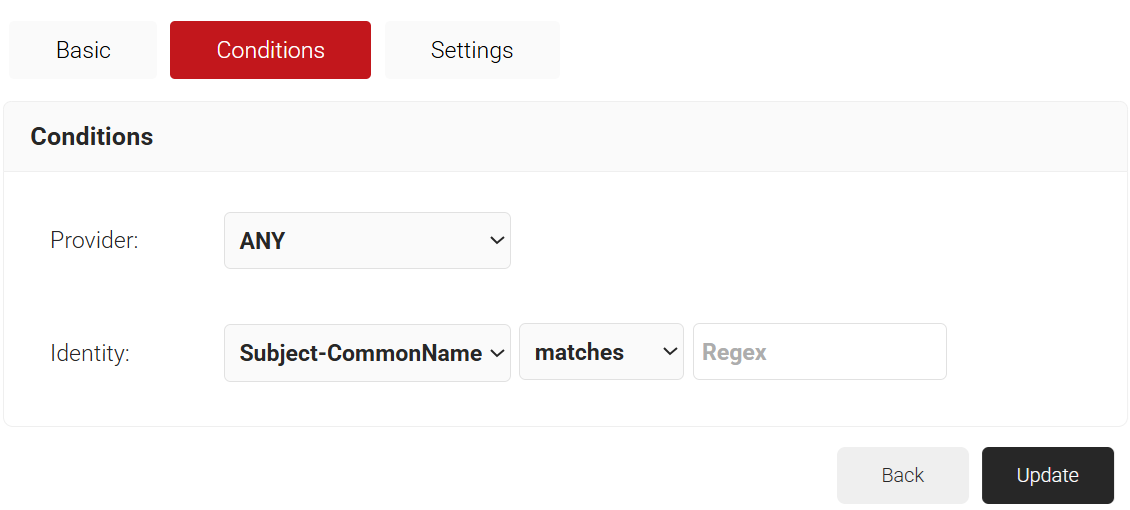
- Select the Conditions tab.
- From the Provider drop-down list, select the Signal Source created in the previous section (refer to the Creating an Entra ID Signal Source section).
- From the Identity drop-down list, select the required identity type.
- Configure Regex to match the values of your devices configured in the Identity field.

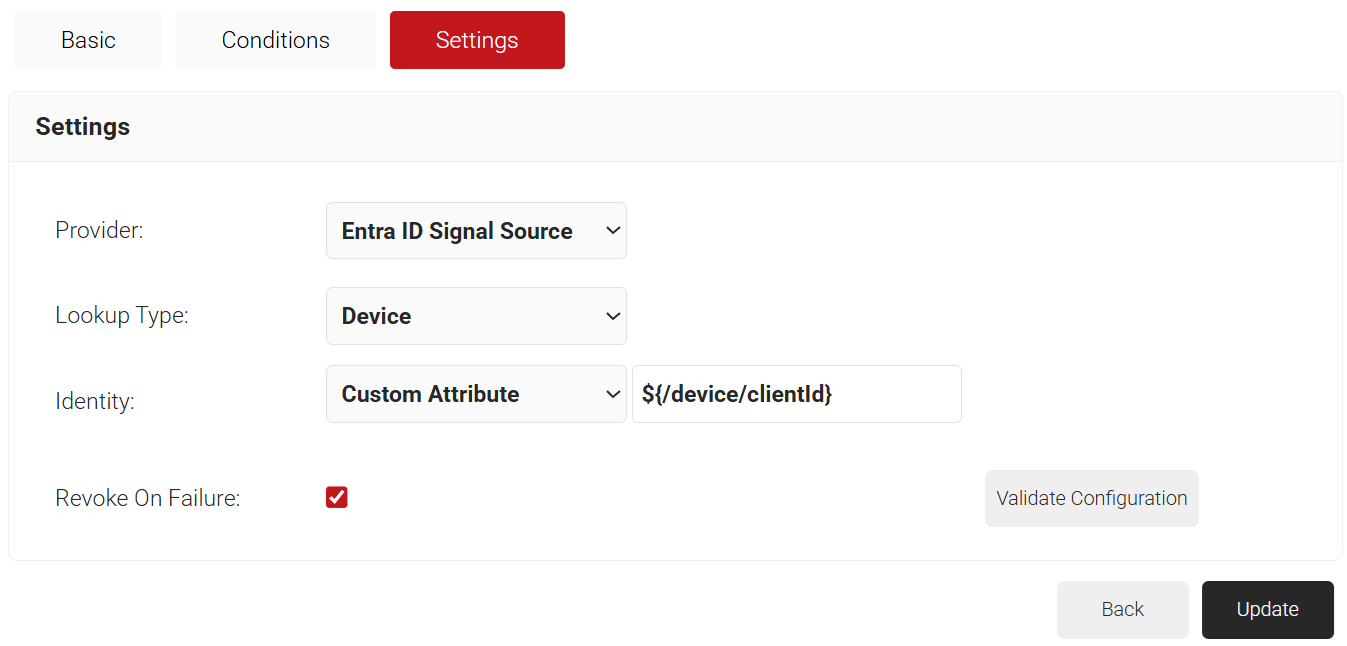
- Select the Settings tab.
- From the Provider drop-down list, select the Signal Source created in the previous section (refer to the Creating an Entra ID Signal Source section).
- From the Lookup Type drop-down list, select the required lookup type.
- From the Identity drop-down list, select the required Identity for the lookup.
- Select the Revoke On Failure checkbox to automatically revoke a certificate if an account lookup fails, if necessary.

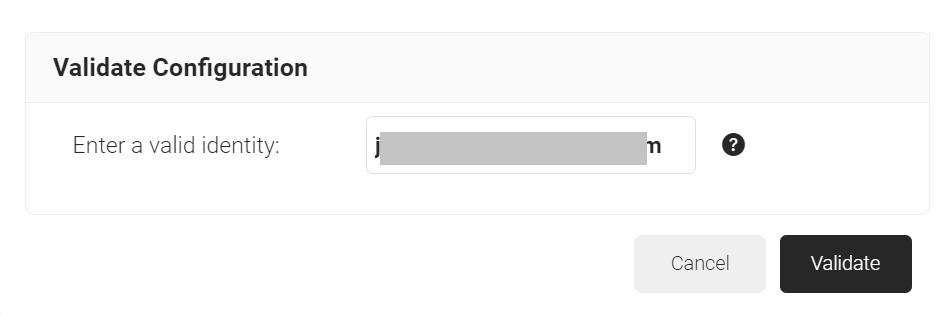
- Click the Validate Configuration button to check if the lookup is valid.
- On the Validate Configuration pop-up window, in the Enter a valid identity field, enter the identity (user/device) to validate the lookup, and then click Validate.

- After the successful validation, the associated attributes and groups of the Signal Source are displayed on the Lookup Details prompt. The admin can use this information to configure the network policies and verify the user’s validity. When the Admin enters an invalid identity on the Validate Configuration pop-up window, the following error message is displayed: “Account validation failed”.
- Click Update.
The first Policy Workflow to be created is for enrollment. JoinNow MultiOS will use this policy when the end users enroll themselves for certificates. MultiOS will not use the OAuth application you previously created in Azure. Instead, you need to use a separate SAML Application in Azure.
NOTE: Refer to one of our SAML Identity Provider configuration guides if you have not already set this up. Once you have your SAML IdP, start here:
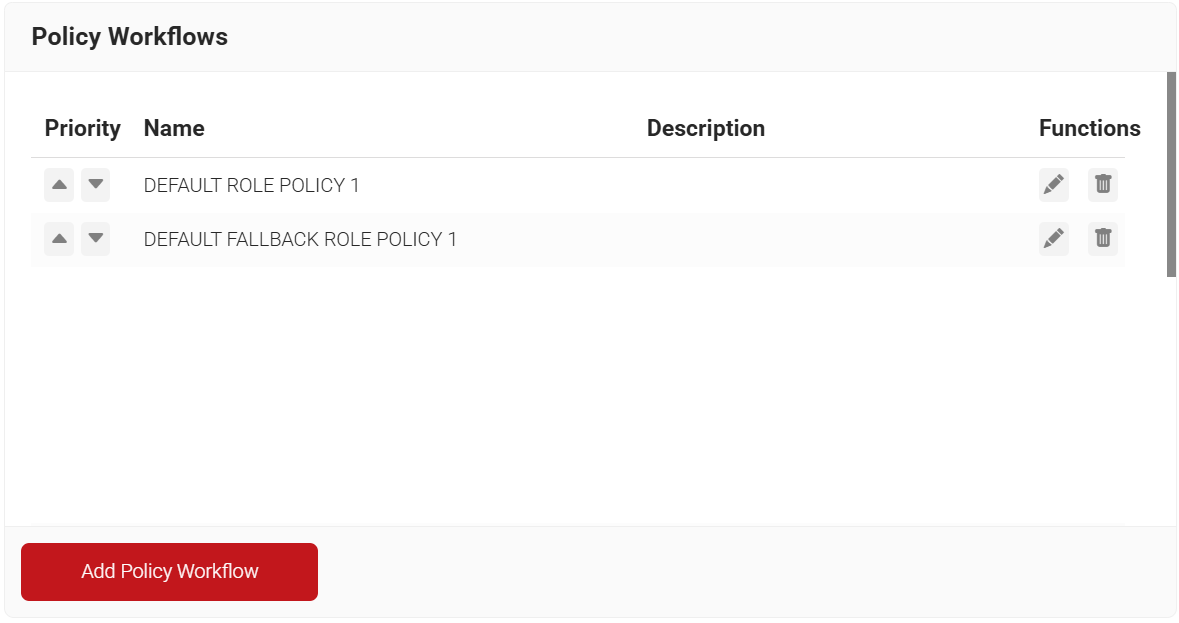
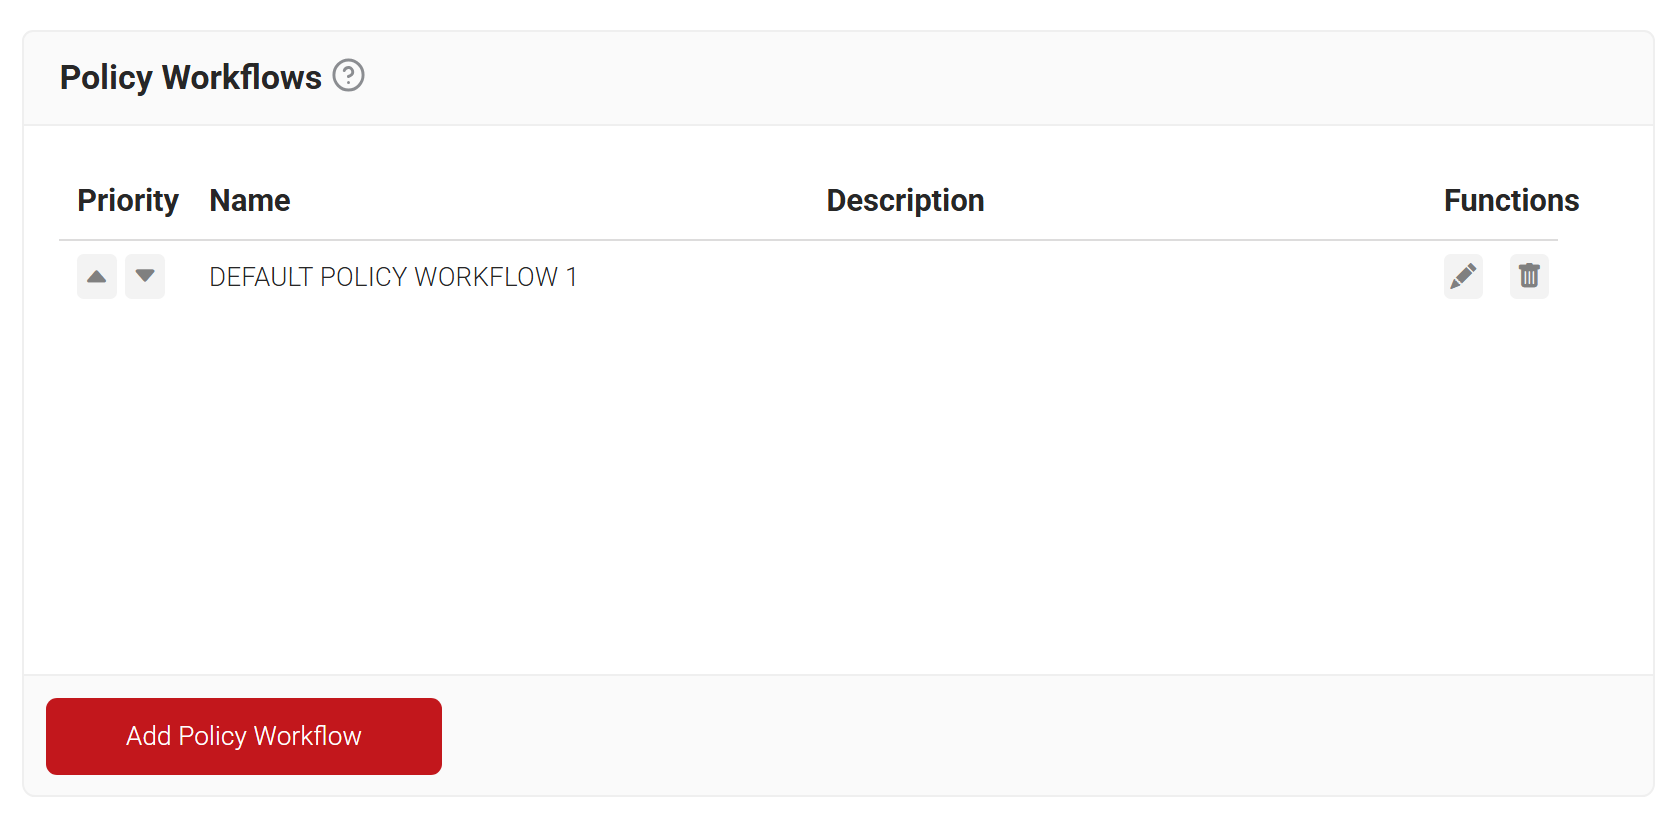
- Navigate to Policy Management > Policy Workflows.
- Click Add Policy Workflow.

- In the Name field, enter the name of the Policy Workflow.
- In the Display Description field, enter a suitable description for the Policy Workflow.

- Click Save.
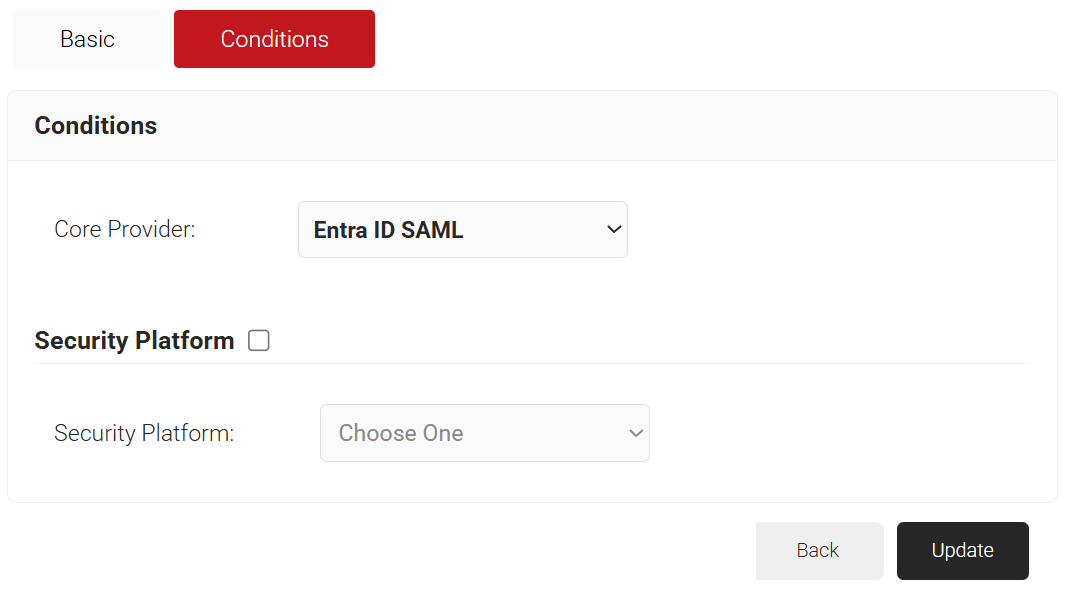
- The page refreshes and displays the Conditions tab.
- Select the Conditions tab.
- From the Core Provider drop-down list, select the core provider you created earlier.

- Click Update.

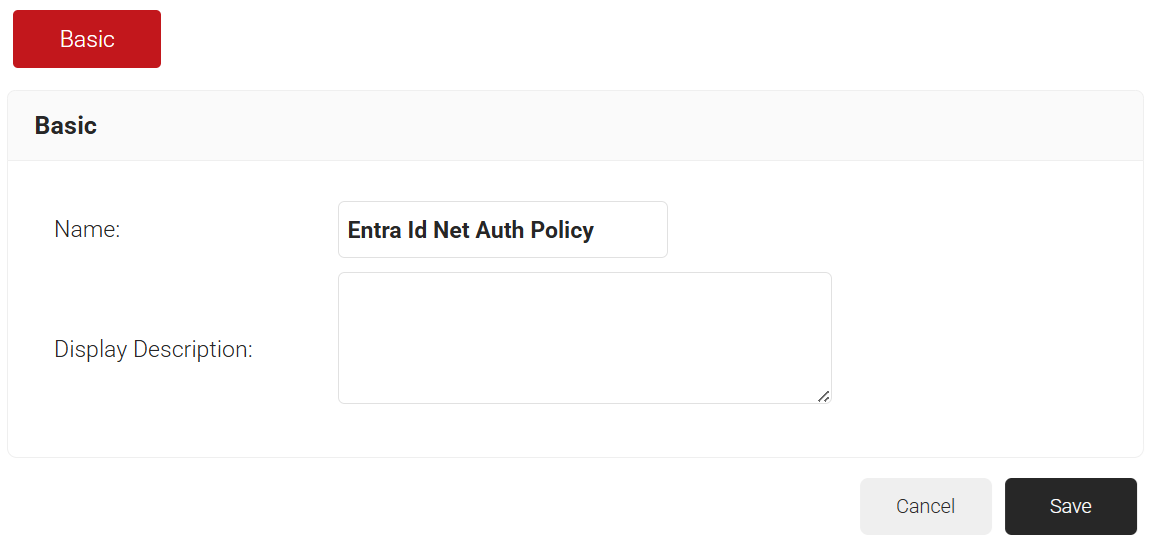
Next, create a User Role Policy for Network Authentication. This policy will be used by the CloudRADIUS Dynamic Policy Engine to look up a user’s status at the time of authentication. Then, CloudRADIUS can dynamically apply Network policies, which you will configure next.
- Navigate to Policy Management > Policy Workflows.
- Click Add Policy Workflow.

- In the Name field, enter the name of the Policy Workflow.
- In the Display Description field, enter a suitable description for the Policy Workflow.

- Click Save.
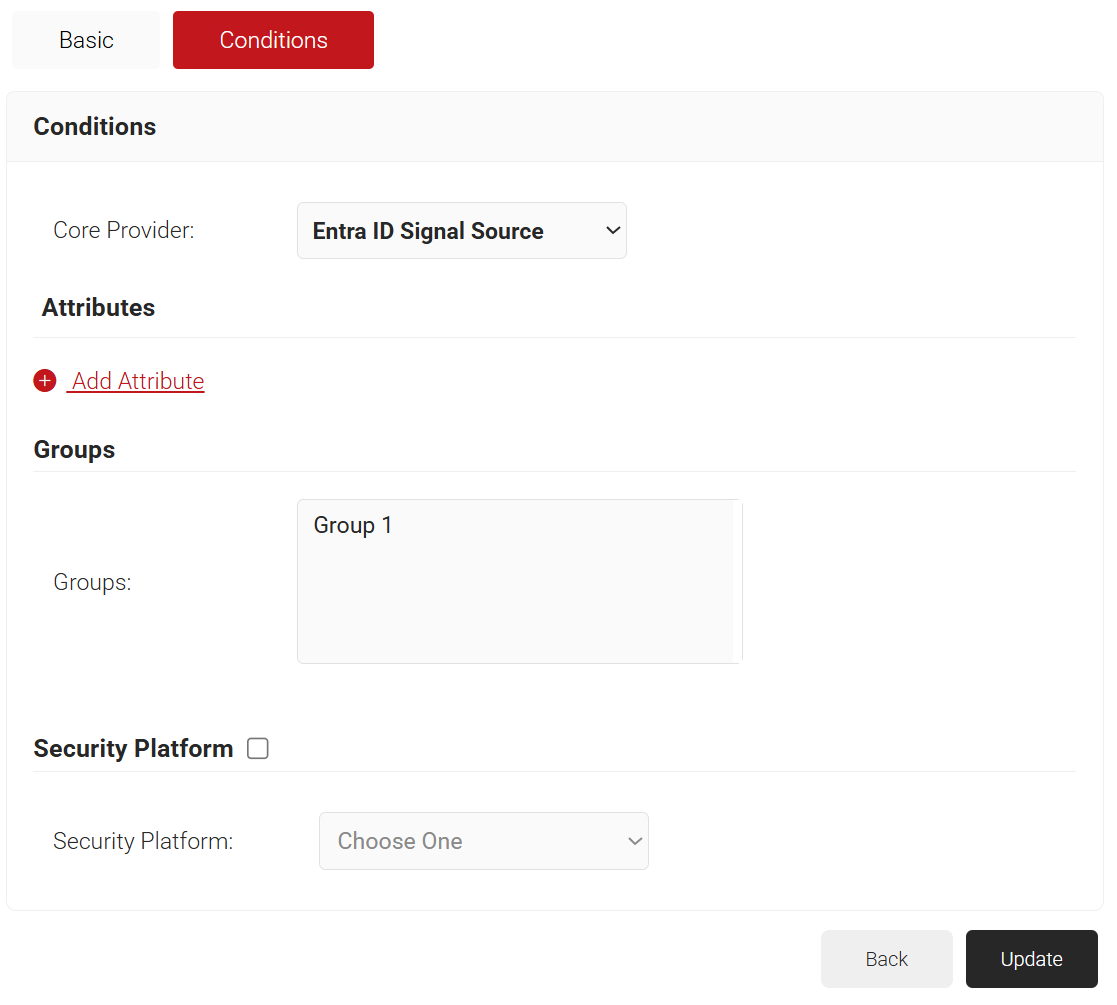
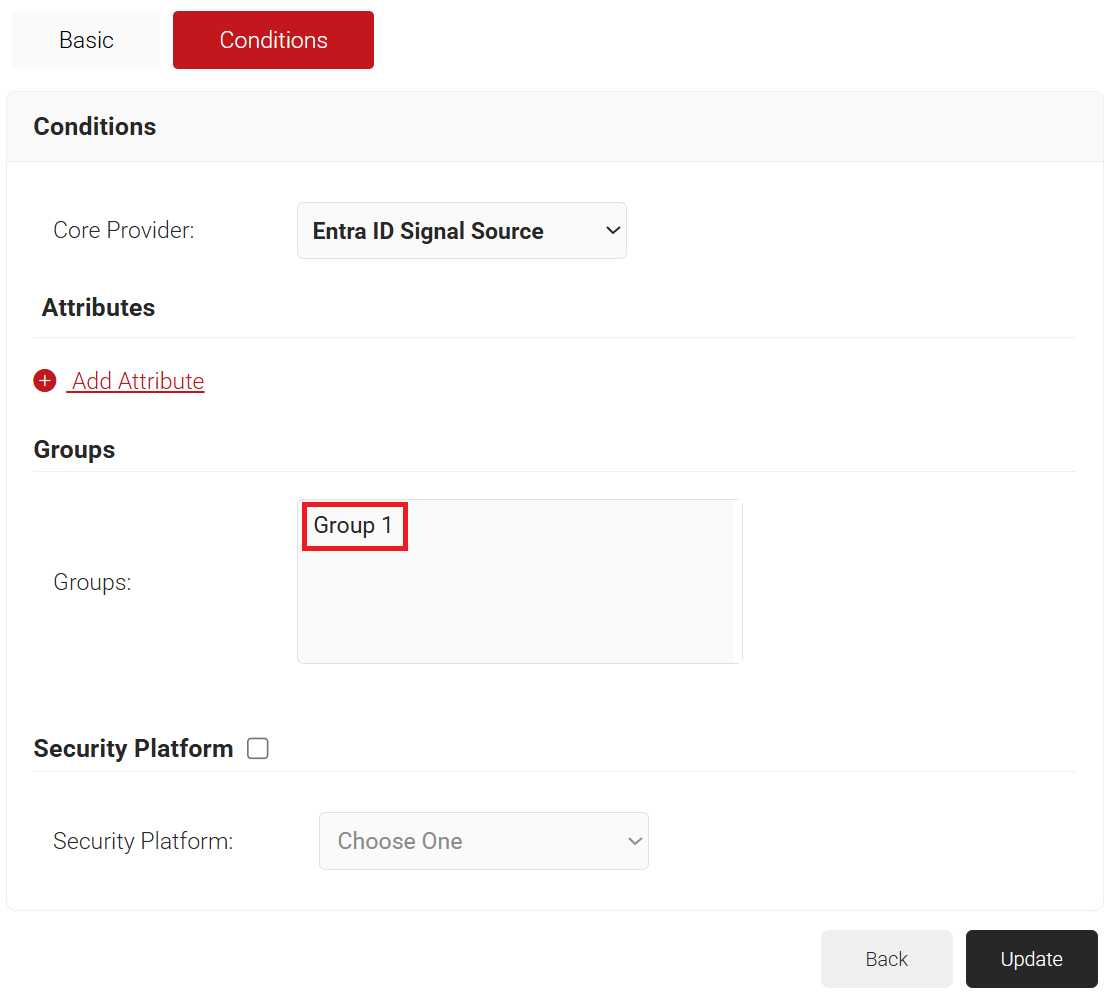
- The page refreshes and displays the Conditions tab.
- Select the Conditions tab.
- From the Core Provider drop-down list, select the Entra ID Signal Source created in the previous section (refer to the Creating an Entra ID Signal Source section).

- Click Update.
Finally, create Role Policies for any Groups you want to grant differentiated network access to. You can then leverage the CloudRADIUS Dynamic Policy Engine to send unique RADIUS attributes based on the Groups users belong to, using your Network policies.
- Navigate to Policy Management > Policy Workflows.
- Click Add Policy Workflow.
- In the Name field, enter the name of the Policy Workflow.
- In the Display Description field, enter a suitable description for the Policy Workflow.

- Click Save.
- The page refreshes and displays the Conditions tab.
- Select the Conditions tab.
- From the Core Provider drop-down list, select the Entra ID Signal Source created in the previous section (refer to the Creating an Entra ID Signal Source section).
- In the Groups field, select the group to which you want to apply this Policy Workflow. The group names listed here are the Local Groups that we previously configured in Core Platform (refer to the Configuring Groups section).
- Click Update.

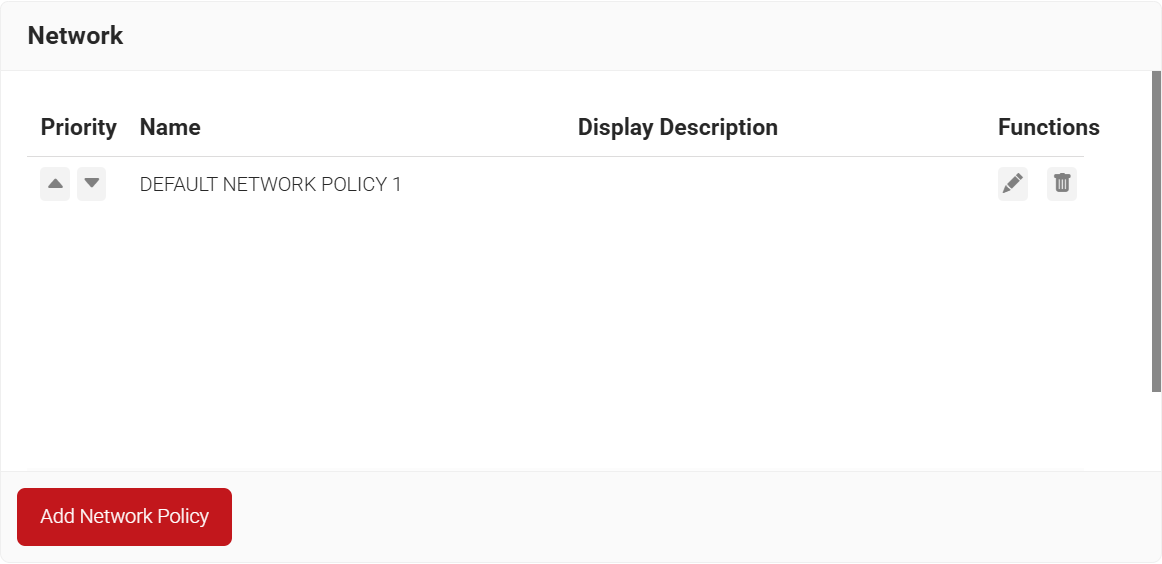
The purpose of a Network Policy is to specify how CloudRADIUS will authorize access to a particular User Role. A typical Network Policy would say something like: “If User Role = Staff, authorize access and assign them to VLAN 2”. You can configure any RADIUS Attribute to be sent to the wireless controller. If you leave the attribute section blank, it will just send Access Accept.
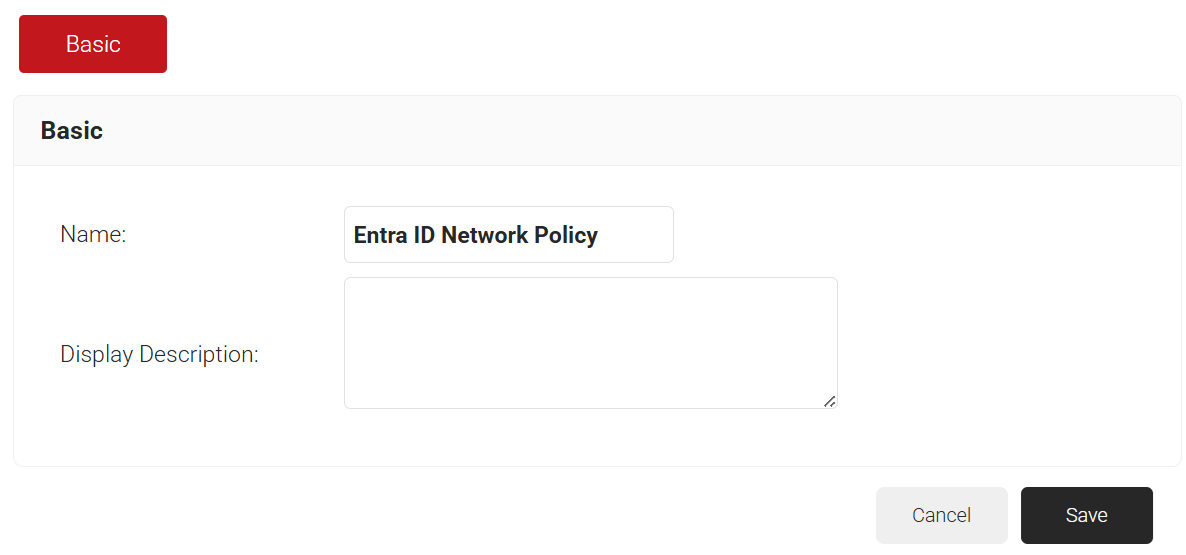
To create and configure the Network Policy, perform the following steps:
- Navigate to Policy Management > Network.
- Click Add Network Policy.

- In the Name field, enter the name of the network policy.
- In the Display Description field, enter a suitable description for the network policy.

- Click Save.
- The page refreshes and displays the Conditions and Settings tabs.
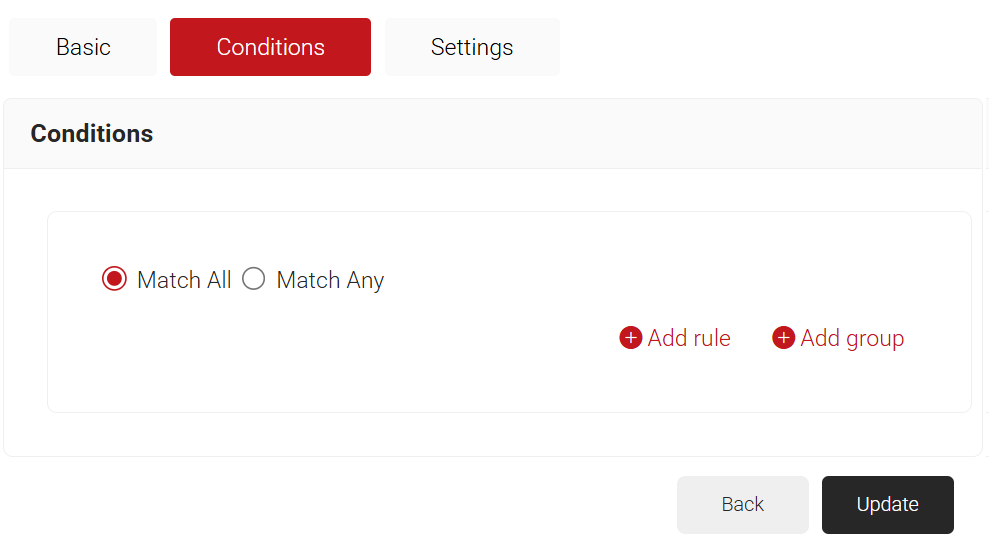
- Select the Conditions tab.
- Select Match All or Match Any based on your requirement to set authentication criteria. In the case explained here, we are selecting Match All.
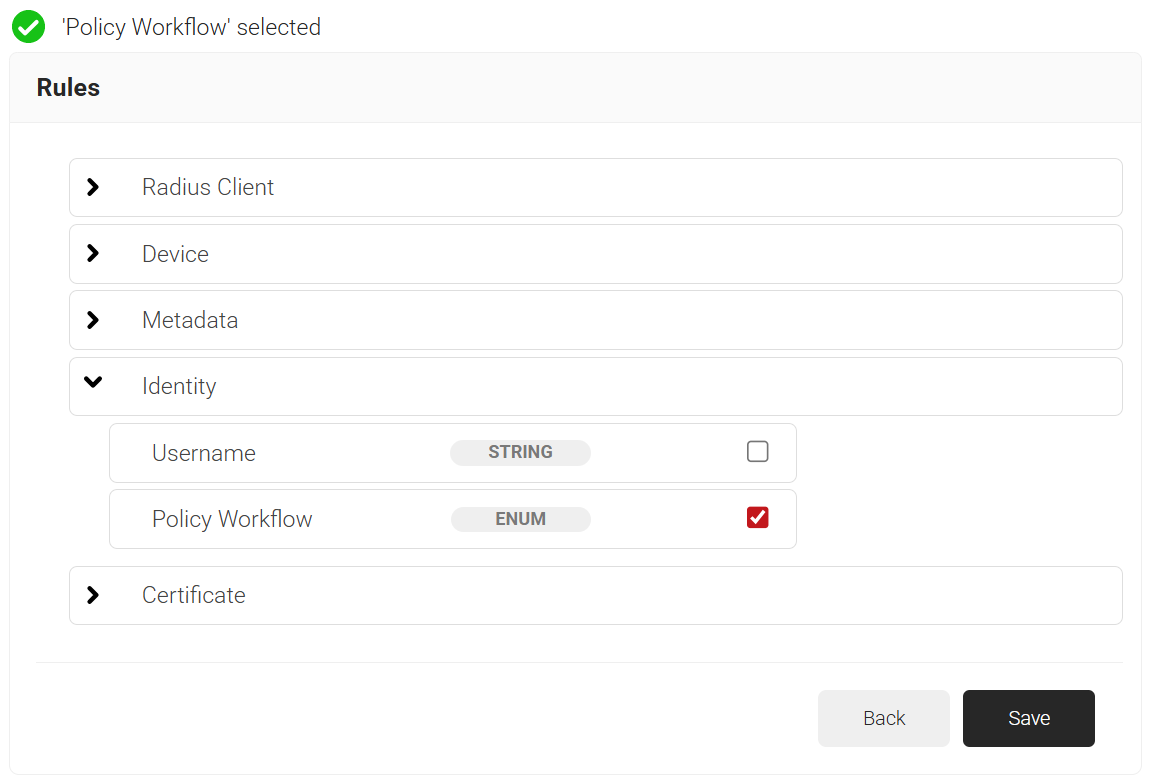
- Click the Add rule and select the role you want to assign to this network policy. It is essential to select the appropriate policy workflow, as it triggers the network policy. This menu offers various rules that you can select based on your business requirements.


- Click Save.
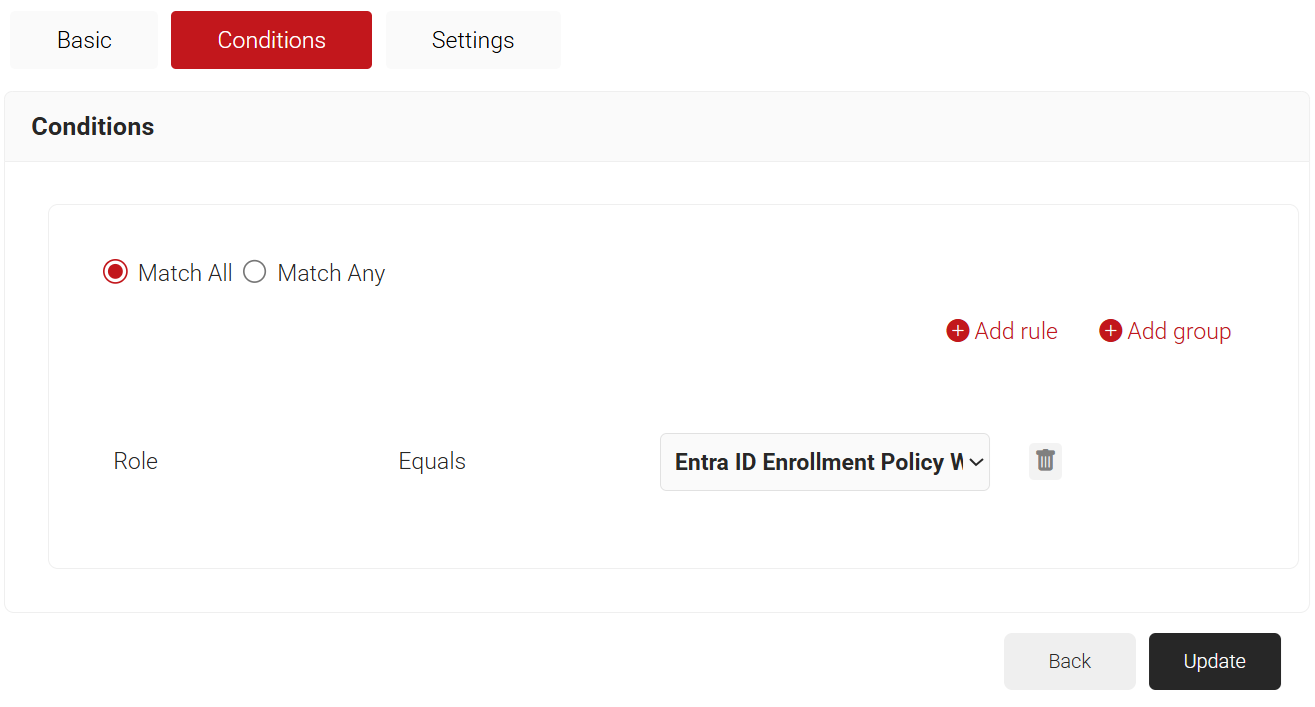
- The Policy Workflow option appears under the Conditions tab.
- From the Policy Workflow Equals drop-down list, select the role policy you created earlier (refer to the Policy Workflow for Enrollment section). You can select multiple User Roles to assign to a Network Policy.

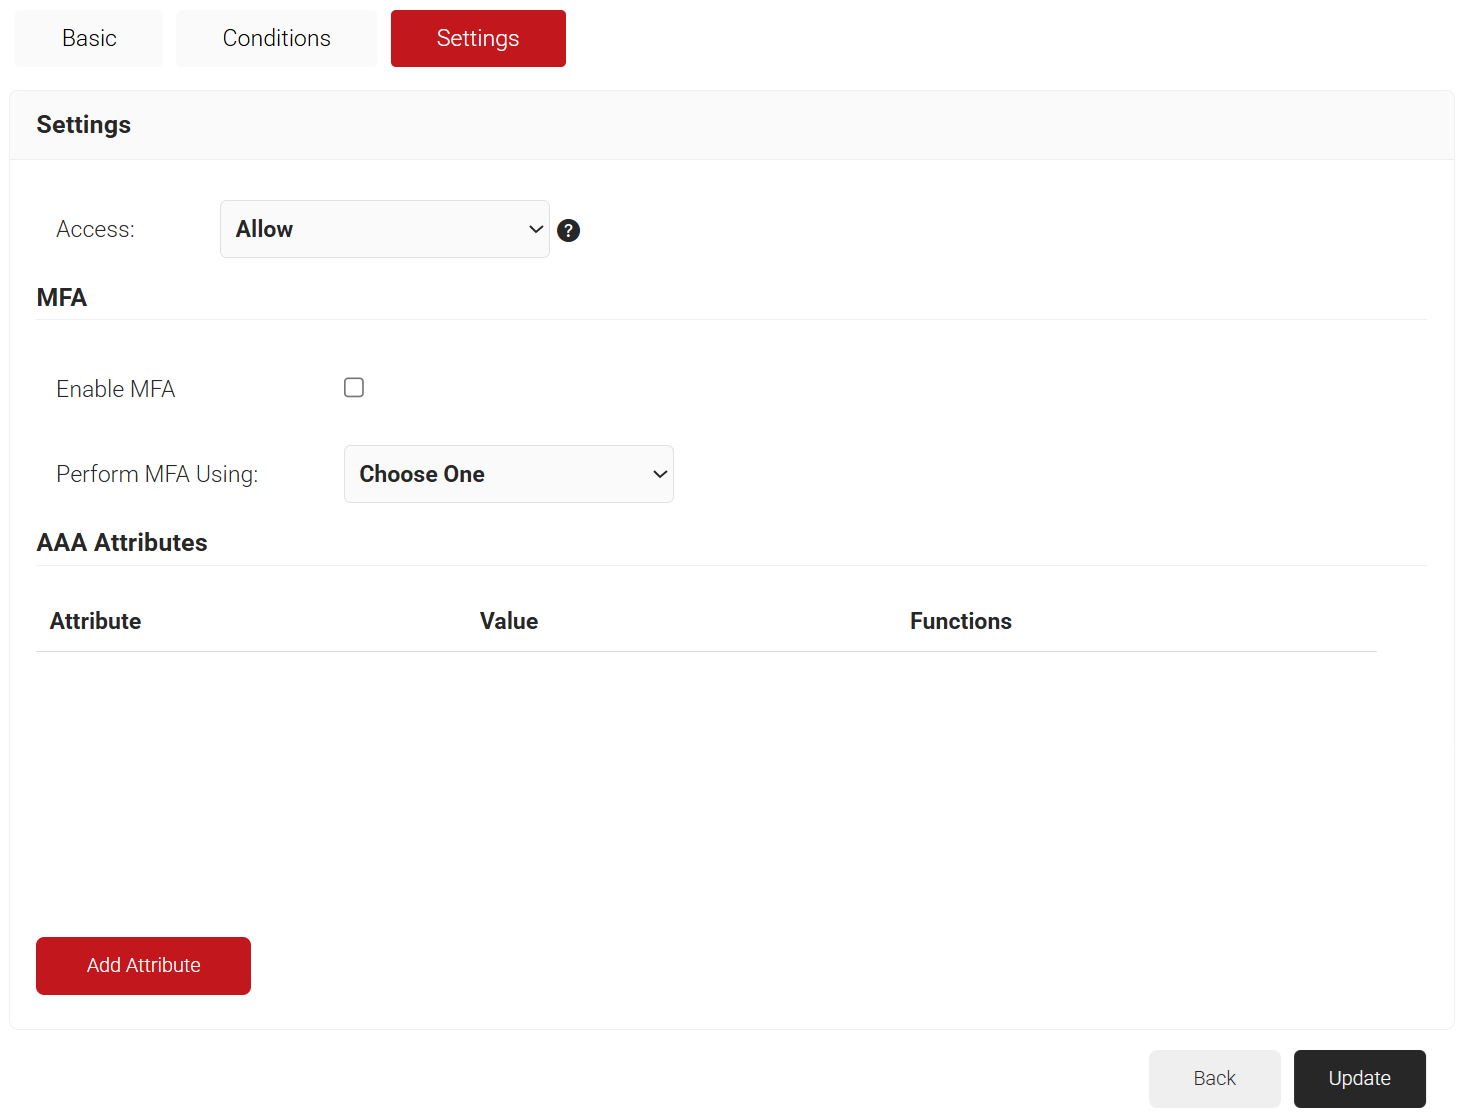
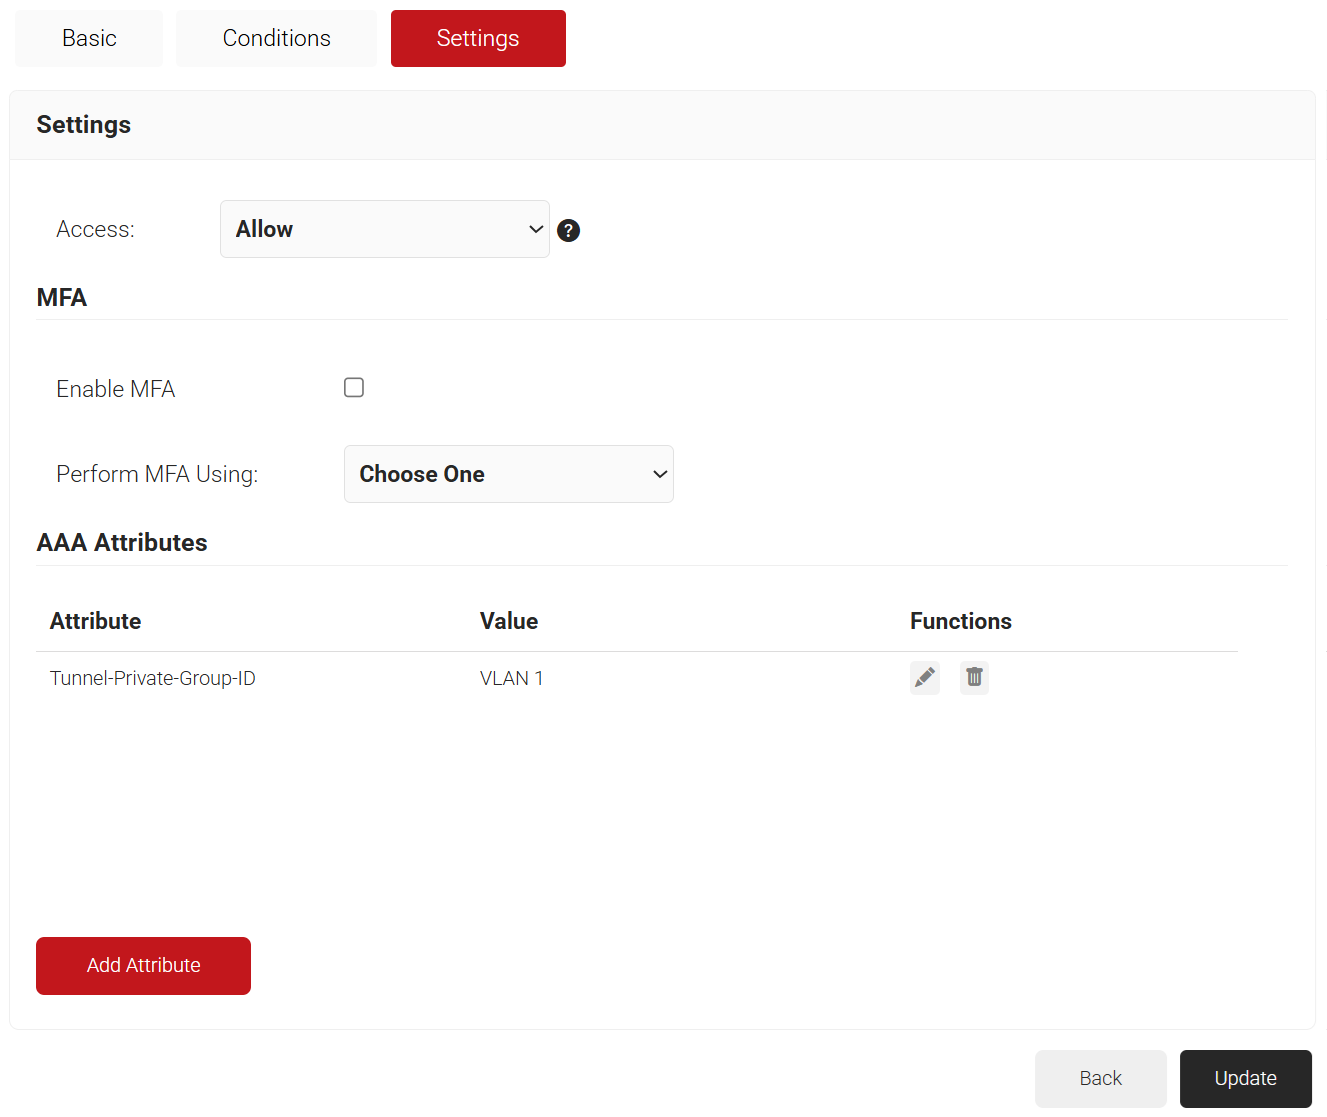
- Select the Settings tab.
- From the Access drop-down list, select any one of the options to allow or deny authentication requests. The default value is “Allow”.
- To configure MFA, select the checkbox to enable MFA.
- From the Perform MFA Using drop-down list, select a Core Provider for MFA.

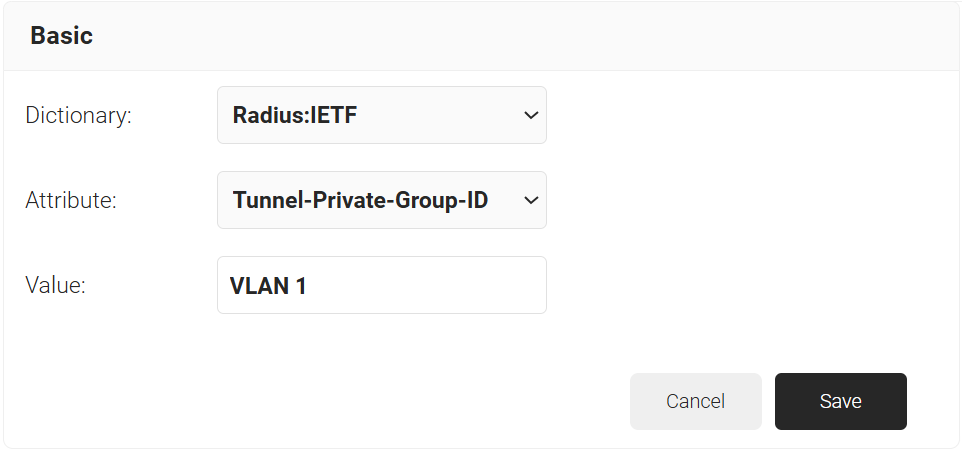
- Click Add Attribute.
- From the Dictionary drop-down list, select an option:
- Radius: IETF – This is what we will use for the following attributes, as we are using standard RADIUS attributes for VLAN assignment.
- Custom: Used for any VSAs (Vendor-Specific Attributes).
- From the Attribute drop-down list, select any of the following options:
- Framed-Protocol
- Framed-IP-Address
- Framed-IP-NetMask
- Framed-Routing
- Filter-Id
- Framed-MTU
- Framed-Compression
- Reply-Message
- Framed-Route
- Framed-IPX-Network
- State
- Class
- Session-Timeout
- Tunnel-Type
- Tunnel-Medium-Type
- Tunnel-Private-Group-ID
- Framed-Pool
- User-Name
- In the Value field, enter the appropriate value for the attribute.

Repeat as necessary for all the attributes you want to send for your User Role. - Click Save

- From the Dictionary drop-down list, select an option:
- Click Update.
This completes all the necessary configurations to integrate Entra ID with CloudRADIUS.