How to Deploy SCEP Certificates Using Addigy and SecureW2

Introduction

A PKI certificate, an X.509 certificate issued by a Public Key Infrastructure (PKI), is critical to maintaining the trustworthiness and security of digital interactions. These certificates allow applications and services to create secure connections and authenticate users or devices, making them essential to the entire PKI ecosystem. SCEP (Simple Certificate Enrollment Protocol) plays a crucial role in automating digital certificate enrollment, reducing the manual reliance on network admins across the network infrastructure. Addigy, a mobile device management (MDM) platform built specifically for Apple settings in the cloud, enables IT departments to remotely manage devices, adjust settings, administer apps, and enforce security policies on Apple devices.

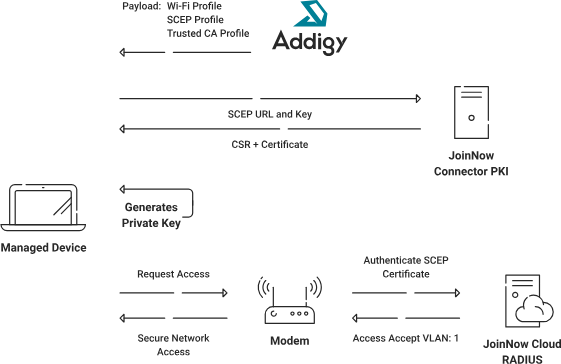
This guide explores the practical configuration steps for deploying SCEP certificates using the combined power of Addigy and the SecureW2 JoinNow Connector PKI. By combining the capabilities of Addigy with those of SecureW2 robust public key infrastructure, organizations can expedite the deployment of SCEP certificates with precision and simplicity.

Join us as we break down the complexities of this configuration and show you how to deploy SCEP certificates smoothly with our JoinNow Connector PKI and Managed Device Gateway, enabling you to enhance your network’s security through a streamlined, well-managed certificate deployment process.

Tech Overview

  1. Set Up the Managed Device Gateway API in the JoinNow Connector Public Key Infrastructure (PKI)
    1. You can easily set up SCEP gateway APIs using our Getting Started Wizard.
    2. Establish a trusted Intermediate Certificate Authority to configure the payload to include certificate enrollment policies.
  2. Configure the SCEP Profile
    1. Create an SCEP URL by generating a shared secret and an access token using the SecureW2 Token wizard.
    2. Configure the Wi-Fi Profile
  3. Configure the Wi-Fi settings to allow stored certificates to connect to the correct server.
    1. Configure the profile for EAP-TLS (Extensible Authentication Protocol-Transport Layer Security) authentication, the most secure authentication protocol.
    2. Push the Payloads to Managed Devices
  4. Add the SCEP URL to the Addigy portal so you can push out configuration profiles to all Addigy devices and
    1. have them authenticated to the network.
    2. After authentication, you can also push out a payload, allowing devices to enroll for a certificate with digital signatures.

Creating an Apple Push Digital Certificate

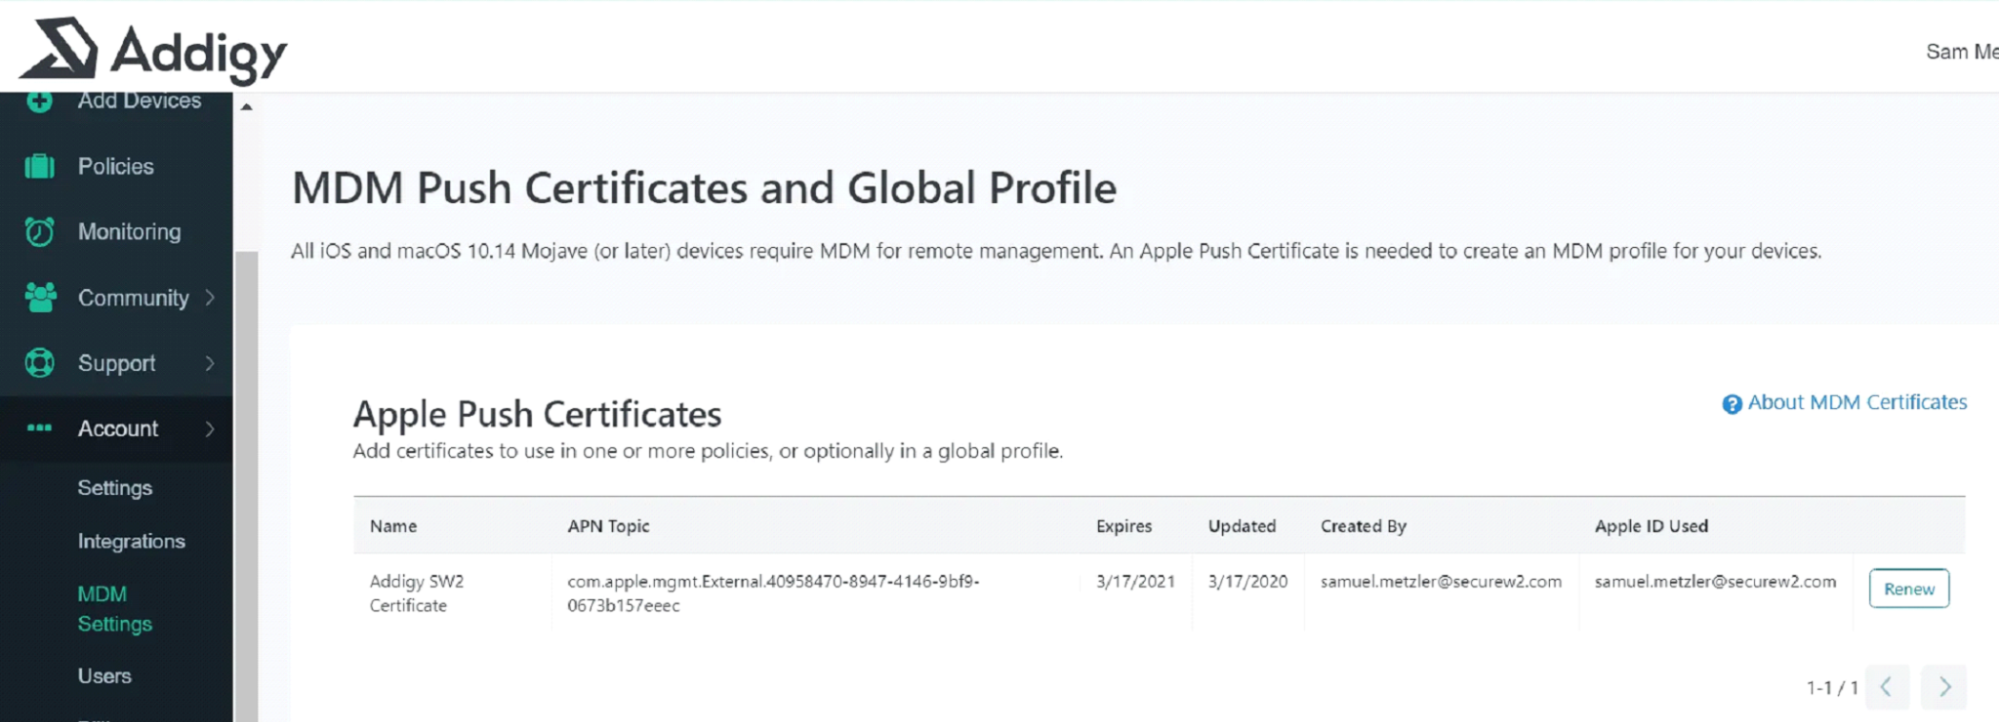
You’ll need to create Apple Push digital certificates to establish secure communications between your managed Apple devices and your certificate management system. You can create an Apple Push Certificate by downloading an Addigy Certificate Signing Request (CSR) file and uploading it to Apple.

  1. On the Addigy Portal, go to Accounts.
    1. Click MDM Settings.

  2. Download CSR File.
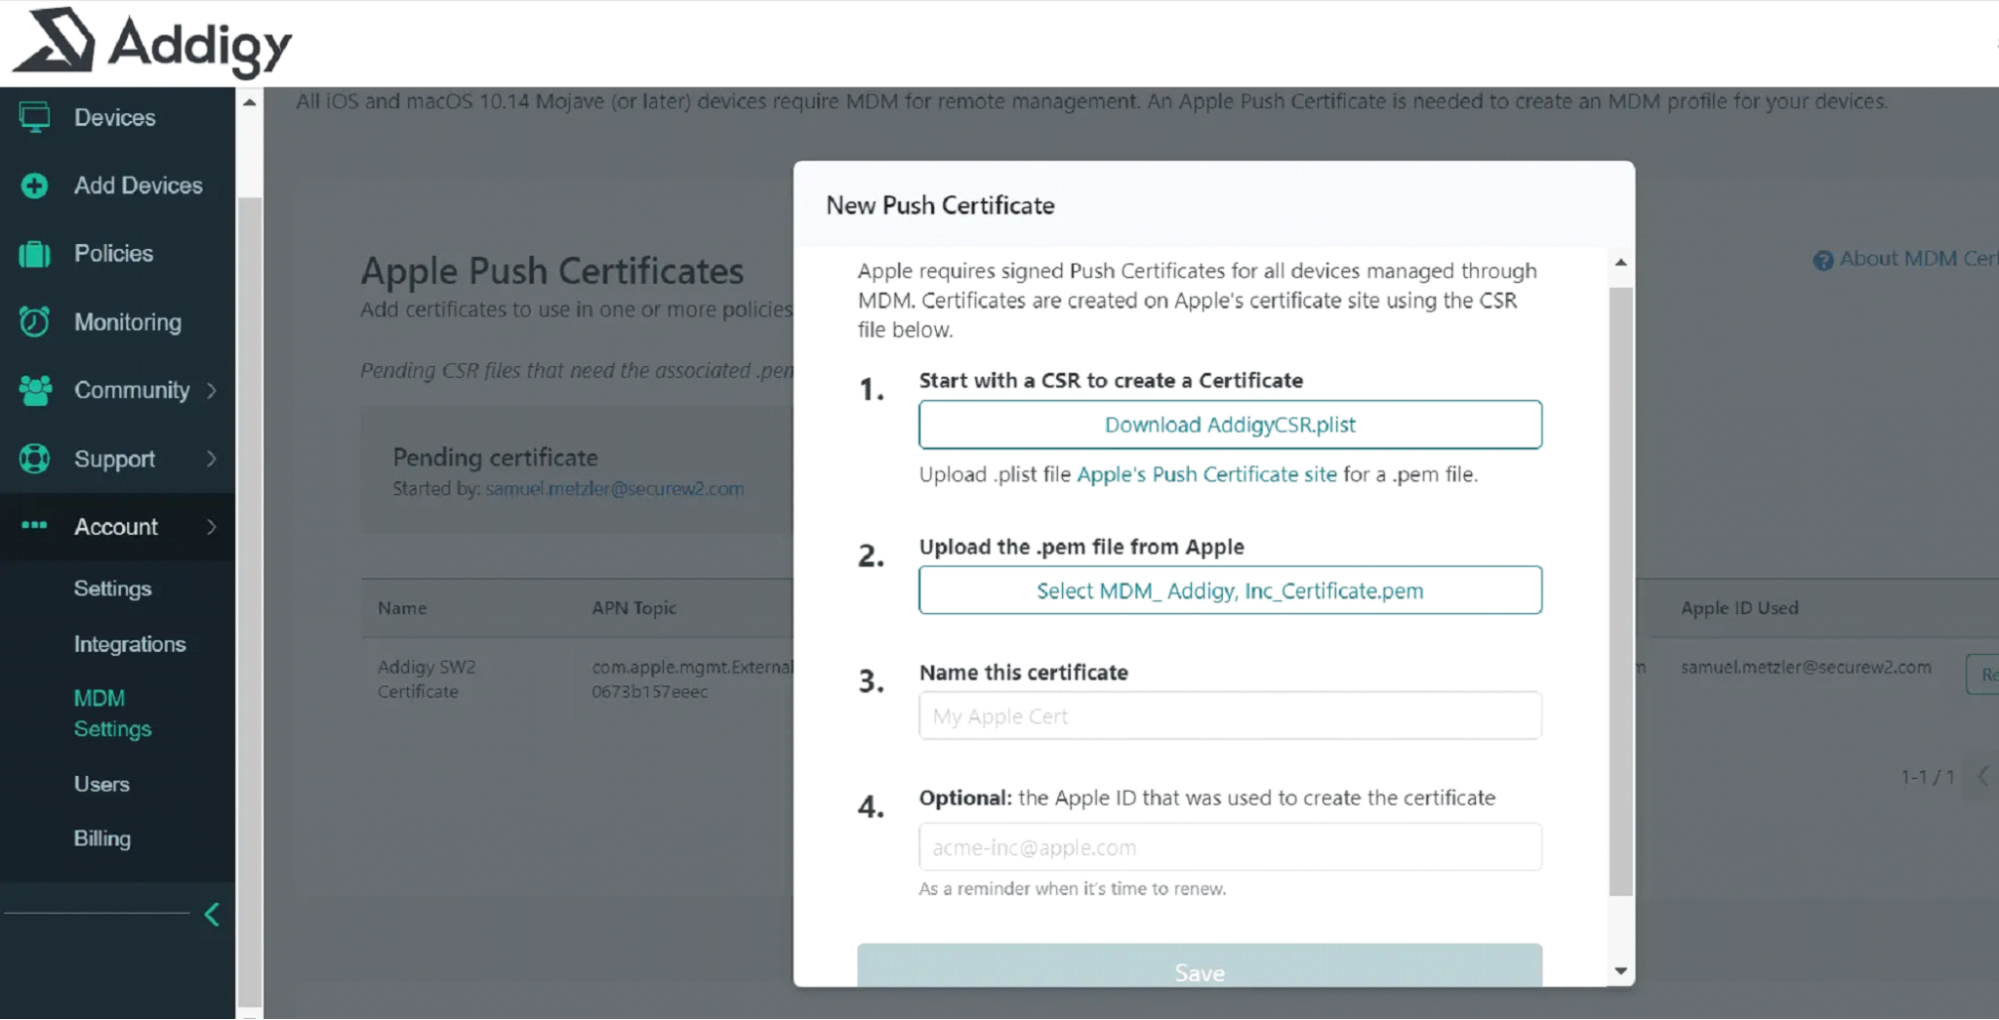
    1. Click Add Certificate under Apple Push Certificates.
    2. Download Addigy CSR.
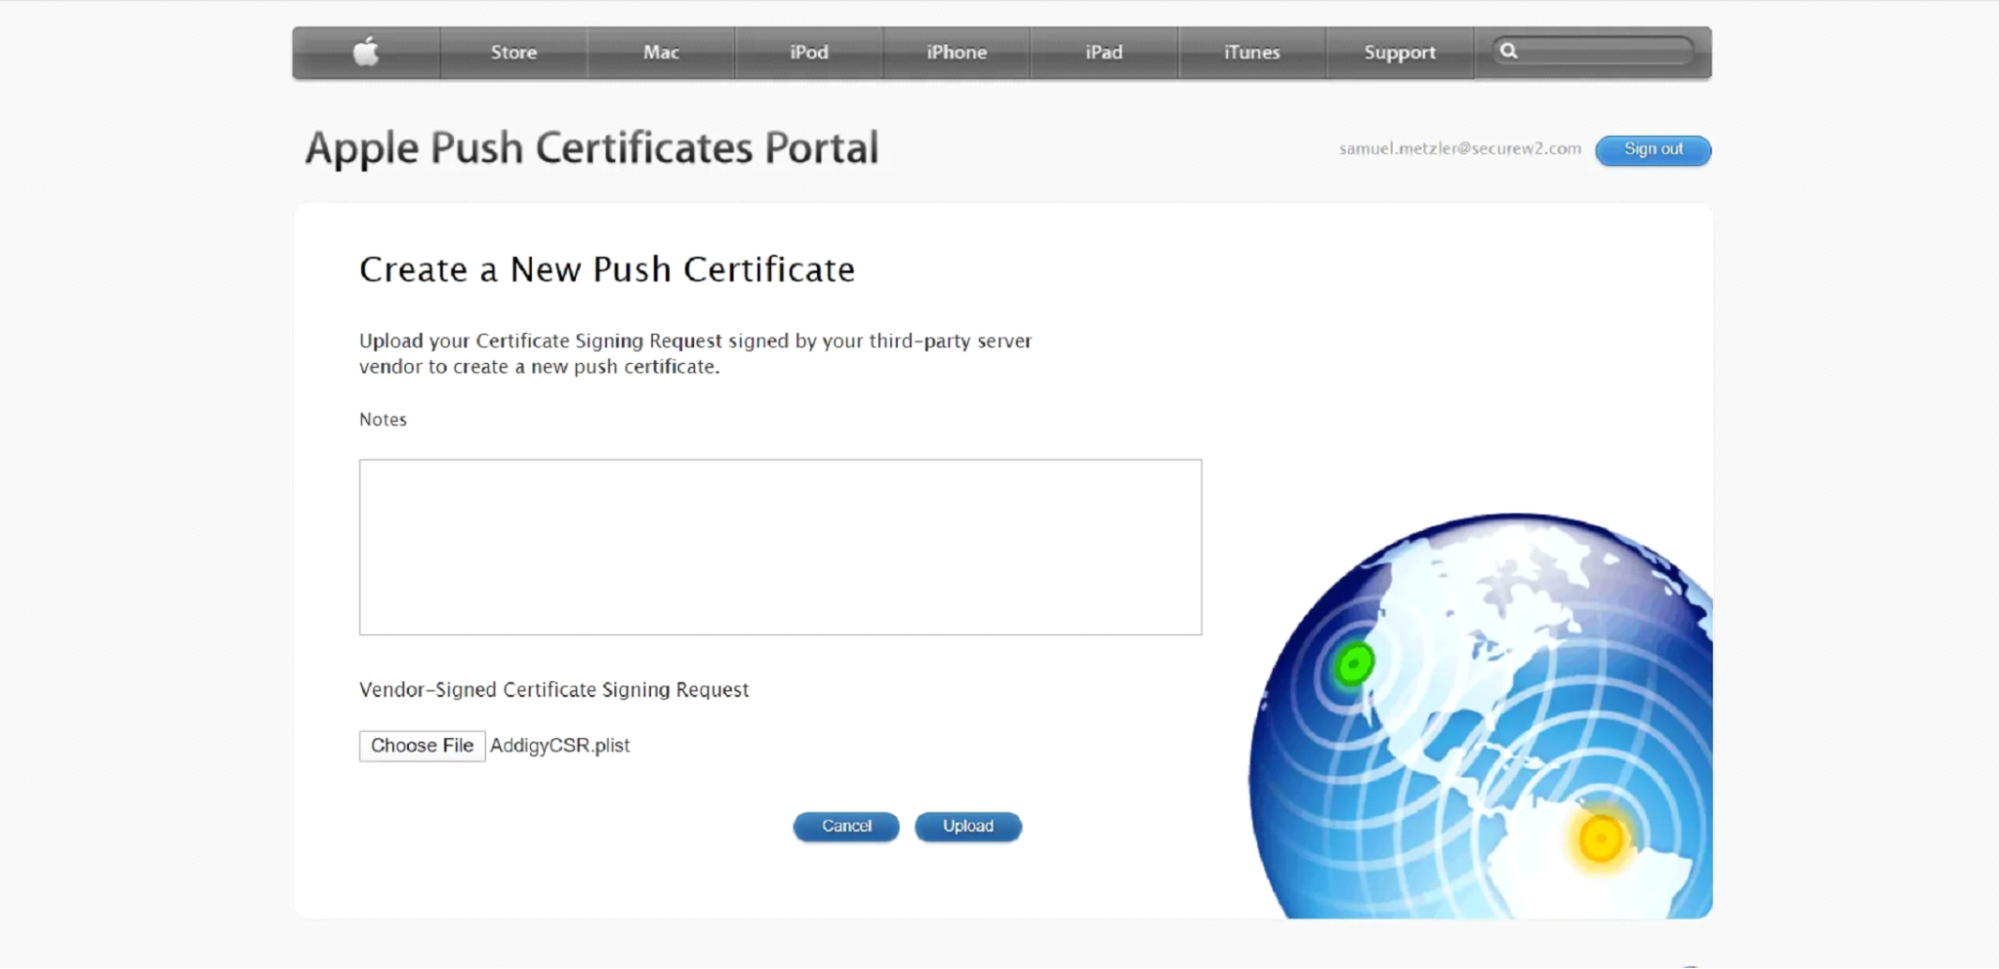
  3. Go to this link.
    1. Click Create a Certificate.
    2. Upload your Addigy CSR.
  4. An Apple Push Certificate will be generated, and a .pem file will be available for download.
  5. Upload the .pem file.
    1. Go back to MDM Settings in Addigy.
    2. Click Add Certificate.
    3. Upload the .pem file.
  6. Click Save.

You have created an Apple Push Certificate with digital signatures for your managed devices. You must establish a secure connection so your managed devices can enroll for the certificate.

Building a .mobileconfig with the JoinNow Public Key Infrastructure

For most platforms, you can create custom Certificate Authorities and generate an SCEP URL with the SecureW2 JoinNow Management Portal. These can be imported into your platform’s UI and deliver digital certificates.

Including a Certificate Authority (CA) in the mobile configuration file is critical for establishing confidence between the RADIUS server we connect to and the CA that provides our client certificates. In essence, anyone may use the public part of a certificate to verify its validity by proving ownership of the private keys used to sign it. Trust in the CA becomes critical because it validates the authenticity of certificates. As a result, when we trust the CA, we may be certain that any data delivered to the certificate holder reaches its intended destination and that the individual or device approves all signatures made with the certificate holder’s private key.

Addigy has no option, so you must build a custom mobileconfig with the SCEP URL and Shared Key. This can all be done in the SecureW2 JoinNow Management Portal. After you’ve done this, reach out to the SecureW2 Support team. They can help you generate a custom .mobileconfig file to upload to Addigy.

Creating a SCEP URL and Shared Secret

To use an SCEP gateway for managed devices to enroll for digital certificates, generate an SCEP URL to communicate with SecureW2 Public Key Infrastructure.

  1. Log in to the JoinNow Management Portal.
  2. Navigate to Integration Hub > Device Management Platforms.
  3. Click Add.
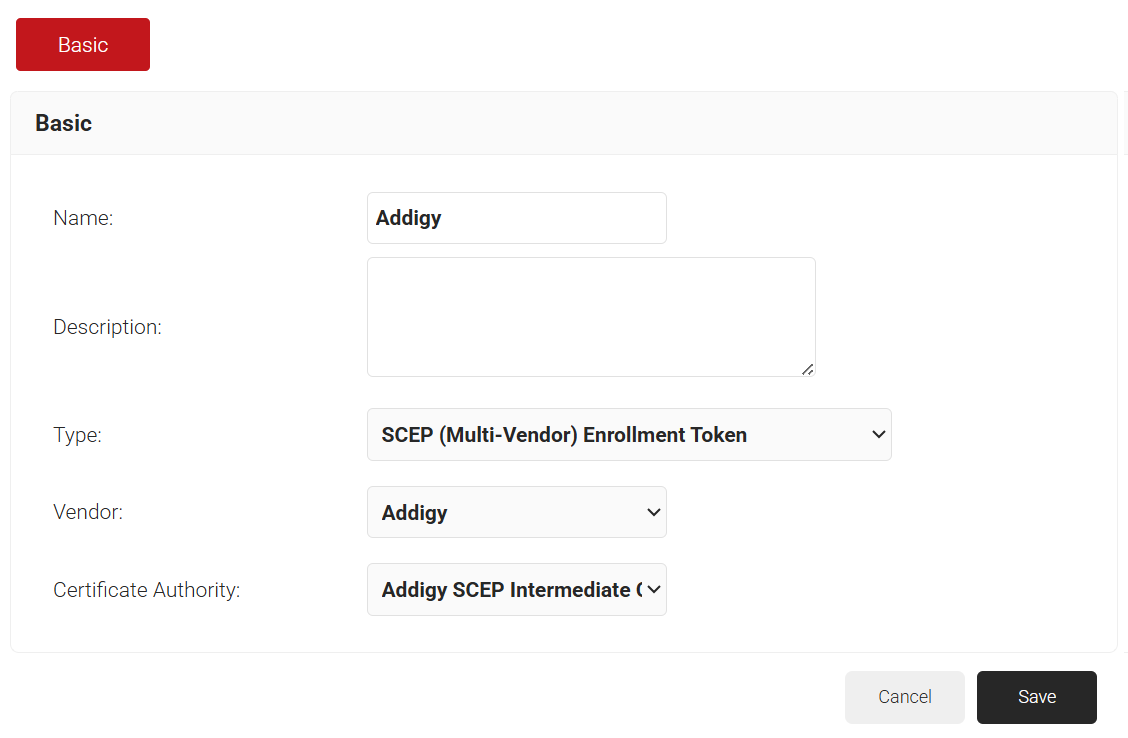
  4. In the Name and Description fields, enter a name and description for the Device Management Platform.
  5. From the Type drop-down list, select SCEP (Multi-Vendor) Enrollment Token.
  6. From the Vendor drop-down list, select Addigy.
  7. From the Certificate Authority drop-down list, select a CA certificate Authority.
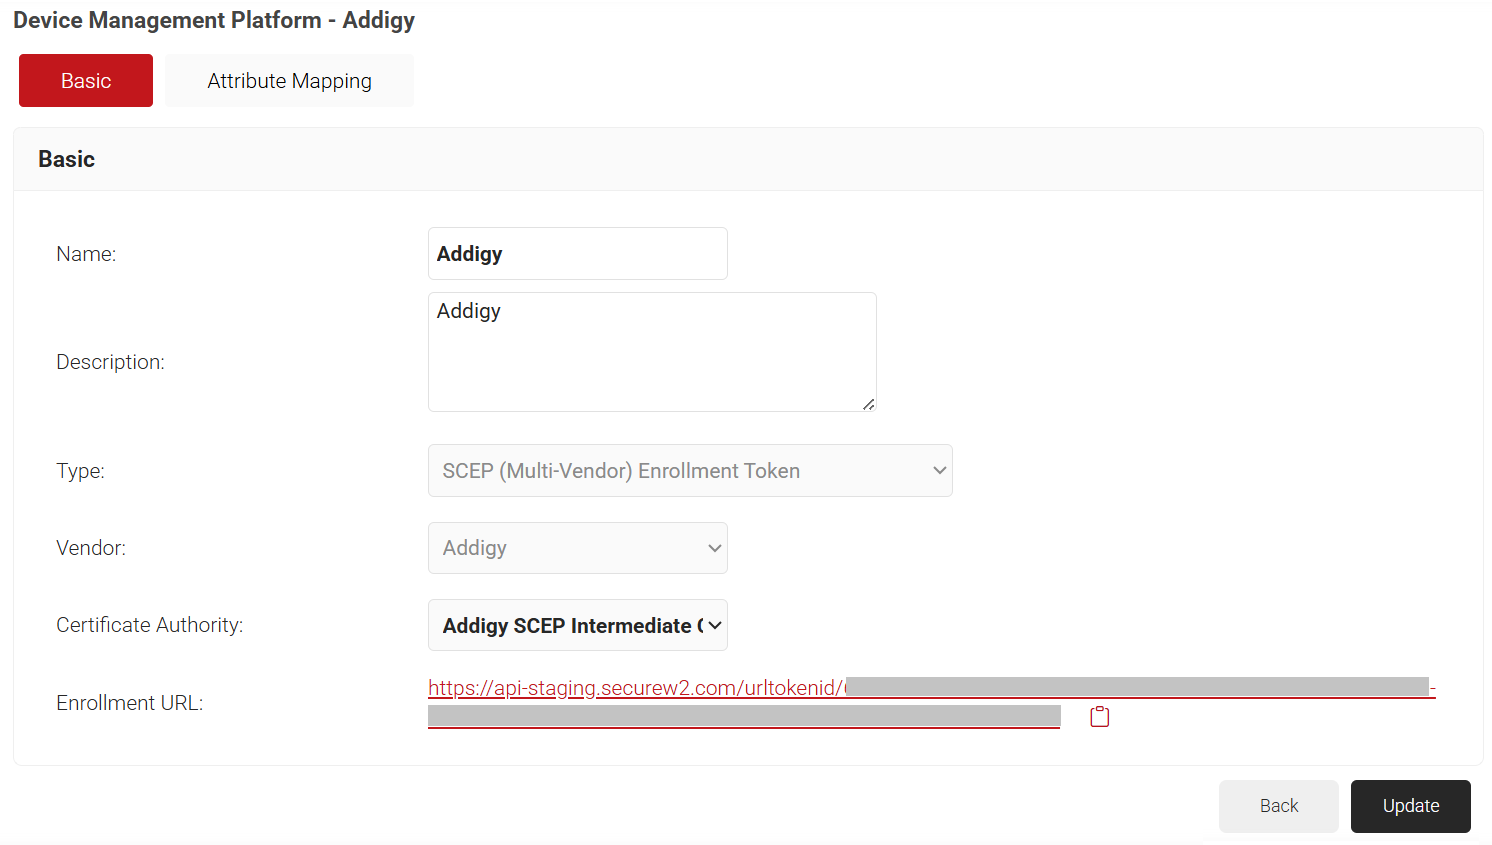
  8. Click Save. A .csv file containing the API Secret and Enrollment URL is downloaded. In addition, the Enrollment URL is displayed on the screen.

Upload a .mobileconfig file to Addigy

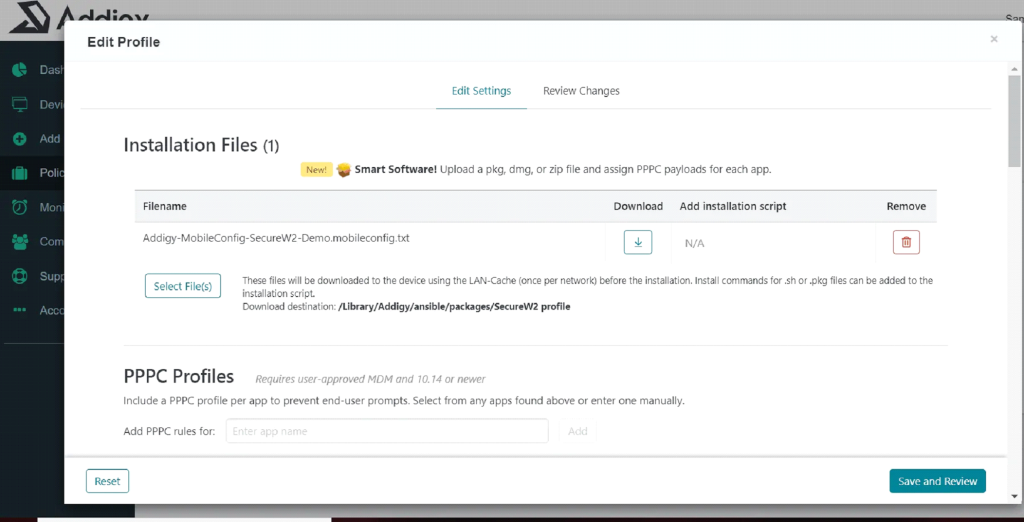
Now that you’ve created a mobileconfig, you can plug it into the Addigy portal and will be able to push the payload to every managed device.

  1. Create a Profile in Addigy.
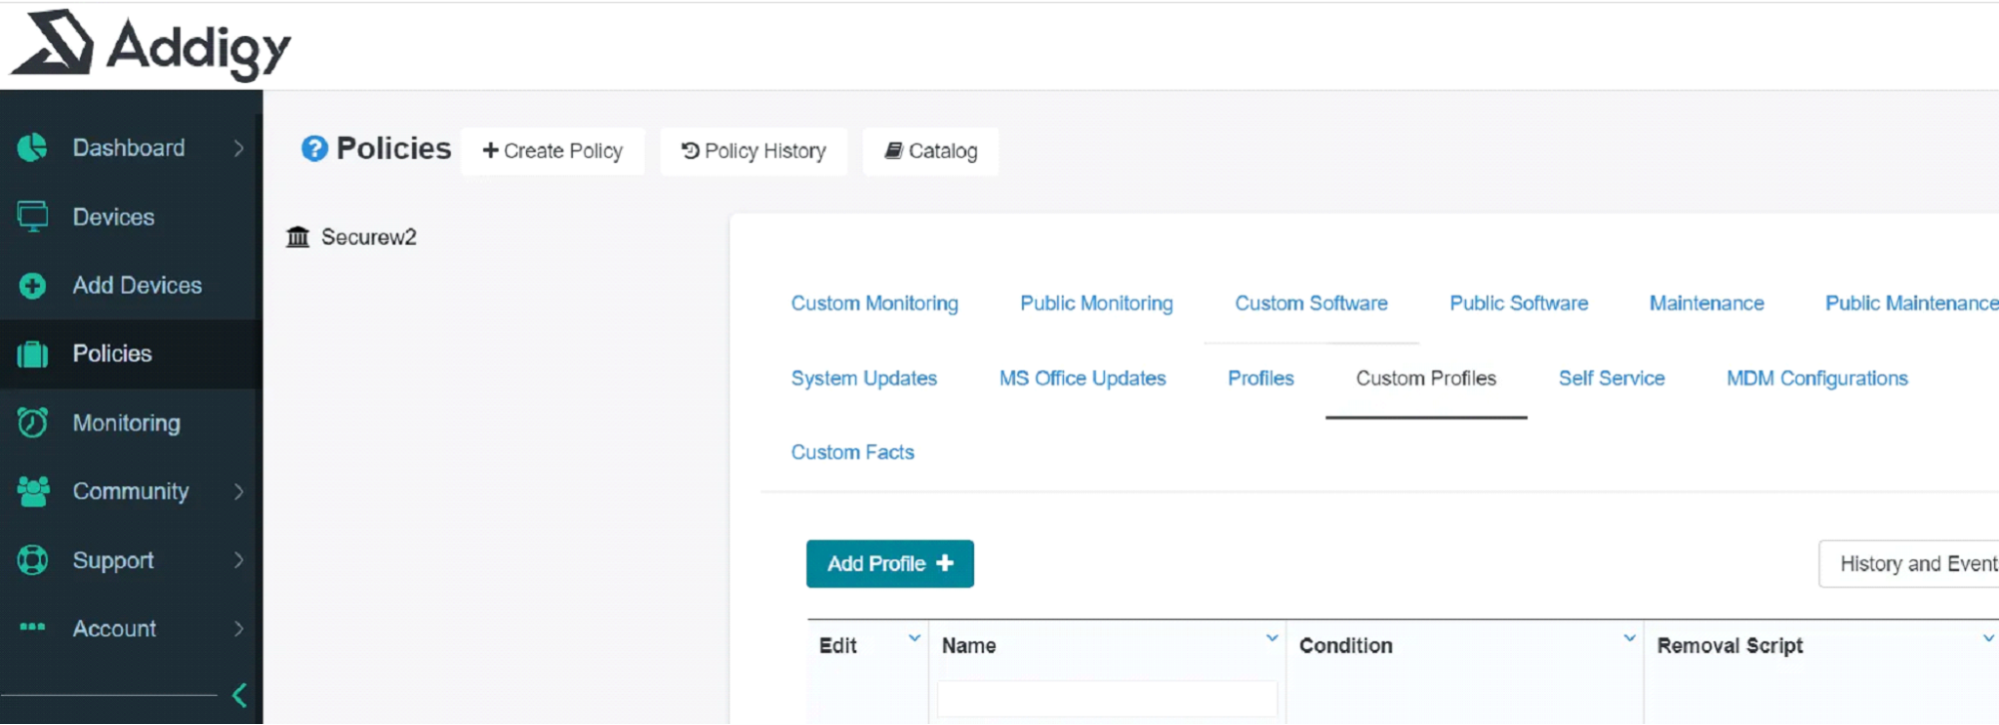
    1. Go to Policies.
    2. Click Catalog towards the top.
    3. Click on Custom Profiles and Add Profile.

  2. Upload your .mobileconfig file.
    1. Enter your profile name.
    2. Under Installation Files, click Select File(s) to upload your .mobileconfig file.
    3. Under Installation Script, the output will be shown after uploading your file.
  3. Click Confirm.

    Now that you’ve created a custom profile in Addigy, you can start deploying that profile to your managed devices.

Do We Need to Create a SCEP Profile?

No, we do not. At the time this documentation was updated, Tuesday, October 3rd, 2023, Addigy does not have SCEP Profiles available. For this reason, we are creating a custom .mobileconfig to distribute our SCEP URL and Secret.

Adding an iOS Device to Addigy Management

Incorporating iOS devices into your Addigy management portal is a smooth process. Here, we will explain how to get the configuration profiles on an iOS device.

  1. Log in to the Addigy management portal.
    1. Navigate to Policies.
  2. Locate your device on the portal and click GoLive.
  3. Switch your device from the ‘Onboarding’ to the ‘Production’ policy
    1. This will deploy the Wi-Fi profile and SCEP payload.
  4. Navigate to MDM Configuration.
    1. Verify that the Addigy SCEP profile has been uploaded.
    2. Click on the Addigy SCEP profile to view the payloads and digital certificate.
  5. Hover over Production.
    1. Click Confirm Production policy deployment.
    2. Click View Details to view the SCEP profile that connects to your iOS device.
      1. The profile will take a few minutes to appear on your device.
  6. To find your profile, open the Settings app and go to Device Management under the General section.
    1. You can also view device certificates here.
  7. Once the profile is on your device, go to Settings > Wi-Fi and connect to the Addigy SCEP network.
    1. The device will connect to the network without any prompts.
  8. Your connected device should now be added to the Addigy management portal.

Removing the iOS Device from Addigy Management

To remove configuration profiles from an iOS device, follow these steps within Addigy:

  1. To remove the device from the network, navigate to Policies > Production.
    1. Click on your device and change the policy from “Production” to “Onboarding”.
    2. Click Onboarding, then confirm the configuration.
  2. Click Onboarding, then confirm the configuration.
    1. The Wi-Fi profile and SCEP payload will no longer appear under Device Management.
  3. The device will connect to the setup Wi-Fi and be removed from “Policy Devices” on Addigy.

Verifying the SCEP Certificate on the iOS Device

If you need to verify that an SCEP certificate is on a network device, here’s how to do it:

  1. Log in to the JoinNow Management Portal.
  2. Navigate to Dynamic PKI > Certificate Authorities and click Certificates on your Issuing Certificate Authority.
  3. Copy either the serial number or the common name of the Certificate Authority.
  4. Paste the ID into Addigy under the Devices tab.
    1. You can find the device associated with that digital certificate.

Revoking a SCEP Certificate from an iOS Device

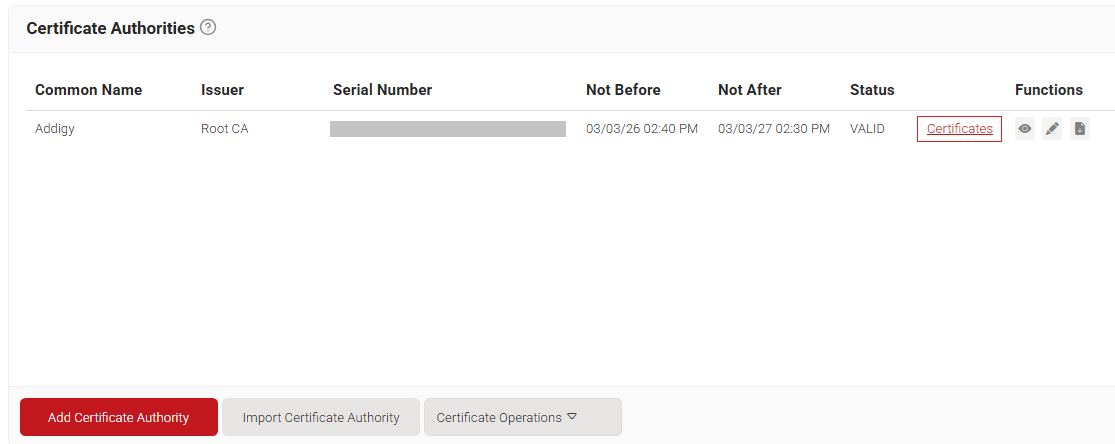
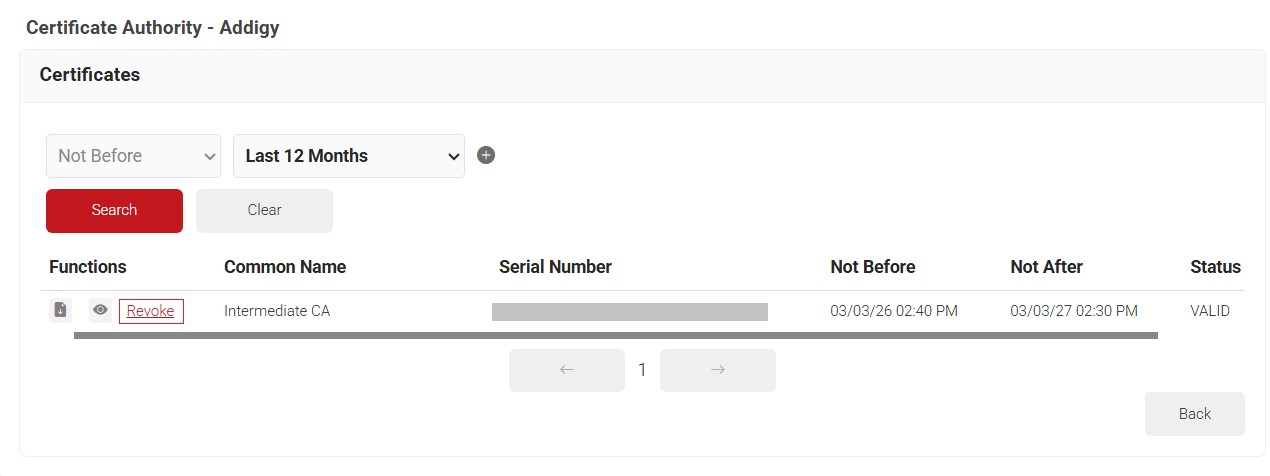
If you want to revoke digital certificates, you can do so easily in SecureW2 JoinNow Connector Public Key Infrastructure. Each Certificate Authority (CA) you build in the JoinNow PKI includes a Certificate Revocation List (CRL). When you revoke certificates in the platform, the PKI certificates are automatically added to the CRL.

  1. Go back to Certificates in the JoinNow Management Portal.
  2. Click Revoke on the certificate.
  3. If you try to connect to the SCEP Wi-Fi network, it will not automatically connect you.
    1. Instead, you’ll see a login credentials prompt.

Automated SCEP Certificate Deployment with Addigy and SecureW2

In this thorough guide, we’ve simplified the issuance of digital certificates and the development of a robust certificate policy to enhance network security and ensure a smooth user experience. Administrators may now easily assure the automated distribution of SCEP certificates across all managed Apple devices by seamlessly connecting Addigy and SecureW2. This potent combo leverages Addigy’s cloud-based MDM platform and SecureW2 advanced Public Key Infrastructure (PKI) to enhance network security while reducing administrative overhead.

With SCEP certificate deployment, MDM can automatically issue digital certificates, thereby enhancing network security and reducing administrative burdens. The combination of Addigy and SecureW2 provides your organization with a cost-effective, efficient certificate management solution that simplifies maintaining a secure network environment.

As you embark on this journey towards enhanced network security, consider our innovative products, such as Cloud RADIUS, which adds an extra layer of security to your network and is compatible with almost all Cloud Identity providers, including Azure, Google, and Okta.

Contact us to learn how Addigy and SecureW2 can transform your organization’s network security and authentication processes.