Configure SecureW2 for SSL Decryption on Palo Alto
Navigate to Device Onboarding and, underneath that section, select Getting Started.
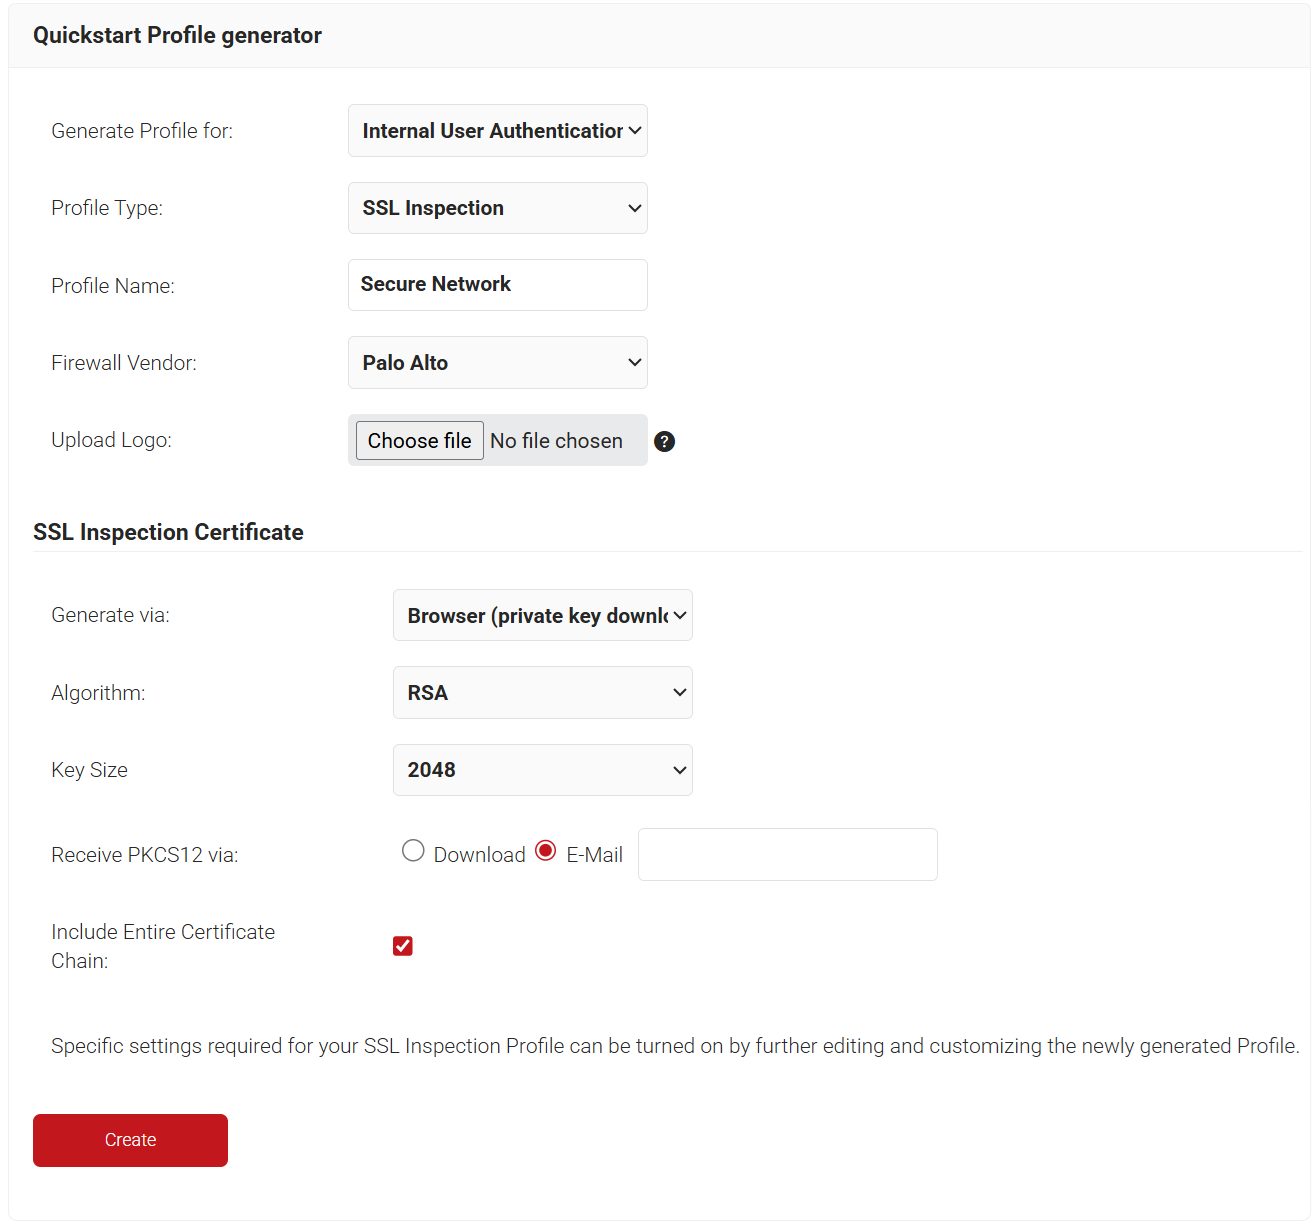
Here you will see our Getting Started Wizard, which configures everything you need to start your SSL Inspection deployment. Configure the wizard settings as shown in the screenshot below.
After clicking create, two things will happen.
- A .p12 file will be generated
- Before it is generated, you will be prompted to create a password, which will be used to password lock the .p12 file.
- This .p12 file is what will be uploaded to your SSL Inspection configuration.
- This .p12 file is only generated once. Make sure it’s saved in a safe place.
- A landing page will be generated
- This landing page can be used to install SSL Inspection certificates on end-user devices
- This landing page automatically detects the device’s operating system and deploys the appropriate client to install the certificate.
- However, we won’t use the landing page generated with this network profile. We will only use it to create the Root CA we need for SSL Inspection and to import that CA into the Network Profile we will create in the next step.
Now we need to generate the Root CA from this Network Profile and download it so it can be installed at the same time our VPN Certificate is configured on the device.
- Navigate to Dynamic PKI and select Certificate Authorities.
- Locate the Root CA that is associated with the Network Profile you just created.
- It should be named “Name of Network Profile” Root CA.
- Click Download.
While we’re here, we also need to download our Intermediate CA so that we can upload it to our Firewall later.
- Locate the Intermediate CA that is associated with the Network Profile you just created.
- It should be named “Name of Network Profile” Intermediate CA
- Click Download.
Configure SecureW2 for VPN
We need to run our Getting Started Wizard one more time, but this time to configure a Network Profile that will be used for enrolling our end users for a certificate that can be used for VPN, web applications, and many other things.
Navigate to the Getting Started Wizard like you did in the previous section, but this time, configure your settings as follows: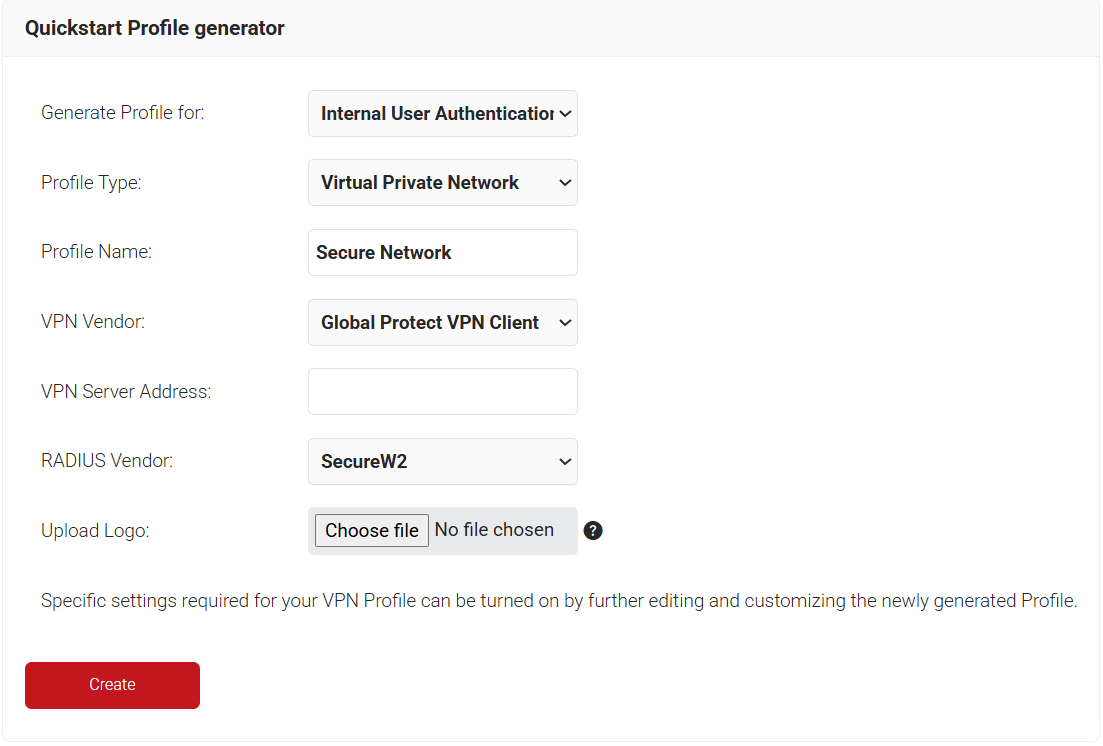
After the Wizard has finished, you will have a second Network Profile. We need to upload our SSL Inspection Root CA to our new Network Profile.
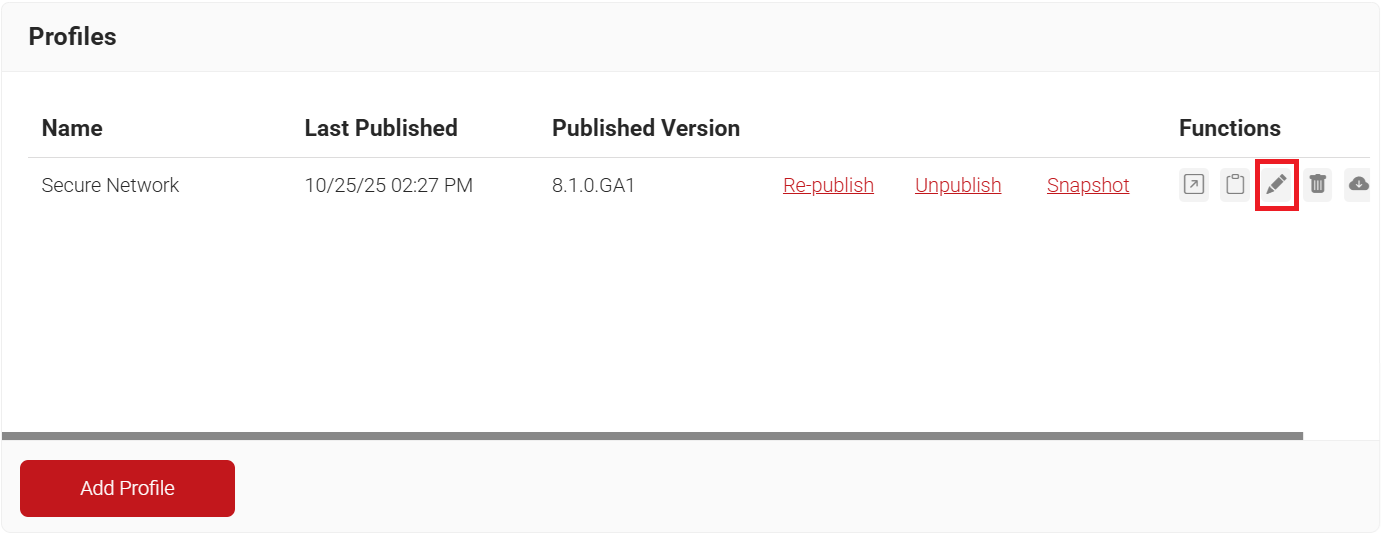
- Click Edit on our new network profile.

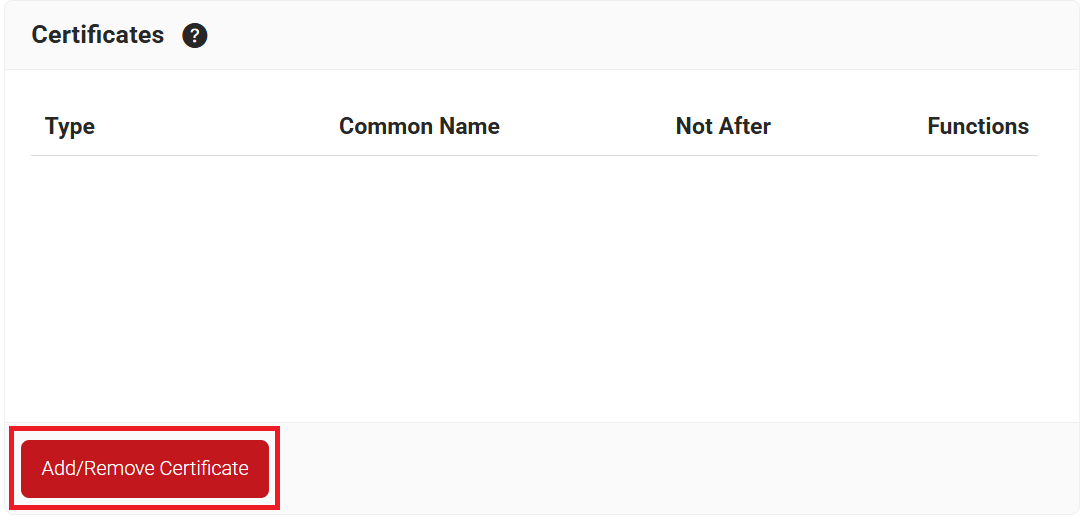
- Under the Certificates section, click Add/Remove Certificate.

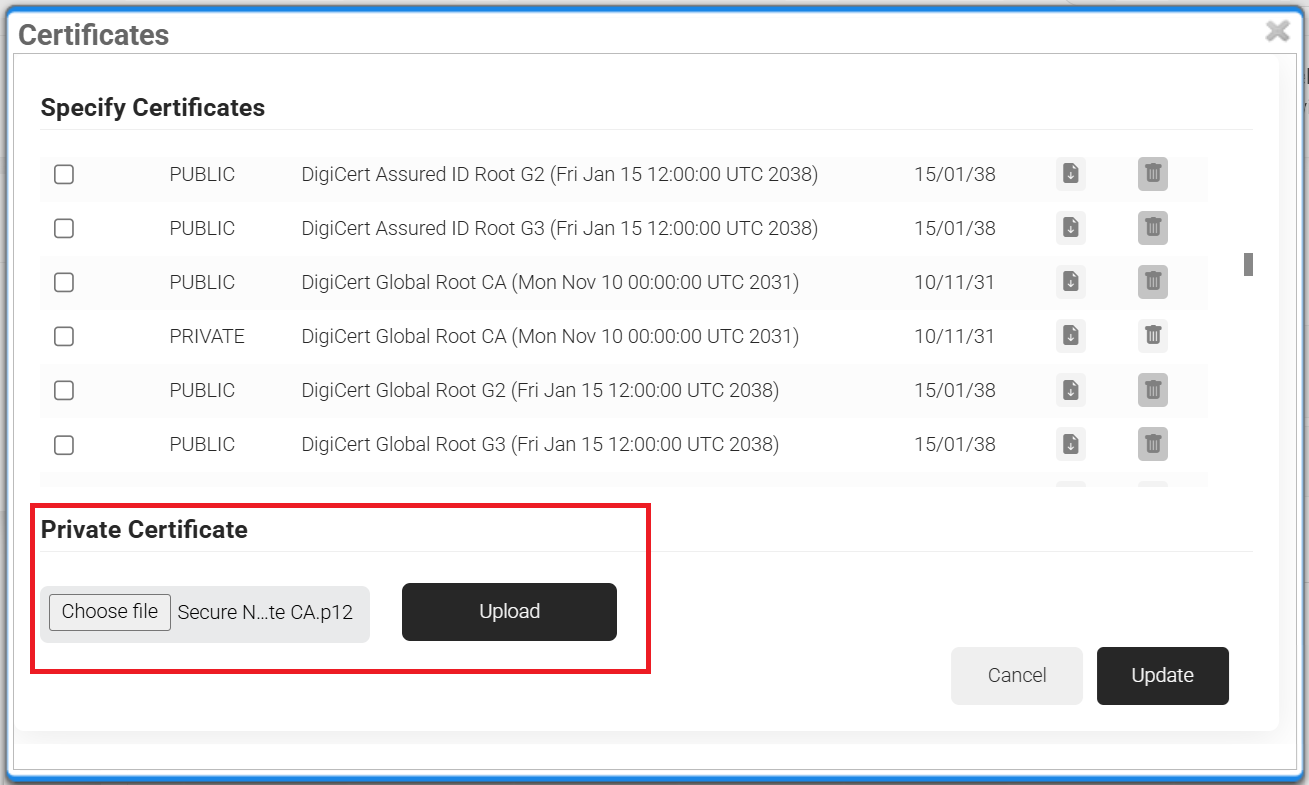
- Under Private Certificate, click Choose File and select the Root CA we downloaded in the previous section.

- Click Upload.
- Now, locate the Certificate we just uploaded in the Specify Certificate section, and check Install.
- Click Update.
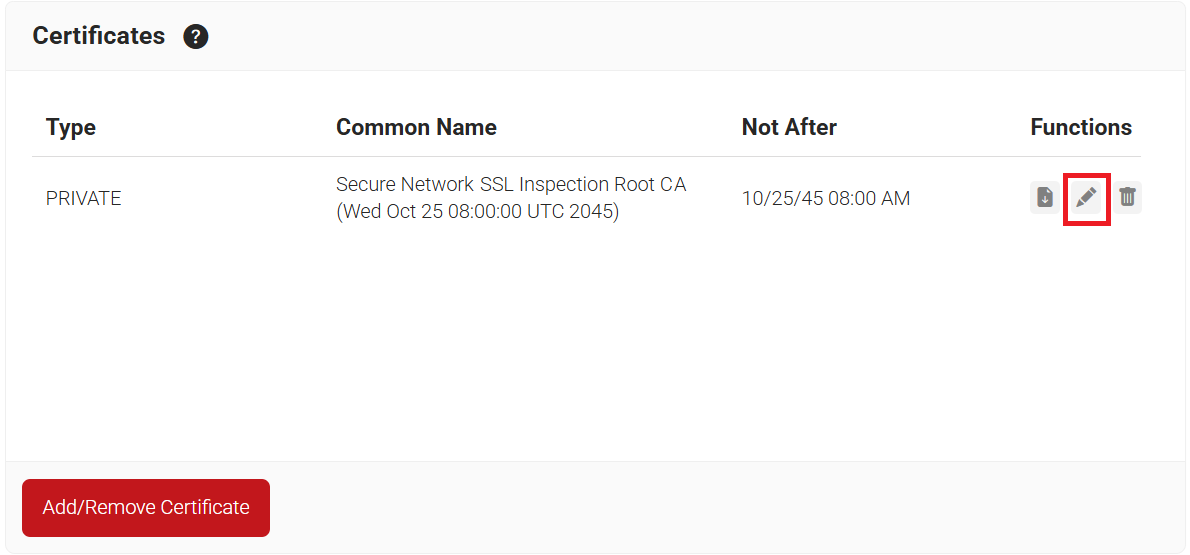
- The new certificate now appears in the Certificates section, and you click Edit.

- In the Additional Certificate Operations section, select the Use Certificate for SSL Inspection and Install in Firefox Certificate Store checkboxes.
- Click Update.
- Scroll to the bottom of the Profile edit screen and click Update.
- Click Re-publish on the network profile that you just edited to push your recent changes.
Lastly, we need to download our Root and Intermediate CAs that have been generated with this Network Profile, so we can upload them to Palo Alto for VPN Authentication.
- Navigate to the Dynamic PKI section and select Certificate Authorities.
- Locate the Root CA that is associated with the Network Profile you just created.
- It should be named “Name of Network Profile” Root CA.
- Click Download.
- Locate the Intermediate CA that is associated with the Network Profile you just created.
- It should be named “Name of Network Profile” Intermediate CA
- Click Download.
Import Intermediate CA for SSL Decryption on Palo Alto
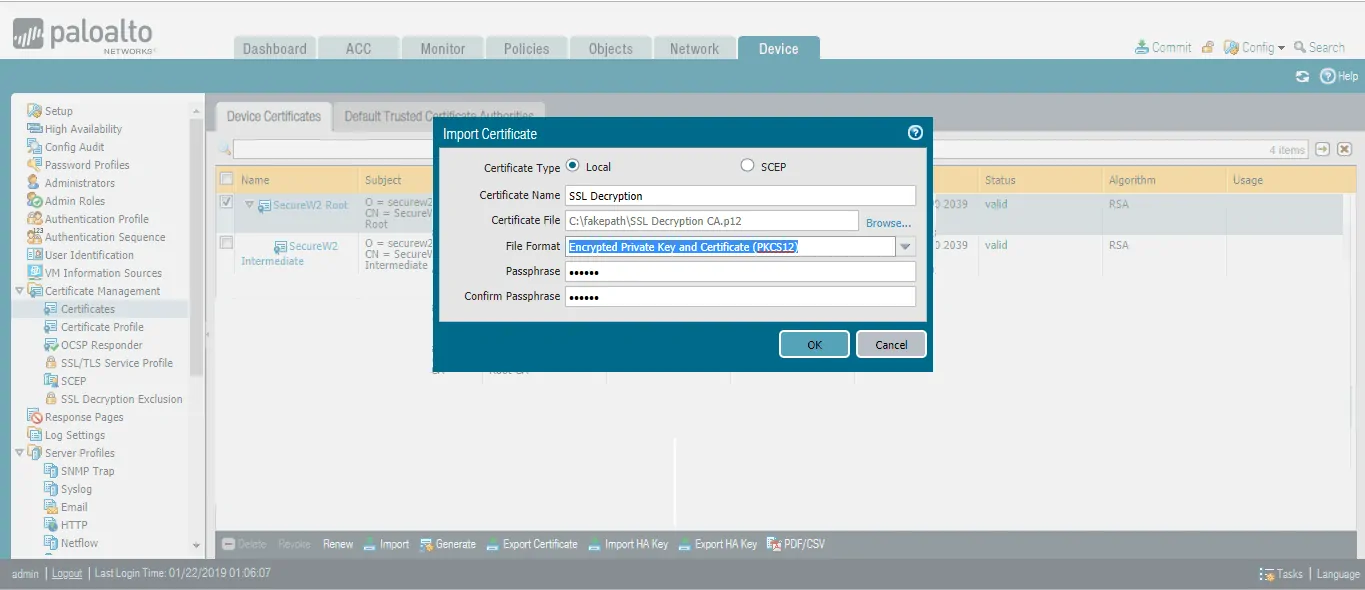
- Navigate to Device > Certificate Management > Certificates.
- Click Import to select the certificate and private key to be used for SSL decryption.

- Click OK to import the CA.
- Click on the imported CA.
- Select the Forward Trust Certificate and Forward Untrust Certificate options.

- Click Commit to commit the changes.

Creating Policies for SSL Decryption in Palo Alto
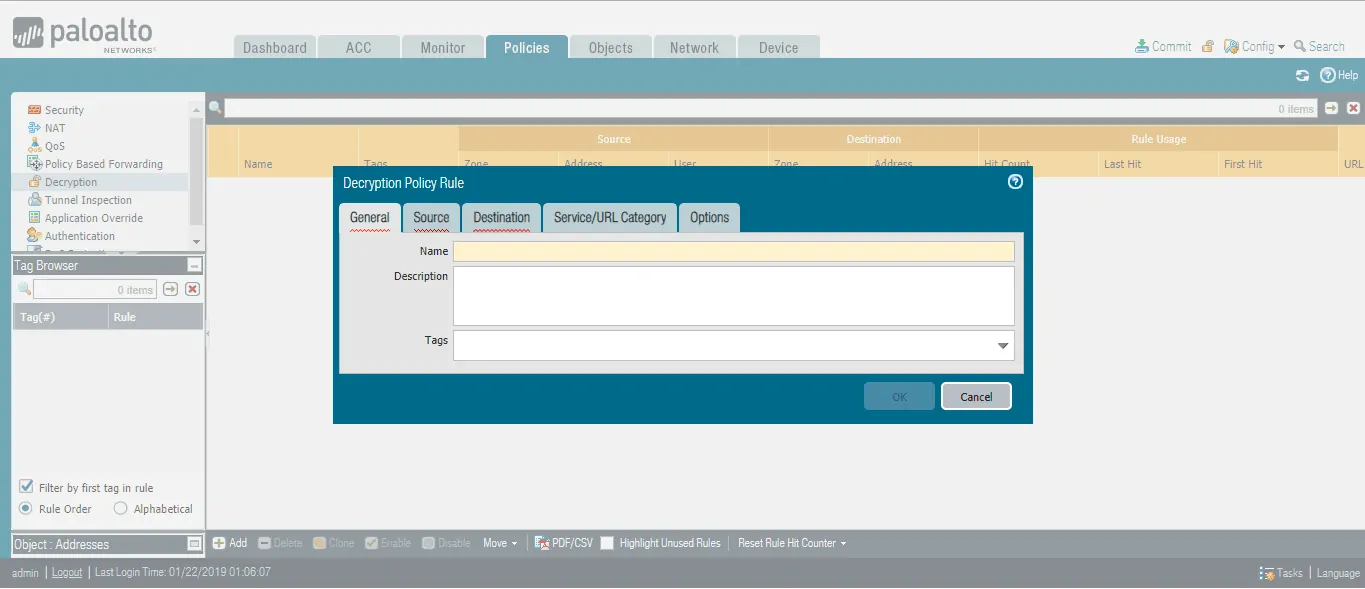
- Navigate to Policies > Decryption.
- Click Add to create a new SSL Decryption Policy.
- In the General tab, provide the Name of the Policy.
- Click the Source tab.
- Specify the source zone/address to which this policy is applied.
- Click the Destination tab.
- Specify the source zone/address to which this policy is applied.
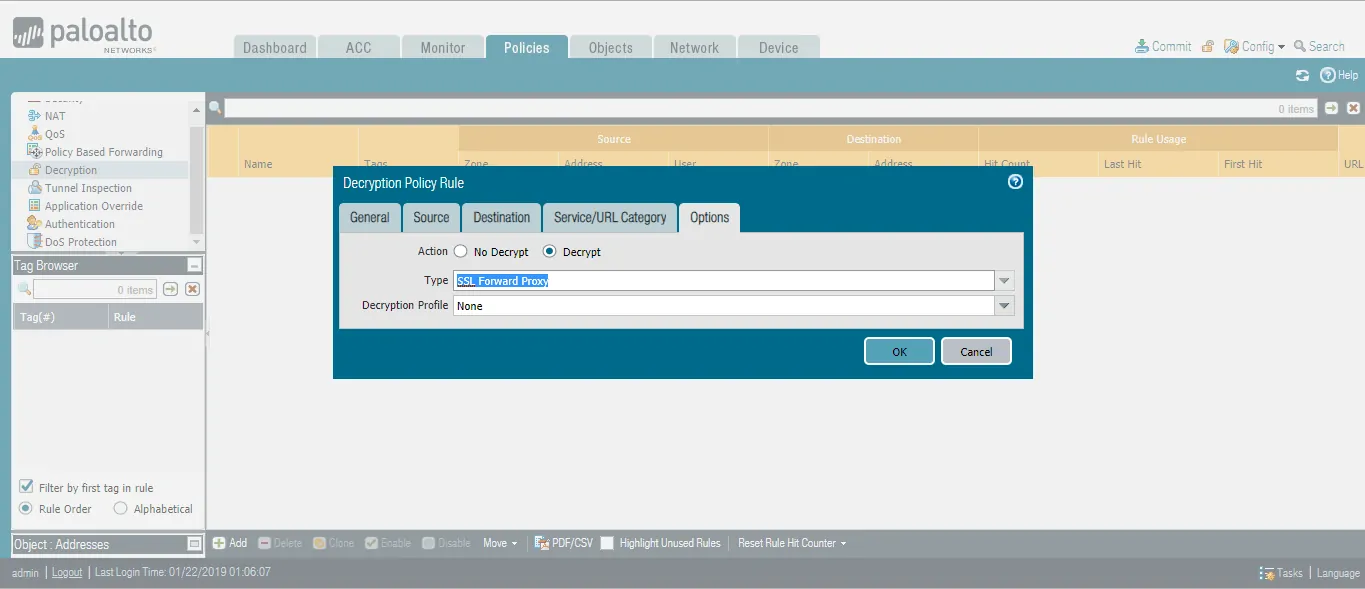
- Click the Options tab.
- Select Action as Decrypt.
- Select Type as SSL Forward Proxy.
- Optional (Create Decryption Profile)
- Click OK to save the changes.
- Click Commit to commit the changes.
Import VPN Intermediate and Root CAs to Palo Alto
- Navigate to Device > Certificate Management -> Certificates.
- Click Import.
- Upload both the Root and Intermediate CAs that we generated and downloaded in the Getting Started for Wi-Fi and VPN Section.
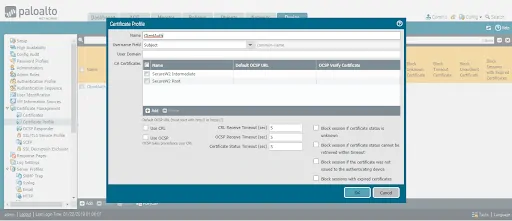
- Navigate to Devices > Certificate Management > Certificate Profile.
- Enter the name of the Certificate Profile.
- Click the Username Field drop-down list to select the certificate attribute to fetch the username.
- Under CA Certificates
- Click Add and select both Root and Intermediate CA certificates imported.
- Click CRL to set up the Firewall to download CRL files.

- Click OK to save the changes.
- Click Commit to commit the changes.
Set Up GlobalProtect Gateway for Remote Clients
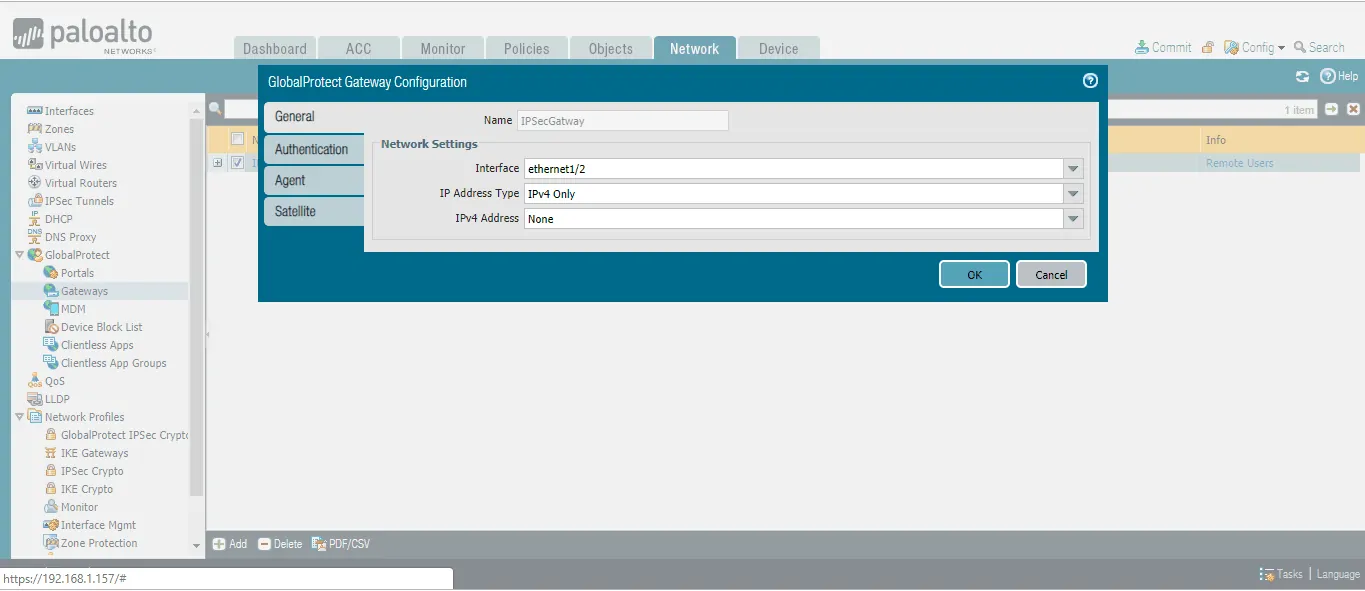
- Navigate to Network > GlobalProtect >Gateways.
- Click Add to create a new Gateway.
- Under the General tab, provide the name and configure the Network Settings.

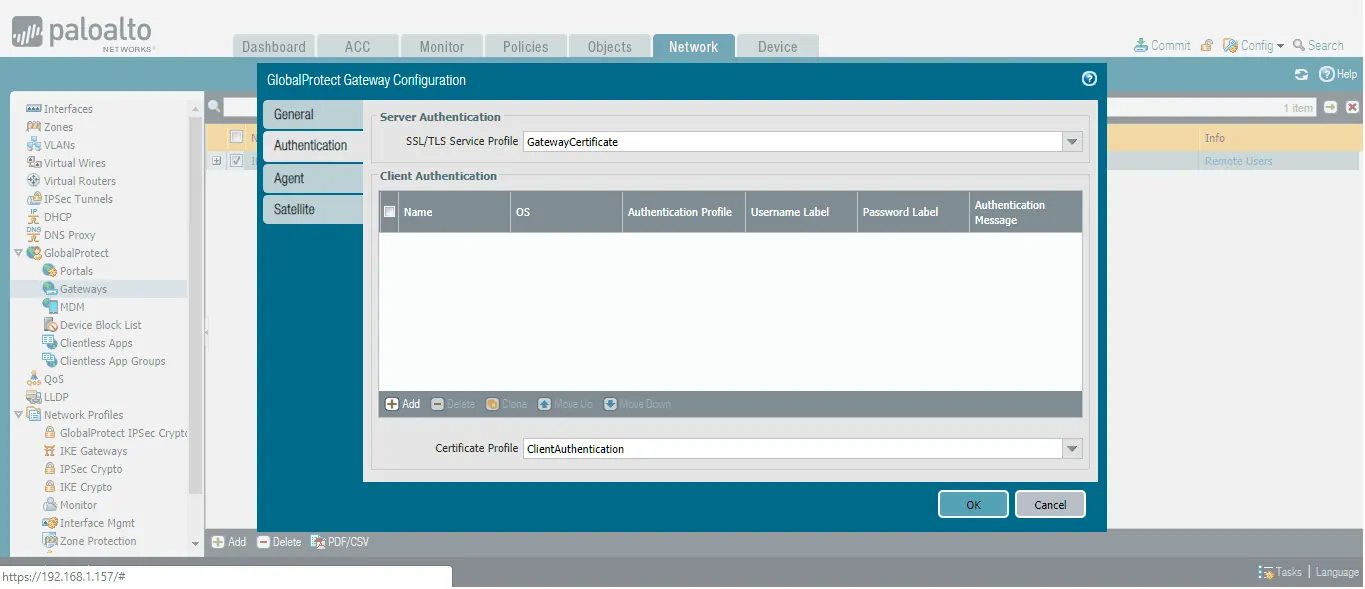
- Click the Authentication tab.
- Under SSL/TLS Service, select Firewall Certificate.
- Under Certificate Profile, select Certificate Profile.
- Click the Agent tab.
- Check to enable Tunnel Mode.
- Select the Tunnel Interface.
- Check to Enable IPSec.
- Click Ok to save the Gateway Configuration.
- Click Commit to commit the changes.
Configure GlobalProtect Portal for VPN
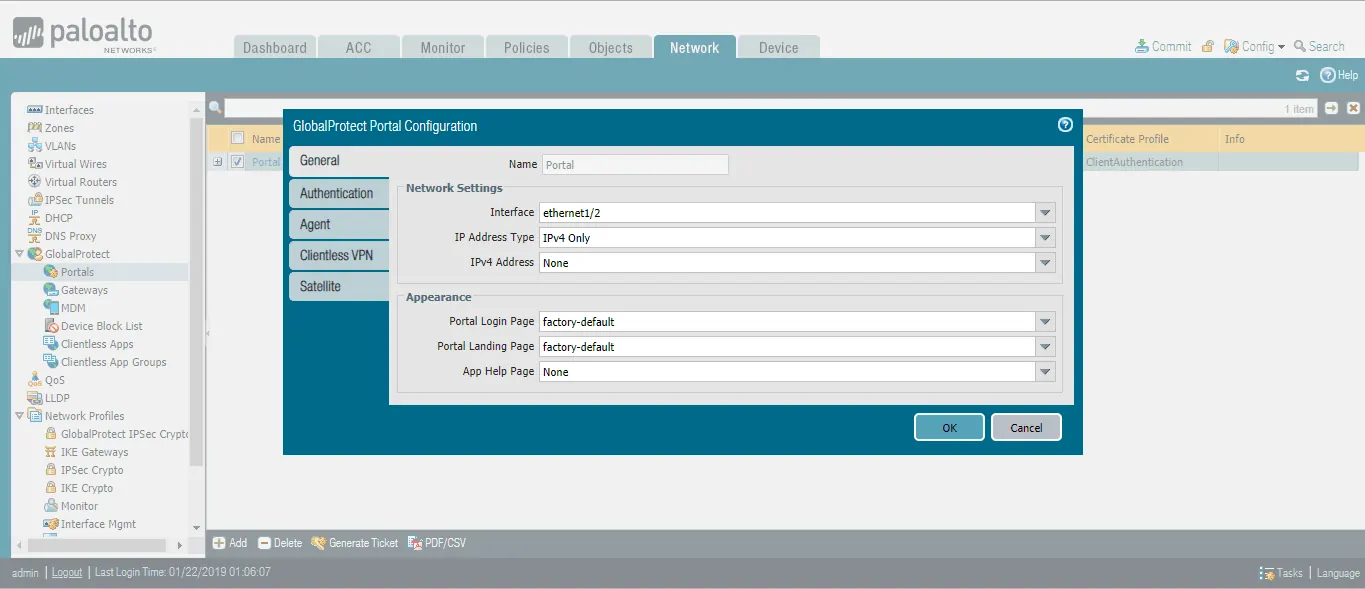
- Navigate to Network > GlobalProtect >Portals.
- Click Add to create a new Portal.
- Under the General tab.
- Provide a Name.
- Configure the Network Settings
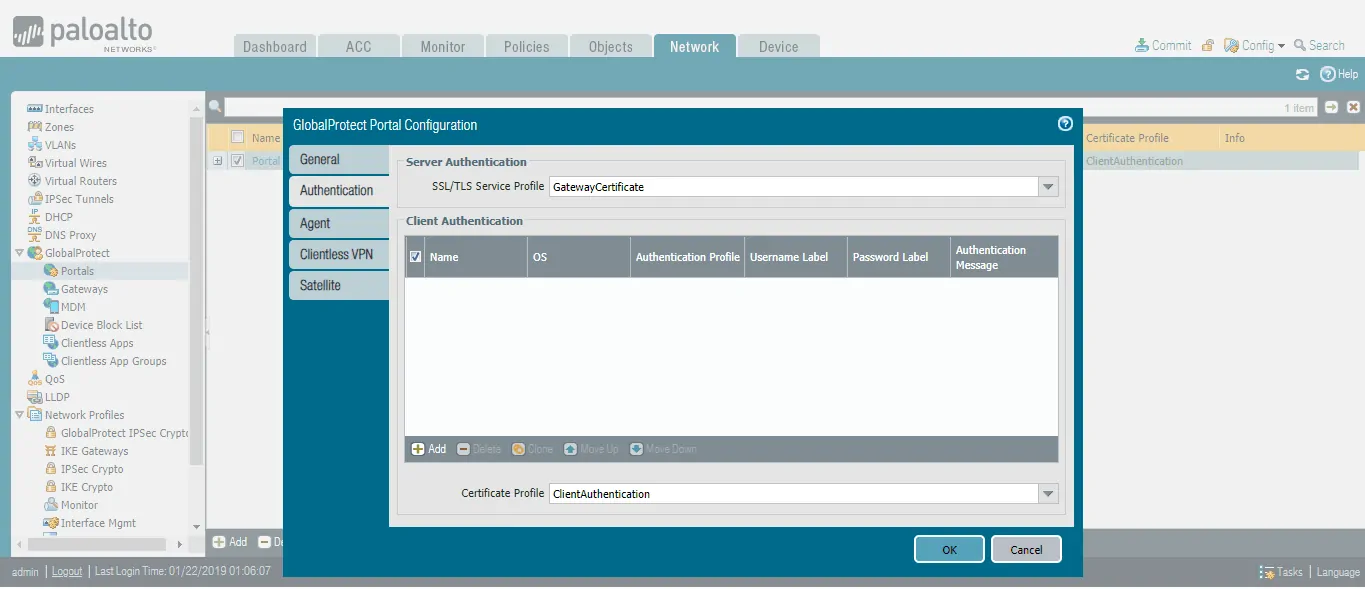
- Click the Authentication tab.
- (Here we are using the same interface and authentication settings for clients to connect to Gateway as well as Portal)
- Under SSL/TLS Service, select Firewall Certificate.
- Under Certificate Profile, select Certificate Profile.
- Click the Agent tab.
- Click Add.
- Provide a Name.
- Click User/UserGroup to map users/OS that can access this gateway. For this guide, we have used Any to allow access to everyone.
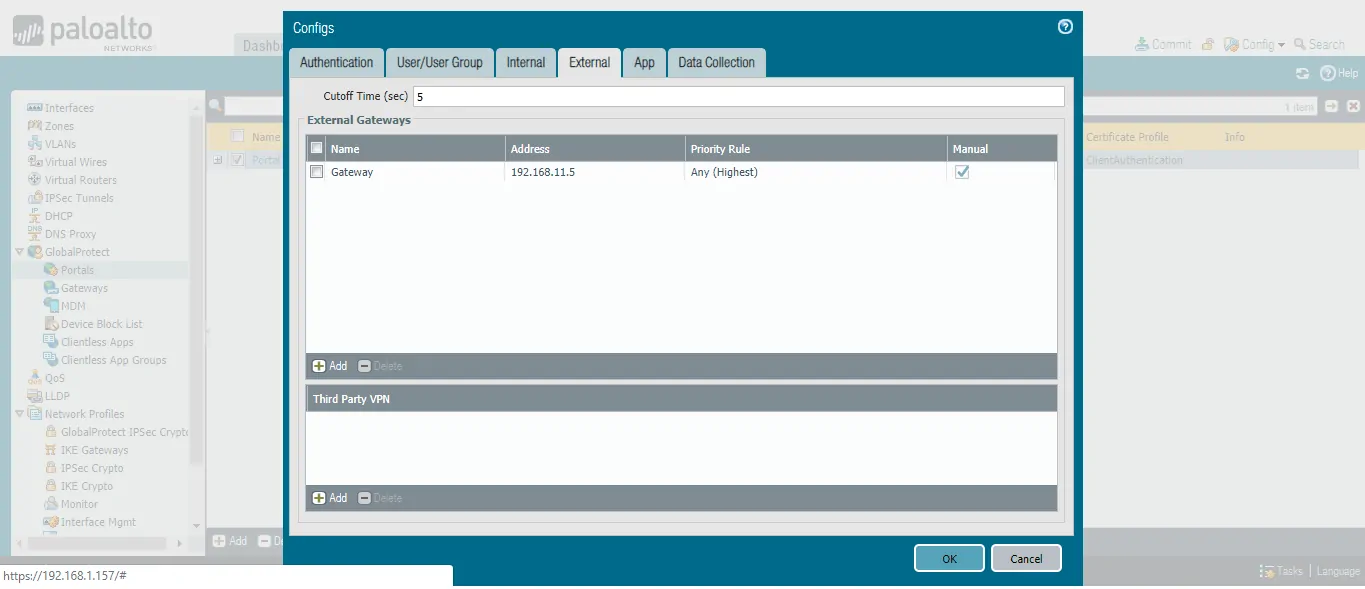
- Click the External tab and add the GlobalProtect Gateway we previously created.
- Click OK.
- Save the Portal Settings.
- Click Commit to commit the changes.
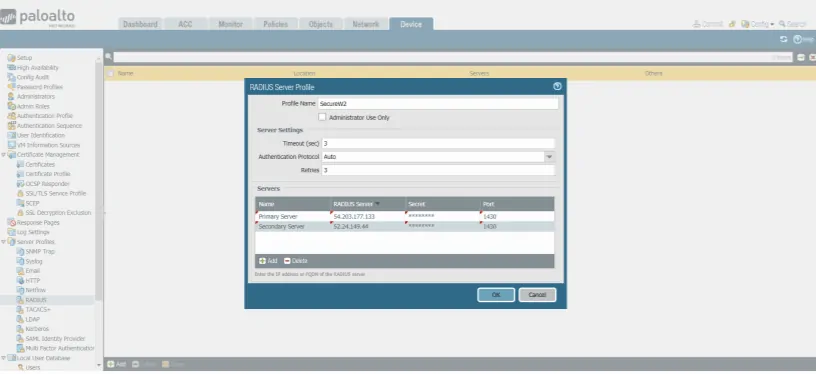
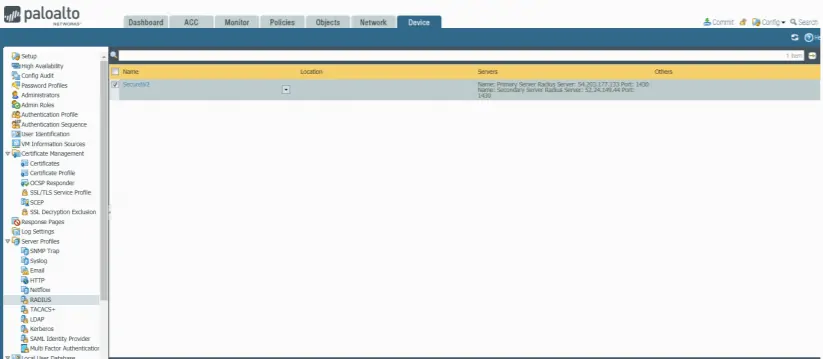
Configuring RADIUS Server in Palo Alto
To configure the RADIUS in Palo Alto, perform the following steps:
- Log in to Palo Alto.
- Under the Devices tab, navigate to Server Profiles > RADIUS.
- Click Add.
- Add the IP Address of the RADIUS Server, Shared Secret, and Port of the primary and secondary server.

- Click OK.