Introduction
Key Points:
- Access cnMaestro to create an Open SSID and direct traffic to SecureW2’s Landing Page, where users can be configured for 802.1x.
- Create a Secure SSID and then integrate SecureW2’s RADIUS server’s IP addresses and port number with cnMaestro to enable 802.1x.
- Paired with Cambium, SecureW2’s PKI and Cloud RADIUS present opportunities to automate and optimize 802.1x using real-time data from your identity and security systems.
By integrating SecureW2’s onboarding and PKI solutions with Cambium networks, your organization can effectively implement a robust, certificate-based 802.1xnetwork. Certificates negate the threat from over-the-air credential theft and ensure that only approved users can access the network. SecureW2 guarantees that a user cannot delete or transfer their certificate from their device. Your users will also be spared from password disconnect policies that require them to reconnect every network device. The costs in support tickets and wasted time is spared as certificates are configured once and set for life.
When enrolling users to the network, utilizing onboarding software is essentially a requirement if you want to maintain the security benefits you expect. Allowing manual configuration is a fast track towards misconfiguration, which can be detrimental to network security.
SecureW2’s onboarding software allows users to self-configure in minutes by completing a couple simple steps. Once complete, they are automatically authenticated to the secure network for the life of the certificate.
The below guide demonstrates the process of integrating SecureW2’s onboarding solution with Cambium networks. As a high-level overview, here are the basic steps to integrate:
- Configure SecureW2’s PKI Services
- Configuring and managing a PKI is not a simple task, so SecureW2 provides a cloud PKI to streamline the process. Our turnkey PKI services includes all the necessary tools to secure and distribute certificates to network users.
- Configure a Secure SSID as a WPA2-Enterprise EAP-TLS network
- Configuring and managing a WPA2-Enterprise EAP-TLS network is no easy task. SecureW2’s configuration guide simplifies the process so you can set up the network in hours instead of days.
- Add the SecureW2 RADIUS Server to the Secure SSID
- SecureW2’s certificate solutions integrate with all major RADIUS vendors, but our Cloud RADIUS is perfect for those that do not want to manage additional infrastructure. In addition to RADIUS, SecureW2 can provide all necessary tools to implement certificate-based authentication (PKI, CRL, Certificate Authorities, Management Software, and more).
- Configure the Onboarding SSID and Landing Page
- To navigate users to the onboarding software, a common solution is the use of an onboarding SSID. Once connected, users will be redirected to a customizable landing page that guides them through onboarding software.
To complete this setup, you need to have already configured:
- A SecureW2 Network Profile
- Cambium Networks Access Points and controller
Creating an EAP-TLS Network Profile
- Log in to the JoinNow Management Portal.
- Navigate to Device Onboarding > Getting Started.
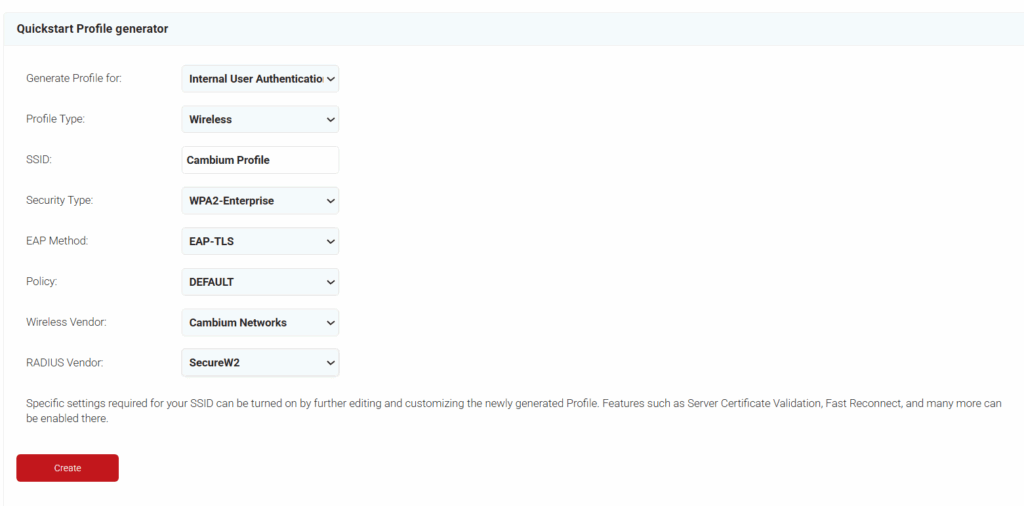
- On the Quickstart Network Profile generator page, from the Profile Type drop-down list, select Wireless.
- In the SSID field, type the name of a profile.
- From the Security Type drop-down list, select WPA2-Enterprise.
- From the EAP Method drop-down list, select EAP-TLS.
- From the Policy drop-down field, retain DEFAULT.
- From the Wireless Vendor drop-down list, select Cambium Networks.
- From the RADIUS Vendor drop-down list, select a RADIUS vendor.

- Click Create.
Creating an SSID
- Login to cnMaestro (Cambium Networks Wireless Network Manager)
- Click New WLAN
- Create a new WLAN using the same SSID Name as early created for the SecureW2 Network Profile
- The new SSID gets added to the WLANs list as shown in the screenshot below

Configuring the SSID to Authenticate with 802.1x
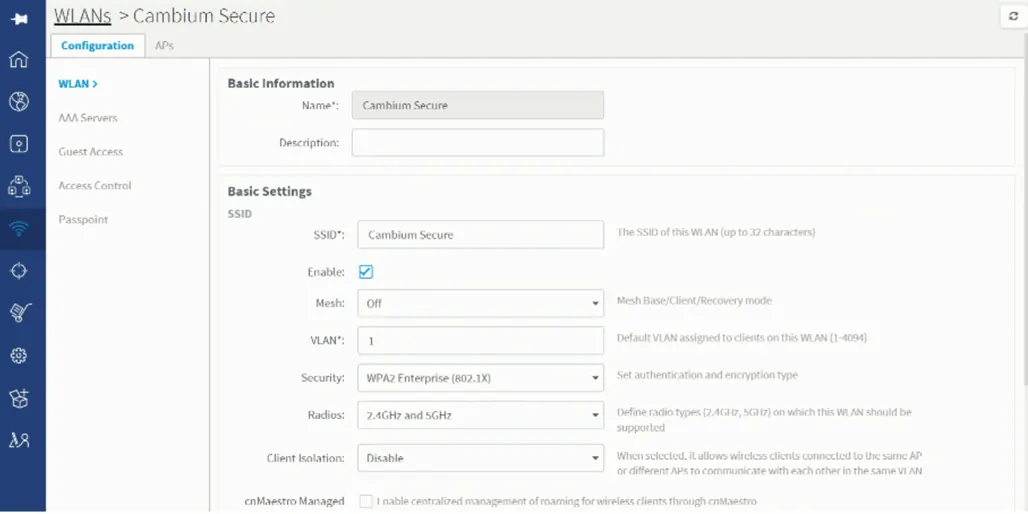
- Click the name of the newly created SSID under WLANs in the earlier section and the following screen will appear

- Navigate to Configurations > WLANs > Basic Settings
- Select WPA2-Enterprise (802.1x) from the Security drop-down list
Adding the SecureW2 Cloud RADIUS Server to Cambium
- Click Configurations > AAA Servers
- In the SecureW2 Management Portal, navigate to and click AAA Configuration under AAA Management
- Copy the Primary IP Address, Shared Secret, and Port and paste them in the 1. Host, Secret, and Port fields, respectively
- Navigate back to the SecureW2 Management Portal and copy the Secondary IP Address, Shared Secret, and Port and paste them in the 2. Host, Secret, and Port fields, respectively
- Click Save
Onboarding Devices for WPA2-Enterprise
- Click the name of the open SSID under WLANs in cnMaestro
- Navigate to Configurations > WLANs > Basic Settings
- Select Open from the Security drop-down list
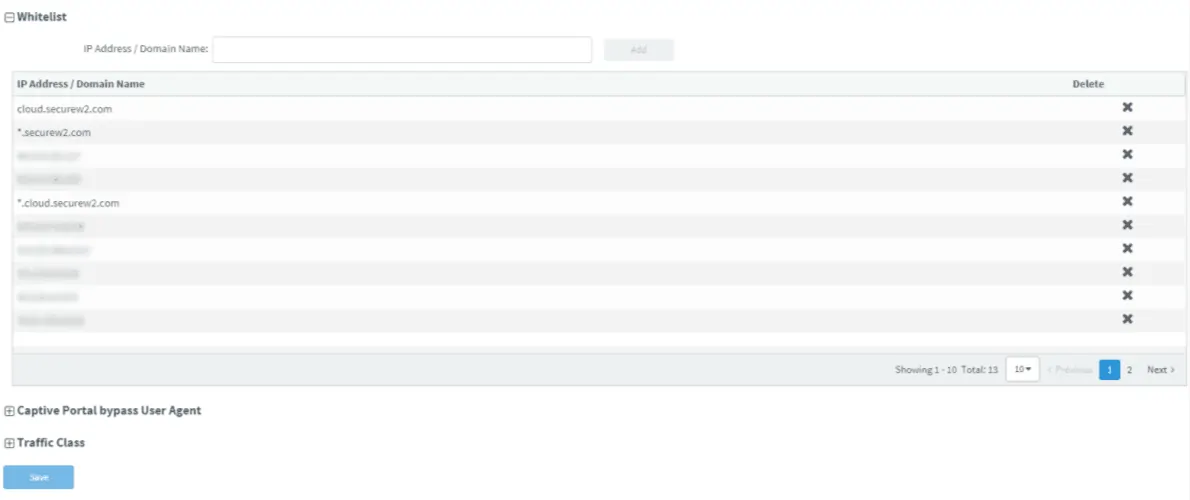
- Navigate to Configurations > WLANs > Guest Access
- Under Whitelist, in the IP Address/Domain Name section, enter in the names that you want to permit in the walled garden and click Add
- Click Save

Configuring Redirect to SecureW2 Landing Page
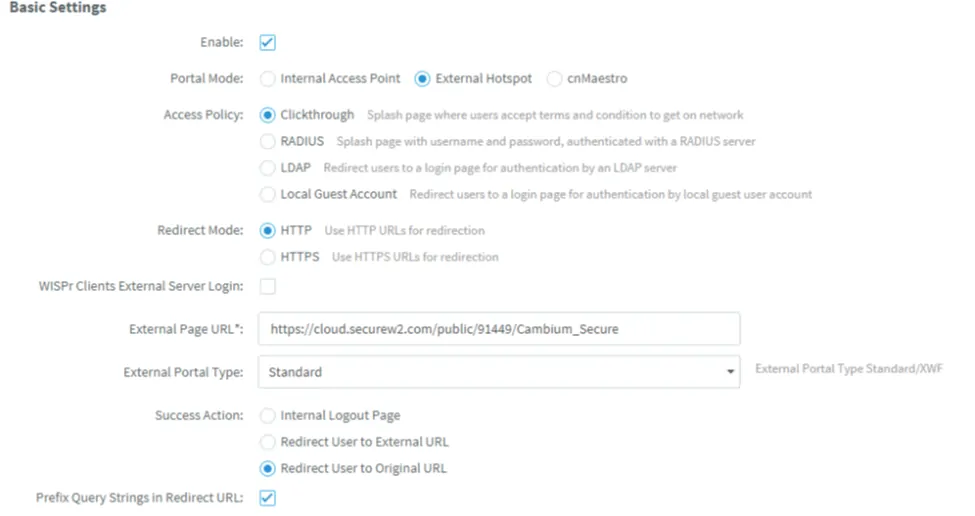
- Navigate to Configurations > WLANs > Guest Access
- Click View on the Network Profile configured earlier and paste it in the External Page URL field
- Click Save
