Set Up ClearPass Policy Manager RADIUS for EAP-TLS

Upgrading from credentials to certificates can seem daunting, but SecureW2 has turnkey solutions that let you make the switch while keeping your current infrastructure.

We offer a full PKI suite with a la carte components – we can use your existing ClearPass RADIUS server or we will migrate you to our world-class cloud RADIUS server. Our PKI Services allow you to easily generate CA’s, custom Base and Delta CRL’s, leverage our Managed Device Gateway API’s, and much more. A clean, intuitive management portal provides visibility into the enrollment and configuration of devices, and you can manually revoke certificates as you wish.

No matter where your organization is at, we can guide the transfer to EAP-TLS with your CPPM RADIUS Server. You’re only a couple hours away from the simple and seamless user experience and nigh-impenetrable security that digital certificates provide.

Tech Overview

  1. Add SecureW2’s Root and Intermediate CA to the CPPM Trust List
    • SecureW2 PKI Services allows you to generate certificate authorities. Integrate them to your CPPM RADIUS so it will allow devices to authenticate after they’ve been enrolled and configured with SecureW2’s best-in-class onboarding software.
  2. Configure Clearpass Policy Manager for EAP-TLS
    • Just a few swapped settings will enable your CPPM server to utilize EAP-TLS and send and receive certificates.
  3. Configure Identity Lookup
    • To ensure the RADIUS has access to the active directory to validate certificates, we need to register SecureW2 as an approved party.
  4. Set up Certificate Revocation List
    • SecureW2 generates and manages your CRL so that you don’t have to, all we need to do is upload the CRL URL to our RADIUS.

To complete this setup, you need to have already configured :

  • A CPPM RADIUS Server
  • A SecureW2 Network Profile
  • An Identity Provider


Configure Clearpass Policy Manager Trust List for SecureW2

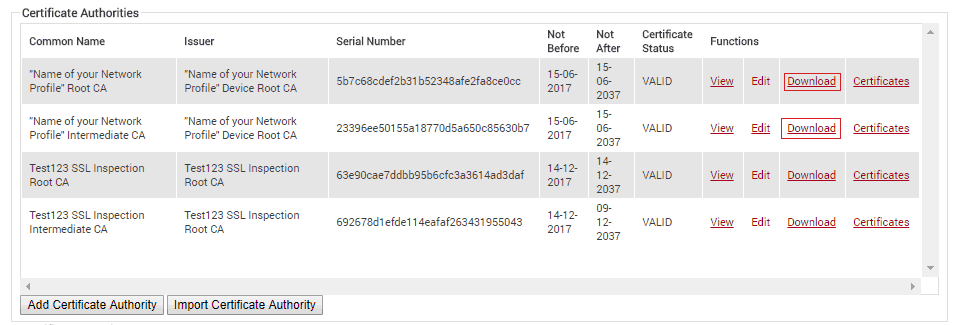
  1. Click Certificate Authorities under PKI Management
  2. Download the Root Certificate and the Intermediate Certificate
  3. Go to the ClearPass Policy Manager Page, navigate to Administration, and click Trust List
  4. Click Add and then Browse
    • Here we will upload the recently downloaded certificates
  5. Locate the certificates in your folder, click Open, and select Add Certificate (the names of your root and intermediate certificate will be the name of your organization)
  6. Check that the certificates are valid and enabled in the Trust List by typing the name of the certificates in the search bar

Confirmation that the certificates created are valid


Enable EAP-TLS on Clearpass Policy Manager

  1. In the ClearPass Policy Manager page, click Services
  2. Click Add, and in the drop-down for Type, change the value to 802.1X Wireless
    • The first service rule has been changed to wireless
  3. Delete the second service rule
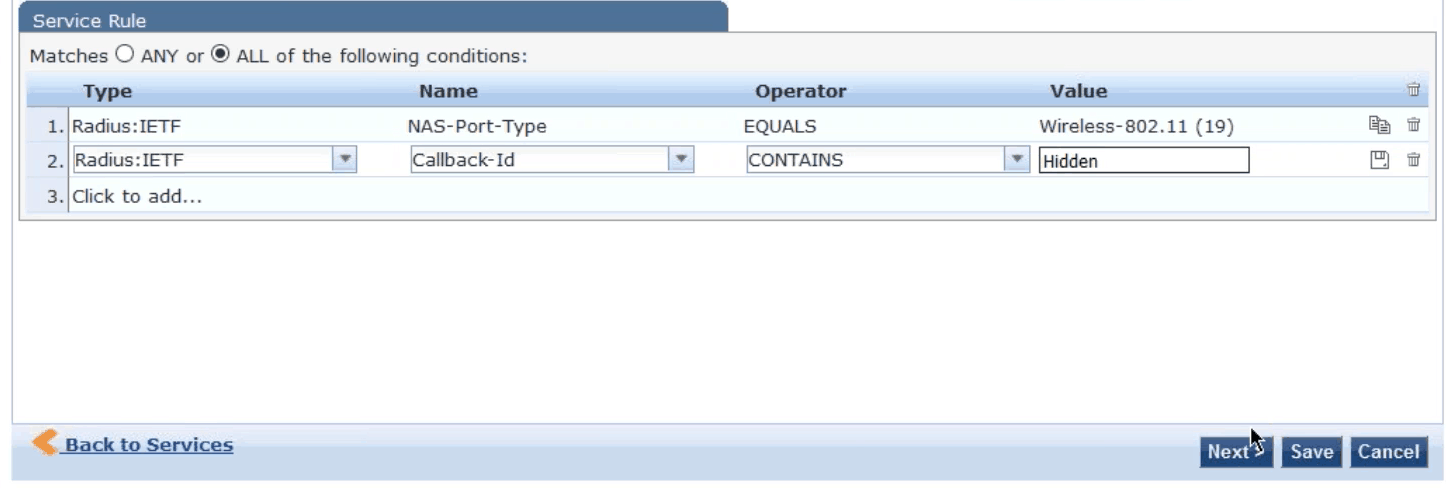
  4. Create a new service rule to specify the SSID for authentication requests by clicking Click to add and choosing RADIUS: IETF in the Type field
    • In the Name field, choose Callback-ID
    • In the Operator field, choose CONTAINS
    • In the Value field, enter the name of your SSID
  5. Click the Authentication tab, then in the Authentication Methods section, delete all except EAP-TLS
    • If you are going to use PEAP-MSCHAPv2 in conjunction with EAP-TLS, do NOT delete it in Authentication Methods
  6. In the Authentication Sources section, add Customer CAS (Active Directory)
  7. To configure roles, click the Roles tab
  8. For the Roll Mapping Policy, click the dialog box and choose the [Guest Roles]
    • You can get very specific with the roles you assign, but for now, the default guest roles will suffice
  9. Click Save

Setting up a Service Rule in CCPM for EAP-TLS Authentication

Configure Identity Lookup on Clearpass Policy Manager

  1. Click Configuration, and in the Authenticating section, click Sources
  2. Double-click Customer CAS (the active directory) and navigate to the Attributes tab
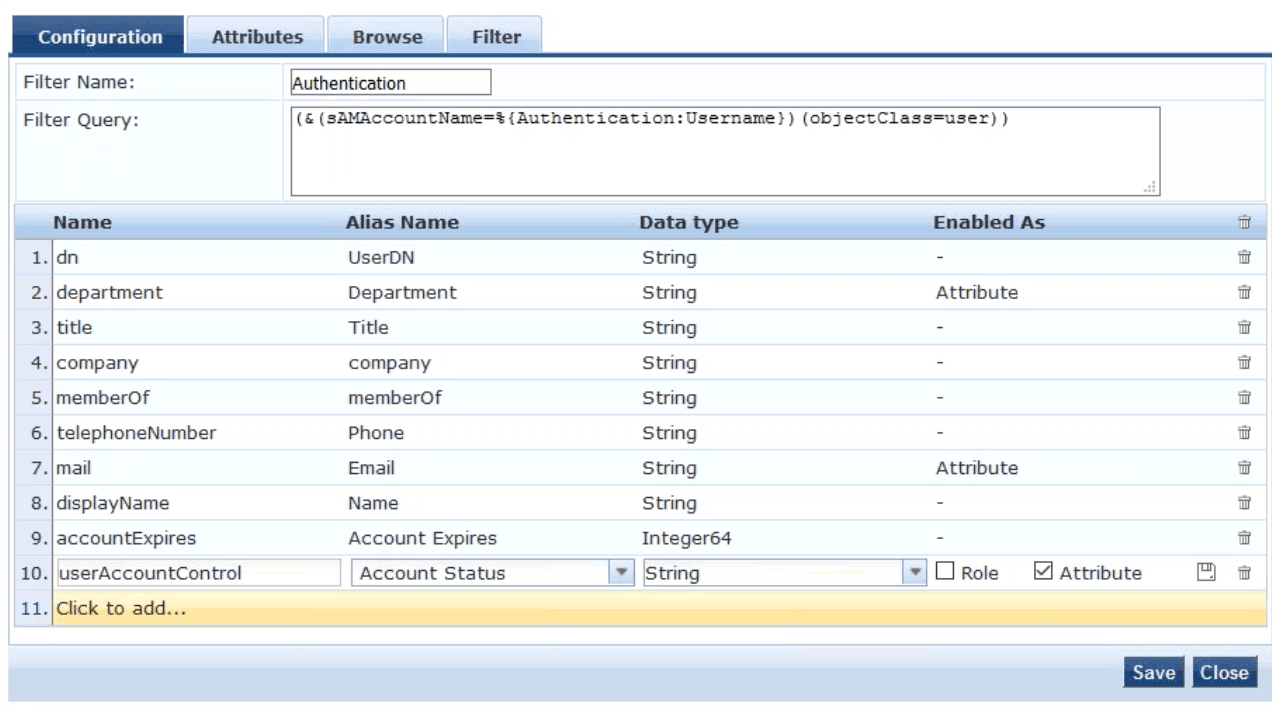
  3. Click Authentication under the Filter Name column
  4. In the bottom row, click Click to add… and add attribute userAccountControl
    • For the Alias Name, enter Account Status
    • For the Data Type, enter String
    • In the Enabled As section, check the box next to Attribute and click Save

Showing the correct settings and entries for Identity Lookup

Now that our Identity Lookup is configured to include this attribute, we have to go back to our Authentication Source to ensure that LDAP is sending over these attributes.

  1. Go back to the Authentication Source Customer CAS, navigate to the Attributes tab, and click Authentication in the Filter Name column
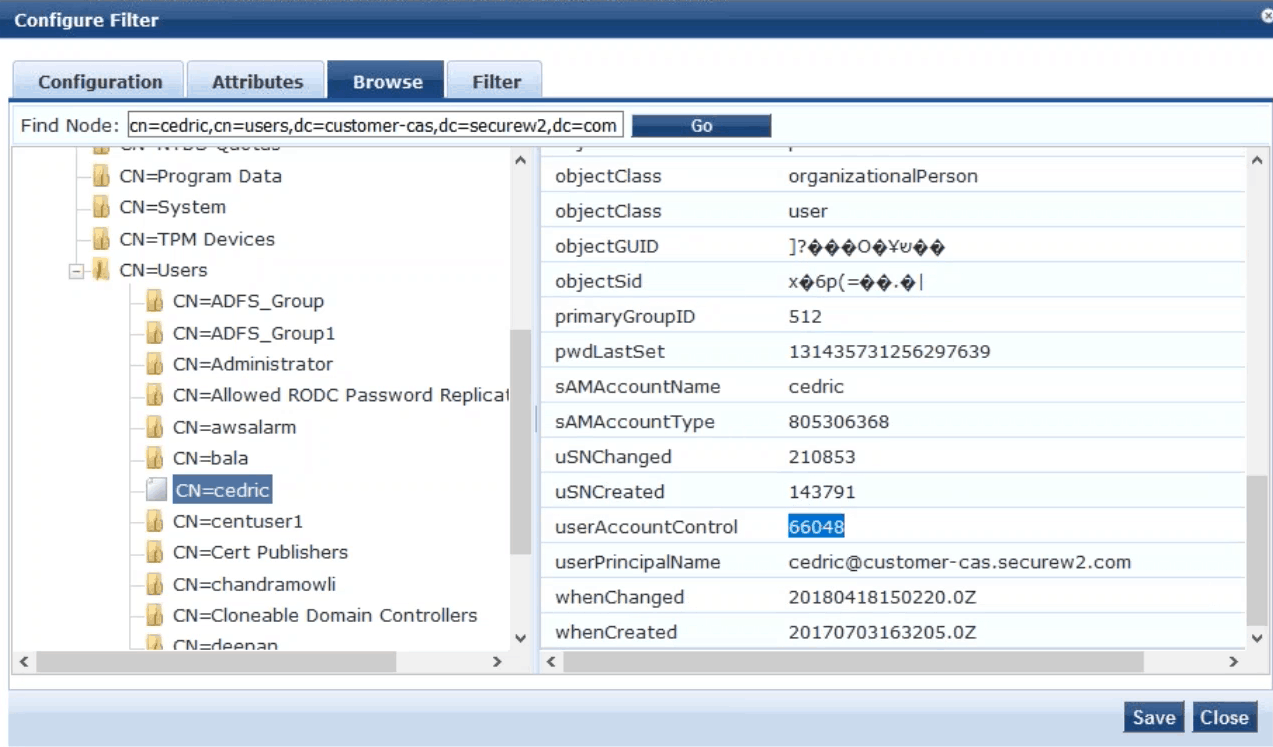
  2. In the Configure Filter window that appears, go to the Browse tab
  3. Click on the folder for your organization, and click CN=Users and click on the test user we previously created

Checking the LDAP to ensure that attributes are correctly sent

  • Check to see that userAccountControl is visible with a value assigned
    • If you see 66048, it means the user is enabled
    • If you see 66050, it means the user is disabled

To ensure that Authorization is enabled, you must:

  1. Navigate to Services and click on the SecureW2 CPPM RADIUS Server
  2. From here, click on the Service tab and check under More Options that the Authorization box is checked
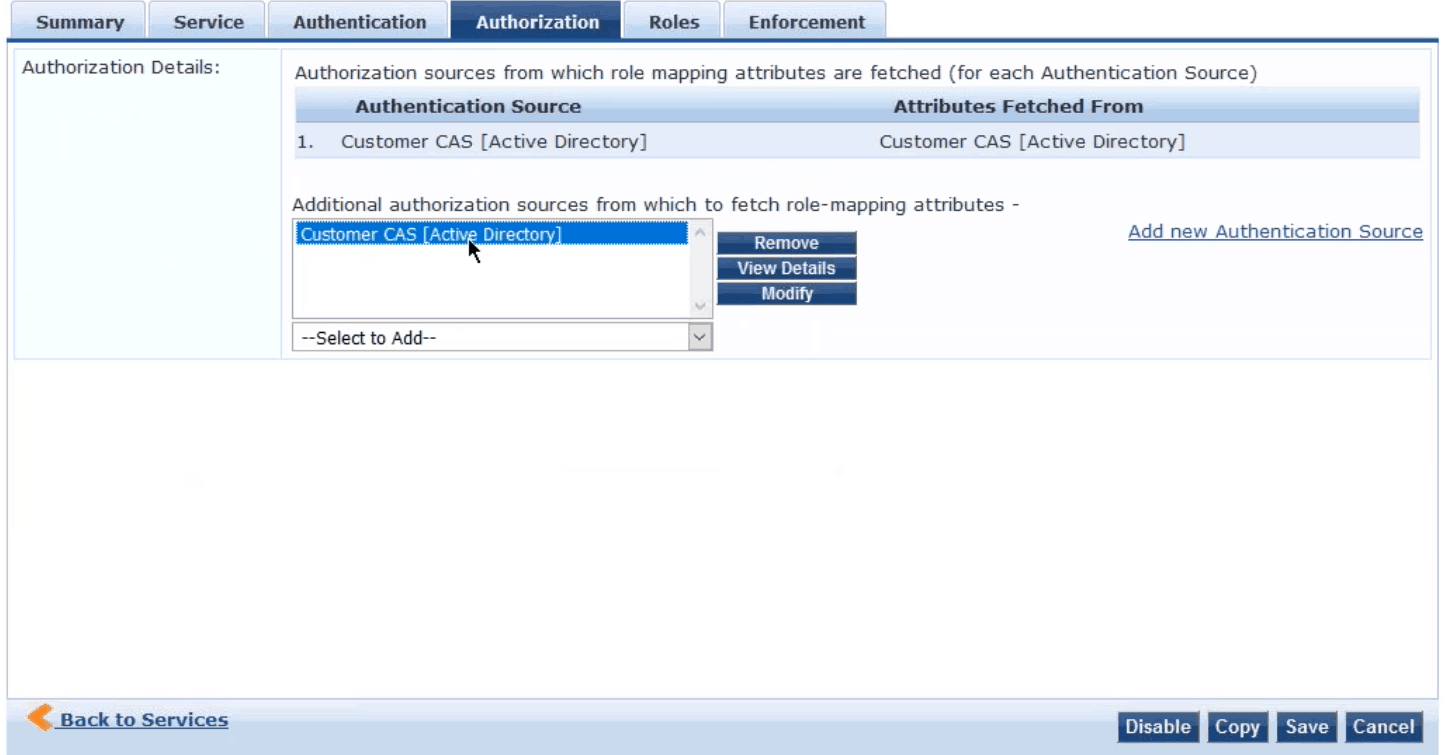
  3. If you go to the Authorization tab, make sure that the Authentication Source is the one previously configured, Customer CAS
    • Customer CAS should also be included in the Additional authorization sources box shown below
  4. Click Save

Configuring the CAS to authorize users

Adding a CRL to Clearpass Policy Manager

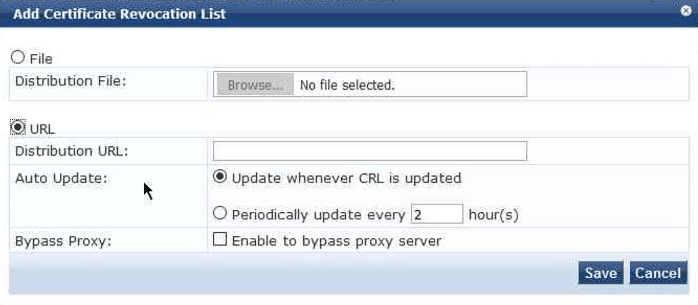
  1. In the ClearPass Policy Manager, navigate to Administration > Certificates > Revocation List
  2. Click Add
  3. In the window that appears, select URL

Location that the CRL will be added

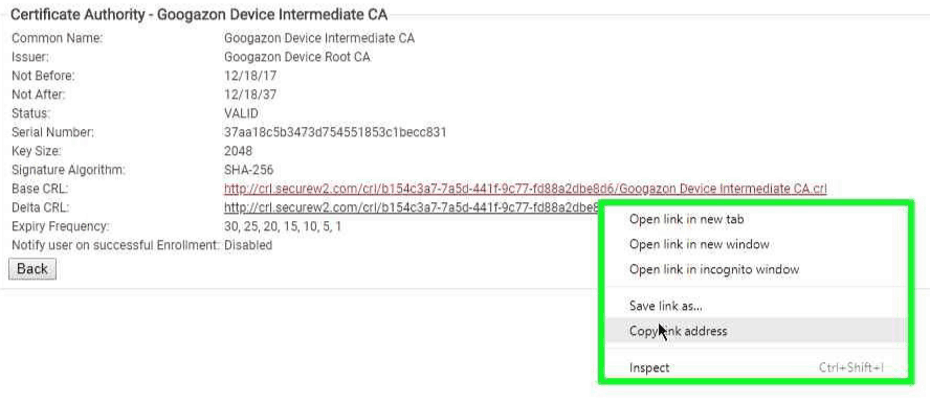
  1. Navigate to the SecureW2 Management Portal, and click Certificate Authorities under PKI Management
  2. Click View that corresponds to the Intermediate CA and right click on the Base CRL link and click Copy Link Address

Copying the link address of the CRL

  1. Navigate back to the ClearPass Policy Manager and paste the URL in the Distribution URL field
  2. Click Save, and the CRL list has been added and will be checked


Concluding Thoughts

With the final Save click, the wireless network is configured for WPA2-Enterprise with EAP-TLS authentication. Now, network users will only need to complete the onboarding process once for uninterrupted and secure Internet use. Network administrators will see their IT help desk tickets reduced and if a problem should arise, they can easily diagnose the problem.

Certificate-based 802.1x authentication will eliminate password-related disconnects and MITM attacks, tie users and devices to network connections, improve network performance, and much more. Historically, setting up this type of network would have taken weeks, but with SecureW2, setting up certificate-based authentication with a ClearPass Policy Manager RADIUS server can take just a few hours.

So if you’d like to try out SecureW2, or have any questions about how we integrate with ClearPass Policy Manager RADIUS server, drop us a line! Our solutions are very affordable and can be tailored to organizations of any size. Click here to see our pricing.

ClearPass and ClearPass Policy Manager are either registered trademarks or trademarks of Hewlett Packard Enterprise Development LP in the United States and/or other countries. Other trademarks, logos and service marks used in this site are the property of SecureW2 or other third parties.