An X.509 digital certificate offers better passwordless authentication than legacy credentials as they rely on public-private cryptography, making them phishing-resistant. Organizations like Microsoft and Google have strongly advocated using a digital certificate for better user and device-based network security.
However, certificate management in Google Chromebooks is tedious as Google doesn’t provide native solutions for auto-enrollment of a digital certificate to Chromebooks. Legacy Microsoft certificate enrollment protocol solutions don’t work well on Chromebooks either.
That is where the Simple Certificate Enrollment Protocol (SCEP) comes into place. The Simple Certificate Enrollment Protocol (SCEP) instructs a device to communicate using a Gateway API URL to a PKI. SecureW2’s Managed Device Gateway API solutions automate certificate distribution in Chromebooks.
Switching to Securew2s Managed Device Gateway API solution will help tie your existing infrastructure to use JSON, similar to the Simple Certificate Enrollment Protocol (SCEP), to manage Google devices for superior user and device management.
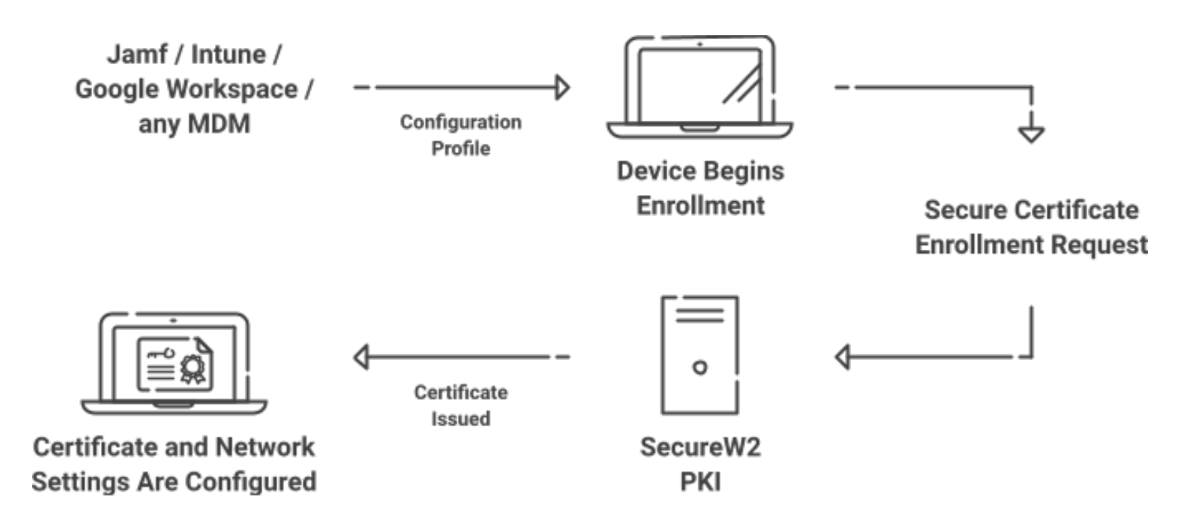
This document will guide you to configure your Managed device to auto-enroll for a digital certificate for EAP-TLS authentication through the SecureW2s Management Portal.
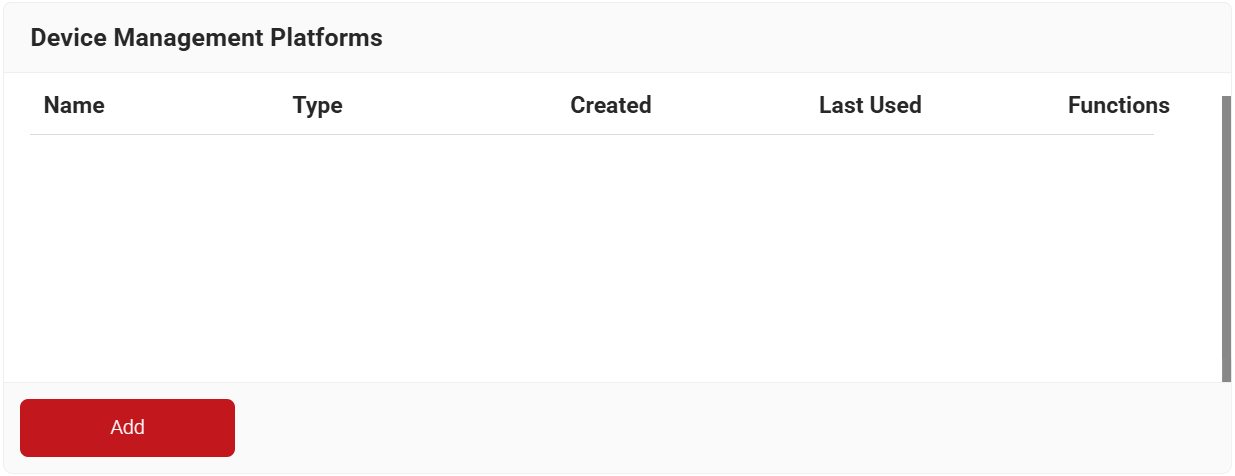
First, we need to create a Device Management Platform in SecureW2. This is necessary for Google and SecureW2 to securely communicate with each other to validate that users and devices deserve certificates.
Then, we need to create a Network Profile, which is used to determine which EAP method is to be used for authentication. An EAP protocol should be used to obtain a primary mechanism to gain identity without the use of an identity response.
SecureW2 recommends the use of EAP-TLS as it provides a mechanism to determine both user and server identity through a digital certificate for your device.
- Log in to the JoinNow Management Portal.
- Navigate to Integration Hub > Device Management Platforms.
- Click the Add button.

- Under the Basic section, in the Name field, enter the name of the device management platform.
- In the Description field, enter a suitable description for the device management platform.
- From the Type drop-down list, select Google Verified Access.

- Click Save.

A Network Profile contains the settings our device will need to use for 802.1x. This will instruct the device to use the certificate that it has recently enrolled for network authentication, and also include other important EAP-TLS 802.1x settings.
To create a Network profile, follow these steps.
- Navigate to Device Onboarding > Getting Started.
- On the Quickstart Network Profile generator page, from the Generate Profile for drop-down list, select Internal User Authentication.
- From the Profile Type drop-down list, select Wireless.
- In the SSID field, enter a suitable name for the SSID.
- From the Security Type drop-down list, select WPA2-Enterprise.
- From the EAP Method drop-down list, select EAP-TLS.
- From the Policy drop-down list, retain DEFAULT.
- From the Wireless Vendor drop-down list, select a wireless infrastructure vendor.
- From the RADIUS Vendor drop-down list, select a RADIUS vendor.

- Click Create.
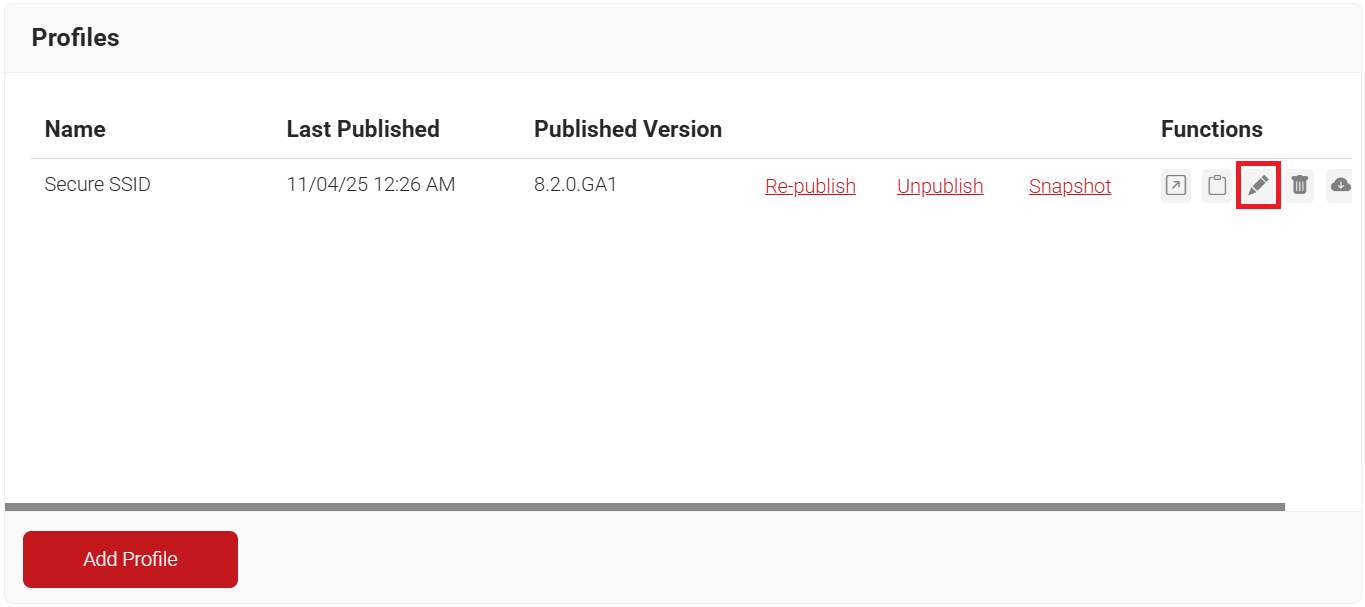
NOTE: The Getting Started wizard will typically take 60-90 seconds to create the profile. - On the Profiles page, click the Edit link for the newly created network profile.

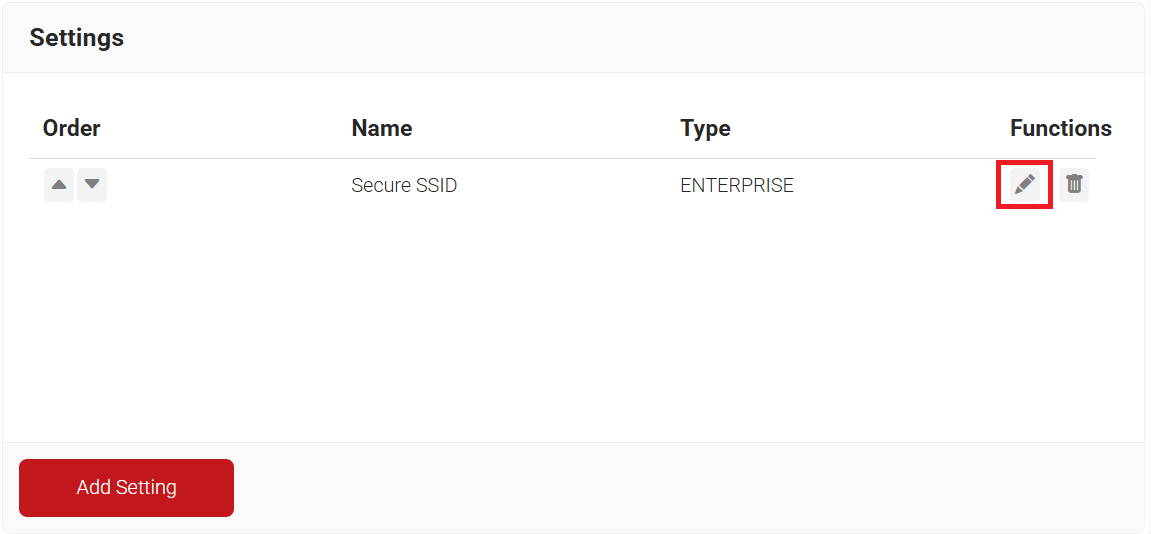
- Scroll down to the Settings section and click the Edit link for the newly created network profile.

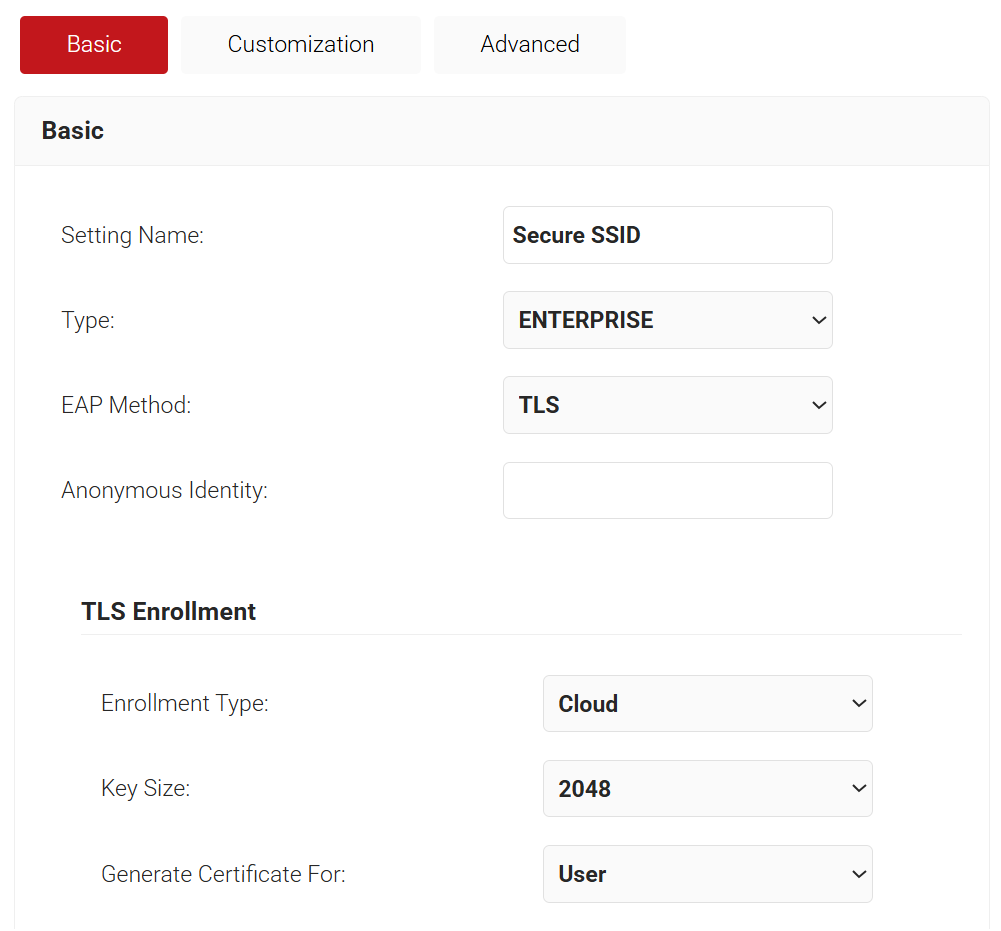
- In the TLS Enrollment section, from the Enrollment Type drop-down list, select Cloud.
- From the Generate Certificate For drop-down list, select:
- System – If you are enrolling systems for certificates.
- User – If you are enrolling individual users for certificates.

- Click Update.
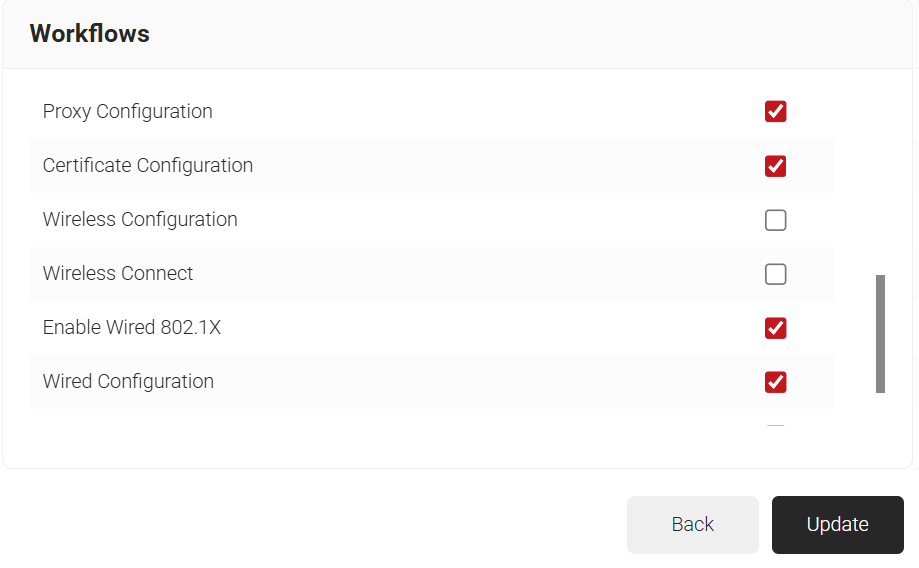
- On the Profile page, select the Advanced tab.
- Scroll down to the Workflows section and uncheck the following options.
- Wireless Configuration
- Wireless Connect

- Click Update.
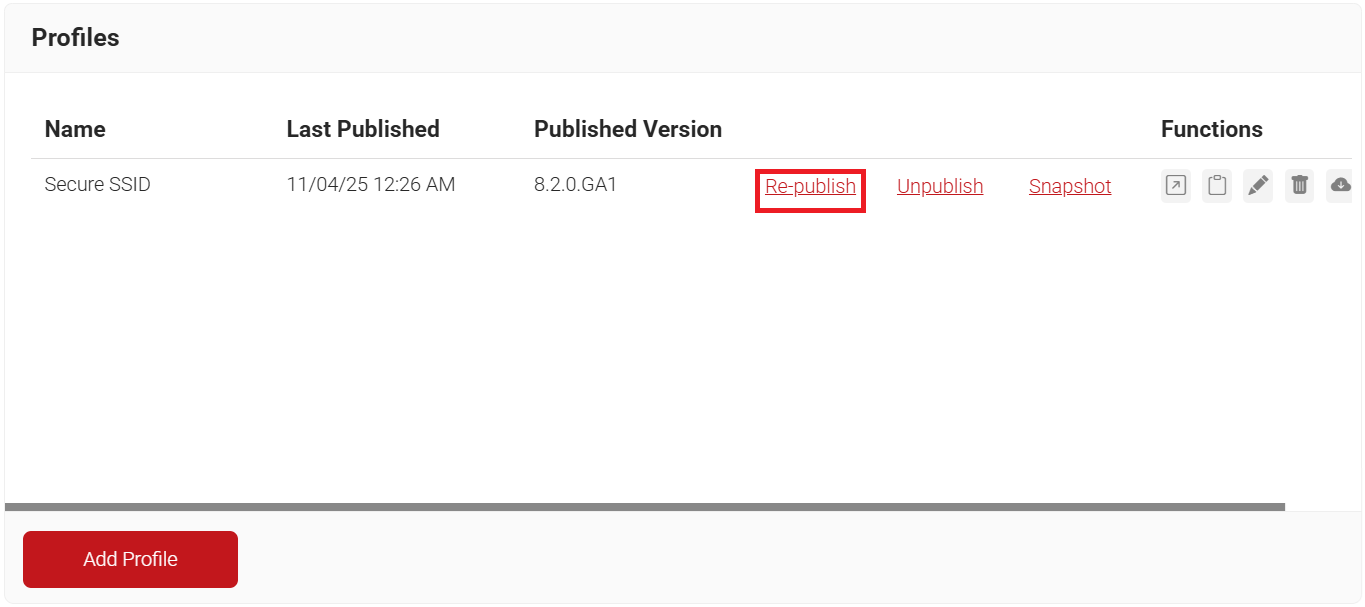
- On the Profile page, click the Re-publish link next to your network profile.
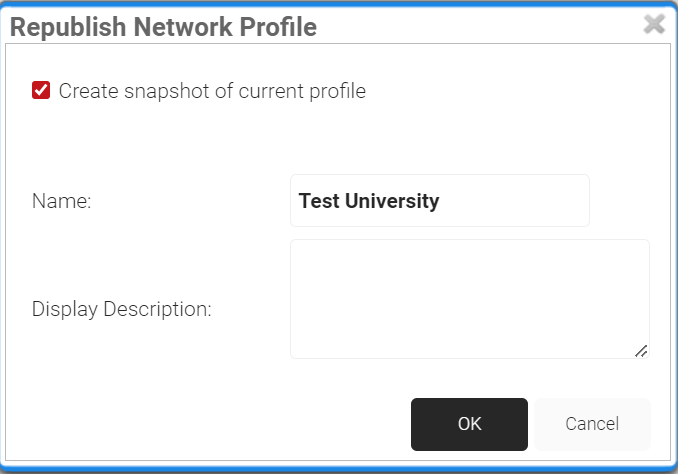
- In the Republish Network Profile pop-up window, type the name of the network profile and click OK.


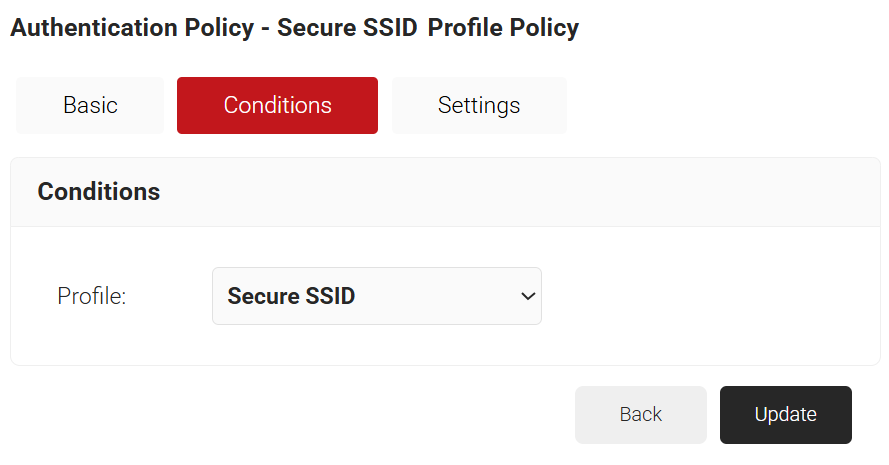
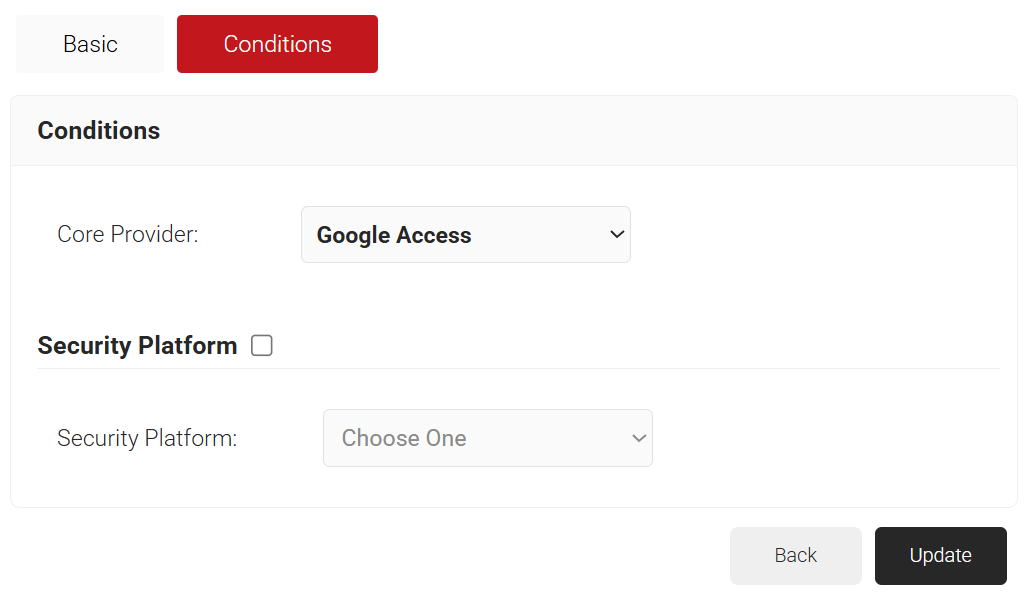
An Authentication Policy connects a core provider with a Network Profile. This is necessary so only our Google-managed Chromebooks can connect to our network. We will need to configure an Authentication Policy to tie the Network Profile we just created, with the Google Verified Access Device Management Platform that we made at the beginning of the document.
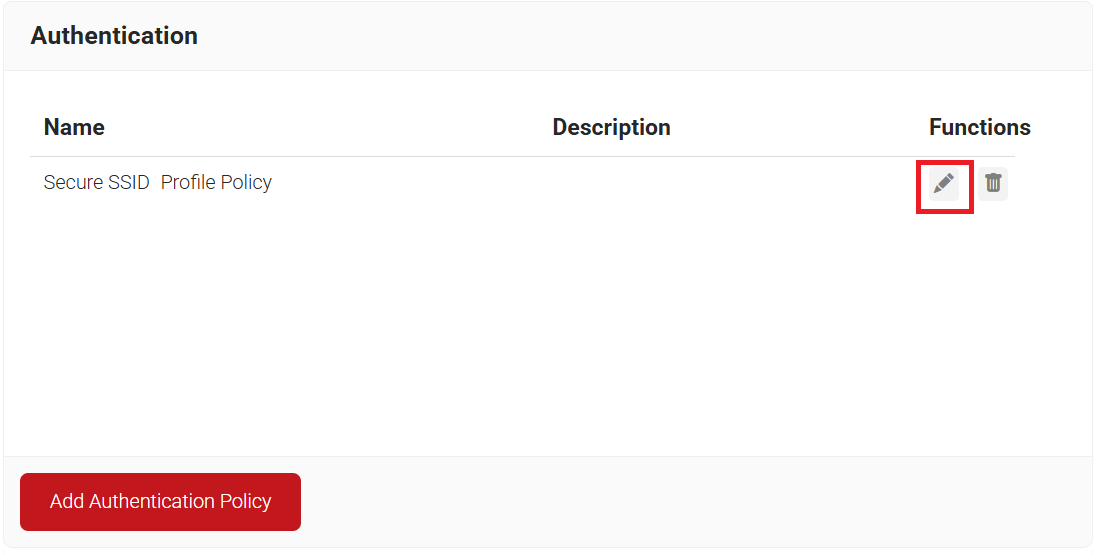
- Navigate to Policy Management > Authentication.
- Click the Edit link for your network profile’s authentication policy.

- Select the Conditions tab and make sure that your network profile is displayed in the Profile field.

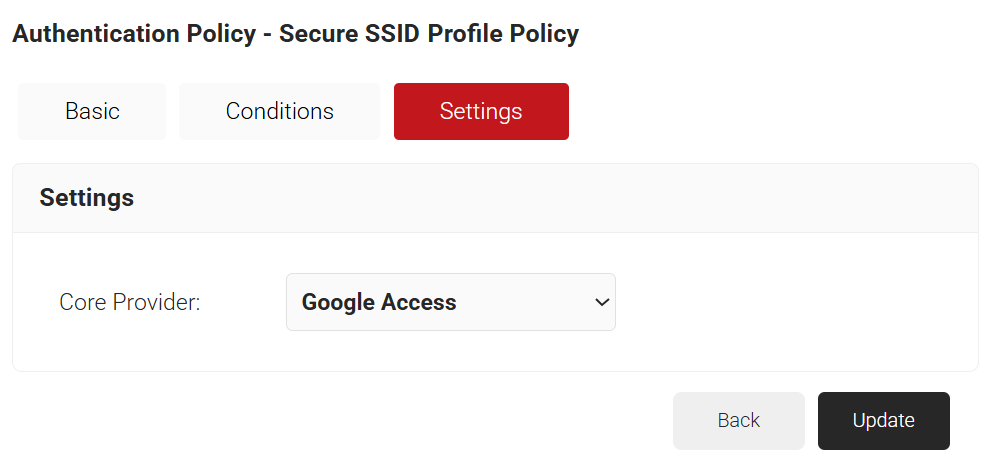
- Select the Settings tab.
- From the Core Provider drop-down list, select the device management platform you created earlier (refer to the Configure a Google Verified Access Device Management Platform section).

- Click Update.
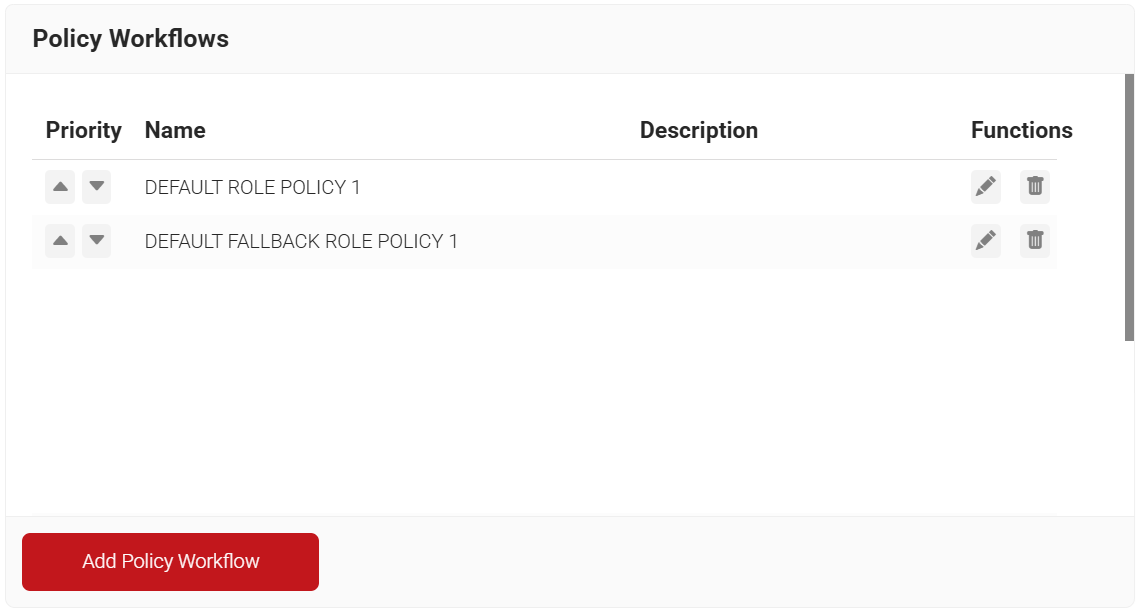
We can create specific roles for users or groups in our Google Workspace and then assign specific Enrollment or Network Policies to those users and groups. This is necessary to use different Certificate Templates, or Certificate Authorities, for our various groups, and to segment users into different Network VLANs.
- Navigate to Policy Management > Policy Workflows.
- Click Add Policy Workflow.

- Under the Basic section, in the Name field, enter the name of the policy workflow.
- In the Display Description field, enter a suitable description for the policy workflow.

- Click Save. The page refreshes, and the Conditions tab is displayed.
- Select the Conditions tab.
- From the Core Provider drop-down list, select the device management platform you created earlier (refer to the Configure a Google Verified Access Device Management Platform section).

- Click Update.

The SecureW2 service account is used to validate the verified access token (sent by the device during enrollment) against Google to confirm if the identity matches the token; based on the results, it proceeds to the next step in enrollment.
- To provide access to the service account for device certificate enrollment:
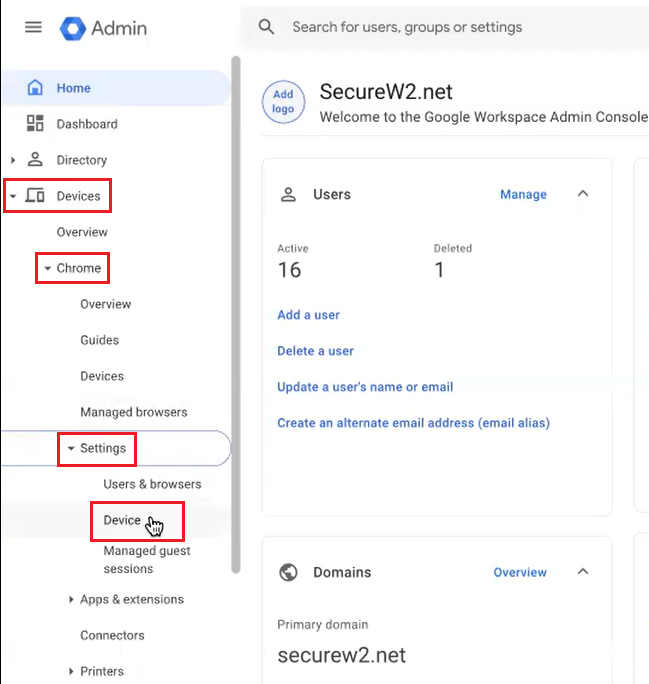
- Log in to the Google Admin Console.
- Navigate to Devices > Chrome > Settings > Device.

- Select the Device Settings tab.
- Under the Enrollment and access section:
- From the Verified access drop-down list, select Enable for content protection.
- From the Verified mode drop-down list, select Require verified mode boot for verified access.
- In the Services with full access field, enter the following email:securew2-verified-access@sw2joinnow.iam.gserviceaccount.com
- Click SAVE.

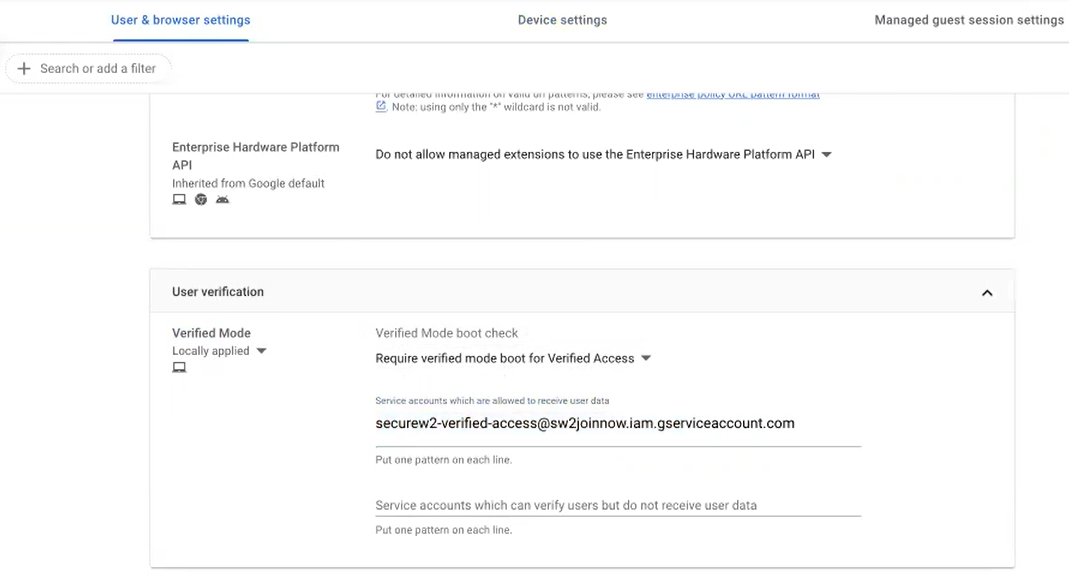
- To provide access to the service account for user certificate enrollment:
- Navigate to Devices > Chrome > Settings > Device.
- Select the User & browser settings tab.
- Under the User verification section:
- From the Verified Mode boot check drop-down list, select Require verified mode boot for Verified Access.
- In the Service accounts which are allowed to receive user data field, enter the following email: securew2-verified-access@sw2joinnow.iam.gserviceaccount.com
- Click SAVE.

- Navigate to Devices > Chrome > Settings > Device.

The JoinNow extension must be installed on your device so they can enroll for a digital certificate. Here, we will configure the Google Admin Console to install the extension.
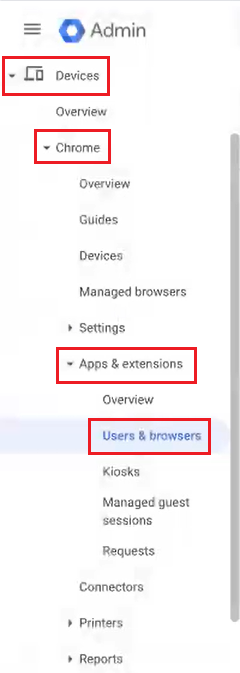
To navigate to the JoinNow MultiOS extension:
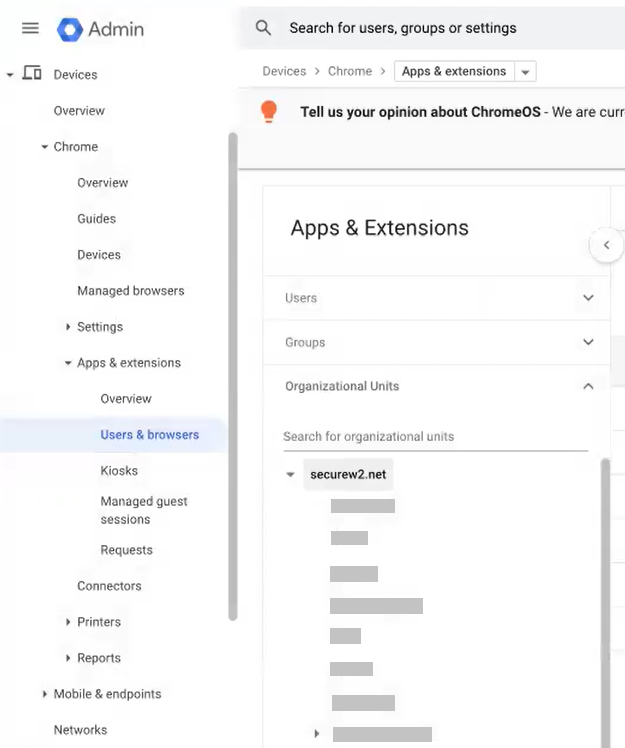
- In the Google Admin Console, navigate to Devices > Chrome > Apps & extensions > Users & browsers.

- On the left pane, from the Organizational Units drop-down-list, select an organization unit.

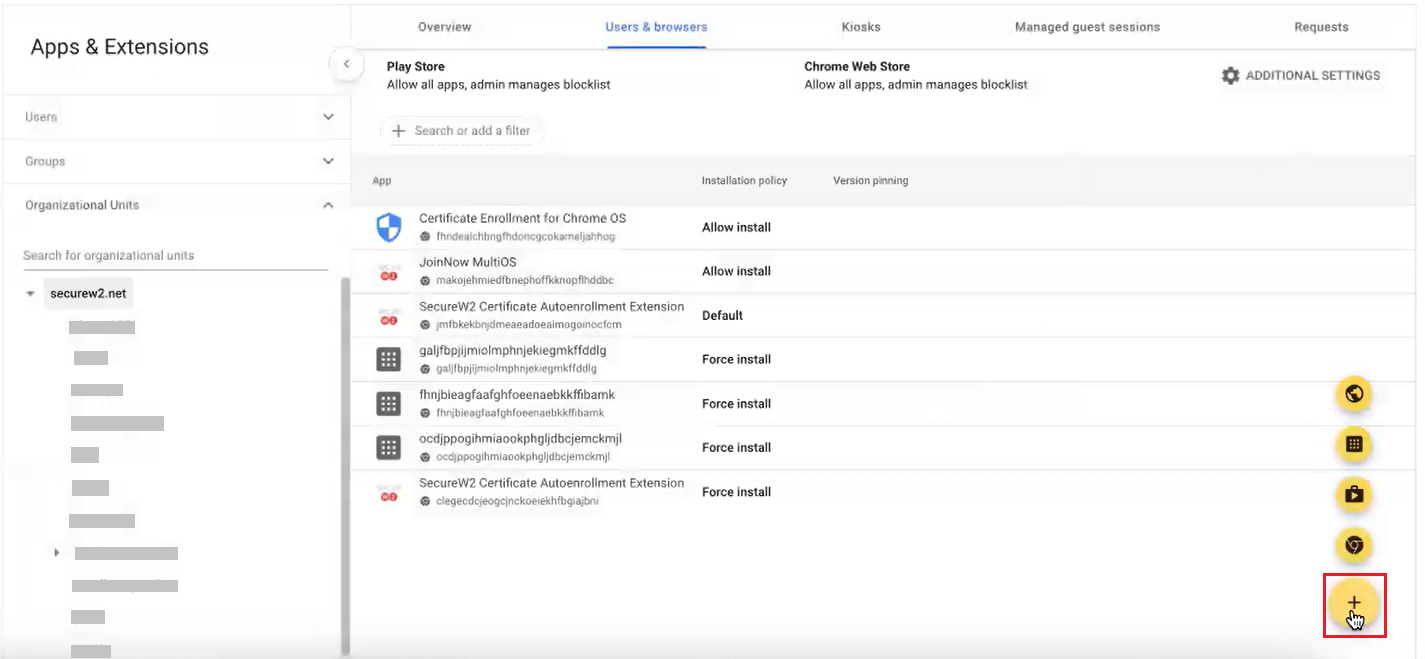
- Under the Users & browsers tab, click the + icon to expand the list of options and select the Add Chrome app or extension by ID option.

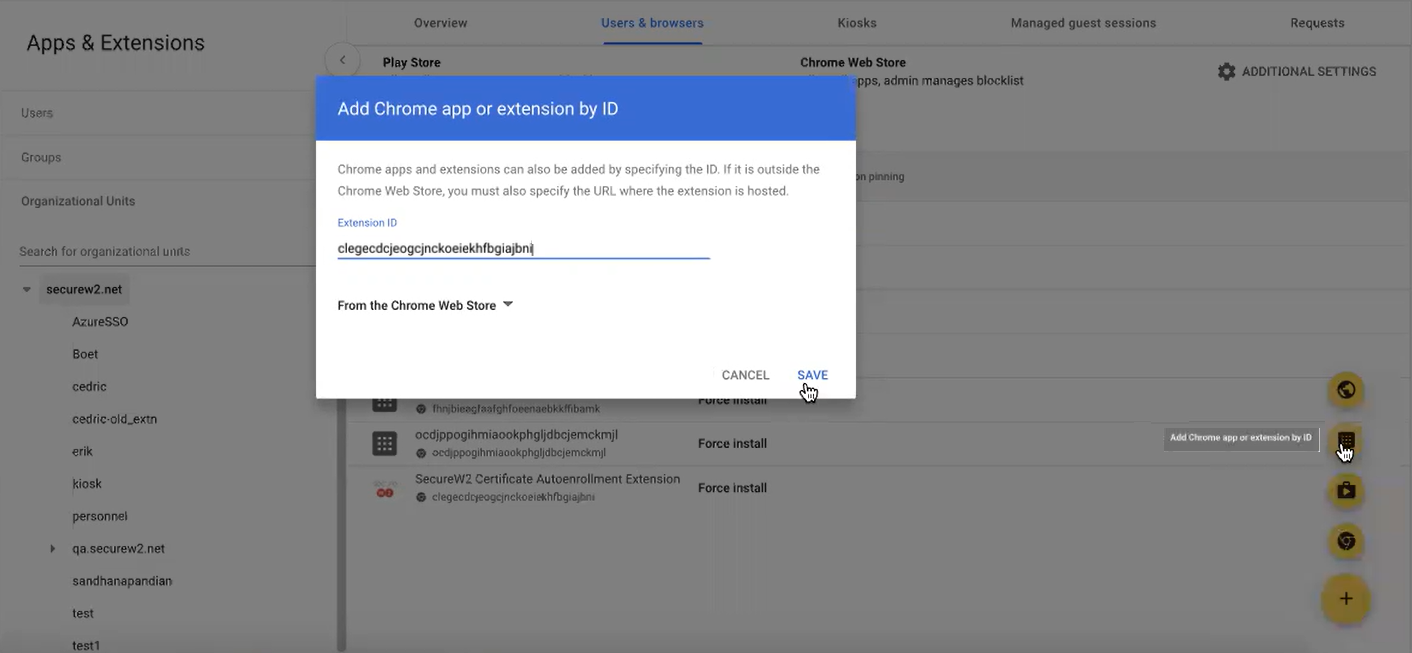
- In the Add Chrome app or extension by ID dialog box, enter the extension ID as clegecdcjeogcjnckoeiekhfbgiajbni in the Extension ID field.

- Click SAVE.
NOTE: You can search for the SecureW2 Certificate Auto-Enrollment Extension by using the extension ID: clegecdcjeogcjnckoeiekhfbgiajbni and not from the Chrome Web Store. This was designed for security reasons.
With the JoinNow MultiOS extension configured on your device, it can auto-enroll itself for a certificate through JSON similar to the Simple Certificate Enrollment Protocol (SCEP).
- Navigate to Devices > Chrome > Apps & extensions > Users & browsers.
- On the left pane, from the Organizational Units drop-down-list, select the organization unit where you added the chrome app using the extension ID.
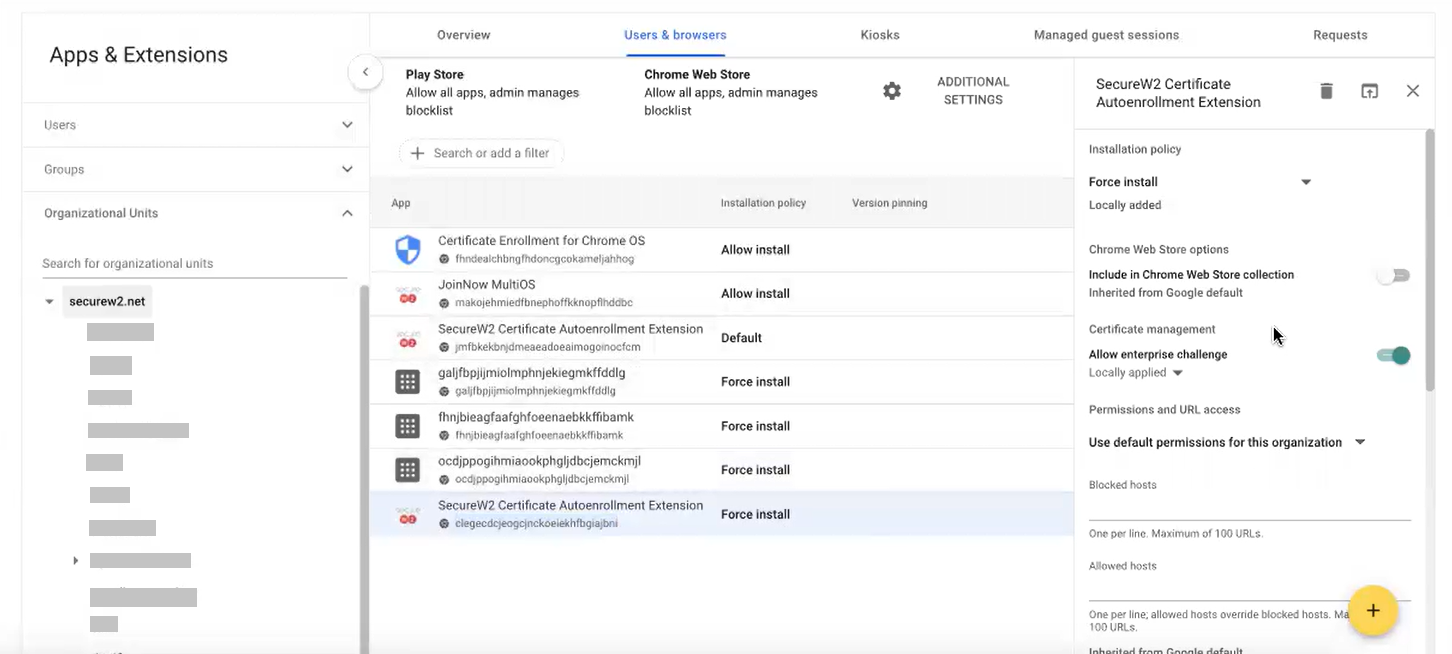
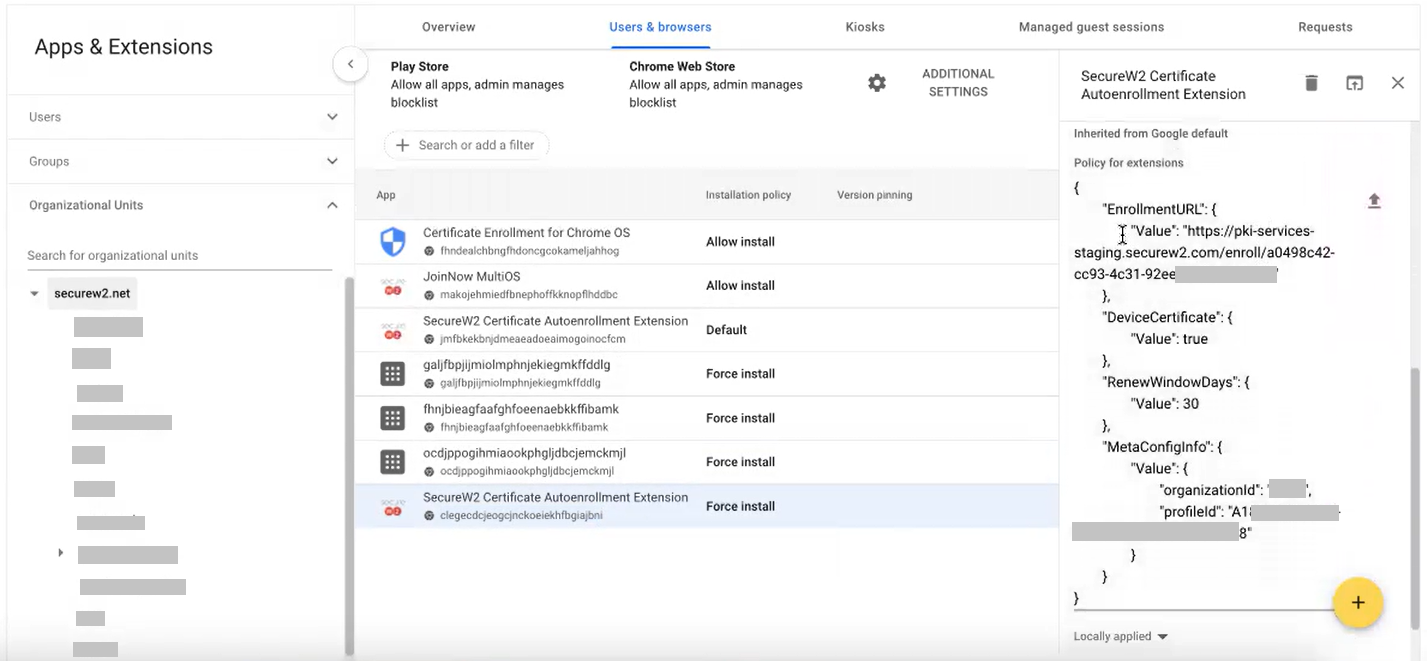
- In the Users & browsers tab, select the SecureW2 Certificate Autoenrollment Extension app and click the Force install link.
- In the SecureW2 Certificate Autoenrollment Extension pop-up window, enable the Allow enterprise challenge option in the Certificate management field.

- In the Policy for extensions section, upload the JSON file shared by the support team.

- Click Save.
SecureW2’s Cloud PKI allows you to create custom root and intermediate certificate authorities for deploying certificate signing requests to ensure that applications are used only by the intended users.
This section lists the steps to export the RADIUS Server Root CA from the JoinNow Management Portal.
To export the SecureW2 RADIUS Server Certificate:
- Log in to the JoinNow Management Portal.
- Navigate to Device Onboarding > Profiles.
- On the Network Profiles page, click the Edit link for the network profile you created earlier (refer to the Configuring a Network Profile for Managed Chromebooks section).
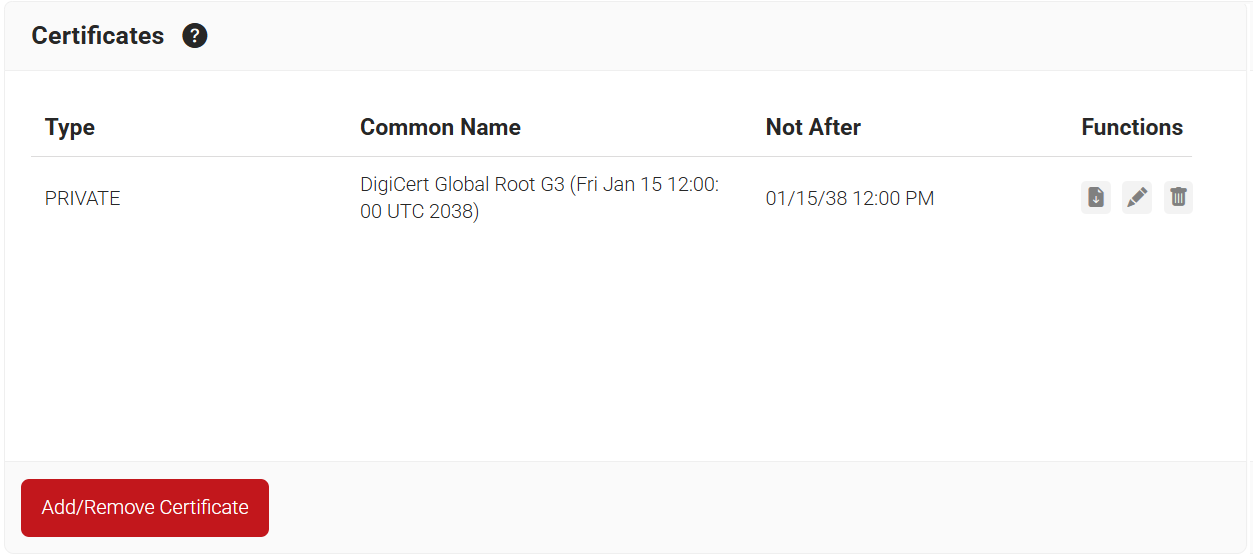
- Scroll down to the Certificates section. The certificate is displayed in the Certificates section.

- Click Download.
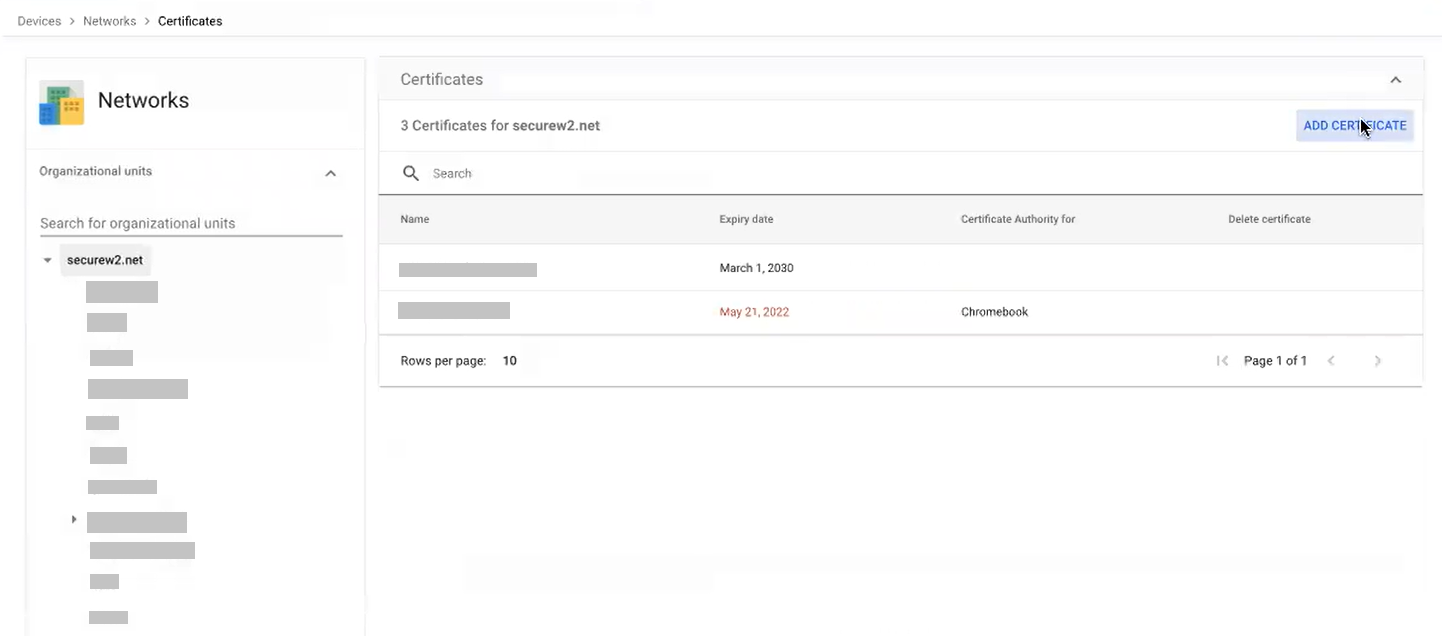
WPA2-Enterprise requires installing and configuring the trusted RADIUS Server issuer CA chain to allow the device to securely connect to the Wi-Fi network. This is also handled by the Google Admin Console. You can select the uploaded CA as the trusted CA in the configured Network, later.
- Log in to the Google Admin Console.
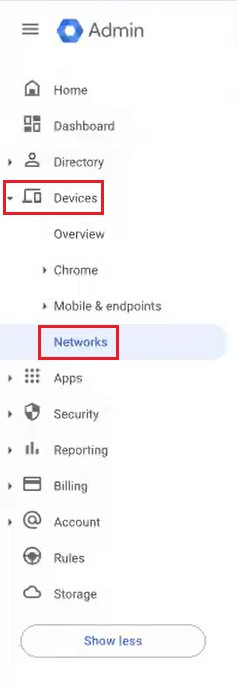
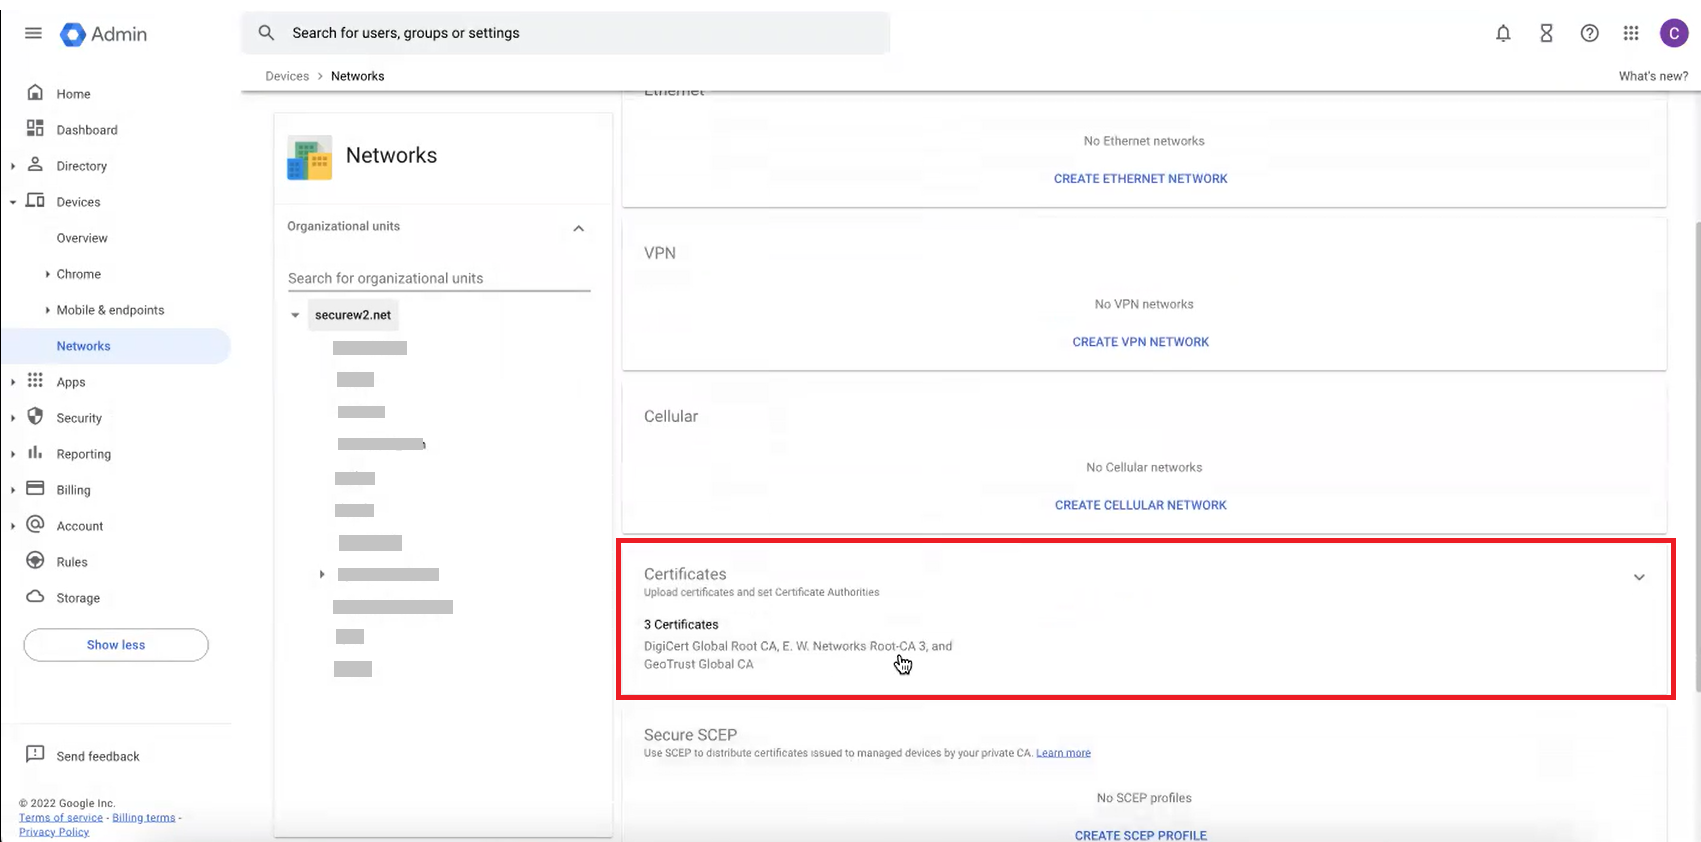
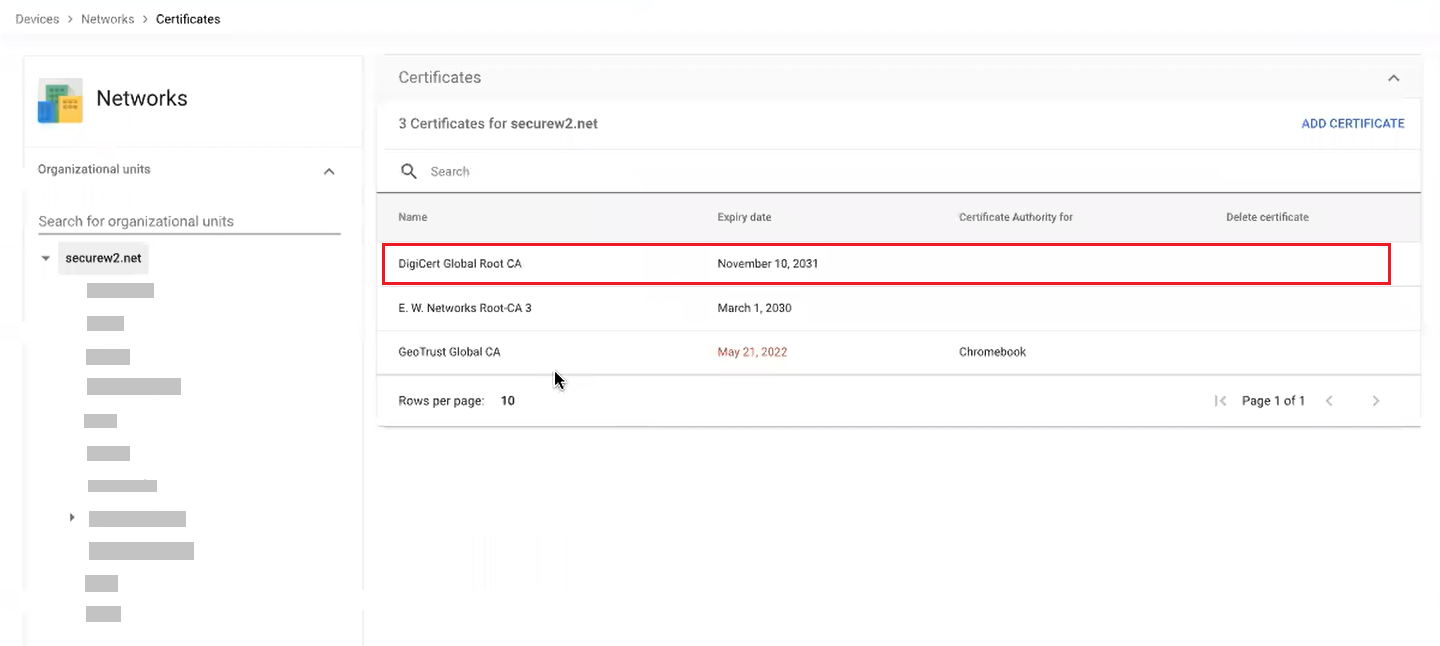
- Navigate to Devices > Networks.

- Scroll down and click Certificates.

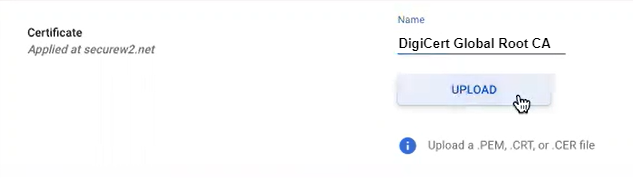
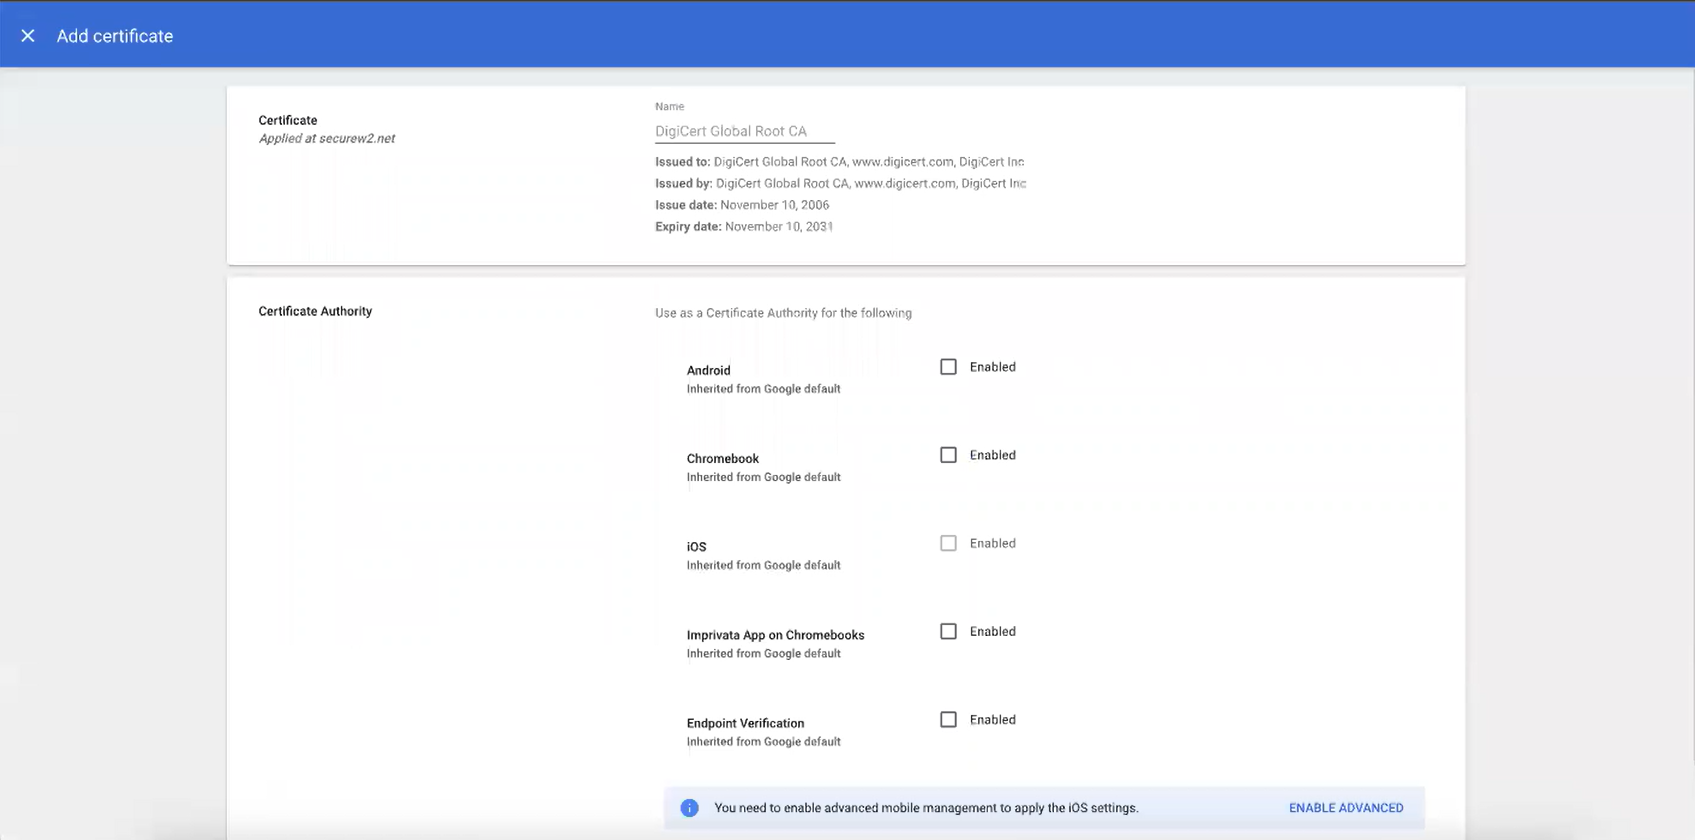
- On the Certificates page, click ADD CERTIFICATE.

- On the Add certificate page, in the Certificate section, in the Name field, enter the name of the certificate.

- Click the UPLOAD button to upload your RADIUS Server issuer CA chain.

- Click ADD.

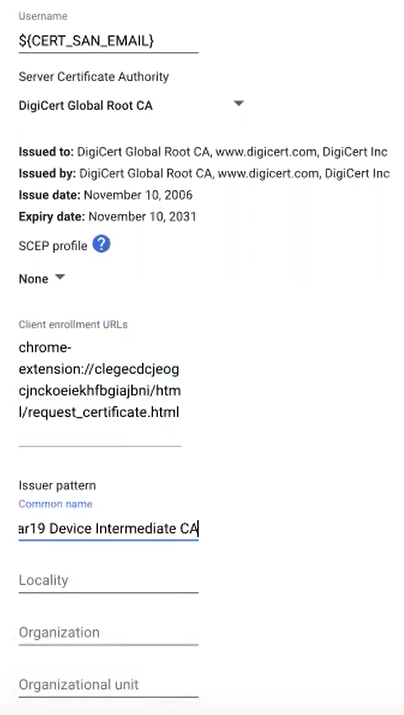
Finally, configure the network settings that will be pushed to the Chromebooks so that they will authenticate the SSID by using SecureW2 for certificate-based Wi-Fi authentication.
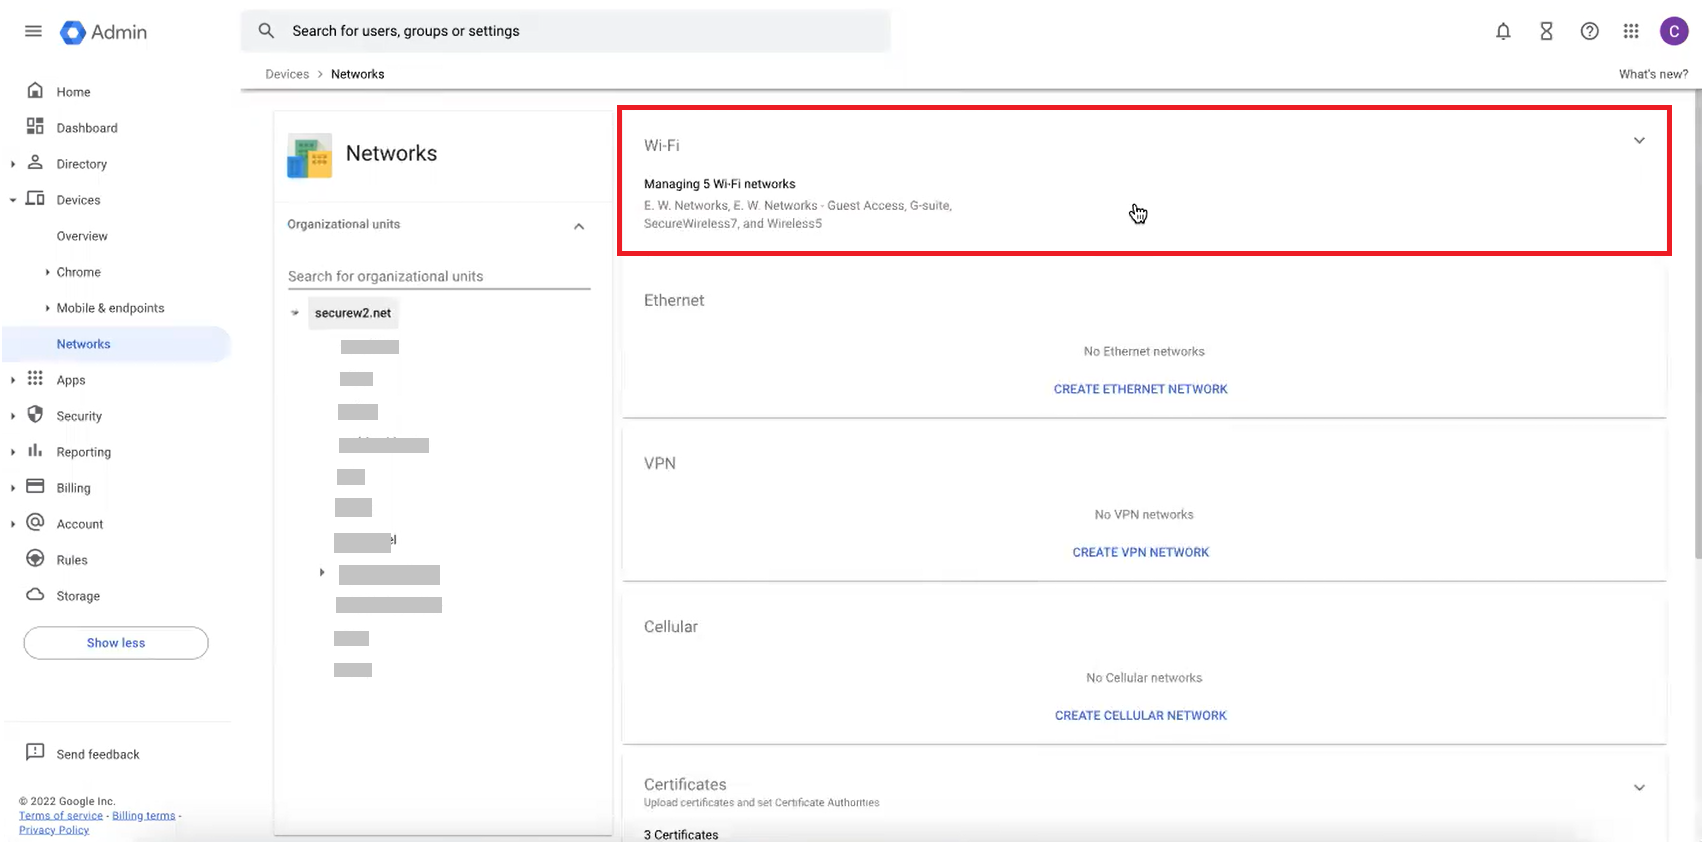
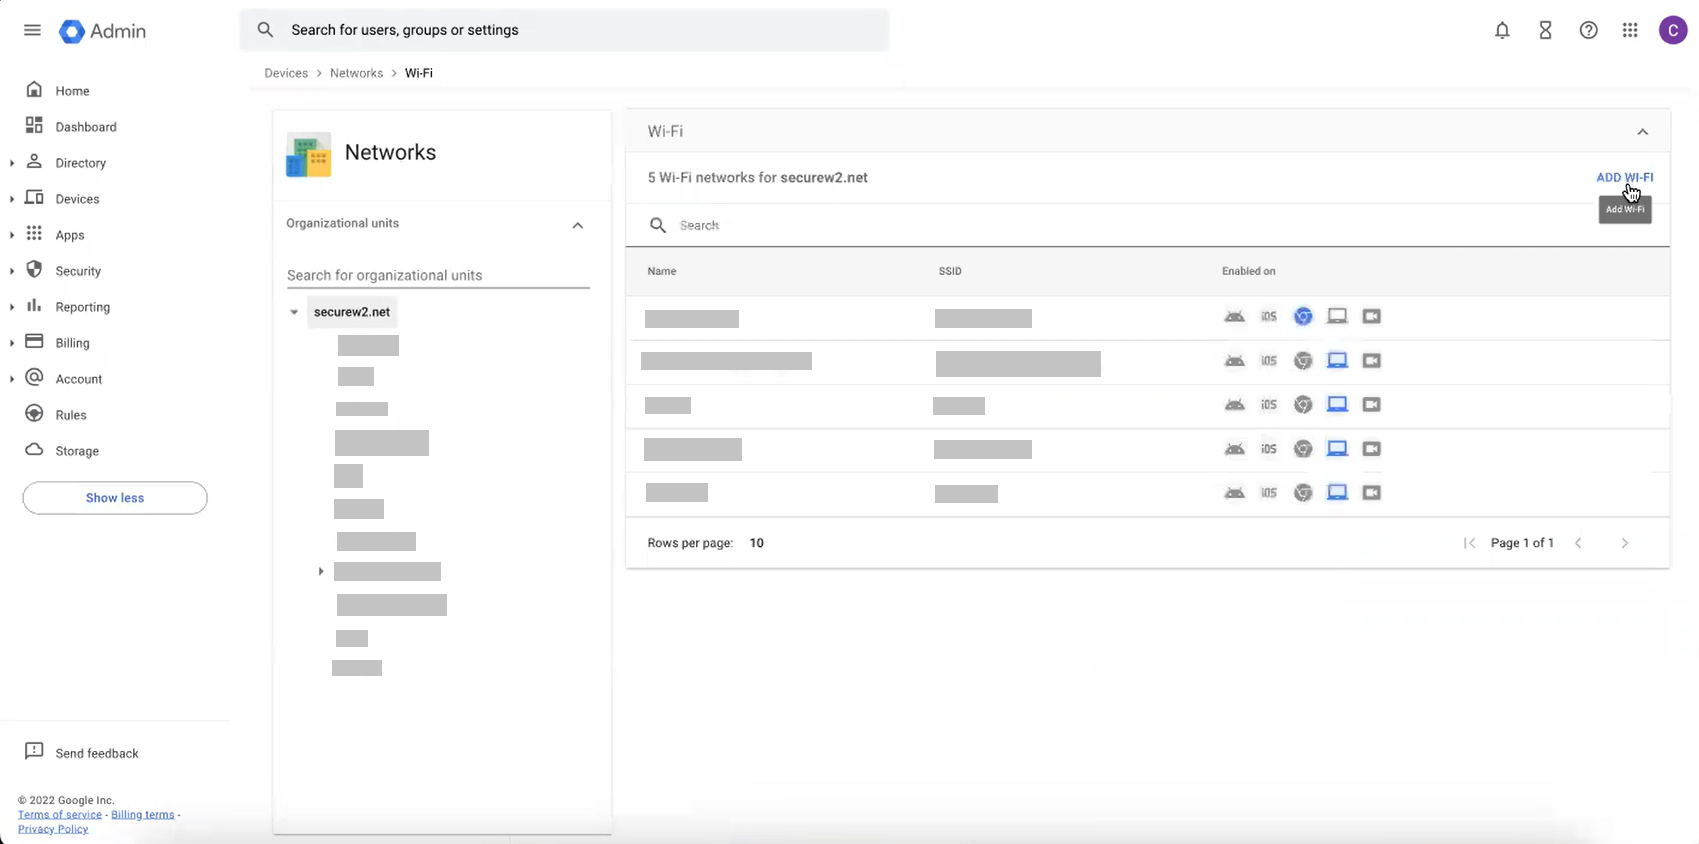
- Navigate to Devices > Networks.
- Select Wi-Fi.

- On the Wi-Fi page, click ADD WI-FI.

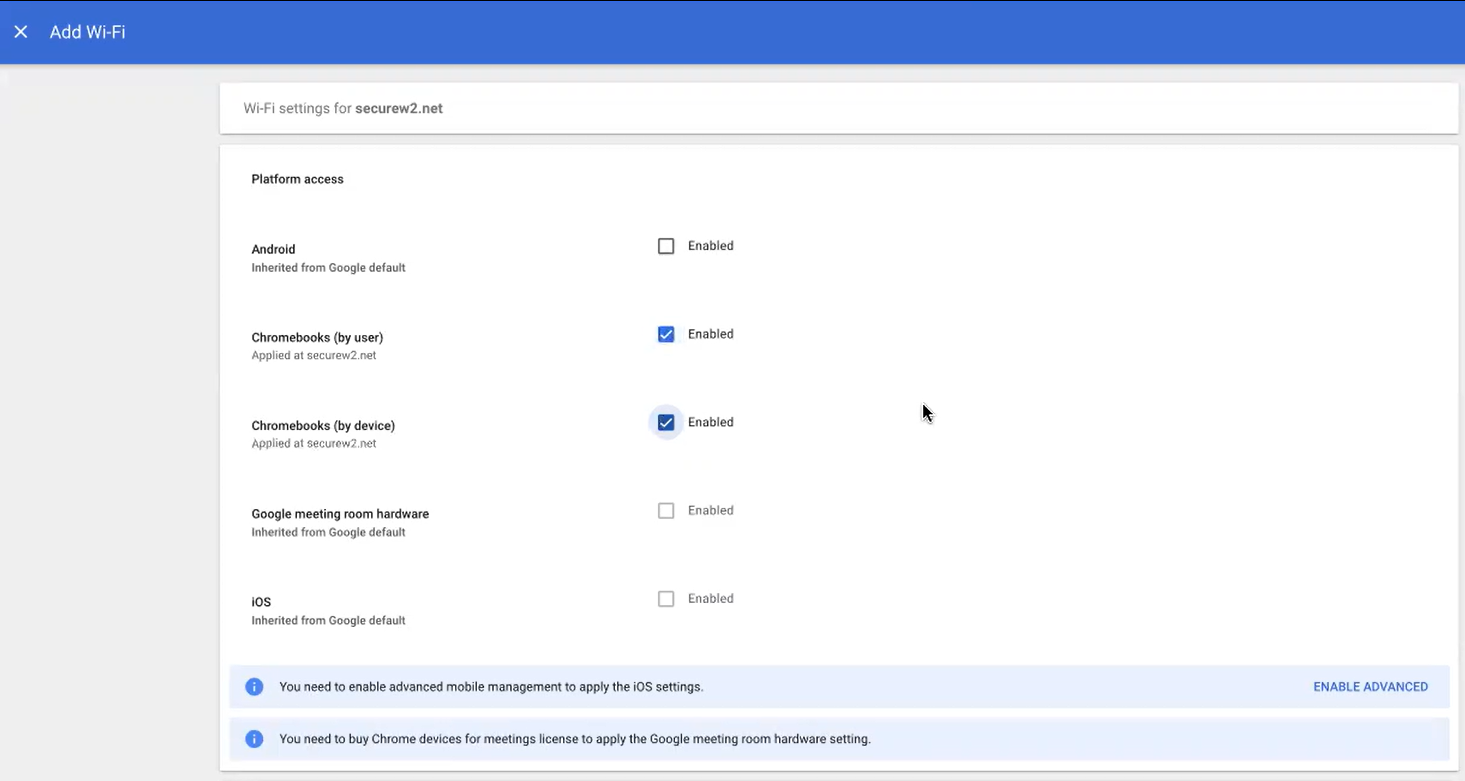
- On the Add Wi-Fi page, perform the following steps:
- Under the Platform access section, select the platform that you want to configure the WiFi.

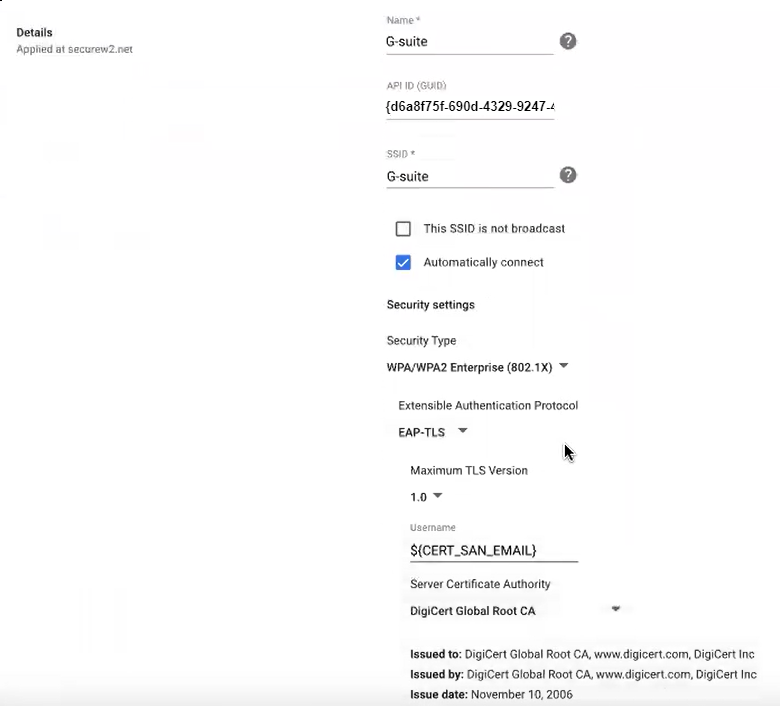
- Under the Details section, type a name and SSID of your Wi-Fi Network.
- Select the Automatically connect option.
- From the Security Type drop-down list, select WPA/WPA2-Enterprise (802.1X).
- From the Extensible Authentication Protocol drop-down list, select EAP-TLS.
- In the Username field, type ${CERT_SAN_EMAIL} or ${CERT_SAN_UPN}.

- From the Server Certificate Authority drop-down list, select the RADIUS Server Issuer CA chain you uploaded earlier.
- In the Client enrollment URLs field, enter the following URL: chrome-extension://legecdcjeogcjnckoeiekhfbgiajbni/html/request_certificate.html
- In the Issuer pattern field, type the matching variables of the CA that will be using the client certificate (NOT the RADIUS Server Issuing CA).
 NOTE: Currently, setting the Organization Name is tested.
 - Click SAVE.
NOTE: When moving the devices to the specific OU for enrollment of certificates, ensure that the user also belongs to that specific OU.
- Under the Platform access section, select the platform that you want to configure the WiFi.
 NOTE
NOTE