Want to learn the best practice for configuring Chromebooks with 802.1X authentication?

Sign up for a Webinar!

How to Set Up Passwordless RADIUS Authentication with a Ubiquiti Unifi Access Point

WPA2-Enterprise, also known as 802.1X, is a highly-secure port-based protocol and is known as the standard for wireless security. The primary difference between 802.1x and the pre-shared key (PSK) networks that are used at home, is that 802.1x uses unique credentials, or certificates, for each user/device that is on the network. 

It does this by using a RADIUS Server, which has the sole purpose of authenticating and authorizing access to the network. This server can be seen as the security guard of your network, and it is often synced with an Identity Provider so it knows who should and shouldn’t be in the network. 

However, configuring Ubiquiti 802.1x is not easy, especially when following security best practices. Most online tutorials instruct you to use credential-based authentication, which can be vulnerable to multiple attacks. They also recommend having your RADIUS Server verify devices using Active Directory, and most organizations today are moving away from relying on on-premise servers. In this guide, we will show you how you can configure certificate-based authentication with Ubiquiti,  as recommended by CISA, and ensure that only users and devices from your Cloud Identities (such as Azure, Okta, Jamf, or Intune) can access the network. 

Onboarding Devices for 802.1X with Cloud Identity Provider of Passwordless RADIUS Authentication

Passwordless RADIUS Authentication with a Ubiquiti Unifi Access Point uses digital certificates instead of a pre-shared key (PSK) for authentication to the network. Of all the authentication methods, the EAP-TLS security protocol is the most secure because it allows the implementation of certificates on WPA2-Enterprise for 802.1x network authentication that provides the highest degree of security for wireless networks.

Depending on the type of device, adding a certificate to a device or enrolling it with an 802.1x digital certificate varies. For BYOD (Bring Your Own Devices), certificates are added using onboarding software, whereas, for managed devices, Gateway APIs are used to facilitate certificate auto-enrollment with no end-user interaction. Here is an example using a Microsoft Environment:

  1. The JoinNow Connector PKI (Public Key Infrastructure) can authenticate Azure AD users, and then issue them certificates
  2. Our Cloud RADIUS Server can authenticate those certificates, and also lookup users/devices in Azure AD in real-time
  3. The JoinNow Connector PKI also offers APIs that allow Intune-managed devices to auto-enroll themselves for certificates.

Once the above steps are completed, certificate lifecycle management is basically automated  using the information that’s available in Intune and Azure. Cloud RADIUS will now be able to communicate directly with Azure AD at the time of authenticating the device for connecting to your network. This eliminates the need for any on-prem servers and enhances your network security to a greater degree as the authentication happens in real-time.

Configuring Ubiquiti 802.1x with the Cloud RADIUS Server

In order to configure a Ubiquiti Unifi access point for 802.1x, we will need to do two things. The first is to configure our Cloud RADIUS Server in SecureW2’s Management Portal. This involves running our Getting Started Wizard, and creating the Network Profile settings we want pushed to our end users. The second step, is to configure our Unifi settings for RADIUS Authentication, and then add the details of our Cloud RADIUS Server (IP, Port Number..etc) to our Ubiquiti infrastructure. 

Follow the steps given below to enable the EAP-TLS extensible authentication protocol for passwordless RADIUS authentication. 

  1. Create a RADIUS Profile using SecureW2’s Cloud RADIUS
    • By creating a new RADIUS Profile with SecureW2’s Cloud RADIUS, you can enable EAP-TLS authentication protocol on your existing Ubiquiti infrastructure.
  2. Create an Open SSID for onboarding
    • In order to automatically issue certificates to connected devices, we will set up an Open/Onboarding SSID that automatically redirects users to a BYOD self-enrollment portal. You can also have your managed devices automatically enroll themselves using our Managed Device Gateway APIs. 
  3. Create Secure SSID
    • Create a new wireless network in the Unifi Network Console and set the security type to WPA2-Enterprise. Once the new RADIUS profile is attached to the network, you’re set up to enjoy increased security and enhanced user experience.

Run the Getting Started Wizard to Configure the Cloud RADIUS Authentication Server

When we run our Getting Started Wizard, it will not only create the Network Profile settings we want to push to end users, it will also configure our RADIUS Server and a host of default policies and settings we’ve found most organizations need for secure 802.1x.

To configure the Getting Started Wizard for wireless, perform the following steps.

  1. Log in to the JoinNow Management Portal.
  2. Navigate to Device Onboarding > Getting Started.
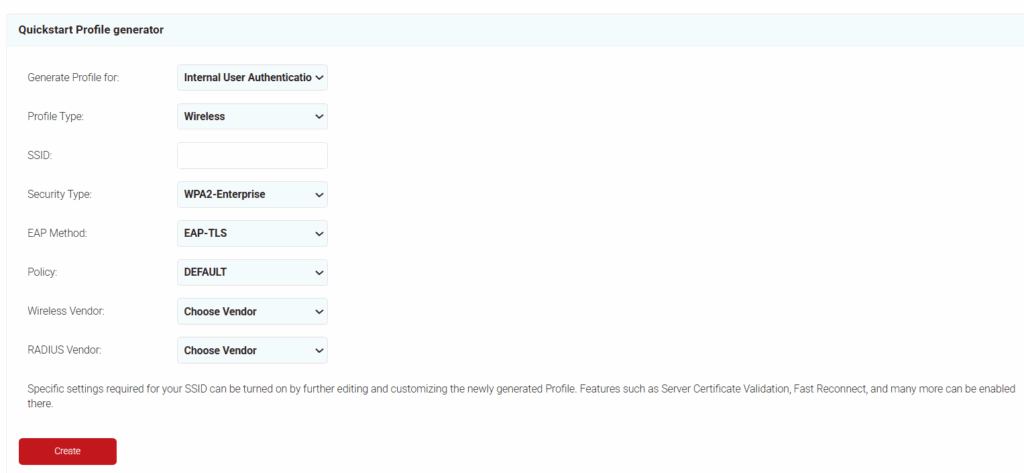
  3. On the Quickstart Network Profile generator page, from the Profile Type drop-down list, select Wireless.
  4. In the SSID field, type the name of a profile.
  5. From the Security Type drop-down list, select WPA2-Enterprise.
  6. From the EAP Method drop-down list, select EAP-TLS.
  7. From the Policy drop-down field, retain DEFAULT.
  8. From the Wireless Vendor drop-down list, select Ubiquiti Networks.
  9. From the RADIUS Vendor drop-down list, select a RADIUS vendor.

  10. Click Create.


Getting the Cloud RADIUS Details for Ubiquiti 802.1x

Next, we need to grab details of our Cloud RADIUS Server to add into our Unifi infrastructure. 

  1. Log in to the JoinNow Management Portal.
  2. Navigate to RADIUS > RADIUS Configuration.
  3. Copy the Primary IP Address of your subscribed region to your console.

Create RADIUS Profile in Ubiquiti Unifi for 802.1X Network

Our next step to setting up a passwordless RADIUS authentication with Unifi AP is to create a RADIUS profile or RADIUS policy in Unifi settings. 

Follow the below steps to enable RADIUS authentication for Unifi AP to set up the framework for defining how you would want the RADIUS server to handle authentication requests for your WPA2-enterprise network. 

  1. From your Unifi Network console, go to Settings > Profiles.
  2. Click Create New Radius Profile.
  3. For Profile Name, enter the name of the profile.
  4. For VLAN Support, select the Enable RADIUS assigned VLAN for wireless network checkbox.
  5. In a new browser tab/window, log into your JoinNow MultiOS Management Portal.
  6. Navigate to RADIUS > RADIUS Configuration.
  7. Copy the information of Primary IP Address, Port, and Shared Secret (to your clipboard or somewhere handy), and paste them respectively into the CREATE NEW RADIUS PROFILE form against the IP Address, Port, and Password/Shared Secret.
  8. Click Save.

Creating the Onboarding SSID Wireless Network in Ubiquiti

We will now create an Onboarding SSID. An Onboaridng SSID is an Open SSID that will be used to redirect users to the JoinNow MultiOS landing page so that their devices can be configured for 802.1x, using our Network Profile Settings, and enrolled for the certificate that will be used for 802.1x. 

Follow the steps below to create an Onboarding SSID in the Ubiquiti switch.

  1. Navigate to Settings > Wireless Networks > Create New Wireless Network.
  2. For Name/SSID, enter the name of the SSID.
  3. Under Enabled, select the Enable this wireless network checkbox.
  4. Under Security, select the Open radio button.
  5. Under Guest Policy, select the Apply guest policies (captive portal, guest authentication, access) checkbox.
  6. Click Save.

    Since Ubiquiti doesn’t support sub-domains in the URL, we recommend that you set up a local webserver with a rewrite URL that directs the user to the SecureW2 landing page.

Setting Up the Onboarding SSID Redirect

Sample rewrite rules using Ubuntu Apache:

sudo vi /etc/apache2/sites-available/000-default.conf

Add the following lines within VirtualHost section:

RewriteEngine on 
RewriteCond %{HTTP_HOST} ^companyname.com [NC]RewriteRule^(.*)$https://cloud.securew2.com/public/82373/local

The above example shows the url as “companyname.com”, which is in the Ubiquiti controller. When a client tries to access this URL, it will encounter the rewrite rule and be redirected to https://cloud.securew2.com/public/82373/local

Add the webserver URL to “Redirect using hostname”:

  1. Navigate to Settings > Guest Control > Guest Policies
  2. Select the Enable Guest Portal checkbox.
  3. Under Authentication, select the No Authentication radio button.
  4. Select the Redirect using hostname checkbox.
  5. Click Save.

Adding an ACL to Restrict Network Access

We need to limit this SSID, so it can only be used for self-service certificate enrollment and device network-access configuration. For more details regarding what should and shouldn’t be accessed on this SSID, you can get in touch with our expert support engineers.

  1. Navigate to Settings > Guest Control > Guest Policies.
  2. Select the Enable Guest Portal checkbox.
  3. On the ACCESS CONTROL page, in the Pre-Authorization Access section, enter the ACLs (hostname or IPV4).
  4. Click Apply.

Creating the Secure WPA2 Enterprise SSID

Now, we will setup the SSID that users will use for network authentication on a daily basis. This SSID will use 802.1x with the RADIUS server we added in the RADIUS Profile. If you are setting this up with Cloud RADIUS, this SSID will use EAP-TLS, which is a passwordless authentication method using digital x.509 certificates.

  1. From your Unifi Network console, go to Settings > Wireless Networks.
  2. Click Create New Wireless Network.
  3. For Name/SSID, enter the name of the SSID.
  4. For Enabled, select the Enable this wireless network checkbox.
  5. For Security, select the WPA Enterprise radio button.
  6. From the RADIUS Profile drop-down list, select the RADIUS profile you created earlier.
  7. Click Save.

Reinforce your Ubiquiti Network with Passwordless RADIUS Authentication

Configuring an Ubiquiti Unifi AP for an 802.1X certificate-based authentication is a relatively painless adjustment that vastly enhances the security and user experience of your WPA2-enterprise network.

Creating a network infrastructure with 802.1X and WPA2-Enterprise makes your network resilient against threats such as malware, credential theft, and man-in-the-middle attacks. Managing PKI for certificate-based RADIUS authentication may sound like a daunting task, but SecureW2’s turnkey PKI solution can integrate into your existing network, eliminating the need for network downtime and costly forklift upgrades. 

Our JoinNow MultiOS platform allows you to onboard BYOD without the risk of misconfiguration, as users can self-enroll their devices for certificates very easily. Now, when users enroll for a certificate using your Onboarding SSID, they’re redirected to your SecureW2 landing page. They enter their login credentials, and a client is deployed on their device, which then installs the Wi-Fi certificate and appropriate network settings to authenticate via EAP-TLS. Their device is then migrated to your secure SSID. Managed Devices can also be configured for certificate auto-enrollment using our Gateway APIs that support all major MDM vendors. 

If you’re interested in purchasing SecureW2, we have affordable options for organizations of all shapes and sizes. Click here to see pricing information.