Digital certificates have been gaining popularity as it is slowly replacing the traditional credential-based authentication for managed devices. Digital certificates are phishing-resistant and can be tailored to an organization’s specific needs. One of the main features of digital certificates is that they can be customized based on specific users and devices.
User and device certificates are relevant only in Windows and MacOS. The attributes in a certificate are based on specific users, and devices determine whether they are user or device certificates. The device certificate is in the local device store, whereas the user certificate is placed in the user’s certificate store. User certificates are assigned attributes that determine what applications a user can access, whereas device certificates mostly determine the network a device/ machine can use.
Mobile Device Management solutions like Intune have many users and devices on their network daily. Certificate distribution to endpoints may become tedious, but this is where SCEP is applied as a means of certificate enrollment in a PKI.
Simple Certificate Enrollment Protocol (SCEP) automates certificate distribution to issue and manage network certificates for users and devices securely. SCEP protocol manages certificate enrollment without any intervention by end users. In Intune, you can start distributing certificates to devices and users as soon as you assign user and device profiles.
This guide will take you through enrolling users/device certificates through Intune using the SecureW2s JoinNow Management Portal.
Note: If you’ve already integrated Intune with SecureW2 for certificate enrollment, you can skip to the SCEP Profile Sections to see the User vs Machine/Device certificate (as shown by the summarizing graphic above) SCEP Profiles in Intune.
Configuring the Intune CA Partner App in Azure
First, we need to create an App Registration in Azure so that SecureW2 can look up and validate users/devices during the SCEP Certificate Enrollment process.

Creating a New Application
To create an application in Azure and communicate with the CA Intune IdP, follow the given steps:
- Log in to the Azure portal.
- Go to App registrations.
- Click New registration.

- On the Register an application page, in the Name field, enter the name of the application.
- In the Supported account types section, specify who can use the application by selecting any one of the following options:
- Accounts in this organizational directory only (MSFT only – Single tenant)
- Accounts in any organizational directory (Any Azure AD directory – Multitenant)
- Accounts in any organizational directory (Any Azure AD directory – Multitenant) and personal Microsoft accounts (e.g. Skype, Xbox)
- Personal Microsoft accounts only
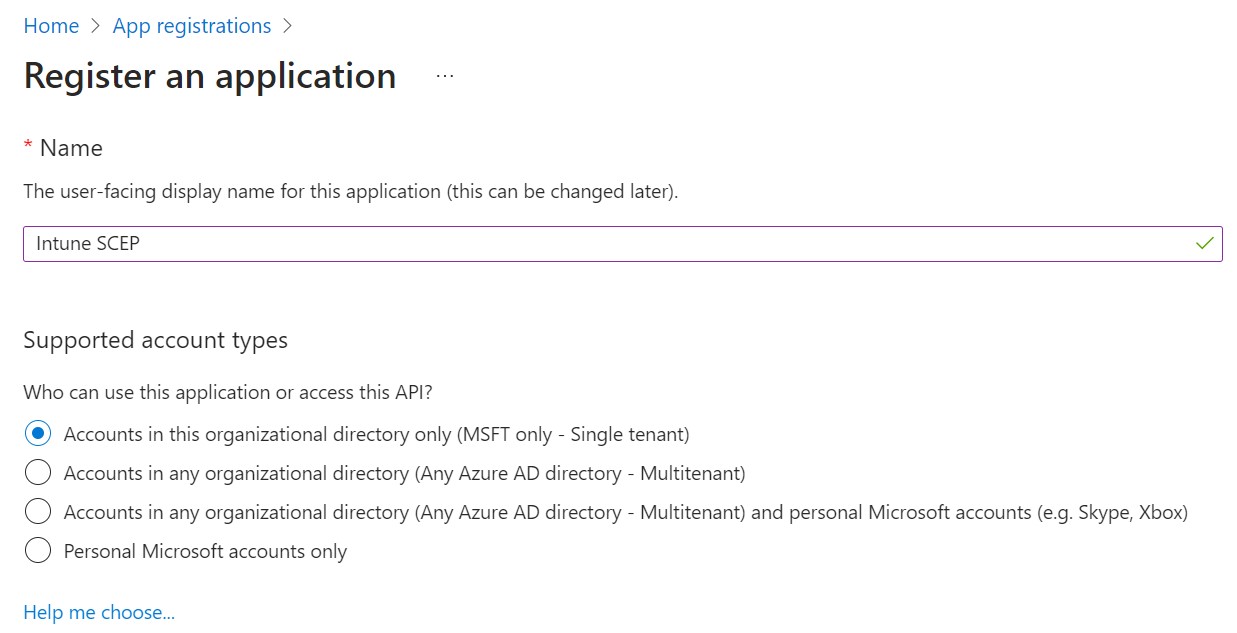
- In the Redirect URI (optional) section, from the Select a platform drop-down list, select Web and enter the URI to receive an authentication response after the successful authentication of the user.

- Click Register. The following screen is displayed.
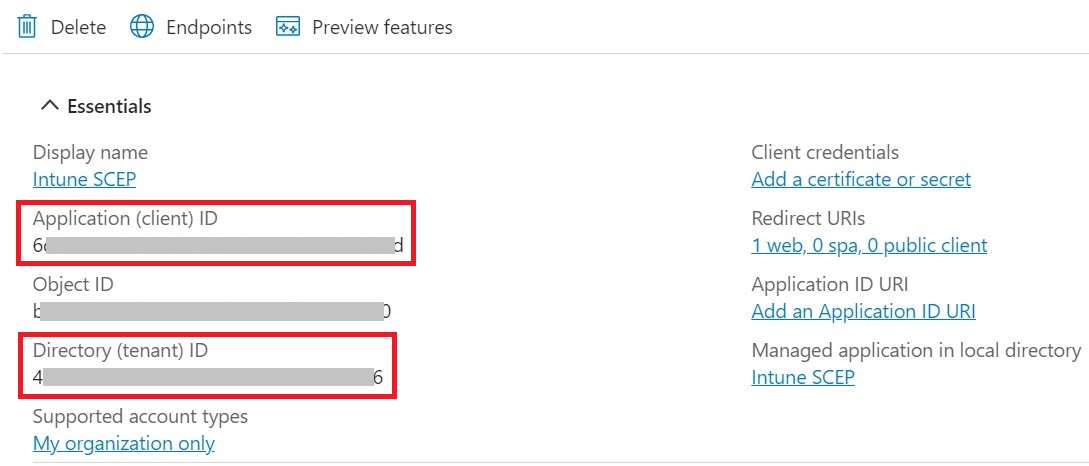
- Copy the Application (client) ID and Directory (tenant) ID values to your console. These values are required to create an Intune Identity Provider in the JoinNow Portal (for more information, see the Creating an Intune CA Identity Provider in SecureW2 section).
Creating a Client Secret
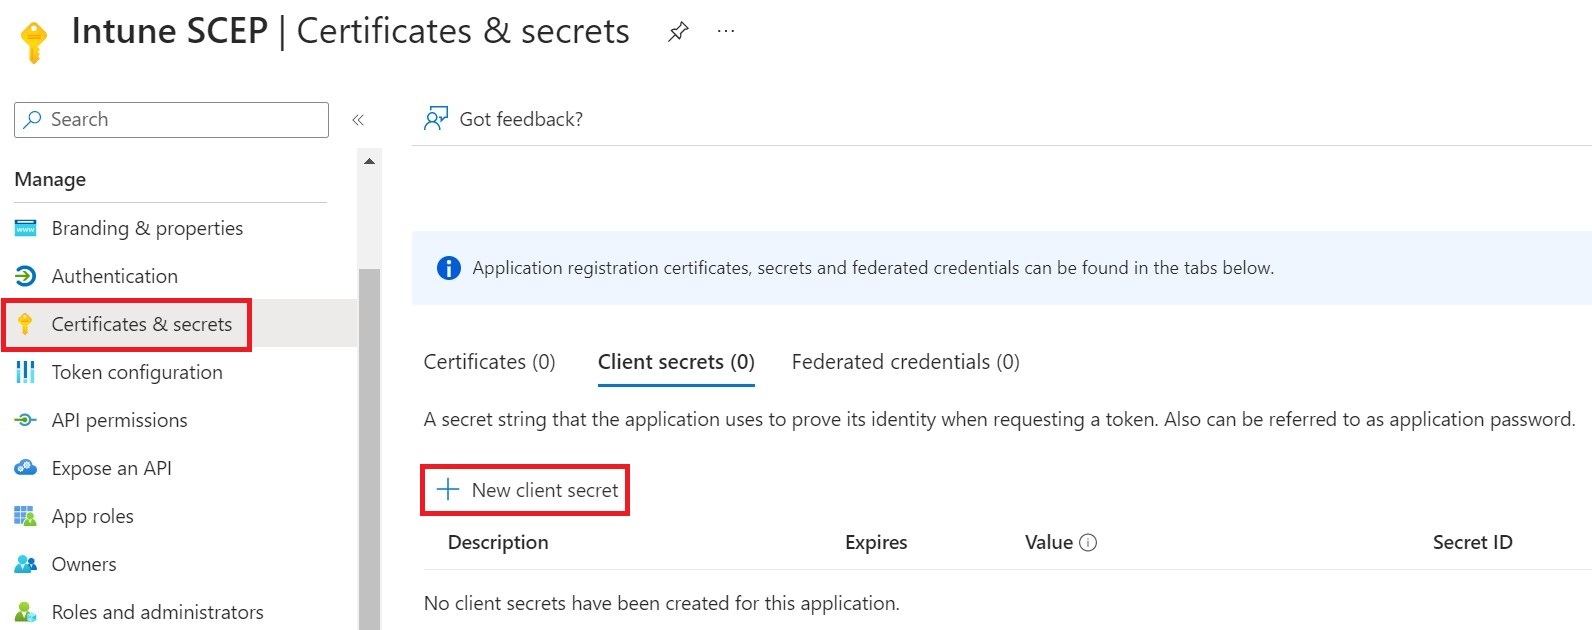
- On the left pane, go to Manage and click Certificates & secrets.
- Click New client secret.
- In the Add a client secret pop-up window, for the Description field, enter a description for the client secret.
- From the Expires drop-down list, select the expiration date of the client secret.
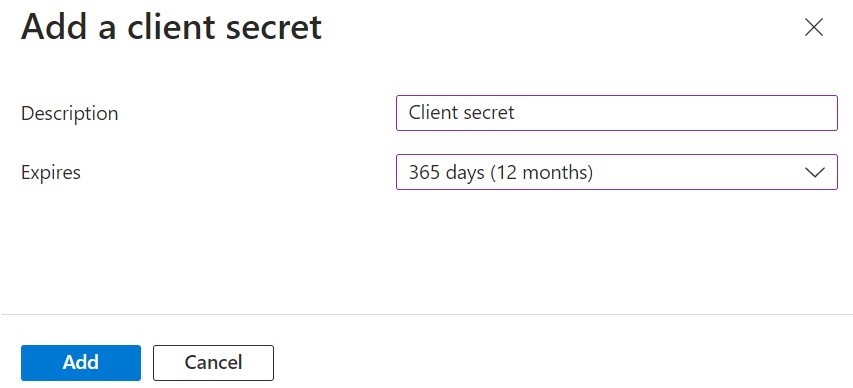
- Click Add.
- The client secret is displayed under the Value column.

NOTE: Ensure that you save the client secret on your console properly, as this secret is non-recoverable.
Adding API Permissions
To provide API permission for SecureW2 to access the Azure directory, perform the following steps:
- On the left pane, go to Manage and select API Permissions.
- On the API permissions screen, click Add a permission.

- Select Microsoft Graph.
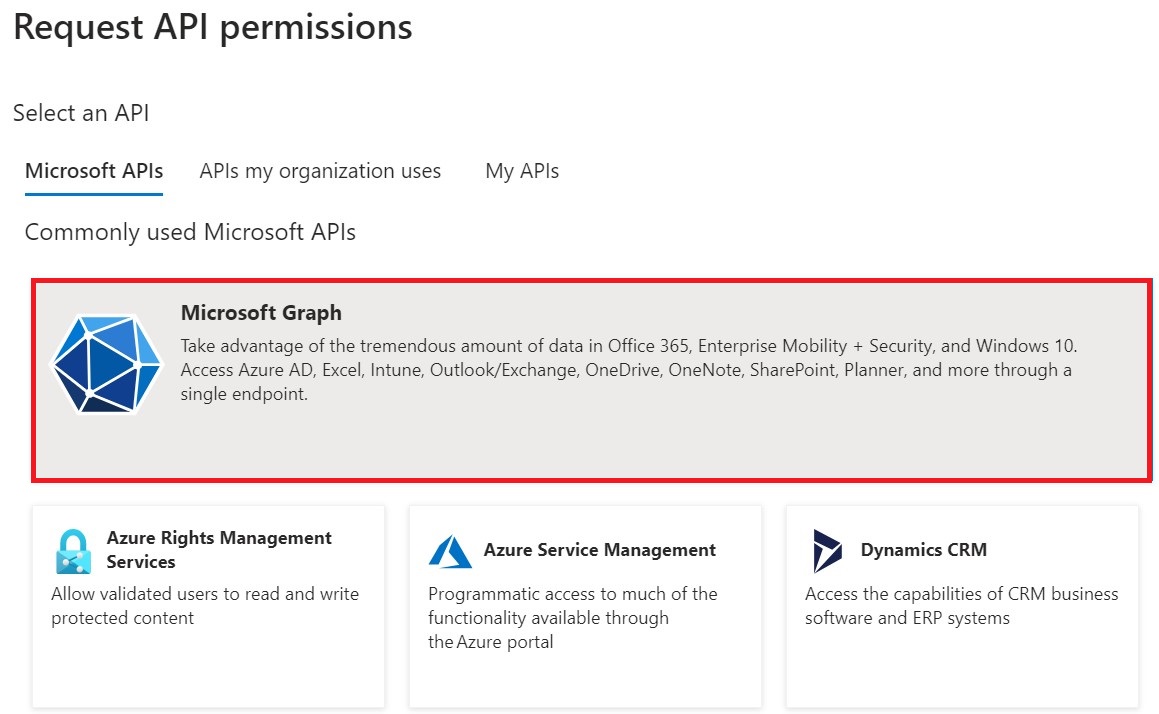
- Select Application permissions.

- In the Select permissions section, from the Application drop-down menu, select Application.Read.All.
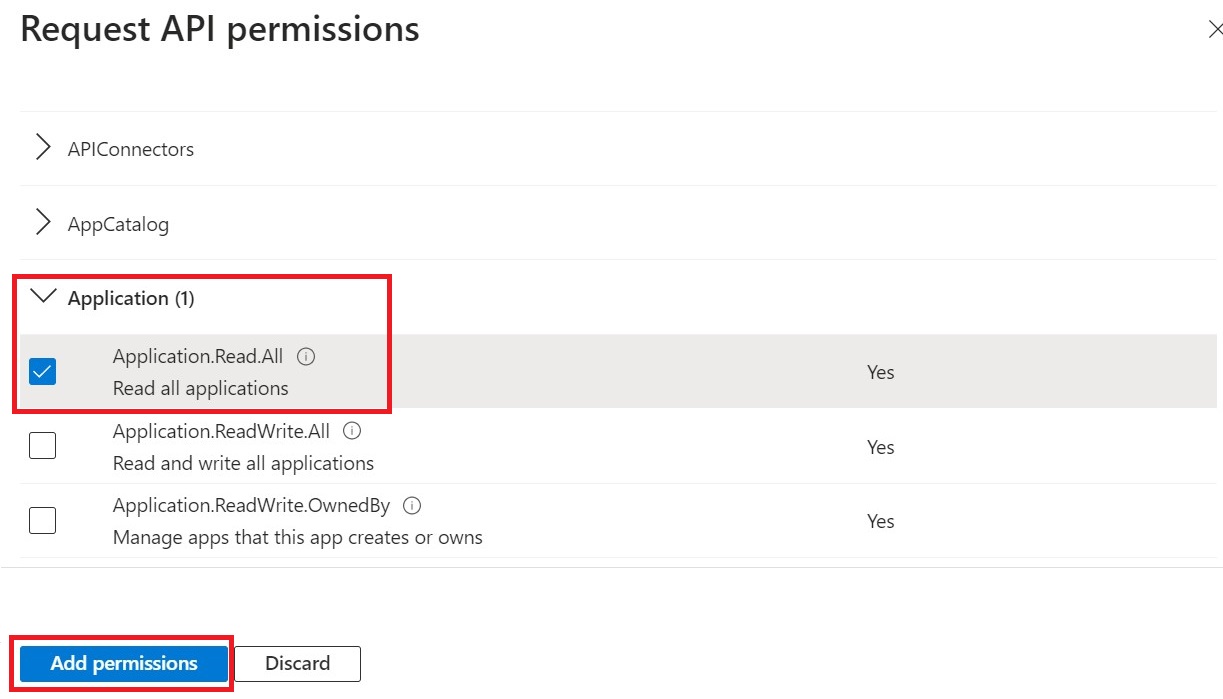
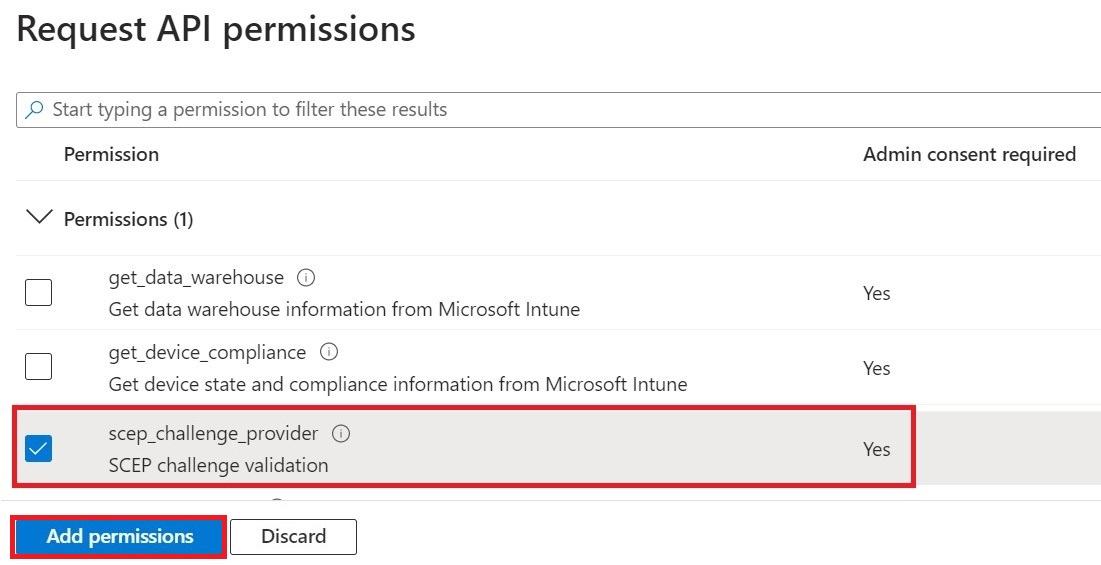
- Click Add permissions.
- Click Add a permission.
- Select Intune.
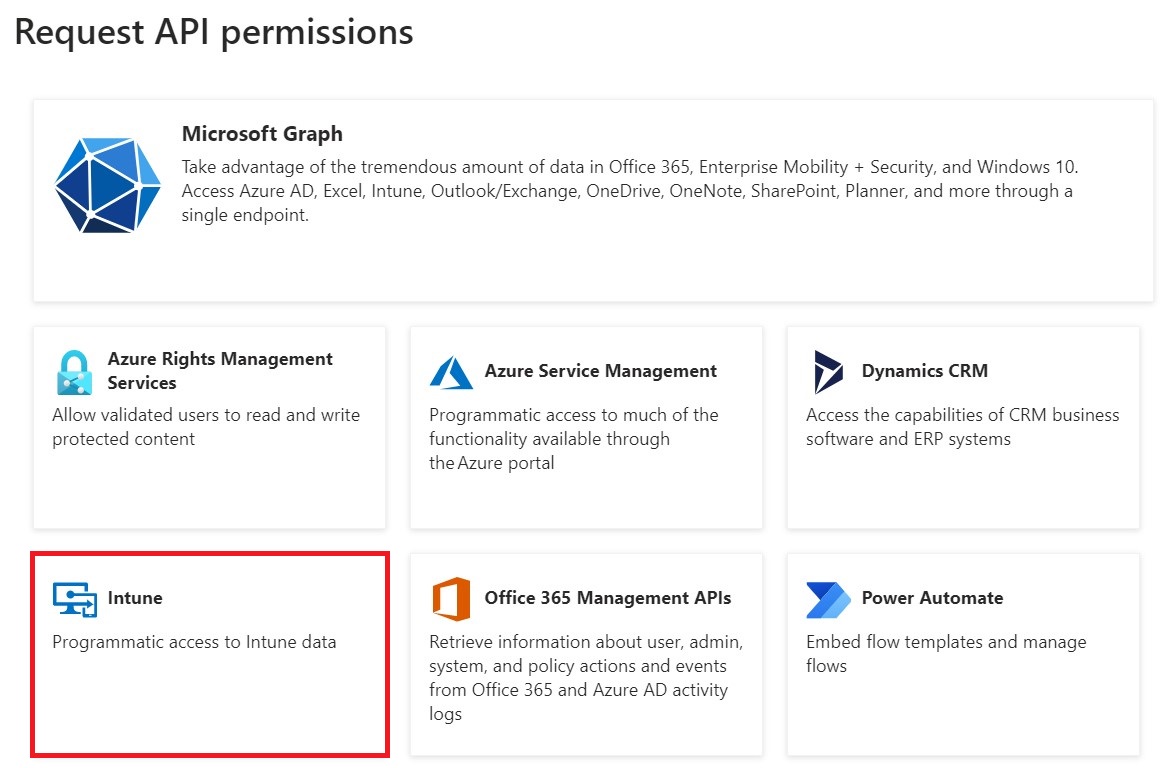
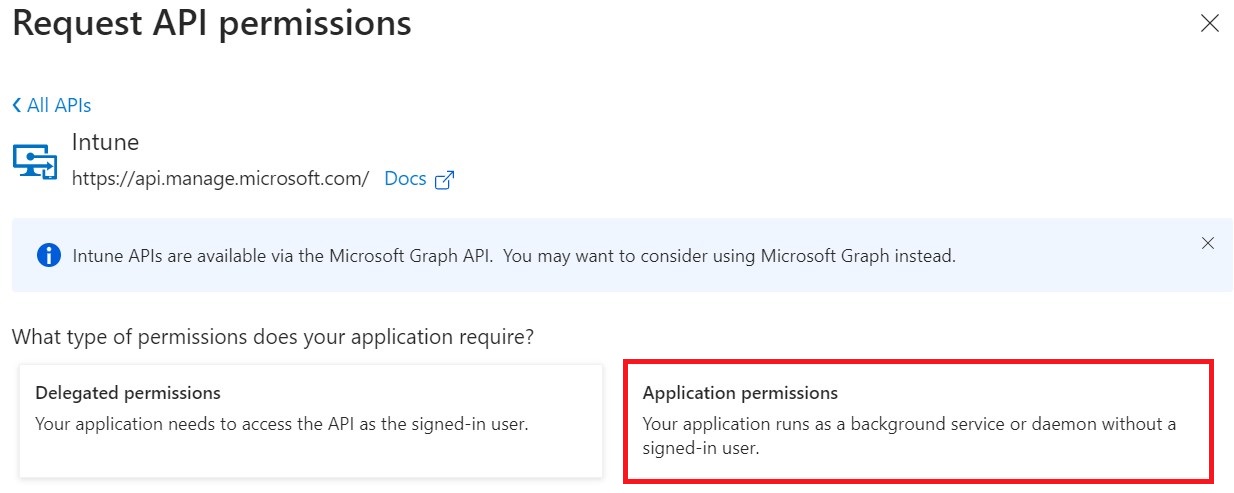
- Select Application permissions.
- In the Select permissions section, from the Permissions drop-down menu, select scep_challenge_provider for certificate request validation, and then click Add permissions.
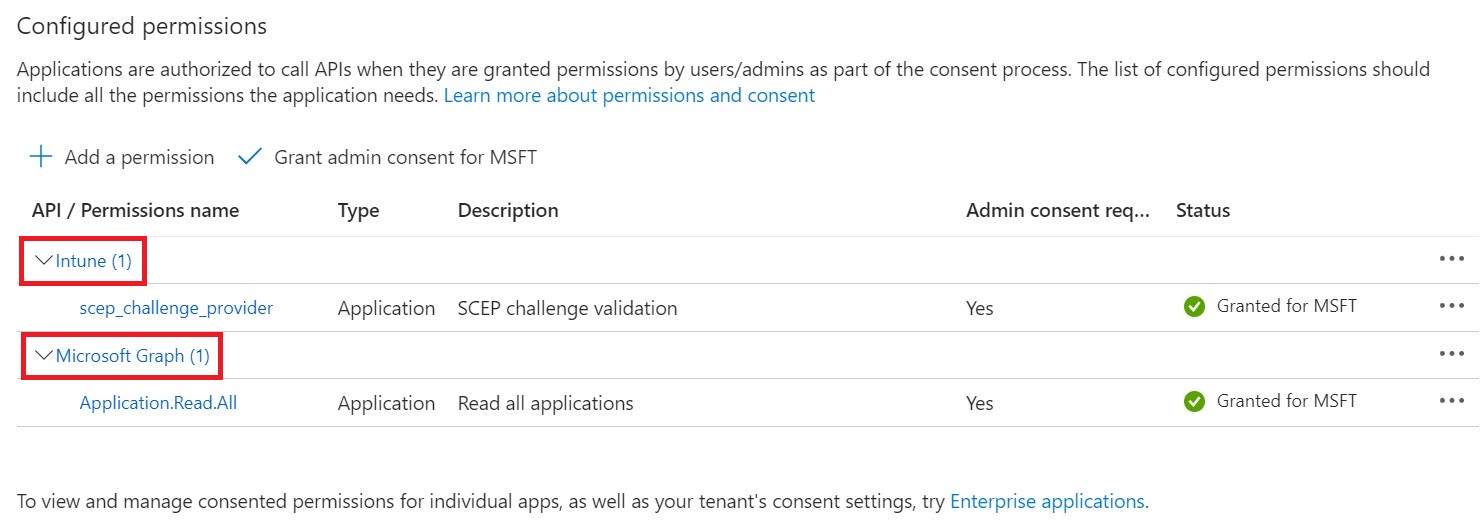
- After adding the permissions, click Grant admin consent for {your organization} to grant consent for the requested permissions.

- In the Grant admin consent confirmation pop-up window, click Yes.

- The configured APIs are displayed on the Configured permissions page.
Configure SecureW2
This section describes the following procedures carried out in the JoinNow Management Portal:
Creating an Intermediate CA for Intune SCEP Gateway Integration
As a best practice, SecureW2 recommends having a new intermediate CA for JoinNow SCEP Gateway integration with Intune. The CA that issues certificates to BYOD devices should be separate from the CA that issues certificates to managed devices because managed devices do not require email notifications. You can disable email notifications for a dedicated CA that issues certificates to Intune-managed devices.
To create a new intermediate CA:
- Log in to the JoinNow Management Portal.
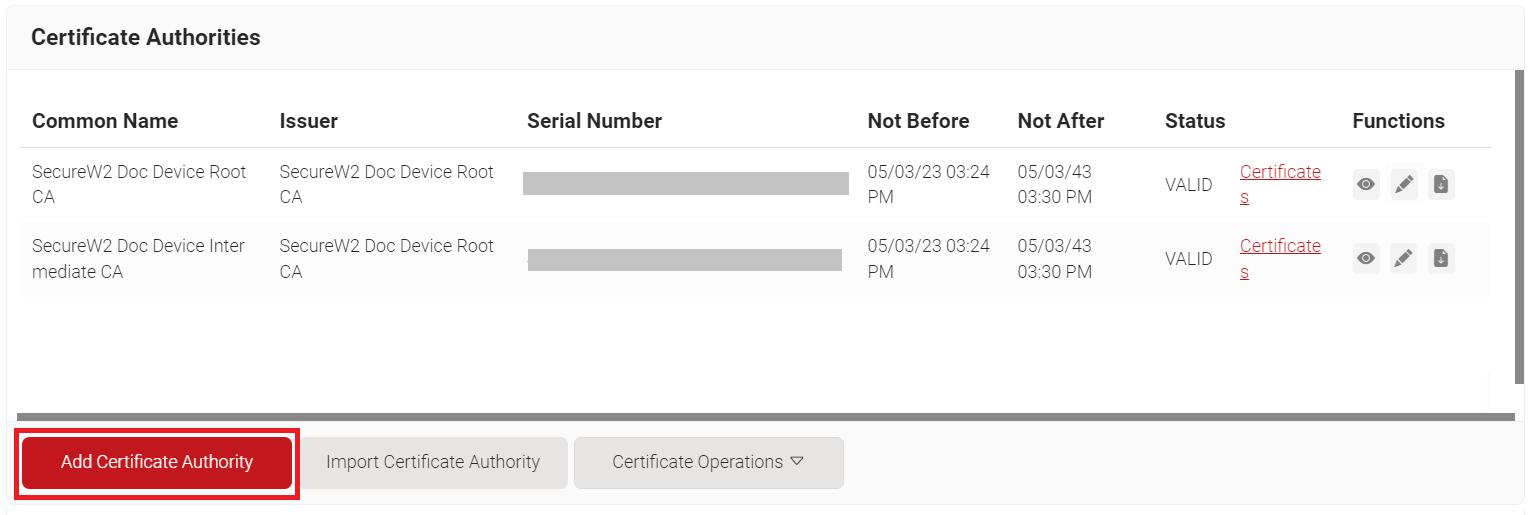
- Navigate to PKI > Certificate Authorities.
- Click Add Certificate Authority.
- In the Basic section, from the Generate CA For drop-down list, select the Device and User Authentication option to authenticate devices and users.
- From the Type drop-down list, select Intermediate CA.
- From the Certificate Authority drop-down list, select the default Root CA that comes with your organization.
- In the Common Name field, enter a common name for the CA certificate. SecureW2 recommends a name that includes “SCEP.”
- From the Key Size drop-down list, select 2048 for the CA certificate key pair.
- From the Signature Algorithm drop-down list, select the signature algorithm for the certificate signing request. The option available is SHA-256.
- In the Validity Period (in years) field, enter the validity period of the CA certificate.
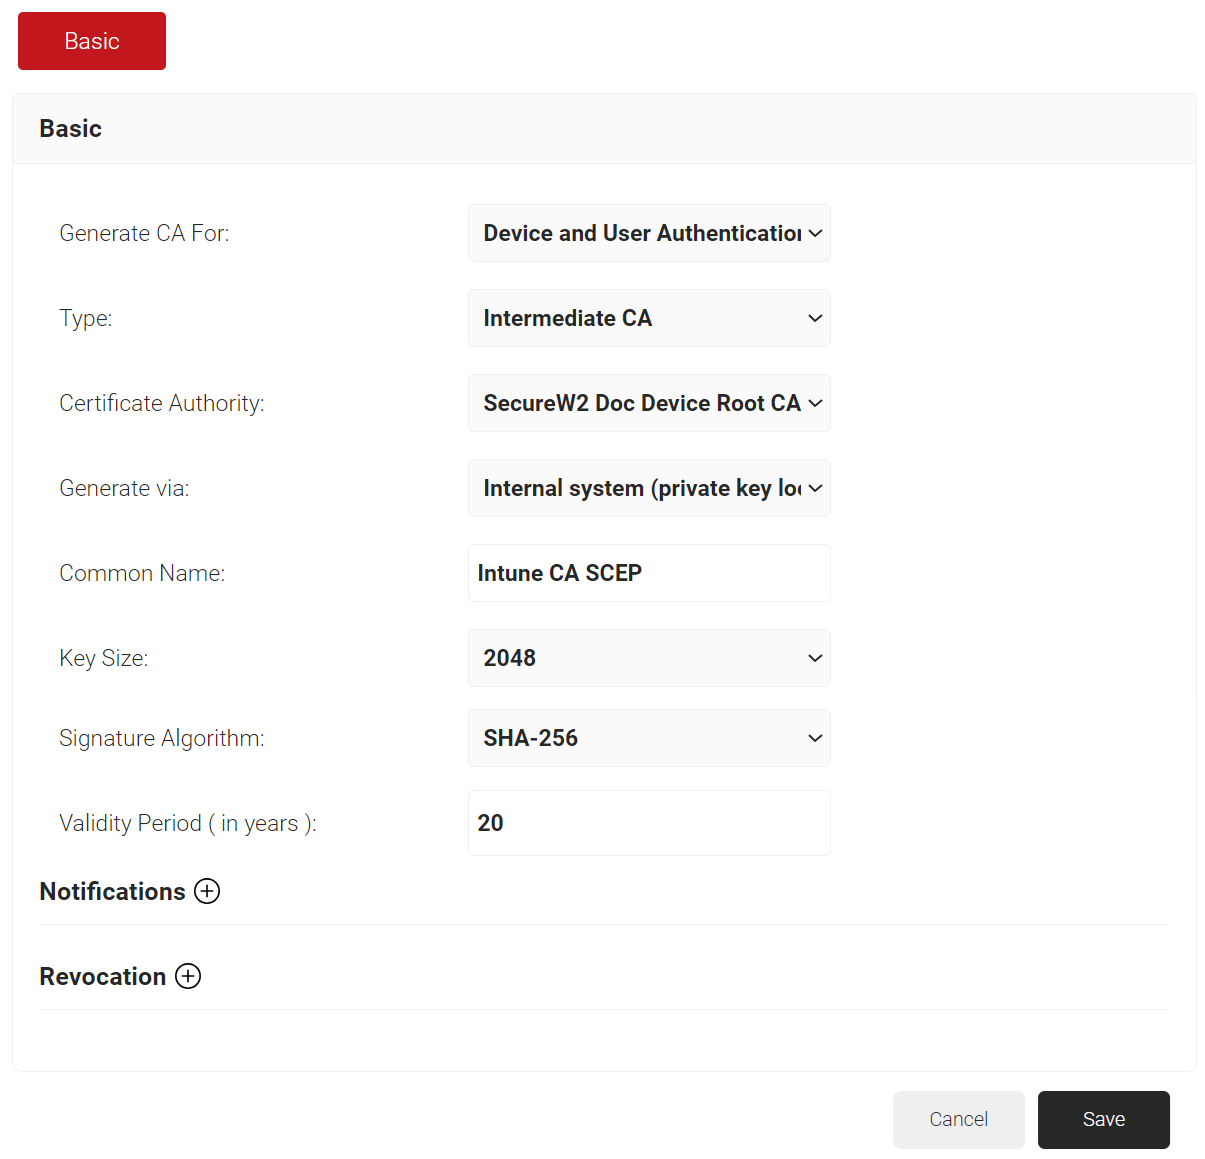
- Click Save. The new intermediate CA is generated.
Creating an Intune Certificate Template
A certificate template determines how information is encoded in the certificate issued by the Certificate Authority (CA). The Certificate template consists of a list of certificate attributes and how the information must be encoded in the attribute values. The organization administrator in the Management Portal provides these details.
MDM usually has a certificate template which you can configure to use a SCEP gateway.
To create an Intune certificate template:
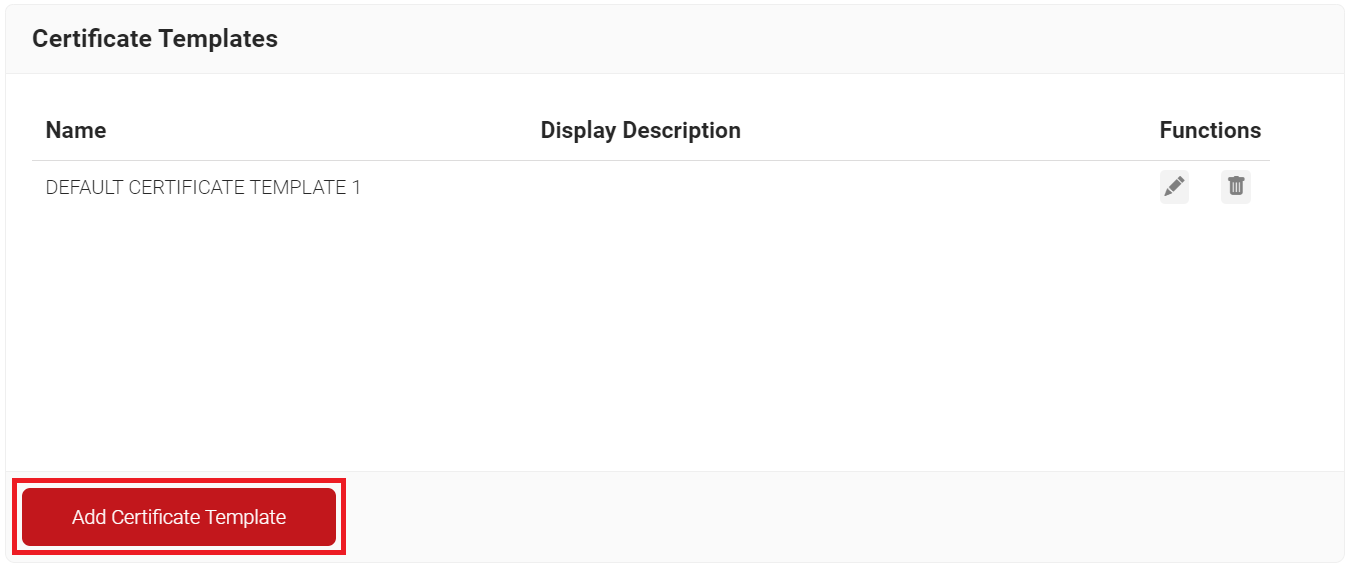
- Navigate to PKI > Certificate Authorities.
- Click Add Certificate Template.
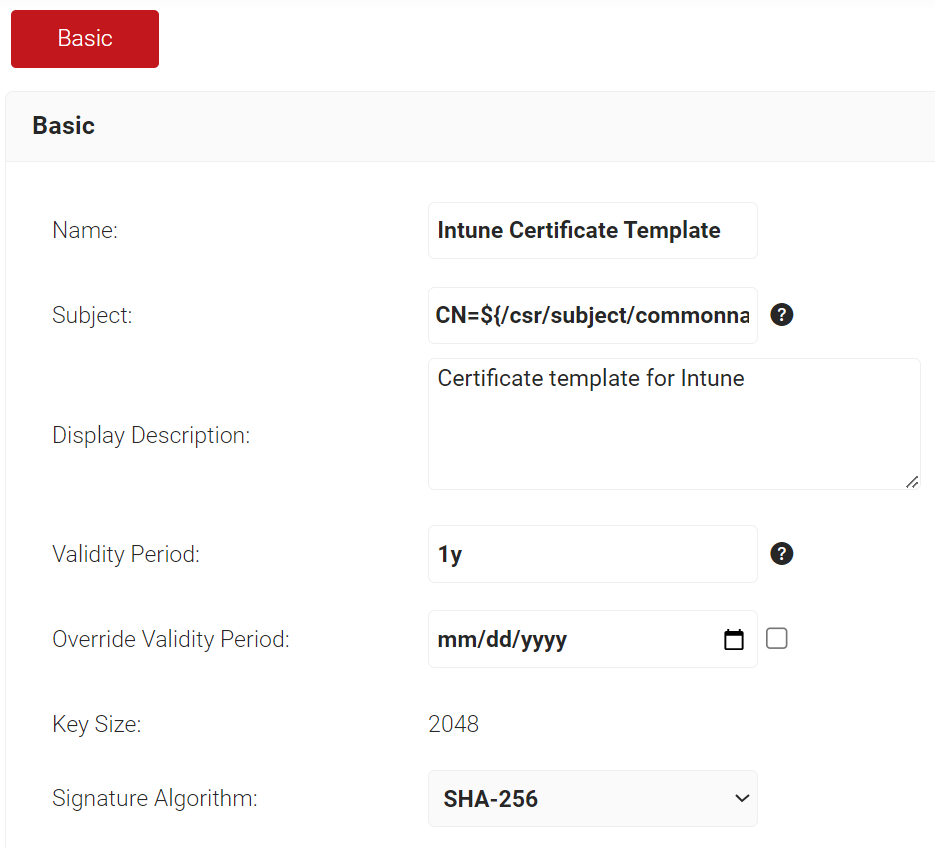
- In the Basic section, for the Name field, enter the name of the certificate template.
- In the Subject field, enter CN=${/csr/subject/commonname}
- In the Display Description field, enter a suitable description for the certificate template.
- In the Validity Period field, type the validity period of the certificate (based on the requirement).
- From the Signature Algorithm drop-down list, select the signature algorithm for the certificate signing request. The option available is SHA-256.
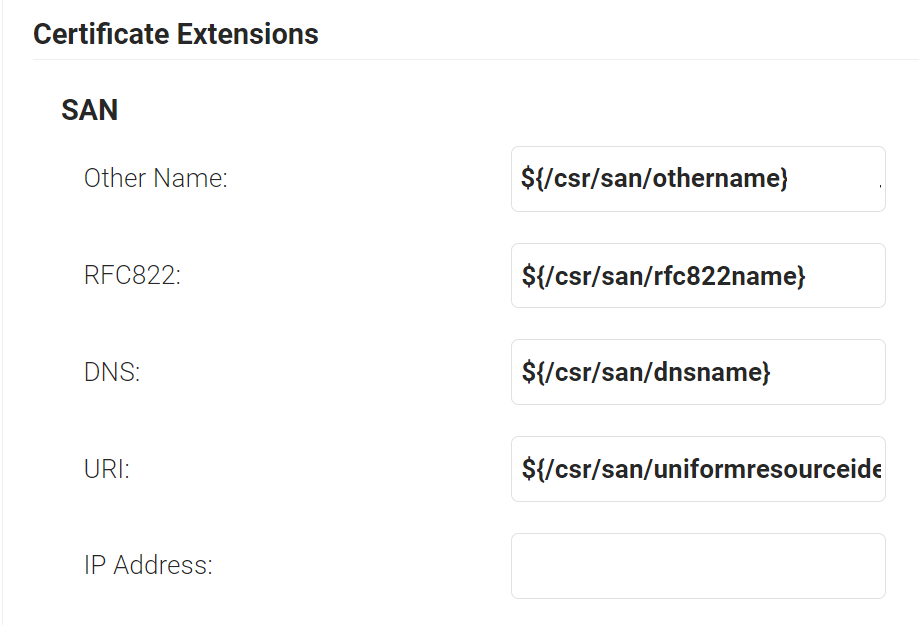
- In the SAN section:
- In the Other Name field, enter ${/csr/san/othername}.
- In the RFC822 field, enter ${/csr/san/rfc822name}.
- In the DNS field, enter ${/csr/san/dnsname}.
- In the Extended Key Usage section, from the Use Certificate For list, select Client Authentication.
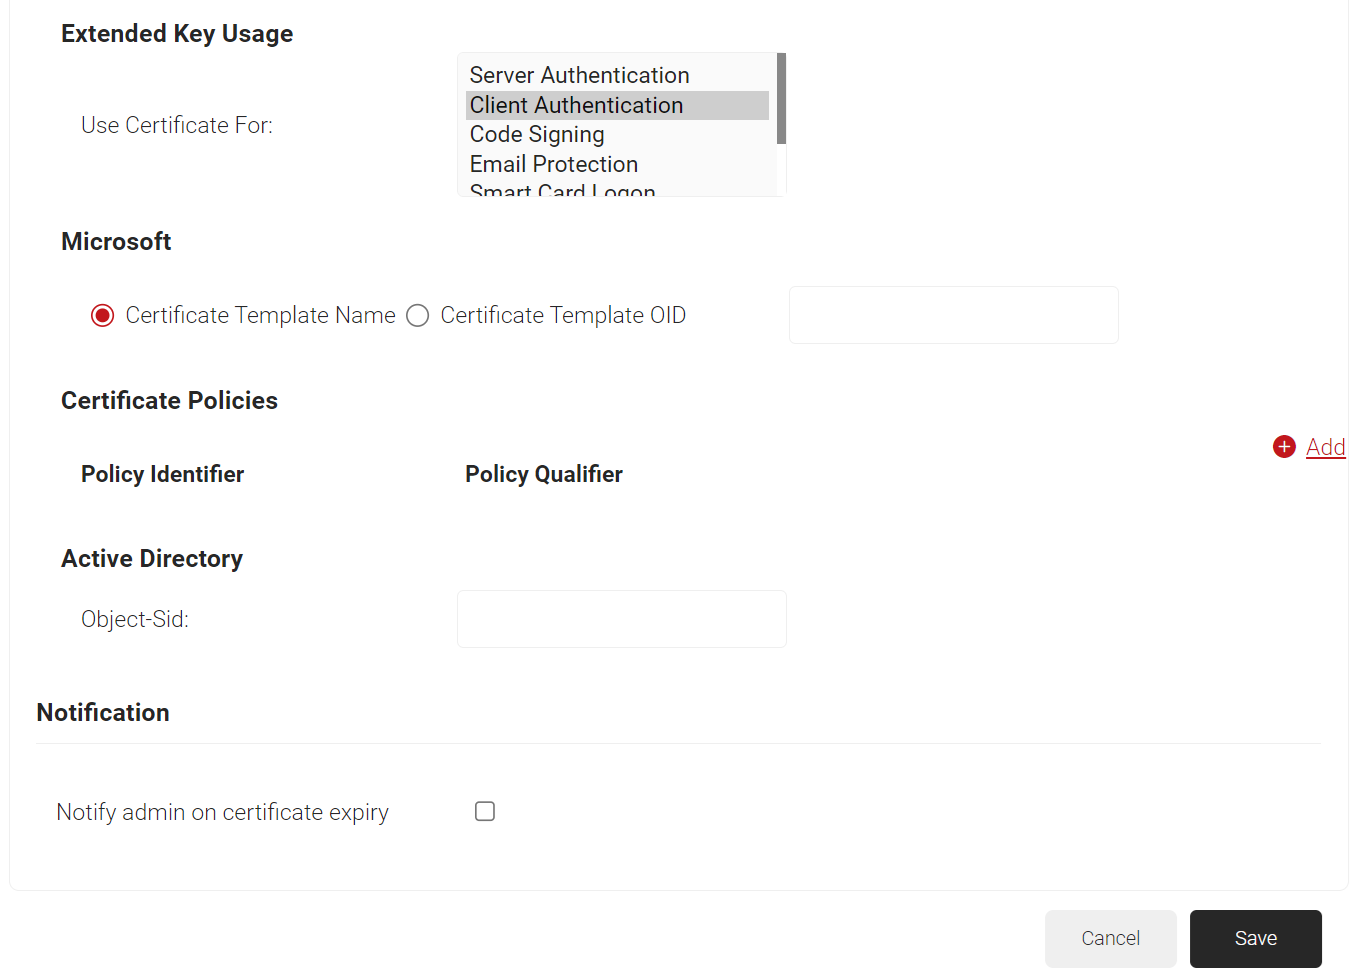
- Click Save.
Creating an Intune CA Identity Provider in SecureW2
In the SecureW2 JoinNow Management Portal, we need to create an IDP (Identity Provider) so SecureW2 can talk to Intune. This IDP provides the endpoint URI which we will add to the SCEP profile in Intune. Also, where we can configure which CA will be used during the SCEP process.
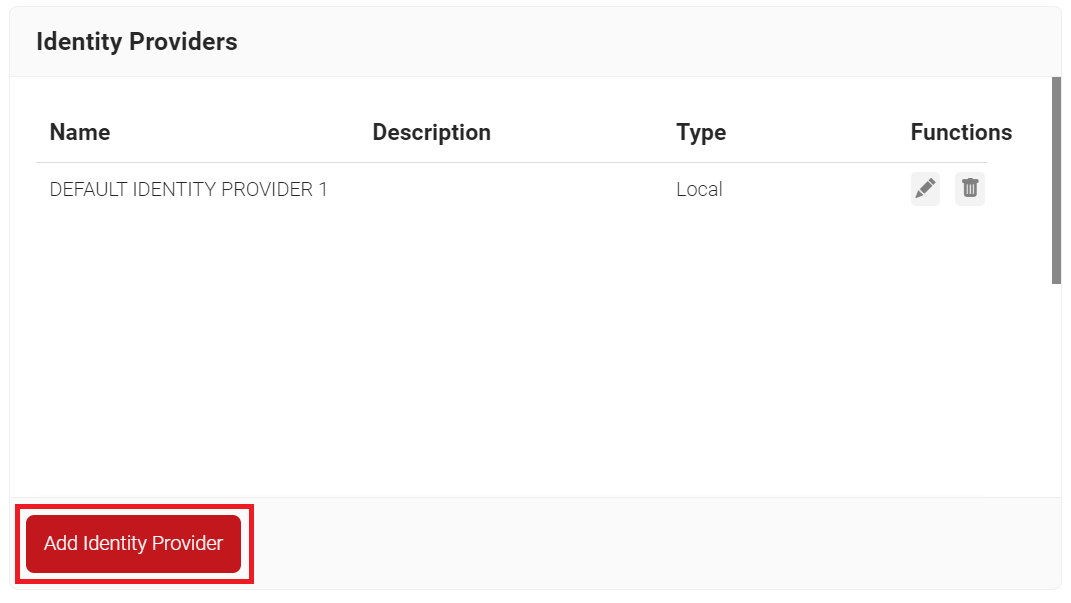
- Navigate to Identity Management > Identity Providers.
- Click Add Identity Provider.
- In the Basic section, for the Name field, enter the name of the IDP.
- In the Description field, enter a suitable description for the IDP.
- From the Type drop-down list, select Intune CA Partner.
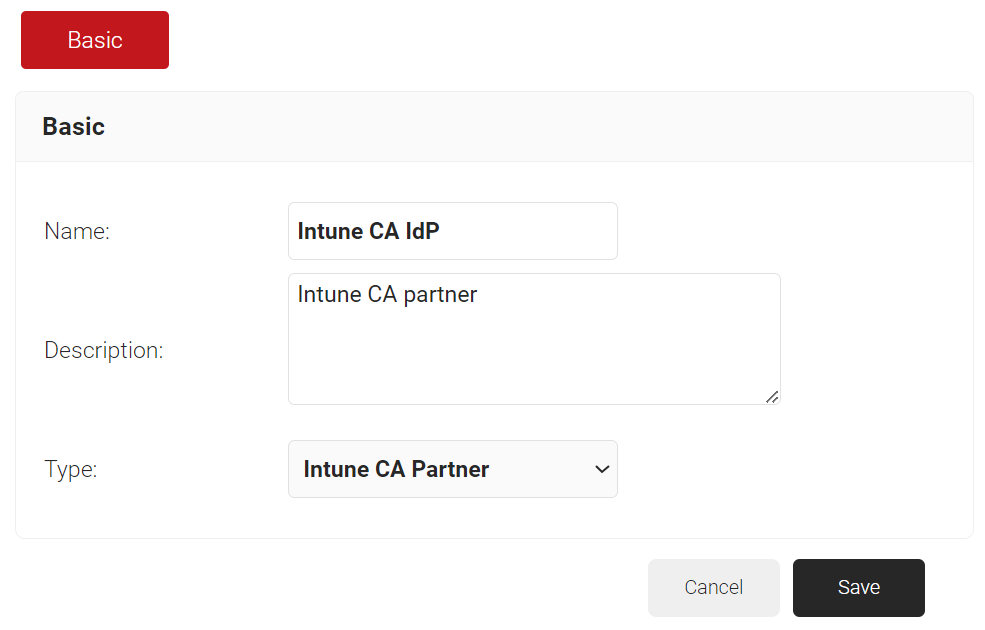
- Click Save.
- The page refreshes, and the Configuration tab is displayed.
- Click the Configuration tab.
- In the Configuration section, for the Client Id and Tenant Id fields, enter the values you obtained after creating a new application in the Azure portal (for more information, see the Creating a New Application section).
- In the Client Secret field, enter the value you obtained after creating the client secret in the Azure portal (for more information, see the Creating a Client Secret section).
- From the Certificate Authority drop-down list, select the intermediate CA you created earlier (for more information, see the Creating an Intermediate CA for Intune SCEP Gateway Integration section).
- Copy the Endpoint URI to your console.
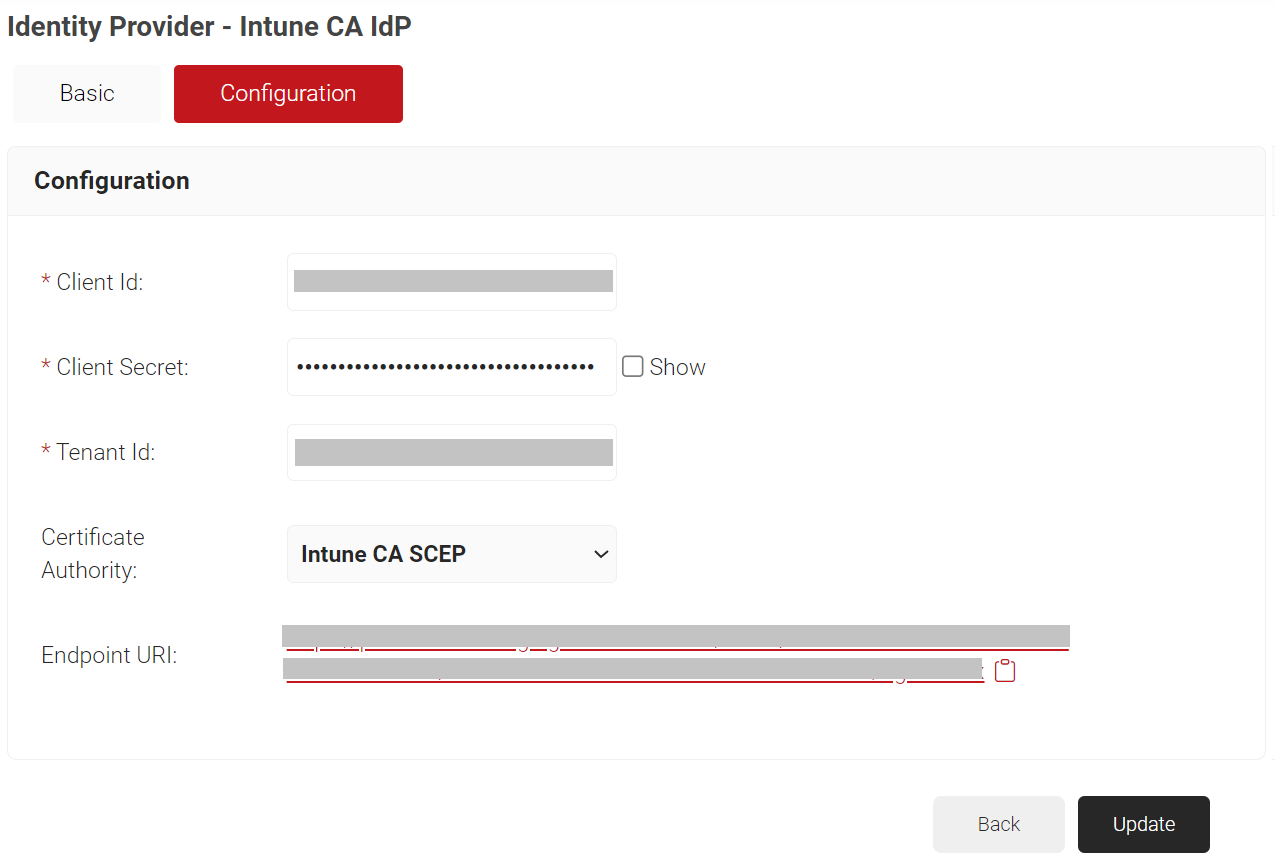
- Click Update.
Configuring Policy Management
Configuring certificate-based authentication for our Intune-managed devices requires three policies in the JoinNow Management Portal:
NOTE: Microsoft Intune does not need a dedicated device role policy. You can use the Default Device Role policy if its settings are default.
Configuring a Policy Engine Workflow
A policy engine workflow grants a user access to defined resources.
To configure a policy engine workflow:
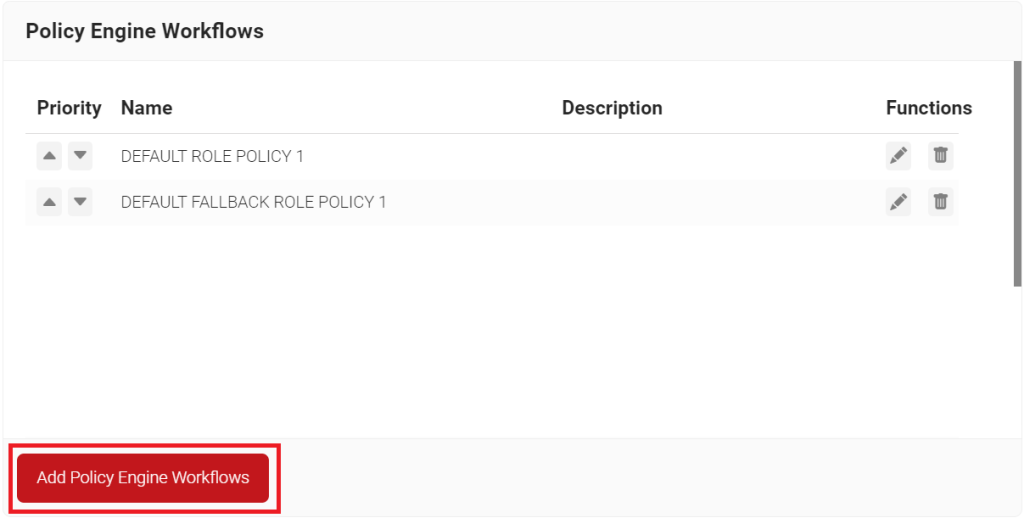
- Navigate to Policy Management > Policy Engine Workflows.
- Click Add Policy Engine Workflow.
- In the Basic section, for the Name field, enter the name of the policy engine workflow policy.
- In the Display Description field, enter a suitable description for the policy engine workflow policy.
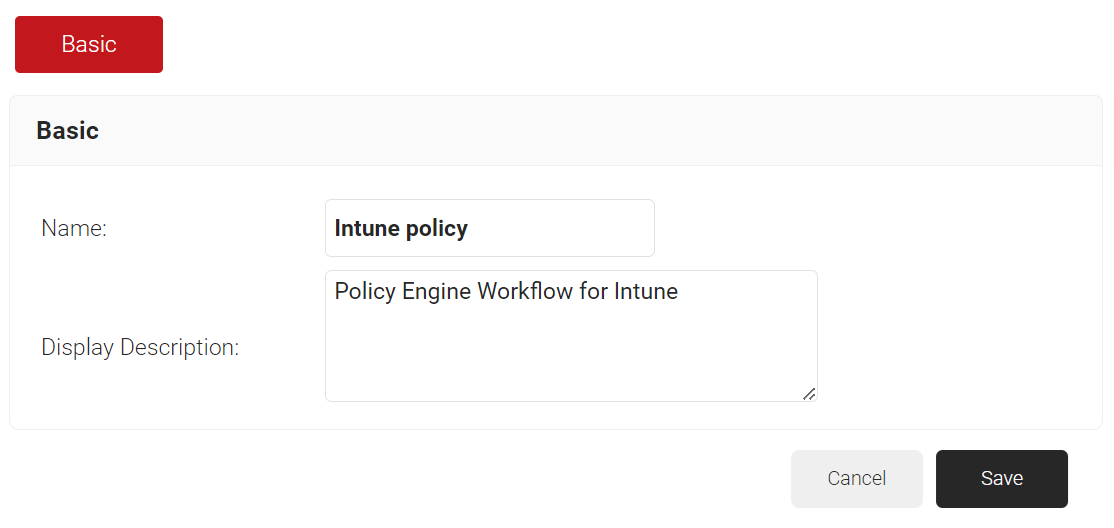
- Click Save.
- The page refreshes, and the Conditions tab is displayed.
- Select the Conditions tab.
- In the Conditions section, from the Identity Provider drop-down list, select the API token you created earlier (for more information, see the Creating an Intune CA Identity Provider in SecureW2 section).
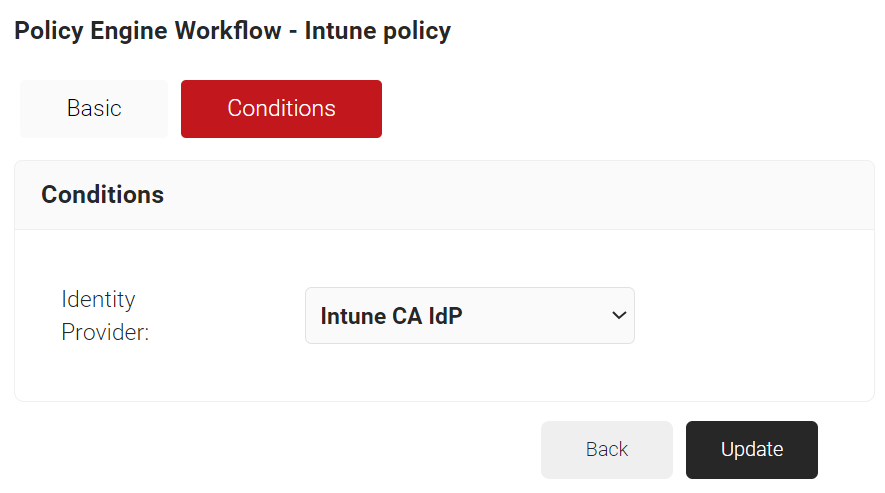
- Click Update.
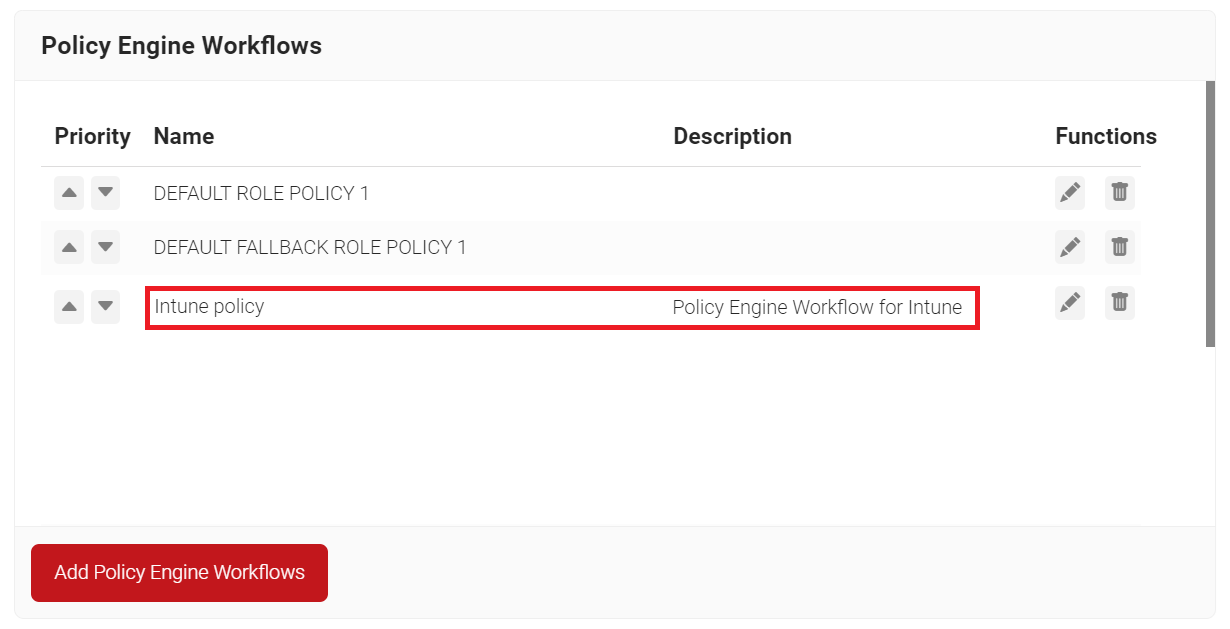
Configuring an Enrollment Policy
An enrollment policy validates the Policy Engine Workflow and Device Role policies before issuing a certificate.
To configure an enrollment policy:
- Navigate to Policy Management > Enrollment Policies.
- Click Add Enrollment Policy.
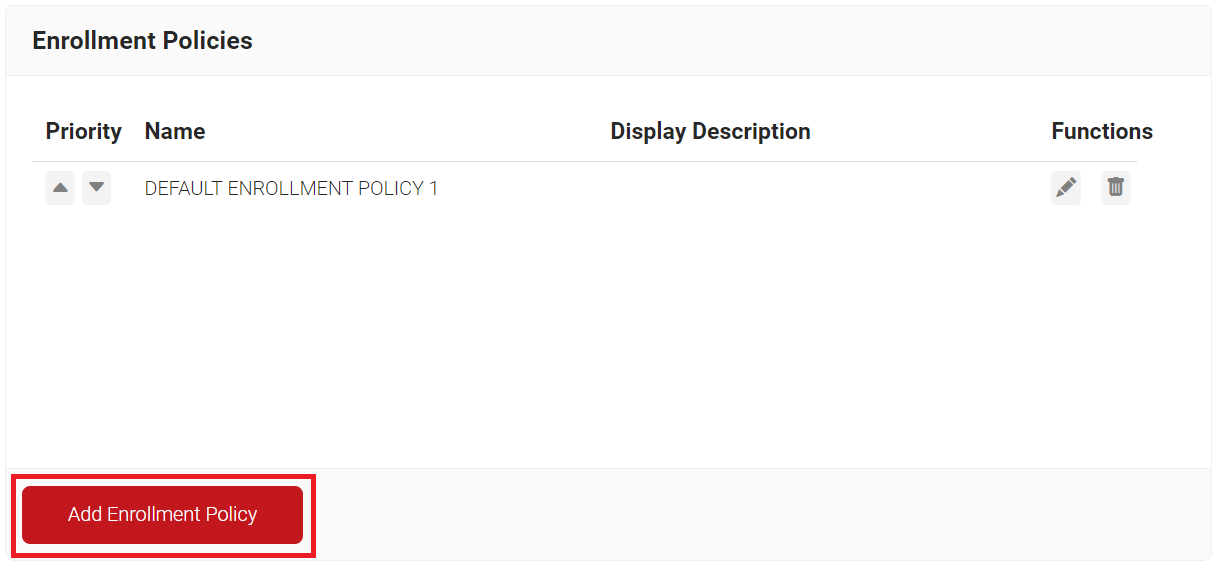
- In the Basic section, for the Name field, enter the name of the enrollment policy.
- In the Display Description field, enter a suitable description for the enrollment policy.
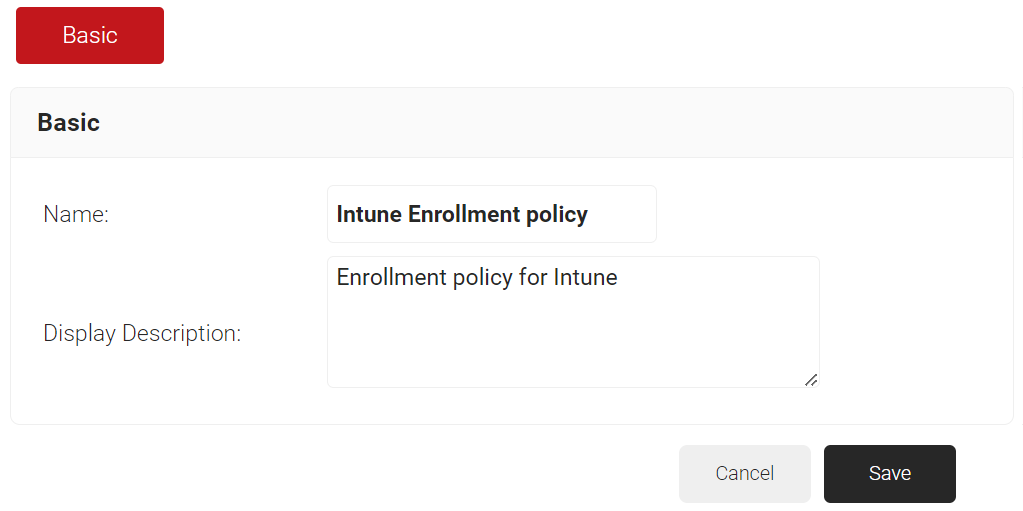
- Click Save.
- The page refreshes, and the Conditions and Settings tabs are displayed.
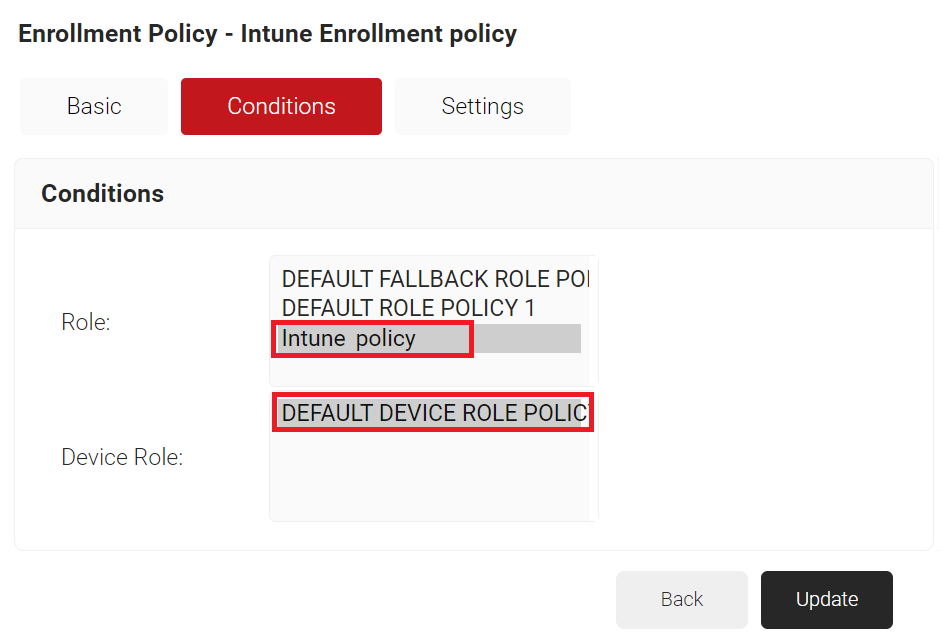
- Select the Conditions tab.
- In the Conditions section, from the Role list, select the policy engine workflows you created earlier (for more information, see the Configuring a Policy Engine Workflow section).
- From the Device Role list, select DEFAULT DEVICE ROLE POLICY.
- Select the Settings tab.
- In the Settings section, from the Use Certificate Authority drop-down list, select the intermediate CA you created earlier (for more information, see the Creating an Intermediate CA for Intune SCEP Gateway Integration section).
- From the Use Certificate Template drop-down list, select the template you created earlier (for more information, see the Creating an Intune Certificate Template section).
- In the other settings, retain the default values.
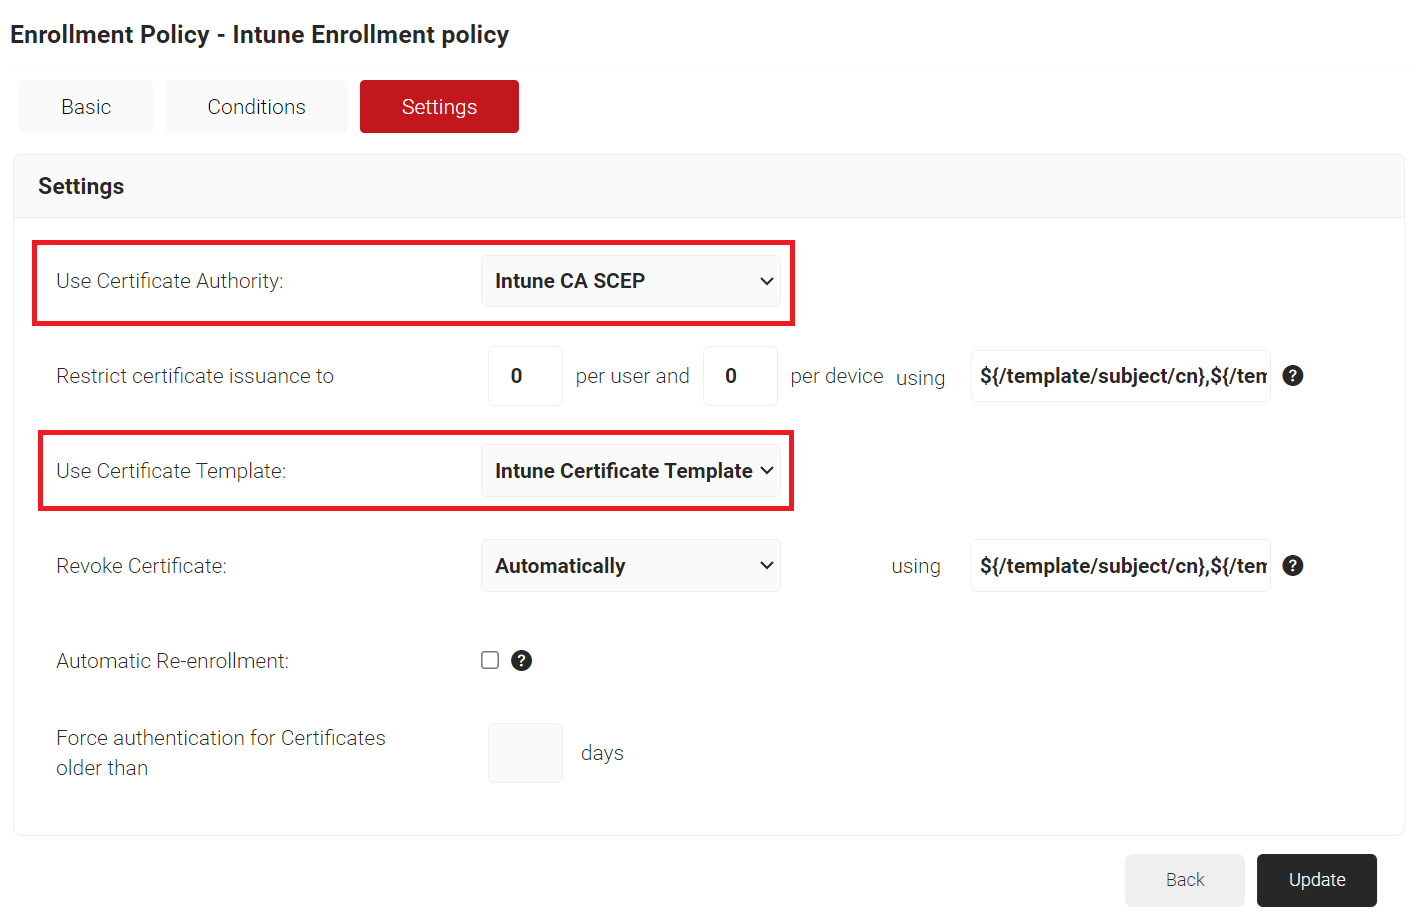
- Click Update.
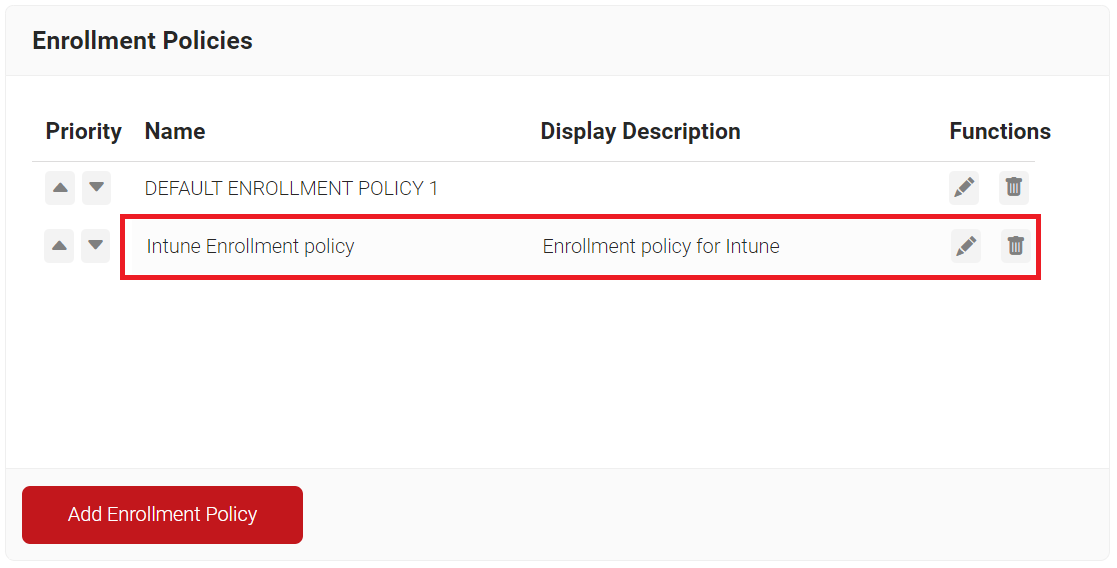
Configuring a Network Policy
The Network Policy section determines the access levels and resources provided to users based on specific conditions created in the network policy.
To configure network policy:
- Go to Policy Management > Network Policies.
- Click Add Network Policy.
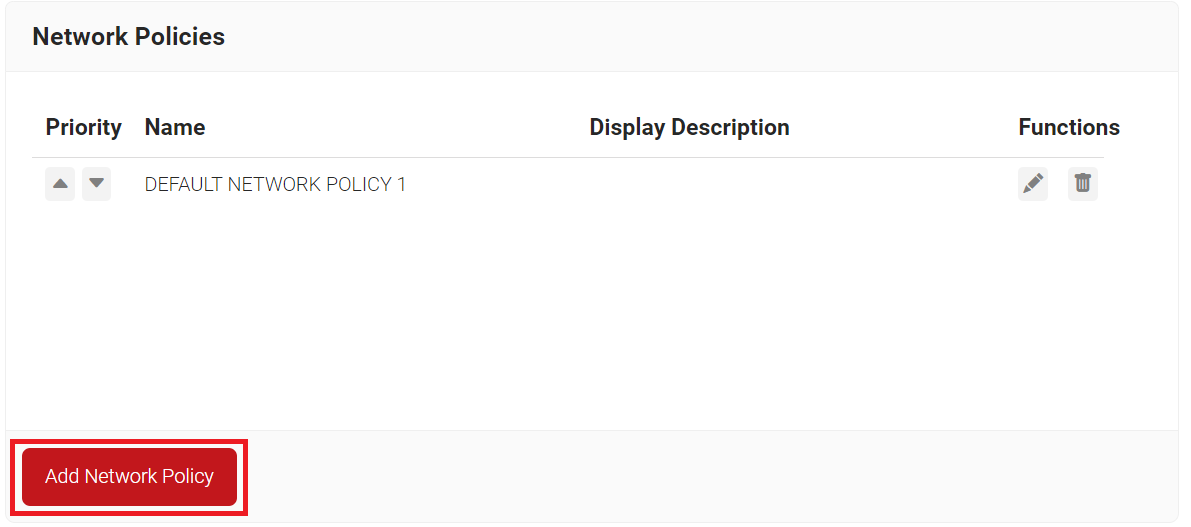
- In the Basic section, for the Name field, enter the name of the network policy.
- In the Display Description field, enter a suitable description for the network policy.
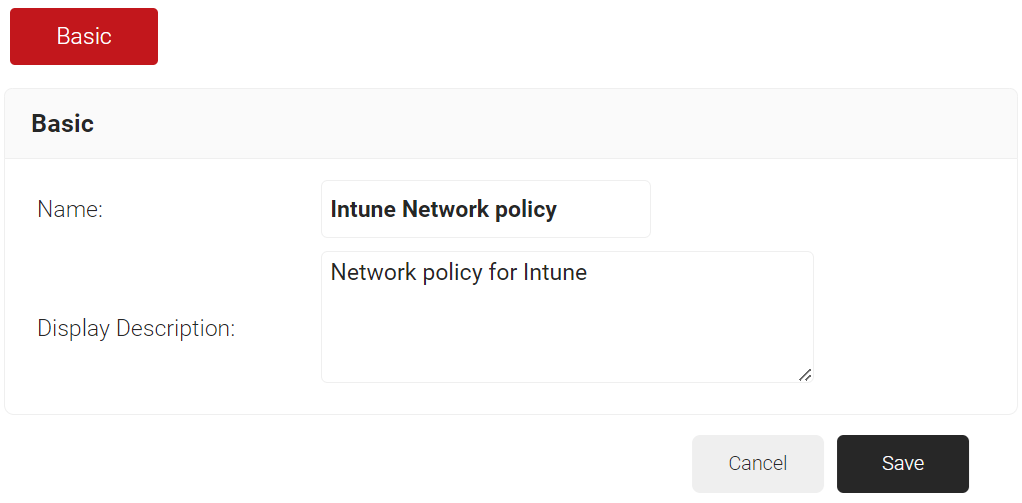
- Click Save.
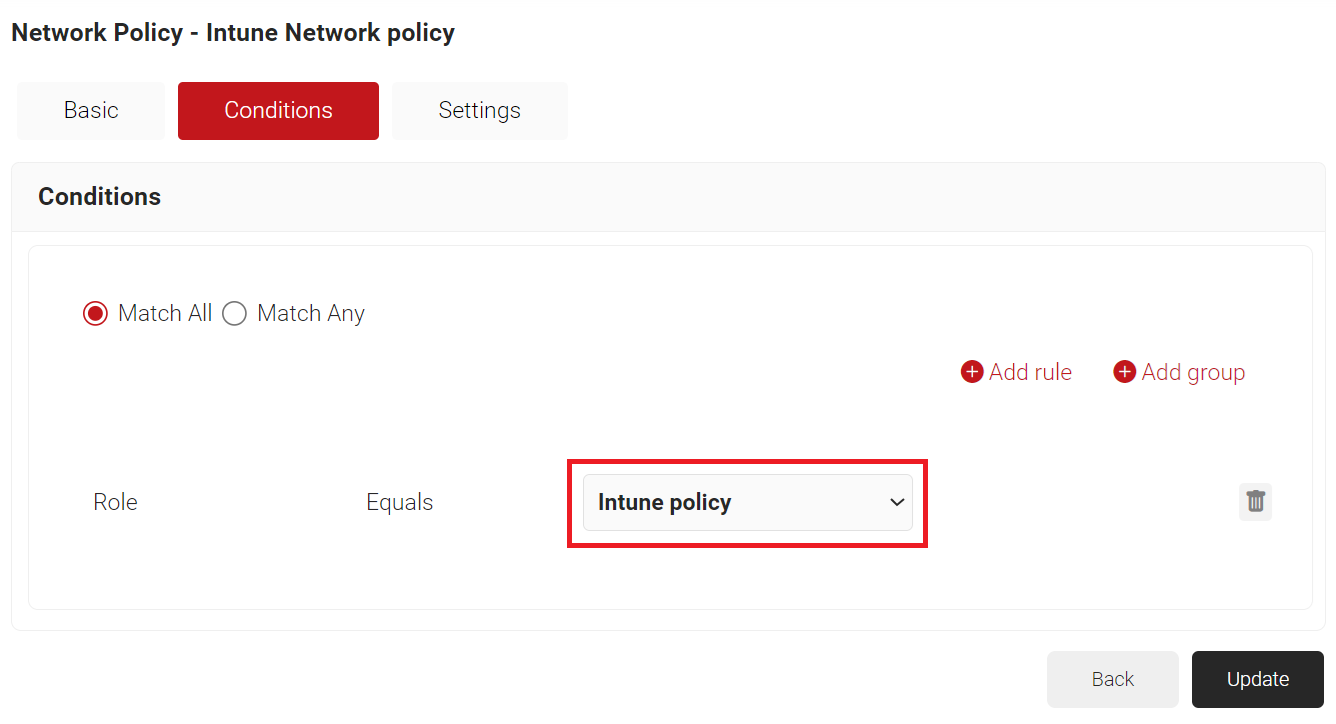
- Select the Conditions tab.
- Select Match All or Match Any based on your requirements to set authentication criteria.
- Click Add rule.
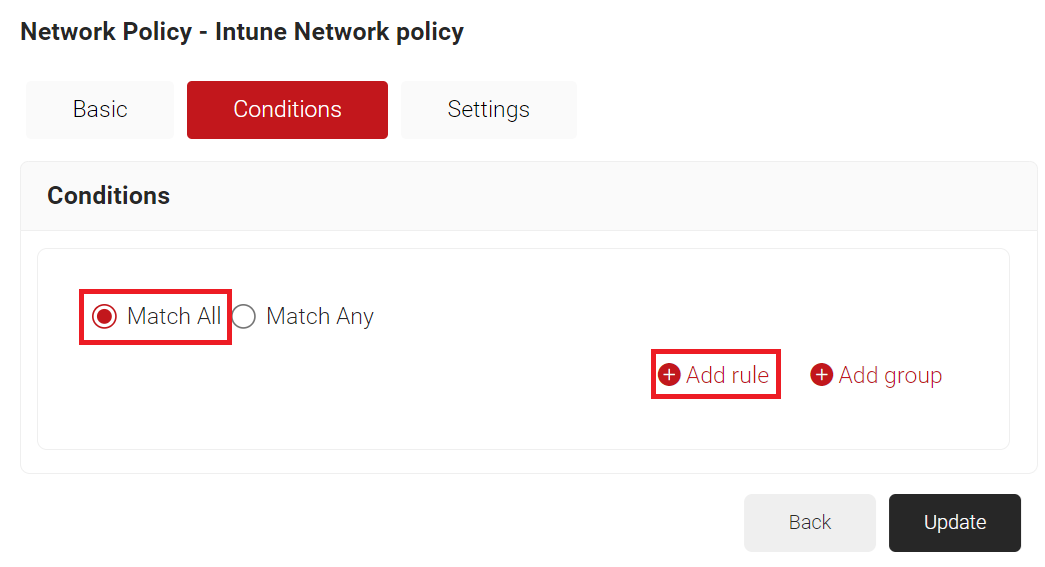
- Expand Identity and click Select adjacent to the Role option.
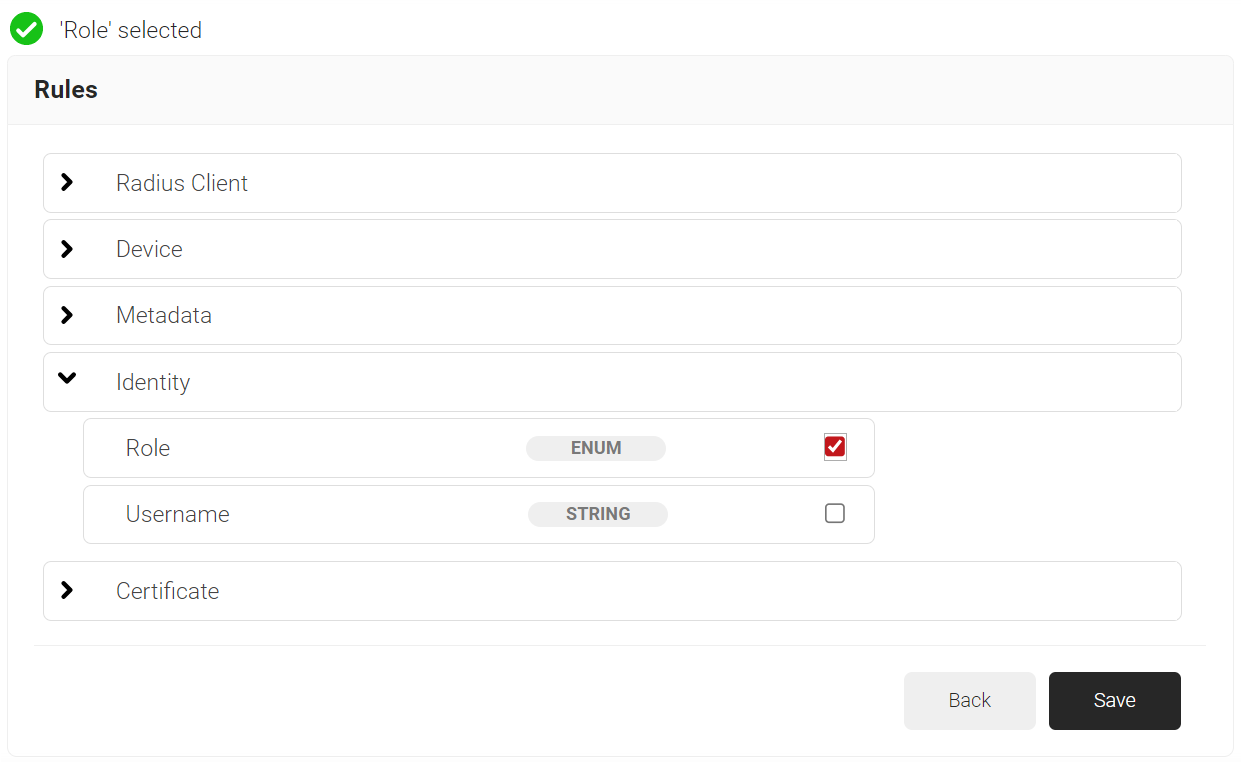
- Click Save.
- The Role option appears under the Conditions tab.
- From the Role Equals drop-down list, select the policy engine workflow you created earlier (for more information, see the Configuring a Policy Engine Workflow section).
- Select the Settings tab.
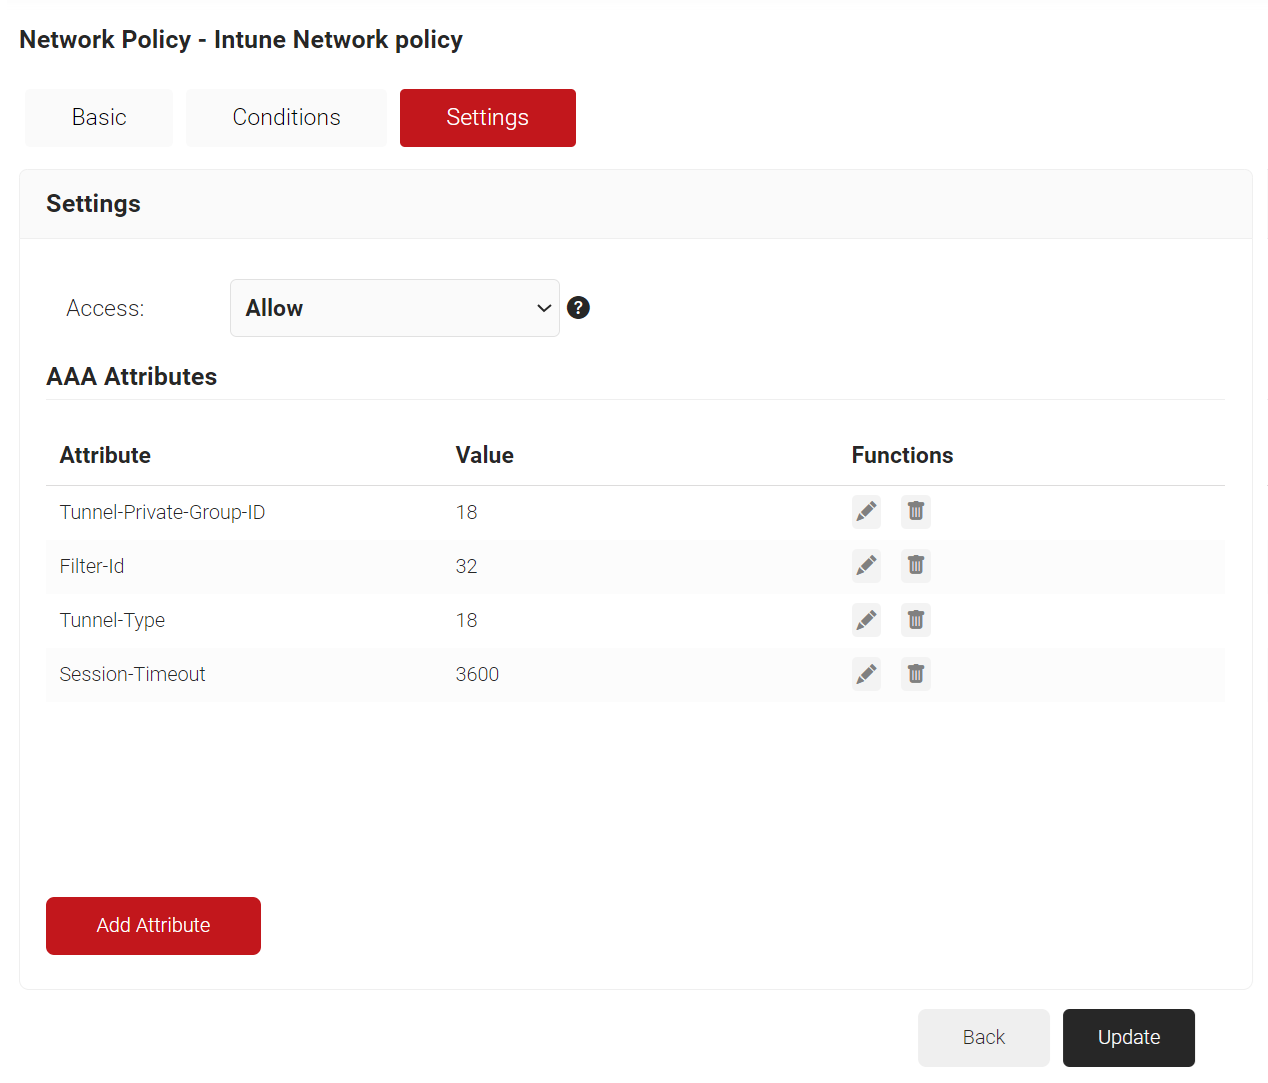
- Under the Settings tab, you can allow or deny the Wi-Fi connection and configure the required RADIUS attributes. These attributes are network parameters that can be sent to the Controller to configure the authenticating devices.
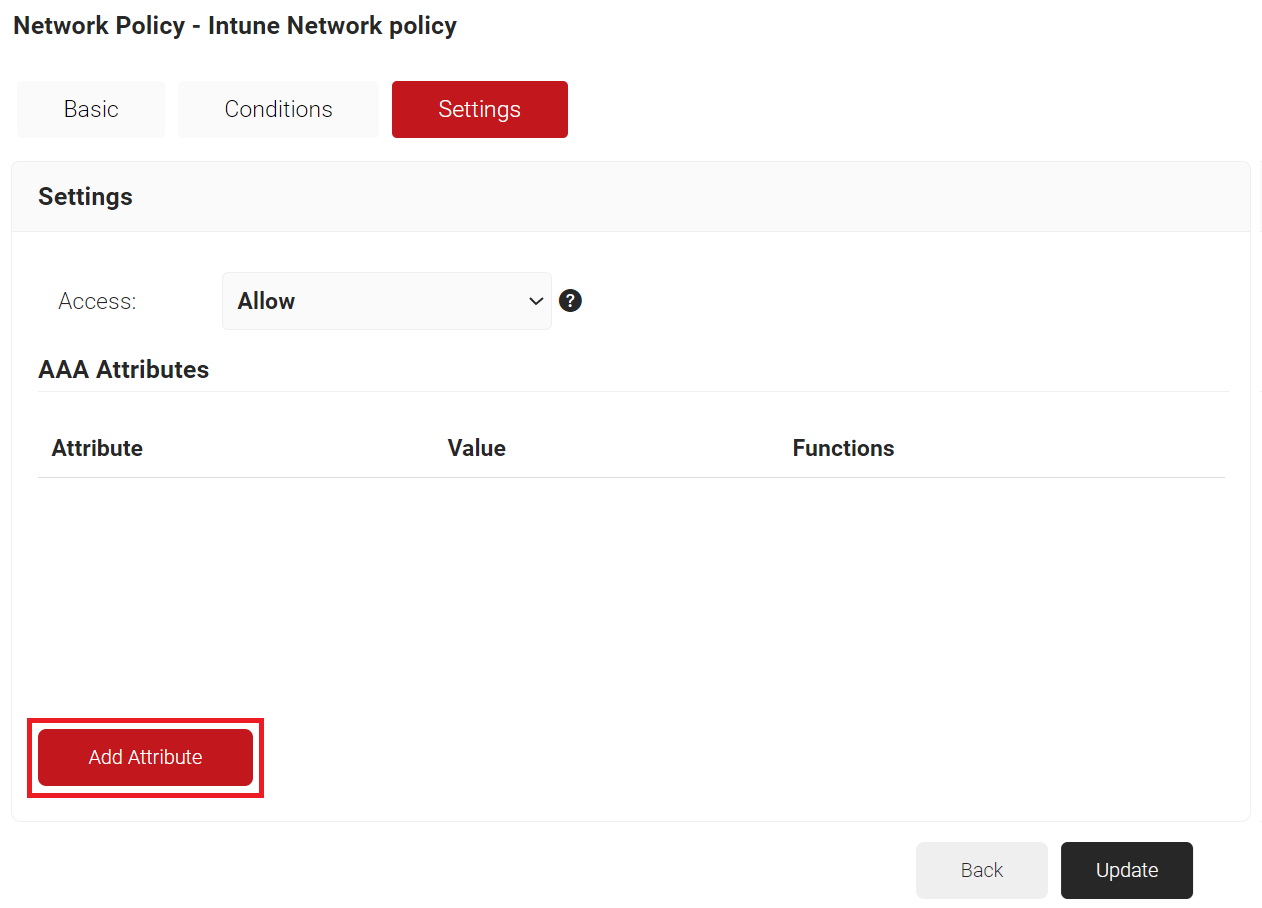
- Click Add Attribute.
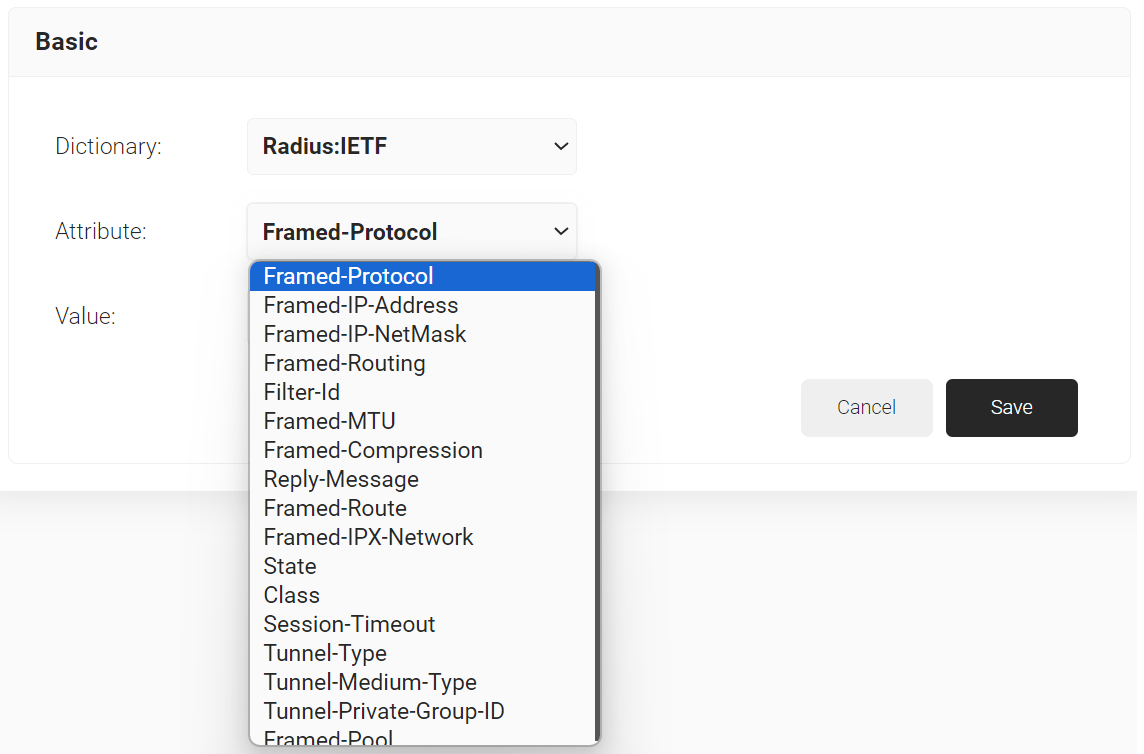
- From the Dictionary drop-down list, select Radius:IETF or Custom.
- RADIUS: IETF – RADIUS IETF represents the standard dictionary of attributes supported by all the Controllers.
- Custom – Custom dictionary of attributes supported by vendors.
- From the Attribute drop-down list, select a RADIUS attribute and enter the value for the RADIUS attribute in the Value field. After successful RADIUS authentication, the specified RADIUS attribute values are sent to the Controller to configure the device. The supported attributes in the RADIUS IETF dictionary are:
- Framed-Protocol
- Framed-IP-Address
- Framed-IP-NetMask
- Framed-Routing
- Filter-ID
- Framed-MTU
- Framed-Compression
- Reply-Message
- Framed-Route
- Framed-IPX-Network
- State
- Class
- Session-Timeout
- Tunnel-Type
- Tunnel-Medium-Type
- Tunnel-Private-Group-ID
- Framed-Pool
- Click Save.
- From the Dictionary drop-down list, select Radius:IETF or Custom.
Trusted Certificate Profile for SecureW2 Root CA
This trusted certificate profile is required to create a chain of trust. In this section we will create three Trusted Certificate Profiles, one for both the Trusted Root Certificate Authority and Trusted Intermediate Certificate Authority that issue the SCEP certificates. Lastly, we will need to create a Trusted Root Certificate profile for our RADIUS Server certificate so our devices can trust Cloud RADIUS.
Note: You must create a separate profile for each OS platform. The steps to create trusted certificates are similar for each device platform.
Exporting the SecureW2 Root CA
To export the SecureW2 Root CA from the JoinNow Management Portal, perform follow the given steps:
- Log in to the JoinNow Management Portal.
- Go to PKI > Certificate Authorities.
- In the Certificate Authorities section, click the Download link for the Root CA issued to your organization.
This certificate is imported when you set up the trusted certificate profile described in the following section.
Creating a Trusted Certificate Profile – SecureW2 Root CA
- Log in to the Microsoft Endpoint Manager portal.
- In the left pane, select Devices > Configuration profiles > Create profile.
- On the Create a profile page, from the Platform drop-down list, select Windows 10 and later for the trusted certificate.
- From the Profile type drop-down list, select Templates, and then select Trusted certificate. Click Create.
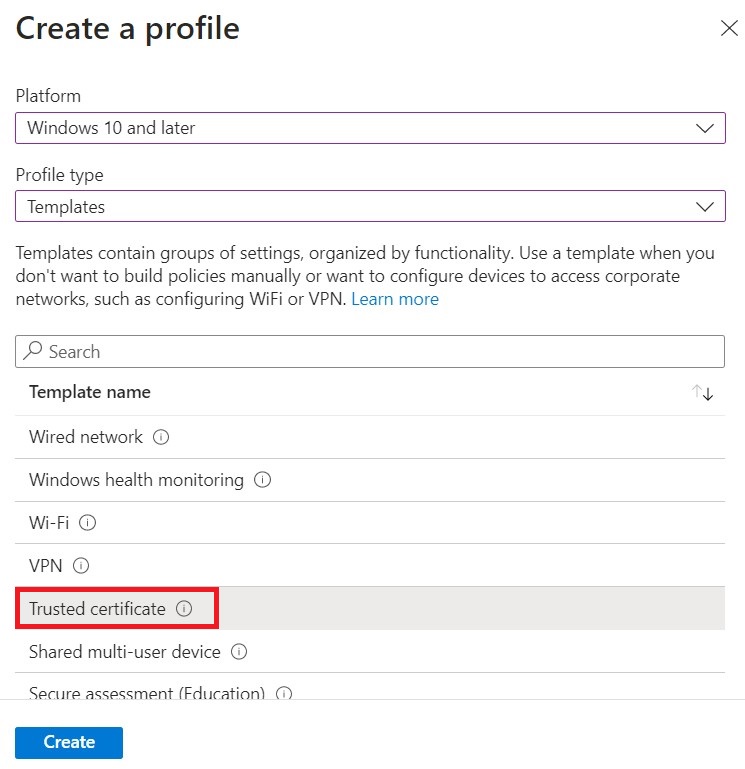
Note: You must create a separate profile for each OS platform. The steps to create trusted certificates are similar for each device platform.
- On the Trusted certificate page, type a name and description for the trusted certificate profile and then click Next.
- Add the Root certificate you saved earlier by clicking the Browse button (see the Exporting the SecureW2 Root CA section).
- Click Next.
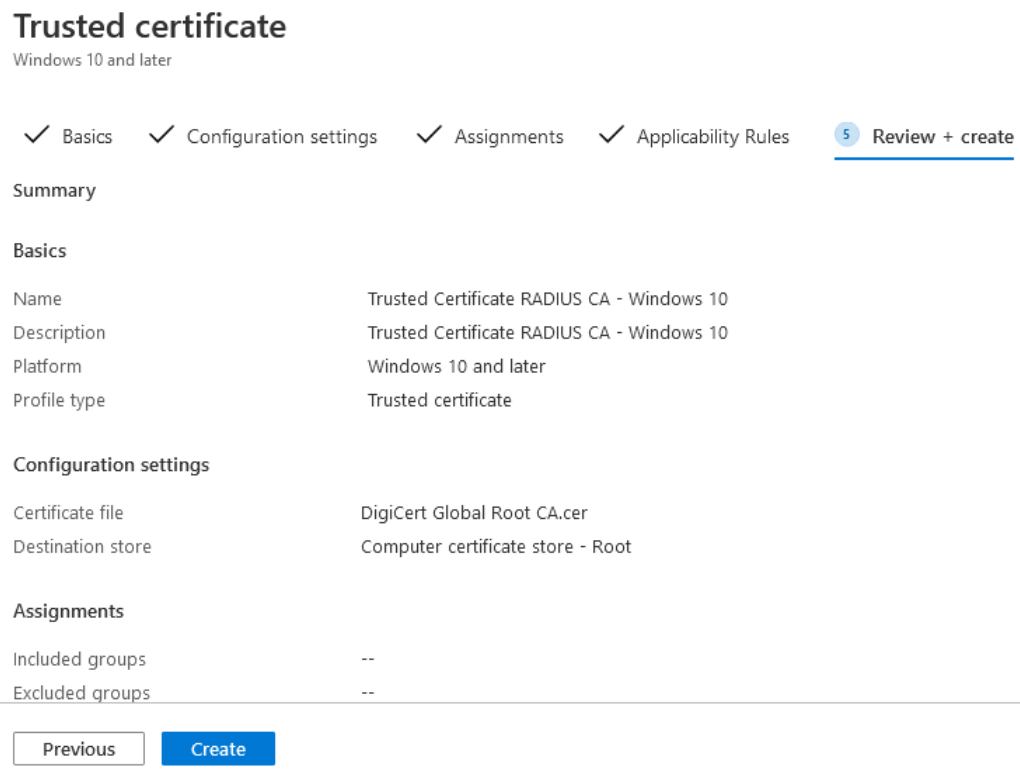
Note: For Windows 8.1 and later devices only, configure the Destination Store field as Computer certificate store – Root as shown in the following screen.
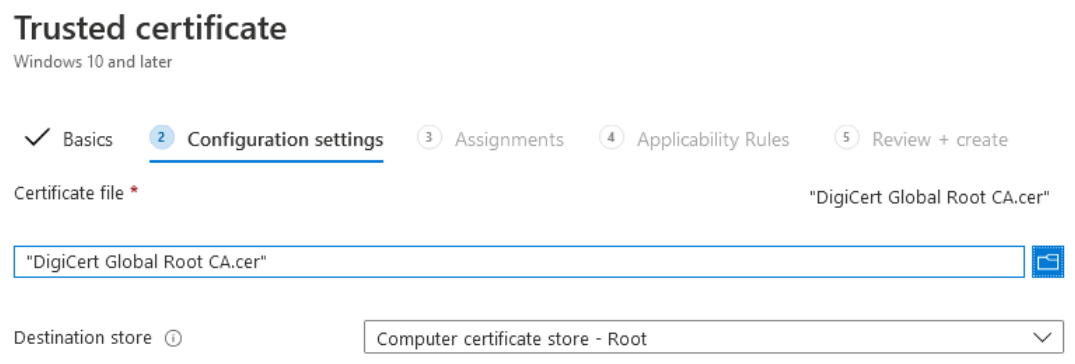
Trusted Certificate Profile for SecureW2 Intermediate CA
This Trusted Certificate Profile is required to map the SecureW2 Intermediate CA certificate to the SCEP certificate profile. This CA certificate must be the certificate that issues the end-user certificates.
Note: You must create a separate profile for each OS platform. The steps to create trusted certificates are similar for each device platform.
Exporting the SecureW2 Intermediate CA
To export the SecureW2 Intermediate CA from the JoinNow Management Portal, perform the following steps:
- Log in to the JoinNow Management Portal.
- Navigate to PKI > Certificate Authorities.
- In the Certificate Authorities section, click the Download link for the Issuing CA certificate created earlier (See the Creating an Intermediate CA for Intune SCEP Gateway Integration section).
This certificate is imported when you set up the trusted certificate profile described in the following section.
Creating a Trusted Certificate Profile – SecureW2 Intermediate CA
- Log in to the Microsoft Endpoint Manager portal.
- In the left pane, select Devices > Configuration profiles > Create profile.
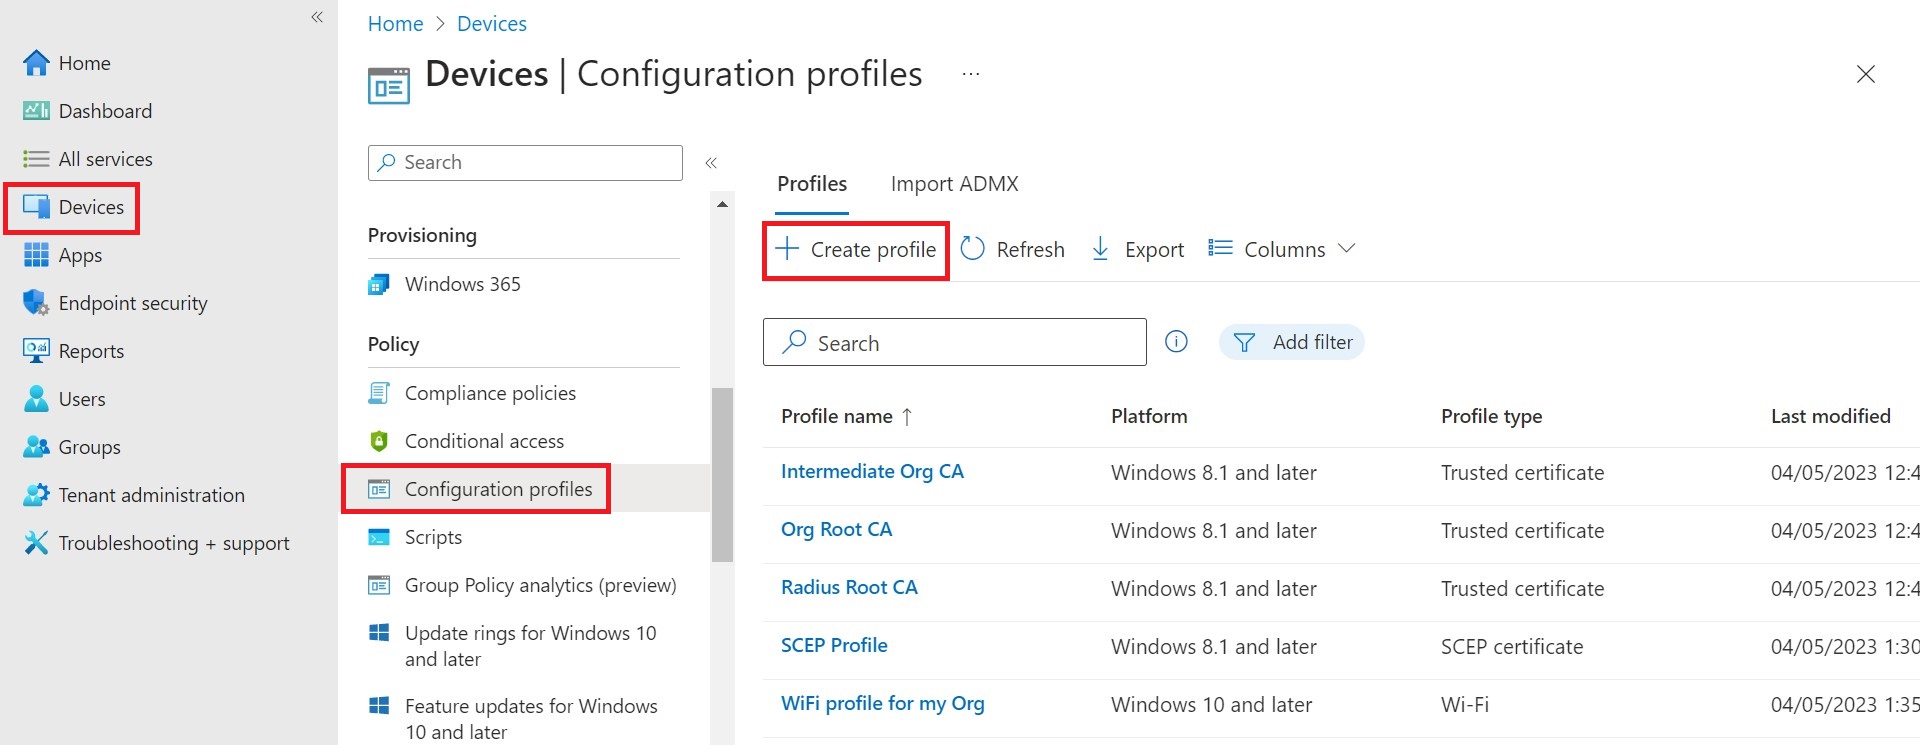
- On the Create a profile page, from the Platform drop-down list, select Windows 10 and later for the trusted certificate.
- From the Profile type drop-down list, select Templates, and then select Trusted certificate.
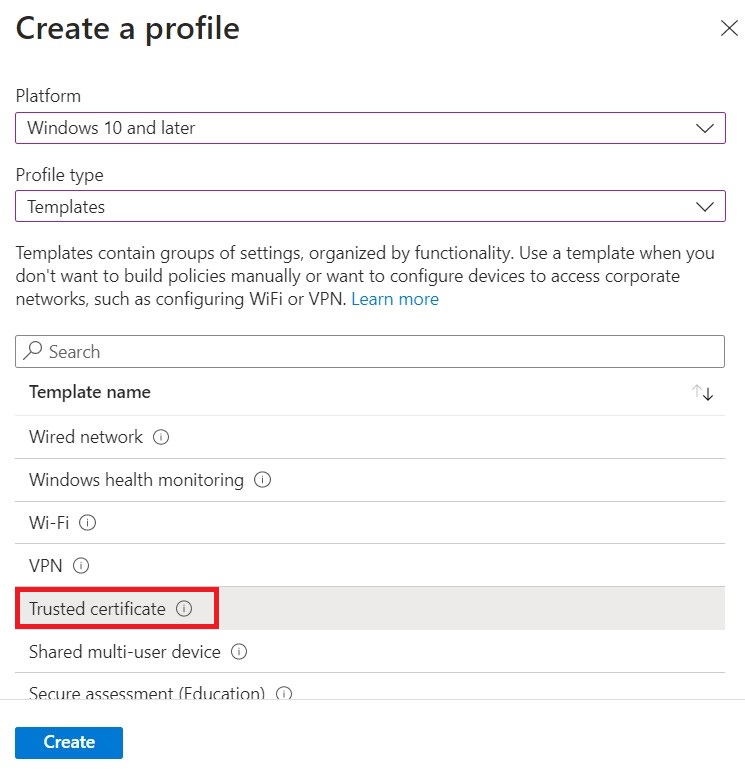
- Click Create.
Note: You must create a separate profile for each OS platform. The steps to create trusted certificates are similar for each device platform. - On the Trusted certificate page, type a name and description for the trusted certificate profile and then click Next.
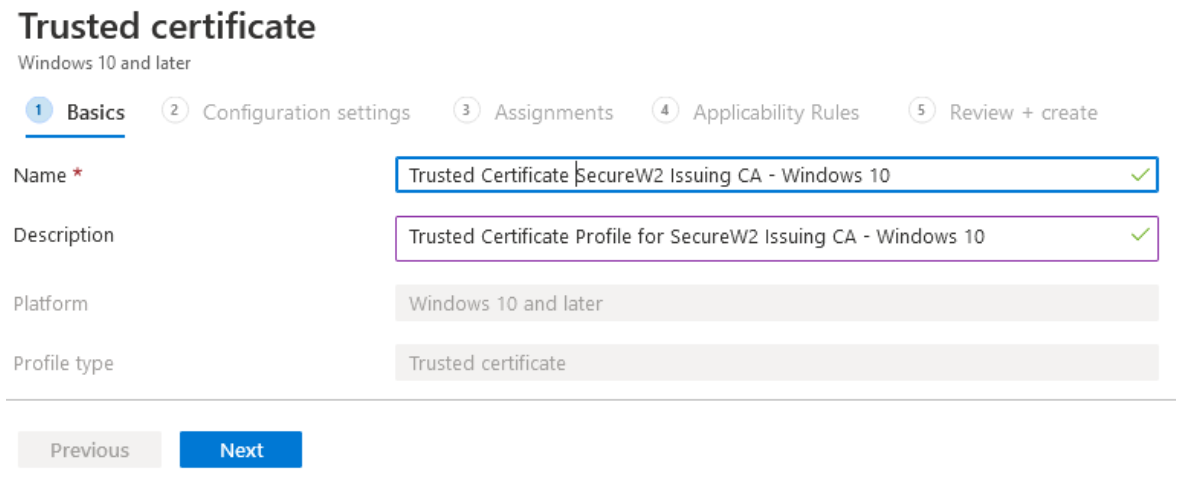
- Add the certificate you saved earlier by clicking the Browse button (see the Exporting the SecureW2 Intermediate CA section).
- Click Next.
NOTE: For Windows 8.1 and later devices only, configure the Destination Store field as Computer certificate store – Intermediate as shown in the following screen.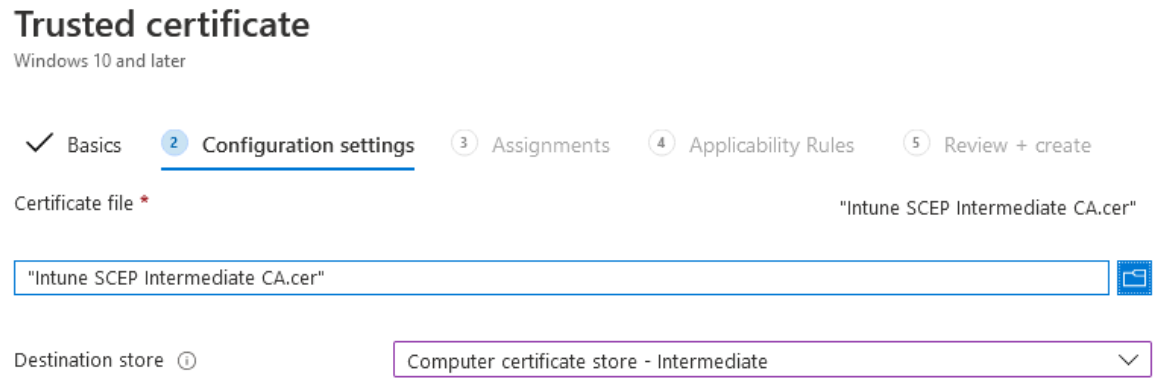
- Assign the profile to the appropriate Groups and Rules, review it, and click Create.
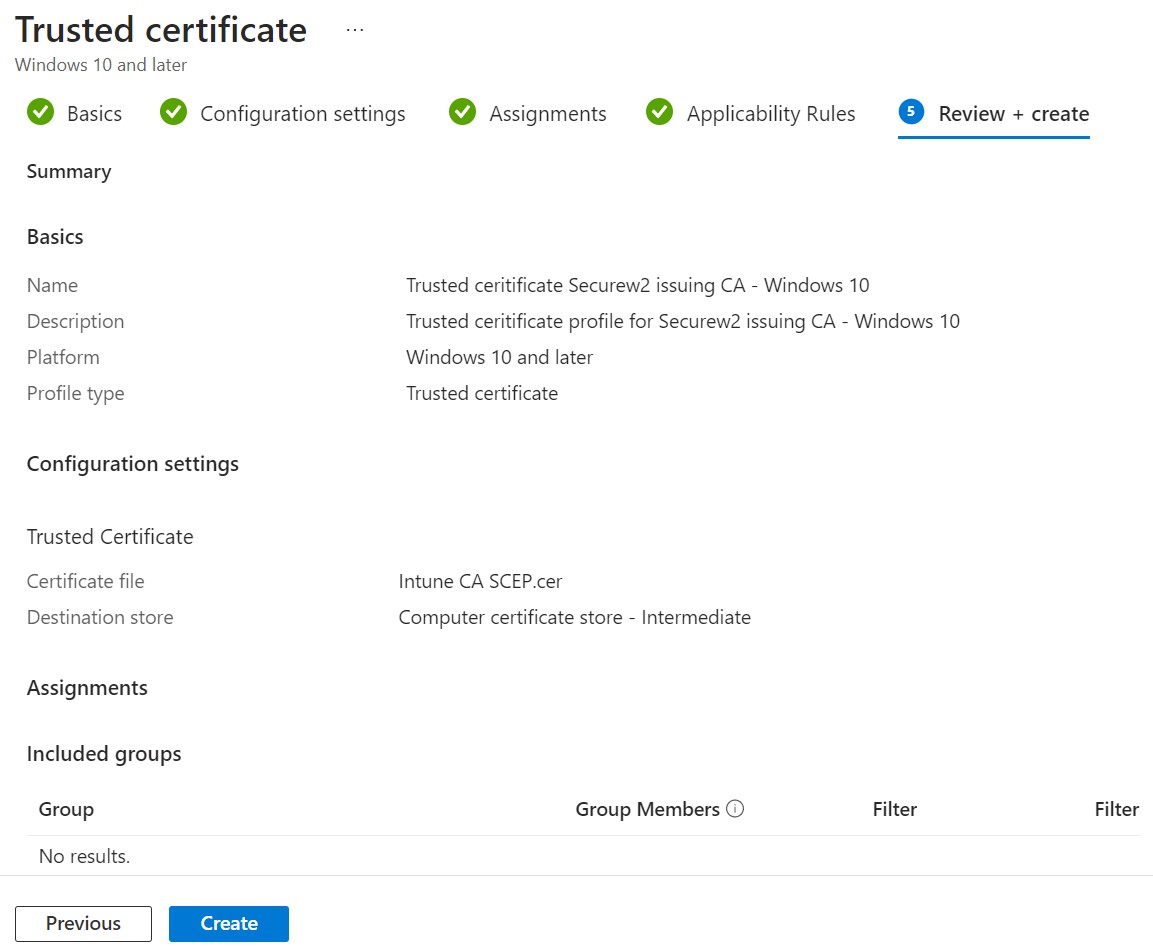
Trusted Certificate Profile for the RADIUS Server Root CA Certificate
We need to create a Trusted Certificate Profile for our RADIUS Server Root CA, so we can configure Server Certificate Validation on our devices, which will prevent our devices from potentially trying to authenticate against a rogue AP.
NOTE: For other RADIUS vendors, other than SecureW2 RADIUS server, ensure that you have the Root or Intermediate CA that issues the RADIUS server certificates.
Exporting the Trusted RADIUS Server Root CA Certificate
This section lists the steps to export the RADIUS Server Root CA Certificate from the JoinNow Management Portal.
- Click Network Profiles.
- Click the Edit link of the network profile you configured earlier.
- In the Certificates section, click Add/Remove Certificate.
- Check the checkbox next to DigiCert Global Root CA (Mon Nov 10 00:00:00 UTC 2031) as shown in the following screen.
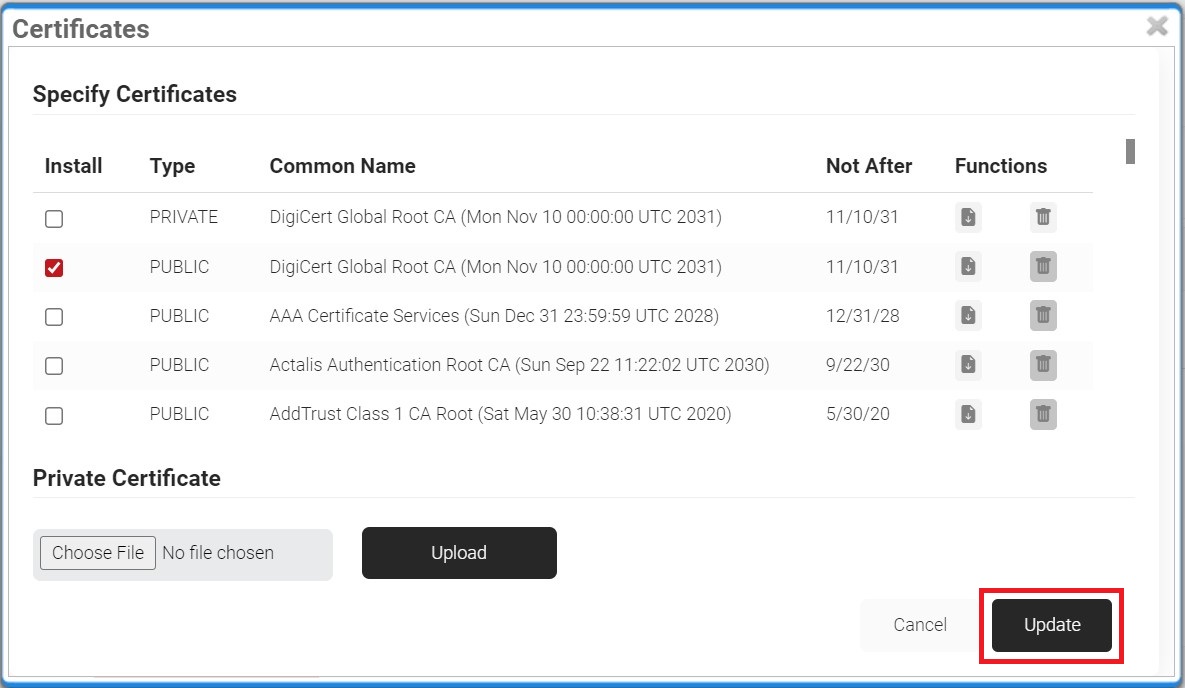
- Click Update.
- The CA appears in the Certificates section.
- Click Download.
Creating a Trusted Certificate Profile – RADIUS Server Root CA
- In the Microsoft Endpoint Manager portal, in the left pane, select Devices > Configuration profiles > Create profile.
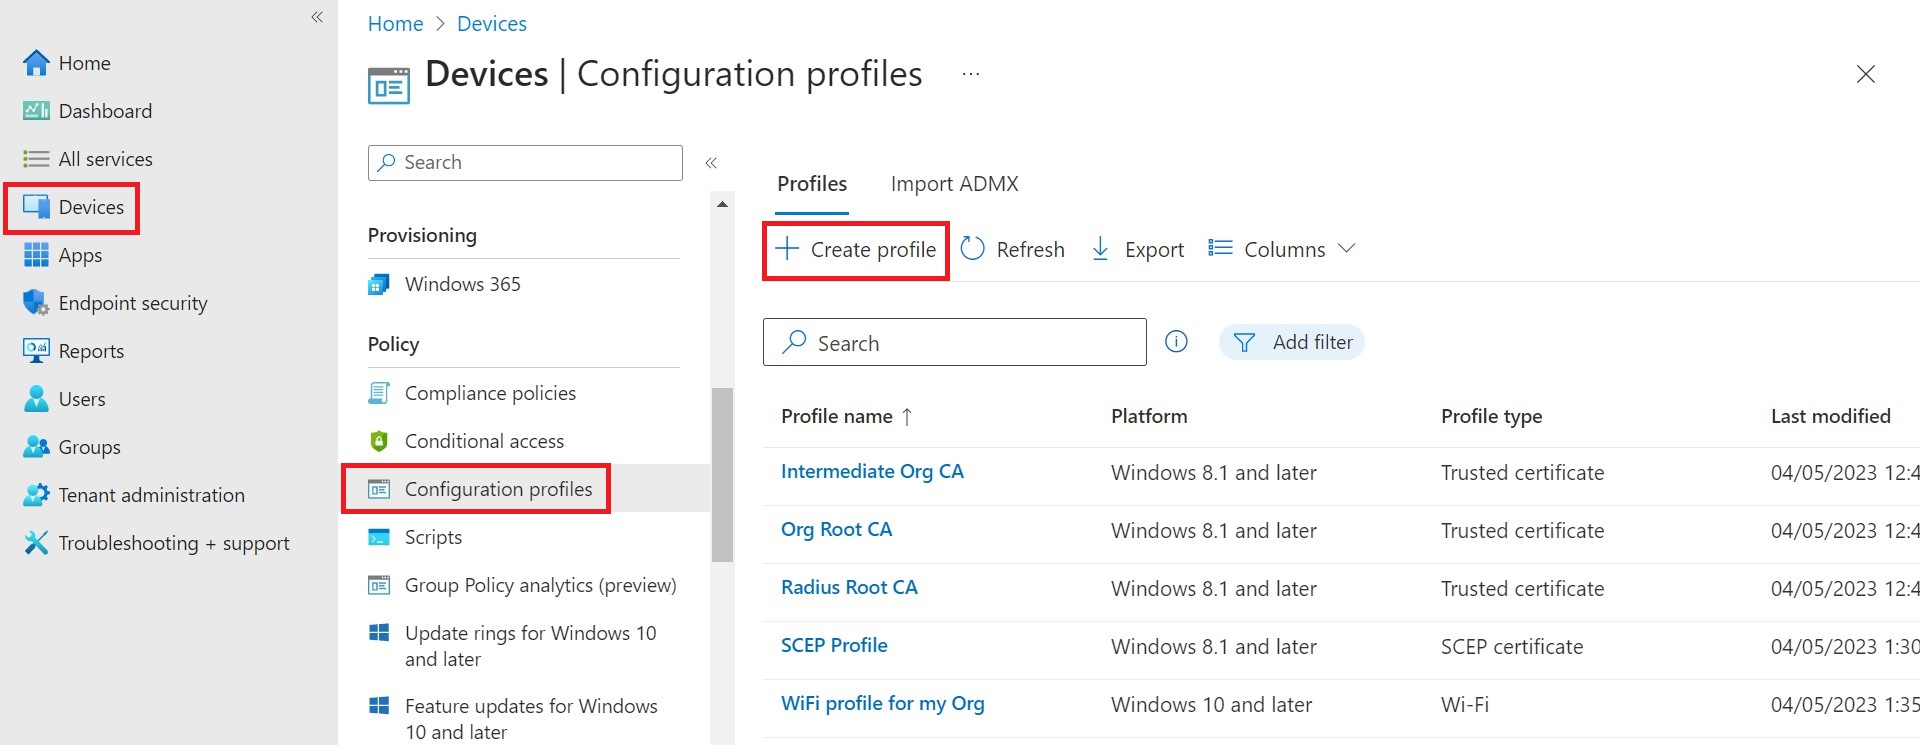
- On the Create a profile page, from the Platform drop-down list, select Windows 10 and later for the trusted certificate.
- From the Profile type drop-down list, select Templates, and then select Trusted certificate and click Create.
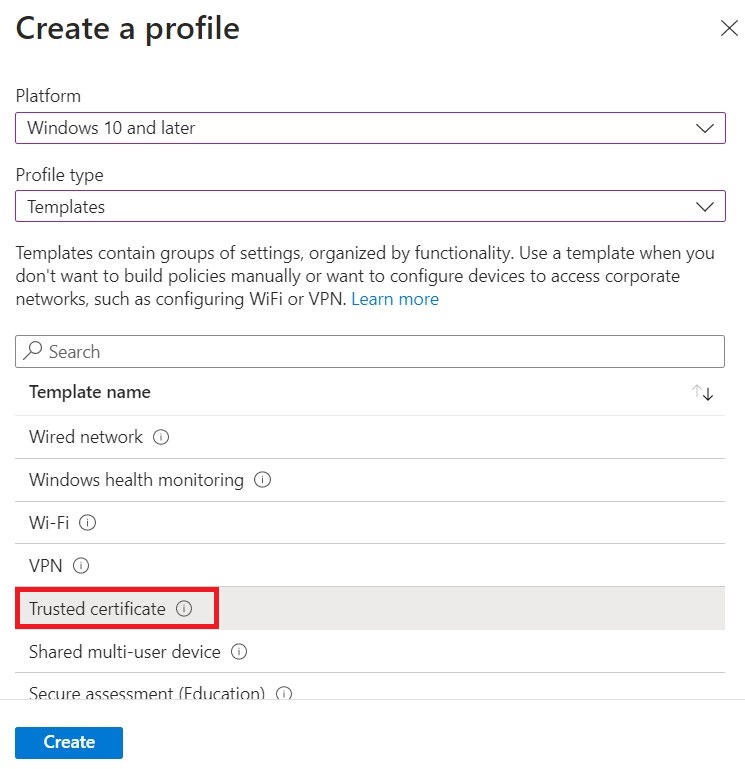
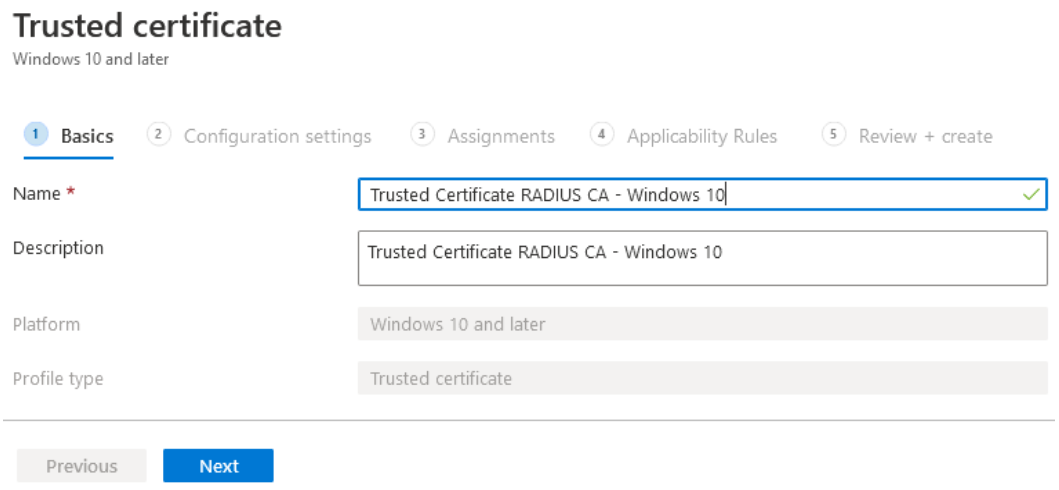
Note: You must create a separate profile for each OS platform. The steps to create trusted certificates are similar for each device platform. - Enter a name and description for the trusted certificate profile, in the respective fields.
- Click Next.
- Click the Browse button to add the certificate you saved earlier (see the Exporting the Trusted RADIUS Server Root CA Certificate section) and then click Next.
Note: For Windows 8.1 and later devices only, from the Destination Store drop-down list, select Computer certificate store – Root.
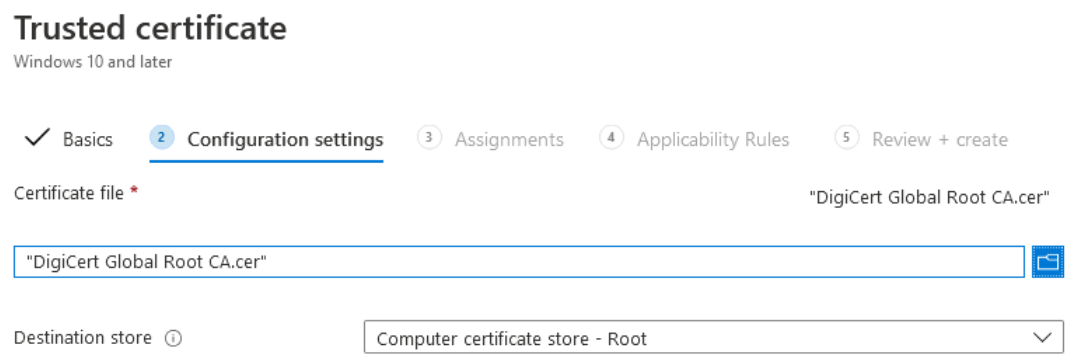
- Assign the profile to appropriate Groups and Rules, review it and click Create.
SCEP Profile for SecureW2 SCEP Certificate Requests
The SCEP profile is required for end-user devices to communicate with the SCEP Server—SecureW2 CloudConnector and request the enrollment of end-user certificates.
NOTE: You must create a separate profile for each OS platform. The steps to create trusted certificates are similar for each device platform.
SCEP Profile for a Device Certificate
The SCEP profile is required for end-user devices to communicate with the SecureW2 issuing CA certificate to enroll device certificates. Once the SCEP certificate is successfully enrolled, it is used to connect to the Wi-Fi network.
- Log in to the Microsoft Endpoint Manager portal.
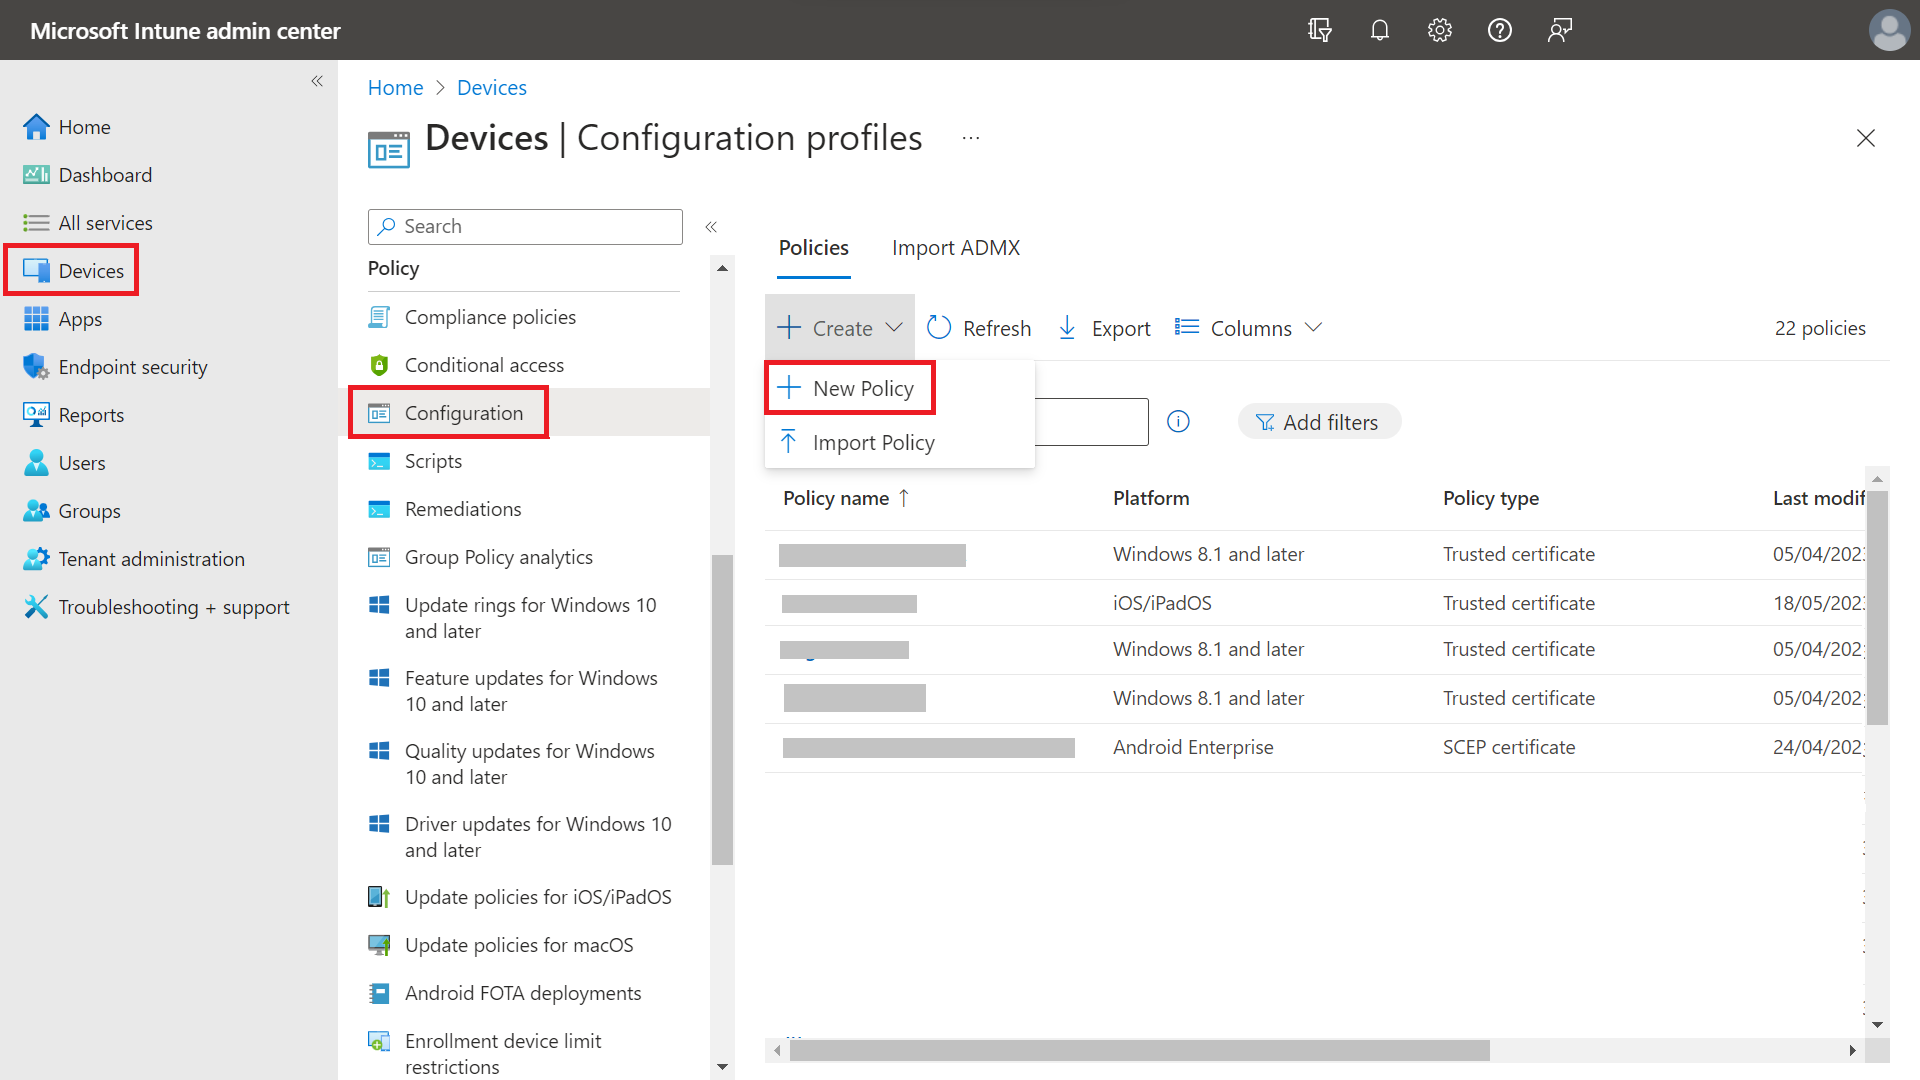
- In the left pane, navigate to Devices > Configuration.
- Click Create and select New Policy.
- On the Create a profile page, from the Platform drop-down list, select the device platform for this SCEP certificate. You can choose one of the following platforms for device restriction settings:
- Android device administrator
- Android (AOSP)
- Android Enterprise
- iOS/iPadOS
- macOS
- Windows 10 and later
- Windows 8.1 and laterNOTE: You must create a separate profile for each OS platform. The steps to create trusted certificates are similar for each device platform.
- From the Profile type drop-down list, select Templates to configure the devices and access the Wi-Fi network.
- From the Template name drop-down list, select SCEP certificate to enable certificate-based authentication in your organization.
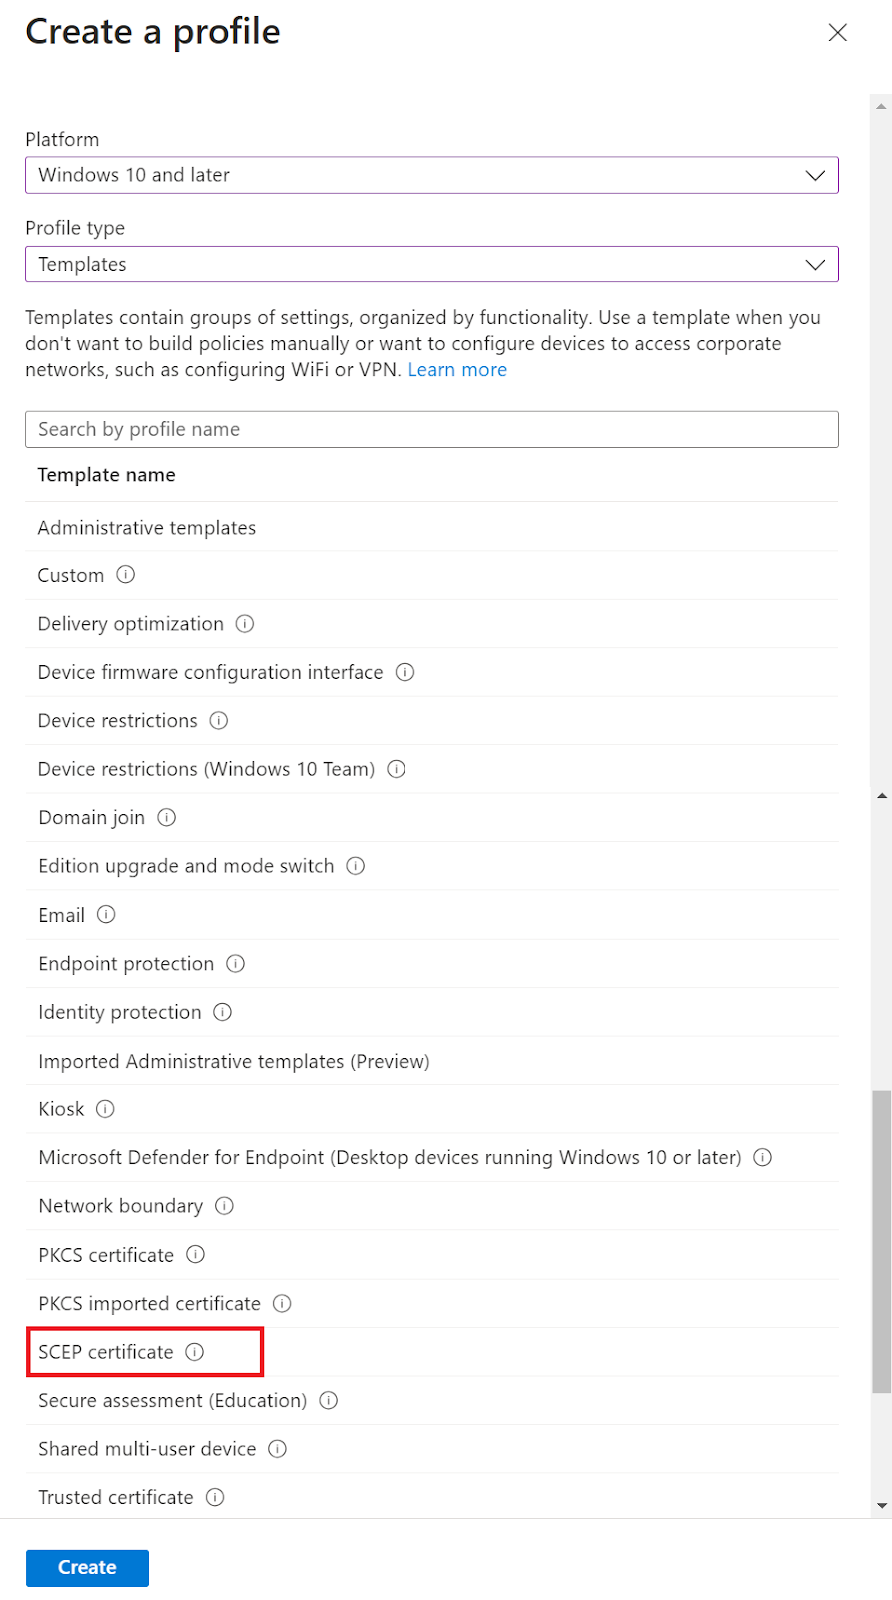
NOTE: You must create a separate profile for each OS platform. The steps to create trusted certificates are similar for each device platform. - Click Create.
- On the SCEP certificate page, in the Basics section, for the Name field, enter the name of the SCEP certificate.
- In the Description field, enter a suitable description for the SCEP certificate.

NOTE: The Platform and Profile type fields are populated with predefined options. - Click Next.
- In the Configuration settings section, from the Certificate type drop-down list, select Device to connect to the network using a device certificate.
- In the Subject name format field, type a name where Microsoft Intune automatically creates a subject name in the certificate request. Select one of the following options:
- CN= {{DeviceName}}
- CN= {{AzureADDeviceId}} (recommended by SecureW2)
- In the Subject alternative name field, select the following attributes from the Attribute drop-down list, and enter their corresponding values:
Attributes Values User principal name (UPN) {{Device_Serial}} DNS {{AzureADDeviceId}} URI tag:microsoft.com,2022-09-14:sid:<value> Email address Not required Microsoft Intune automatically creates the subject alternative name (SAN) in the certificate request.

NOTE: To test if the attributes are configured correctly, in the JoinNow Management Portal, go to Data and Monitoring > General Events and look for any event messages, such as Device Creation Failed, that indicate that the attributes are not correctly mapped. - From the Certificate validity period drop-down list, select the date until which the certificate is valid.
- From the Key storage provider (KSP) drop-down list, for Windows 10 and later platforms, select Enroll to Trusted Platform Module (TPM) KSP if present, otherwise Software KSP to store the certificate’s key.
- From the Key usage drop-down list, select both the Key encipherment and Digital signature checkboxes to exchange the certificate’s public key.
- Key encipherment: Allows key exchange only when the key is encrypted.
- Digital signature: Allows key exchange only when a digital signature protects the key.
- From the Key size (bits) drop-down list, select the number of bits contained in the key. Select the largest key size.
- From the Hash algorithm drop-down list, select SHA-2, the highest level of security that the connecting devices support.

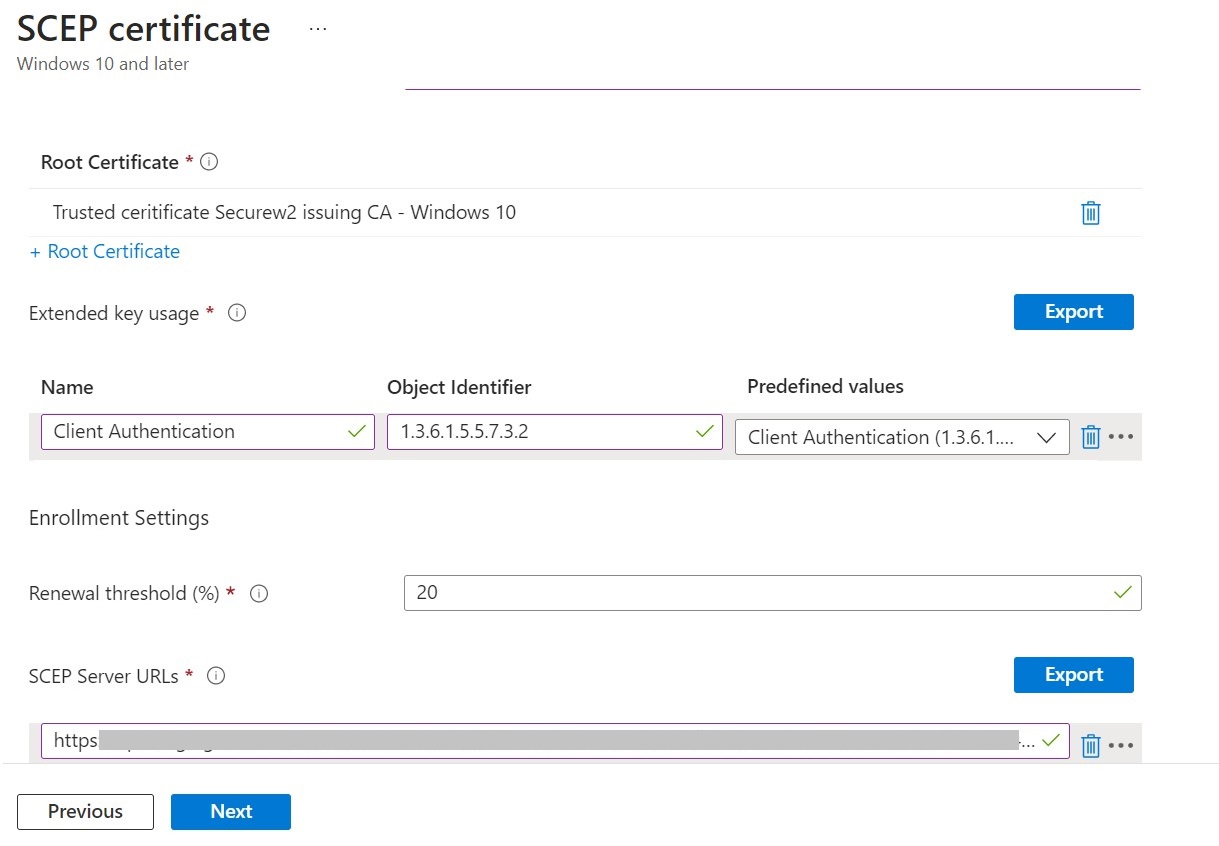
- In the Root Certificate section, click + Root Certificate.

- In the Root Certificate pop-up window, select the profile created earlier (For more information, see: Trusted Certificate Profile for SecureW2 Intermediate CA section).
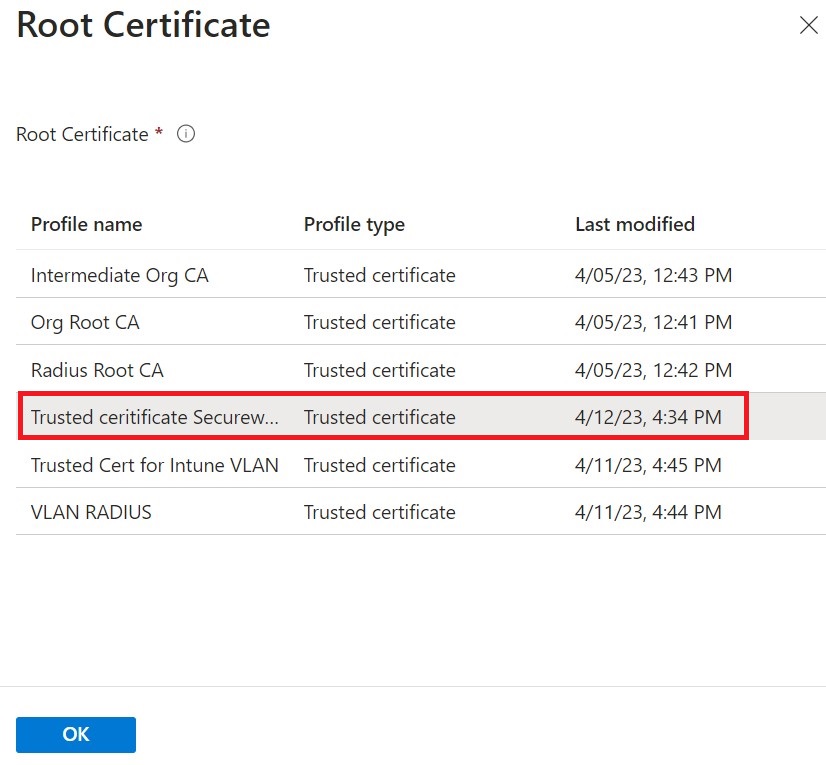
- Click OK.
- Under the Extended key usage section, add values for the certificate’s intended purpose. In most cases, the certificate requires client authentication for the device to authenticate to a server.
- In the Name field, enter the name of the extended key usage.
- In the Object Identifier field, enter a unique string of decimal numbers to identify an object.
- From the Predefined values drop-down list, select Client Authentication.

- Under the Enrollment Settings section, for the Renewal threshold (%) field, enter the percentage of the certificate lifetime that remains before the device requests renewal of the certificate. The recommended value in Microsoft Intune is 20%.
- In the SCEP Server URLs field, enter the SCEP URL generated from the JoinNow Management Portal.
- Click Next.
- In the Assignments section, include or exclude groups from the SCEP profile created.
- Click Next.
- In the Applicability Rules section, create and apply rules as applicable to the profile.
- Click Next.
- In the Review + create section, review the profile set-up and click Create.

SCEP Profile for a User Certificate
The SCEP profile is required for users to enroll for a SCEP certificate when they login to the device. Once the user certificate is issued, users can then switch to connecting to their specific Wi-Fi network/VLAN using their SCEP certificate.
- Log in to the Microsoft Endpoint Manager portal.
- Navigate to Devices > Configuration.
- Click Create and select New Policy.

- On the Create a profile page, from the Platform drop-down list, select the device platform for this SCEP certificate. You can choose one of the following platforms for device restriction settings:
- Android device administrator
- Android (AOSP)
- Android Enterprise
- iOS/iPadOS
- macOS
- Windows 10 and later
- Windows 8.1 and laterNOTE: You must create a separate profile for each OS platform. The steps to create trusted certificates are similar for each device platform.
- From the Profile type drop-down list, select Templates to configure the devices and access the Wi-Fi network.
- From the Template name drop-down list, select SCEP certificate to enable certificate-based authentication in your organization.

NOTE: You must create a separate profile for each OS platform. The steps to create trusted certificates are similar for each device platform. - Click Create.
- On the SCEP certificate page, in the Basics section, for the Name field, enter the name of the SCEP certificate.
- In the Description field, enter the suitable description for the SCEP certificate.

NOTE: The Platform and Profile type fields are populated with predefined options. - Click Next.
- In the Configuration settings section, from the Certificate type drop-down list, select User for user certificates.
- In the Subject name format field, type a name where Microsoft Intune automatically creates a subject name in the certificate request. Select one of the following options:
- CN= {{UserPrincipalName}} (recommended by SecureW2)
- CN= {{UserName}}
- CN= {{EmailAddress}
- In the Subject alternative name field, select the following attributes from the Attribute drop-down list, and enter their corresponding values:
Attributes Values Email address {{EmailAddress}} User principal name (UPN) {{UserPrincipalName}} DNS {{AzureADDeviceId}} URI tag:microsoft.com,2022-09-14:sid:<value> Microsoft Intune automatically creates the subject alternative name (SAN) in the certificate request.

- From the Certificate validity period drop-down list, select the date until which the certificate is valid.
- From the Key storage provider (KSP) drop-down list, for Windows 10 and later platforms, select Enroll to Trusted Platform Module (TPM) KSP if present, otherwise Software KSP to store the certificate’s key.
- From the Key usage drop-down list, select both the Key encipherment and Digital signature check boxes to exchange the certificate’s public key.
- Key encipherment: Allows key exchange only when the key is encrypted.
- Digital signature: Allows key exchange only when a digital signature protects the key.
- From the Key size (bits) drop-down list, select the number of bits contained in the key. Select the largest key size.
- From the Hash algorithm drop-down list, select SHA-2, the highest level of security that the connecting devices support.

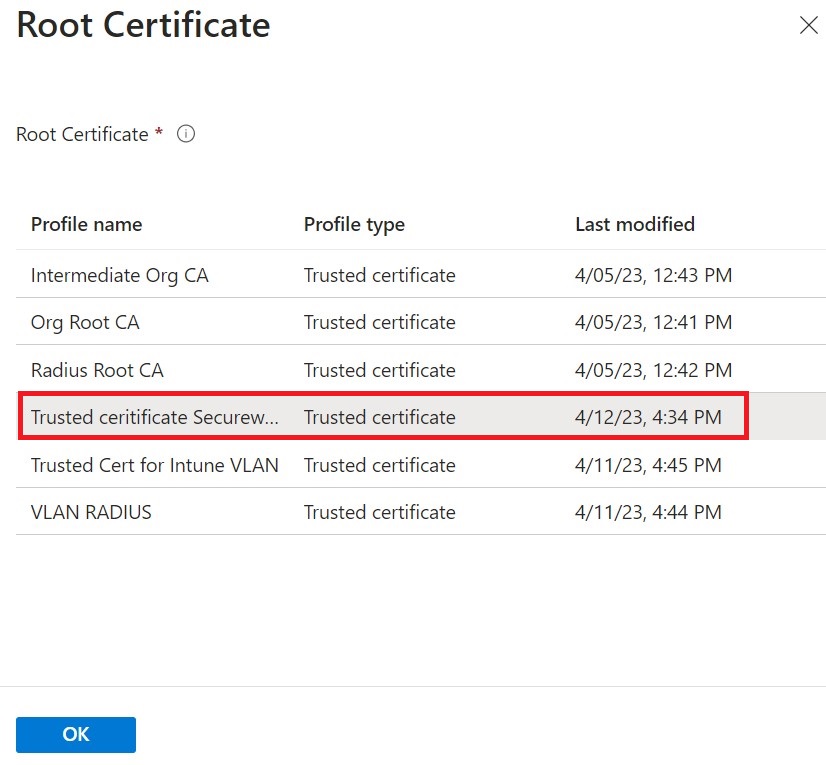
- In the Root Certificate section, click + Root Certificate.

- In the Root Certificate pop-up window, select the profile created earlier (for more information, see the Trusted Certificate Profile for SecureW2 Intermediate CA section).
- Click OK.
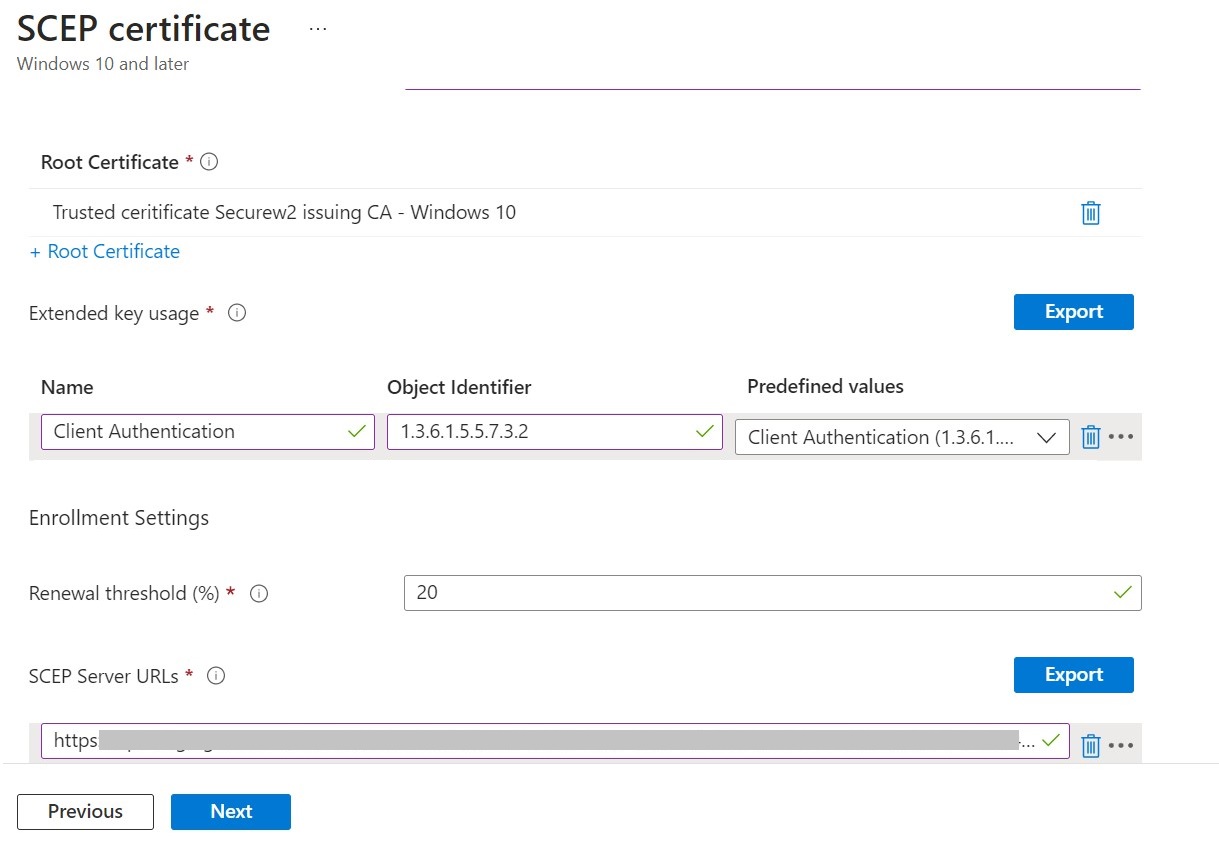
- Under the Extended key usage section, add values for the certificate’s intended purpose. In most cases, the certificate requires client authentication for the user to be able to authenticate to a server.
- In the Name field, enter the name of the extended key usage.
- In the Object Identifier field, enter a unique string of decimal numbers to identify an object.
- From the Predefined values drop-down list, select Client Authentication.

- Under the Enrollment Settings section, for the Renewal threshold (%) field, enter the percentage of the certificate lifetime that remains before the device requests renewal of the certificate. The recommended value in Microsoft Intune is 20%.
- In the SCEP Server URLs field, enter the SCEP URL generated from the JoinNow Management Portal.
- Click Next.
- In the Assignments section, include or exclude Groups of the SCEP profile created.
- Click Next.
- In the Applicability Rules section, create and apply rules as applicable to the profile.
- Click Next.
- In the Review + create section, review the profile set-up and click Create.

Quickly & Easily Enroll Your Intune-Managed Devices with User or Device Certificates
If you use credential-based authentication for your organization, you are fraught with constant cyber threats. With digital certificates, your network is well-secured. However, to deploy digital certificates, you should have the necessary PKI in place, which could be tedious and expensive.
At SecureW2, we can tie with your existing infrastructure to provide you with a seamless certificate-based onboarding for managed devices. Our PKI binds with your existing MDM to provide user and device SCEP certificates automatically through the Simple Certificate Enrollment Protocol (SCEP). It provides numerous customization, such as customized user and device certificates based on the needs of our customers. SecureW2’s Management portal also offers advanced features like auto revocation of certificates for MDMs like Jamf and Intune.
We have a price range that comfortably fits any budget. Click here to know more.