Introduction
The following guide covers how to set up SecureW2’s Cloud RADIUS with Nile Infrastructure to enable passwordless 802.1X. This document will also cover Network Segmentation, and Troubleshooting. If you’d like to learn more about the solution, you can read our solution brief here.
The following are the high-level steps to set up the Nile Infrastructure with SecureW2:
- Setting Up the SecureW2 JoinNow Management Portal.
- Running the Getting Started Wizard, setting up our Identity Provider, and getting RADIUS details.
- Set up Cloud RADIUS in the Nile Portal. (Authentication Settings):
- Setting up the RADIUS to be used by the SSID involves putting in the IP address of the RADIUS server, ports, and shared secret in your Nile Access Points
- set up the Secure Wireless SSID (Wireless Settings):
- Set up an SSID for WPA2-Enterprise, and set up any segments for the desired site.
- Use SecureW2 JoinNow MultiOS to connect to the Network.
- Enrolling for a certificate, connecting to the network.
- Troubleshooting
- Looking at RADIUS and Enrollment/Configuration Events in SecureW2.
Prerequisites
- Active Subscription to JoinNow Cloud Connector Bundle.
- Active Subscription to Nile Access Point.
Setting up the JoinNow Management Portal
Please Log-in to the JoinNow Management Portal and run the Getting Started Wizard.
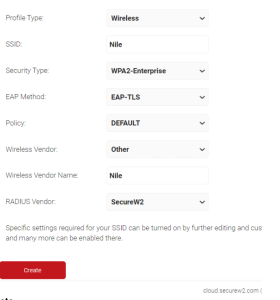
- Navigate to Device Onboarding > Getting Started and set up settings as shown below:

- Click Create.
- The process will take 60-90 seconds to complete. Afterward, a Network Profile and a RADIUS Server will be generated.
Setting Up an Identity Provider:
Next, we will need to create some credentials to use to enroll for a certificate. We will use the Identity Provider that comes with SecureW2 for testing purposes, but you can use any SAML Identity Provider like Azure, and Okta for certificate enrollment.
- This can be done in Identity Management > Identity Providers.
- Click Edit on the DEFAULT IDENTITY PROVIDER.
- Click Users.
- Click Add a User.
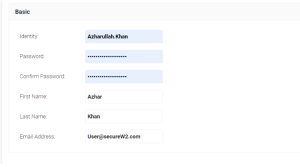
- Enter in details as show below. The username and password will be used to enroll for the certificate that will be used for authentication.

- Click Save.
Setting up Cloud RADIUS
- Navigate to RADIUS > RADIUS Configuration.
- Here you will see the RADIUS Servers available to use.
- Save the details of the server that is best for your geo-location so we can enter it in Nile in the next sections.
NOTE: If you don’t see a Server for your region like the image below, contact us to inquire about our Global RADIUS Servers.
Nile Authentication Settings
- Log-in into the Nile Portal.
- Navigate to Settings > Authentication
- Click Add Authentication.
- Name: RADIUS Server Name
- Host1:
- Host2:
- Once you have set up this, please select the Geo scope of your Cloud RADIUS server.

- Click Save.
Nile Wireless Settings
- Login to the Nile Portal and click on the Settings tab from the left-side Navigation Panel.
- Under the Wireless tab, select Type as Enterprise.
- For Name: Please name the SSID name you would like to create.
- For Security: Please select the WPA2 Enterprise or WPA3 Enterprise option from the list.
- Segments: If you had set up RADIUS Authentication for a particular segment, that segment will be displayed under the drop-down menu. Please select the appropriate segment.

- Navigate to the Service area. Under Subnet, click the arrow on the right-hand side and select the IP Subnet range from the dropdown.

- Log-in to the SecureW2 Management Portal.
- Navigate to Policy Management > Network Policies and create a new Network Policy.
- Navigate to Settings and Click Add Attribute. Set the Attribute as Nile-NetSeg and list Segment desired under Value.
- Attribute: Nile-NetSeg
- Value: Engineering

- Your wireless SSID is set up now.
Connecting to the Network
After completing the set-up, run JoinNow MultiOS on a test device. The dissolvable client will enroll for a certificate and install a Network Profile which will use the certificate for 802.1X authentication.
Note: Corporate-managed devices can use APIs to automate the issuance and management of certificates. To learn more, read the guides listed in the Navigation on the left under MDM / EMM Integrations.
To start the process:
- Navigate to Device Onboarding > Network Profiles.
- Click View on the required Network Profile.

- Click JoinNow and the <MultiOS dissolvable client will download.
Note: MultiOS has different user experiences for the varying operating systems. E.g. Android users get an App, iOS get a .mobileconfig file.
- Run the client. When you click Next, you will be redirected to a Web SSO where you will enter in the credentials, we created in step 3: setting up the JoinNow Management Portal.
- The device will enroll for a certificate and connect to the network.
Troubleshooting
You can view RADIUS events logs in the SecureW2 Management Portal by navigating to Data and Monitoring > RADIUS Events.
You can view device configuration or enrollment issues by viewing General Events, which is also in Data and Monitoring.
For more details on the error codes found in our logs, or if you have any questions at all, please contact us today and we’d be happy to help!