Key Points
- Setting up Windows devices for 802.1X is difficult, as it requires enterprise-grade APs and controllers, a RADIUS Server, and sometimes a PKI.
- Most end users find it challenging to configure the network settings for 802.1X on Windows devices. This requires extensive documentation, helpdesk staff, or, more commonly, an onboarding application like JoinNow MultiOS.
- SecureW2 streamlines the onboarding process to 802.1X with our JoinNow Suite, which can help you deploy the SCEP Gateway API URL with almost all MDMs, such as Intune and Jamf.
802.1X is a network security protocol that enhances the security of a network by requiring authentication before granting access, preventing unauthorized network access. In Windows environments, 802.1X is widely employed to ensure the security of both wired and wireless connections. It supports features such as server validation, integration with Windows security features, and EAP-based authentication methods, enabling organizations to enforce secure, centralized network access control.
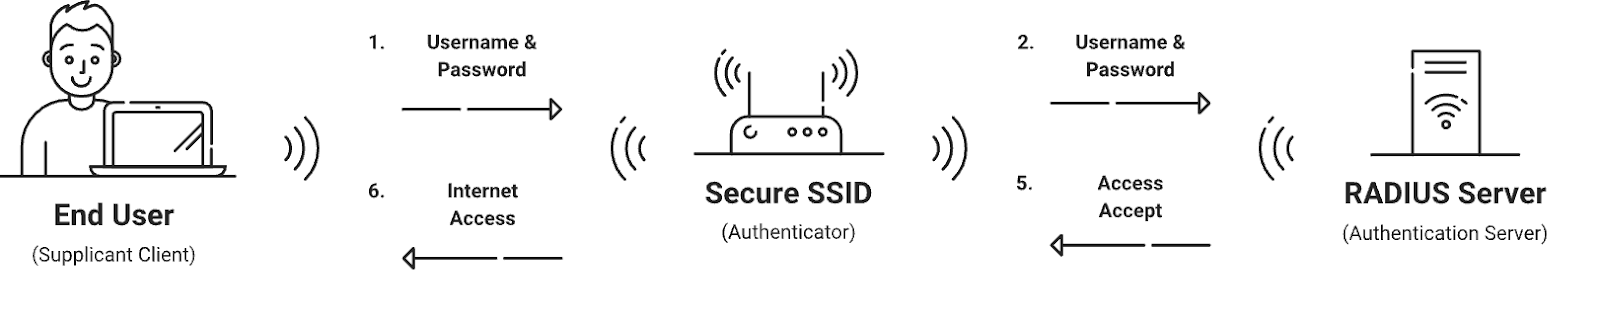
Key components of 802.1x authentication for Windows are:
- Supplicant
- The entity seeking network access which is usually a user’s device.
- Authenticator:
- The network device (such as a switch or wireless access point) for controlling access to the network.
- EAP (Extensible Authentication Protocol):
- A flexible framework defining authentication methods for selecting the mechanism
- RADIUS (Remote Authentication Dial In User Service):
- A secure communication protocol between the authenticator and authentication server
- PKI (Public-Key Infrastructure)
- This technology uses pairs of one and one private key to encrypt and decrypt information using user/device and machine certificates.
By leveraging 802.1X authentication, organizations can protect their networks while granting access to trusted individuals and devices exclusively. To achieve this, administrators must obtain a trusted (Certificate Authority) to enable Certificate Validation on Windows Devices.
Common Issues Faced with Windows 802.1x Configuration
Maintaining or configuring the network protocols, RADIUS server, and PKI certificate is complex. They can come with many complications and support tickets due to misconfigurations or server validation issues that can lead to credential-based attacks.
Our goal is to ensure your organization has the information needed to avoid these incidents and promote a positive end-user experience.
Here’s a list of common issues organizations may face, as well as UI examples for Windows 10 and 11. If you want to find out more about solutions aligned with your organizational needs, please look at our homepage for our JoinNow Solutions.
- Certificate and Server Validation Issues: This can lead to authentication failures, disruption in day-to-day processing, and a spike in support tickets.
- Mismatched Authentication Protocol: Not having the correct protocol can lead to authentication failures and daily issues for the user manually not being able to use SSO and re-authenticating their Windows Sessions due to Windows Security features marking that protocol insecure.
- Shared Certificate Authority (CA): Using a shared certificate can potentially lead to your certificate being compromised, misconfigured, or revoked, causing issues within your organization due to being unable to control your certificates. It is recommended that you have control over your own CA to ensure a robust authentication process and your certificate validation.
- Insufficient Network Infrastructure Compatibility: This can occur when your organization’s devices, switches, and access points do not fully support 802.1x or if your organization does not have the RADIUS Server Required for 802.1x authentication.
EAP (Extensible Authentication Protocol) Security Protocols
How you configure your environment, and the clients themselves for .1x depends on your EAP protocol.
By determining which protocol is suitable for your organization, you can decide what servers or services you may or may not need and how to set up your Windows devices so they can use that protocol.
PEAP-MSCHAPv2 (Protected Extensible Authentication Protocol), EAP-TLS (Extensible Authentication Protocol), and EAP-TTLS stand out as three employed authentication protocols within the framework of 802.1X security measures.
Here’s a quick comparison:
| WPA2 & WPA3 Enterprise Common Protocols | Level of Encryption | Authentication Speed | Directory Support | Credentials |
| EAP-TLS | Public-Private Key Cryptography | Fast – 12 Steps | Universal | Passwordless |
| PEAP-MSCHAPv2 | Bad Encryption (MD4, Compromised since 1995) | Slow – 22 Steps | Active Directory | Passwords |
| EAP-TTLS/PAP | No Credential Encryption | Slowest – 25 Steps | Non-AD LDAP Servers | Passwords |
The choice between the EAP Protocols depends on your security needs and infrastructure to prevent unauthorized access.
PEAP and EAP-TTLS are more straightforward to implement. However, it is universally recommended that organizations use EAP-TLS. This is because both credential protocols are vulnerable to credential-based threats, like Evil Twin Attacks, and configuration issues, such as being unable to run the Microsoft Credential Guard Windows credential security feature.
What you need to support your Windows devices for 802.1x depends on your chosen protocol. Below is a quick summary of what EAP-TLS needs vs. what PEAP-MSCHAPv2 needs:
For EAP-TLS, you need the following:
- A RADIUS Server, ideally one that can talk to Azure
- A PKI
- Certificate enrollment software like a SCEP Server or Onboarding Software
- Something to automate the Configuration of 802.1x on devices like an MDM or Onboarding Software
For PEAP-MSCHAPv2, you can use the following:
- A RADIUS server that can talk to Active Directory like NPS
- An AD – LDAP sync service if you want to use Azure with Active Directory
- Something to automate the Configuration of 802.1x on devices like an MDM or Onboarding Software
- Some IT teams forgo onboarding software and write out manual instructions instead
Now that we’ve covered EAP Protocols and what each requires for your setup, let’s talk about configuring our devices.
Configuring Windows Devices for 802.1X Manually
Typically, the following settings are required for setting up 802.1x on Windows devices
- WPA2 Enterprise Settings
- EAP Protocols
- Server Certificate Validation
In this section, we will show you how to configure these settings manually through the native Windows settings and also how you can automate the Configuration of these settings through Microsoft Intune.
Configuring Windows 10/11 Devices Manually for Wi-Fi
Configuring 802.1X authentication on Windows plays a role in ensuring access to your network-connected devices. This process involves steps and settings that must be carefully followed. In this section, we will guide you through setting up your configurations. This will show the same displays for Windows 10/11 devices.
PEAP-MSCHAPv2 Settings
- Launch Control Panel.
- Select Open Network and Sharing Center.
- Select Set Up a new connection or network in the Network and Sharing Center.
- Select Manually connect to a wireless network.

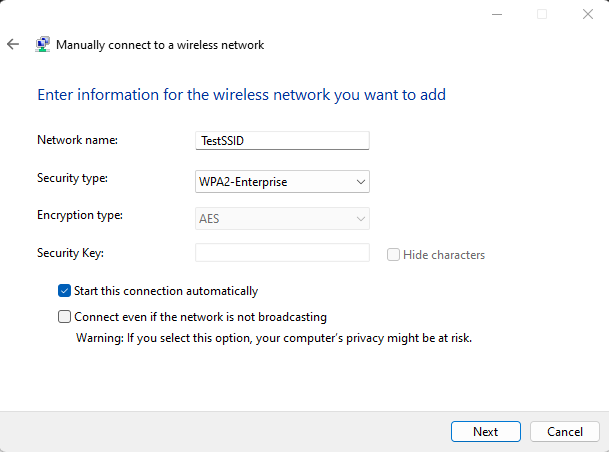
- Enter the information for your organization’s wireless network as shown below and Select Next.

- Network Name: Name of your network (this must be in all capitals)
- Security Type: WPA2-Enterprise
- WPA2-Enterprise Standard is often used synonymously with the 802.1x
- Encryption Type: AES (Advanced Encryption Standard)
- Enterprises commonly use this 256 symmetric block cipher encryption as a highly secure symmetric key cipher for self-encrypting disk drives, database encryption, and storage encryption.
- Enterprises commonly use this 256 symmetric block cipher encryption as a highly secure symmetric key cipher for self-encrypting disk drives, database encryption, and storage encryption.
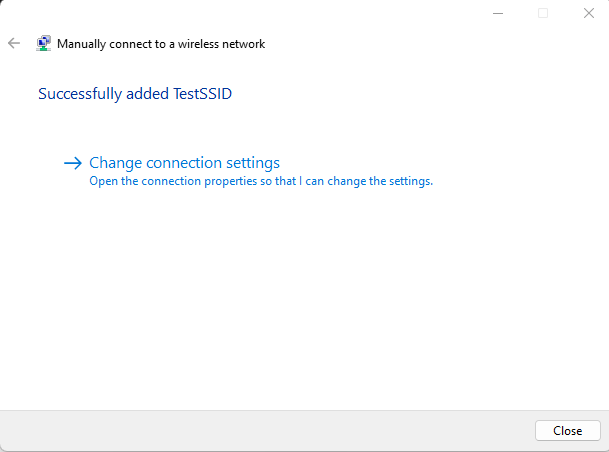
- Select the Change Connection Settings box.
* Here, you will choose the type of protocol you would want to implement for your network security
- Select the Security Tab at the top of the window.
- Change the Choose a network authentication method to Microsoft: Protected EAP (PEAP), then click Settings.
Next, we are going to configure Server Certificate Validation. This is a critical step for PEAP-MSCHAPv2 security, as it prevents clients from sending their passwords to hackers spoofing the SSID. The client must validate the RADIUS Server’s Domain and Certificate Authority before sharing its credentials.
- Check the Validate server certificate box and click Configure
- Connect to these servers.
- Here, you will configure what your device needs to look for in the RADIUS Server CA’s Common Name certificate field. This is typically the DNS that exists in the RADIUS Server CA. For customers who use Cloud RADIUS, it would be securew2.com.
- Select your Trusted Root CA
- This will be the Root CA that your RADIUS Server uses to verify its identity. It is essential to select this so your device can identify that the RADIUS is trusted before sending it the credentials.
- Select the authentication method EAP-MSCHAP v2 and enable the following
- Enable Fast Reconnect: Fast Reconnect allows the PC to create a new or refreshed security association more efficiently within a smaller number of refreshes after the security association was established.

- Select OK and Close the settings window.
- Uncheck Automatically use my Windows logon name and password (and domain, if any) box, and Select OK.
- Select OK again.
- Select the Advanced Settings button.
- On the 802.1x settings tab, check the Specify authentication mode and set the mode to User Authentication
- This will allow you to use user credentials to login to the network
- Left click the wireless symbol on the bottom right-hand corner to bring up the Networks menu.
- Select and connect to Your Organization Network.
- A prompt should appear to sign in. Type your organization’s Credentials
Configuring EAP-TLS for Windows Devices
Now, we will show the steps for configuring EAP-TLS authentication for Windows Devices. This will allow you to authenticate without using credentials through Secure Certificates that prevent network attacks.
- Launch Control Panel.
- Select Open Network and Sharing Center.
- Select Set Up a new connection or network in the Network and Sharing Center.
- Select Manually connect to a wireless network.

- Enter the information for your organization’s wireless network below and Select Next.
- Network Name: Name of your network (this must be in all capitals)
- Security Type: WPA2-Enterprise
- WPA2-Enterprise Standard is often used synonymously with the 802.1x
- Encryption Type: AES (Advanced Encryption Standard )
- Enterprises commonly use this 256 symmetric block cipher encryption as a highly secure symmetric key cipher for self-encrypting disk drives, database encryption, and storage encryption.
- Enterprises commonly use this 256 symmetric block cipher encryption as a highly secure symmetric key cipher for self-encrypting disk drives, database encryption, and storage encryption.

- Select the Change Connection Settings box.
- Select the Security Tab at the top of the window.
- Change the Choose a network authentication method to Microsoft: Smart Card or Other Certificates, then select Settings afterwards.

- Clients making authentication requests must present a smart card certificate to be authenticated by the network. For example, this could be your employee badge set up to your user account attributes. The PC will log in under your account with the access established for your access.
- Enable both Use a certificate on this computer and Use simple certificate selection.
Note*
- Enabling the use of a certificate on this computer will allow your device to run authentication through certificates uploaded to your PC
- This means the device’s network must be signed by a CA to only interact with sites with the same public or private CA.
- Simple certificate selection controls whether Windows automatically selects a certificate for authentication or prompts the user with a dropdown to choose one manually.
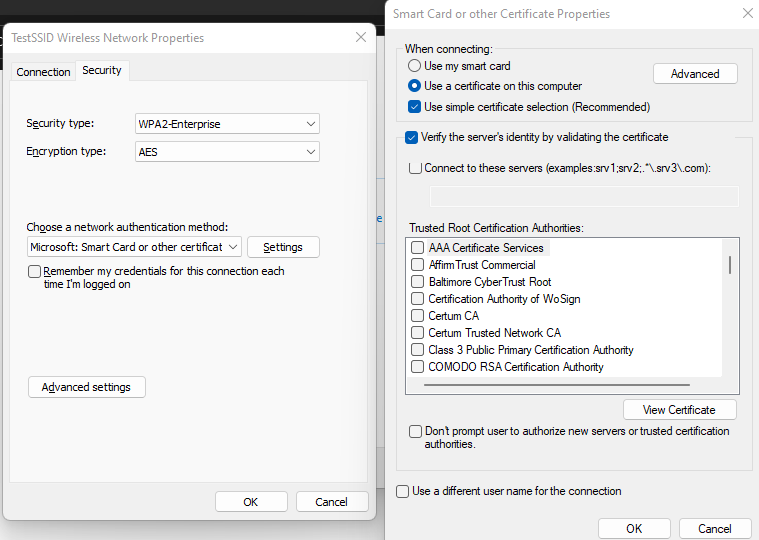
- After selecting these settings click OK.
- Disconnect from your network and reconnect. You’ll see that you would be authenticated by certificates
To enhance your network security, we recommend verifying the server’s identity by validating the certificate. This allows the client to validate the server and the server to validate the client. This feature requires that you import a CA certificate to the Windows 10 computer and ensure it is enabled as a Trusted Root Certification Authority in the Windows Certificate Store.
Now that we have done this manually, for those who have older devices we will go over the steps on how to manually configure Windows 8 devices for 802.1x authentication.
Configuring Windows 8 Manually for Wi-Fi
If you are using a Windows 8 PC, it will have the same UI as Windows 10/11 for configuring EAP protocols. Here are the following steps; please refer to the above screenshots for further assistance.
Configuring PEAP-MSCHAPv2 Settings on Windows 8
First we are going to configure PEAP-MSCHAPv2, which will use the AD credentials of users for authentication.
- Click on the Windows button to display the main menu Click on Control Panel.
- In the Control Panel window, click on Network and Internet.
- In the Network and Internet window, click on Network and Sharing Center.
- In the Network and Sharing Center window, click on Manage wireless networks
- In the Manage Wireless Networks window, click on Add.
- Next window, click on Manually create a network profile.
- When prompted to enter the wireless network information:
- Network name: Your organization’s SSID.
- Security Type: WPA2-Enterprise
- AES will be automatically selected after choosing this type of security
- Enter your Security Key.
- Enable the Start this connection automatically.
- Enable the Connect even if the network is not broadcasting .
- Click the Next
- After adding the wireless network profile successfully, click on the Change Connection settings.
- In the pop-up window, Wireless Network Properties:
- Enable Connect automatically when this network is in range.
- Enable Connect even if the network is not broadcasting its name (SSID) are checked.
- Click on the Security tab
- Under the Security options:
- Ensure Security type is set to WPA2-Enterprise
- Ensure Encryption type is set to AES
- Select Microsoft: Protected EAP (PEAP) for network authentication method
- Uncheck the Remember my credentials for this connection each time I’m logged on
- Click on Settings button
- Under the Security options:
- In the Protected EAP Properties page:
- Uncheck Validate server certificate.
- Check Enable Fast Reconnect.
- Select Secured password (EAP-MSCHAP v2) for authentication method
- Click on the Configure…
- Uncheck Automatically use my Windows login name and password.
- Click on the OK button.
- Under the Security options:
- Click on the Advanced settings option from the followings:
- Ensure the checkbox for Specify authentication mode is checked.
- Select User authentication under the Specify authentication mode.
- Click the OK button twice to return to the below screen Click on Close
- You have successfully created a wireless network profile.
- Click on the Advanced settings option from the followings:
- Disconnect and reconnect to your Wifi and you’ll be able to log in with your Windows credentials.
Configuring EAP-TLS Settings on Windows 8
- Launch Control Panel.
- Select Open Network and Sharing Center.
- In the Network and Sharing Center, select Set Up a new connection or network.
- Select Manually connect to a wireless network.
- Enter the information for your organization’s wireless network as shown below and Select Next.
- Network Name: Name of your network (this must be in all capitals)
- Security Type: WPA2-Enterprise
- WPA2-Enterprise Standard is often used synonymously with the 802.1x
- Encryption Type: AES (Advanced Encryption Standard )
- This 256 symmetric block cipher encryption is commonly used by enterprises as a highly secure symmetric key cipher for self-encrypting disk drives, database encryption, and storage encryption
- Select the Change connection settings box
- Select the Security Tab on the top of the window
- Change the Choose a network authentication method to be Microsoft: Smart Card or Other Certificates, then select Settings after
- Clients making authentication requests must present a smart card certificate to be authenticated by the network. For example, this could be your employee badge that was set up to your user account attributes. The PC will log in under your account with the access that was established for your access.
- Enable both Use a certificate on this computer and Use simple certificate selection
- Enabling use a certificate on this computer will allow your device to run authentication through certificates uploaded to your pc
- This means the network that the device is on must be signed by a CA so that the device can only interact with sites with the same public or private CA
- The use of simple certificate selection determines whether Windows will automatically select a certificate for authentication without any user interaction or, depending on the scenario, will show a dropdown for the user to select their certificate for authentication.
- Enabling use a certificate on this computer will allow your device to run authentication through certificates uploaded to your pc
Now that we have done this manually, next we will go over how to set up automated 802.1x policy configuration for network devices for enterprises with the use of Intune.
How to Automatically Set a Windows 10/11 Device for Wi-Fi Using Intune
Here we will show you how to use Intune to automatically push out MDM Wi-Fi profiles for server certificate enrollment within your organization’s active directory domain so that all managed devices can successfully authenticate without password-based credentials using EAP-TLS or without a password using PEAP-MSCHAPv2.
Prerequisites for EAP-TLS
- PKI
- For EAP-TLS authentication, you’ll want to ensure you have a PKI Infrastructure in place and Intune configuration profiles so your devices can be authenticated through certificates.
- Server Trust
- Certificate Server Names: One or more relevant names issued certifications by the trusted certificate authority.
- Root Certificate for server validation:
- A trusted root certificate profile that can help authenticate the network connection. It applies only to the RADIUS server root CA.
- Intermediate Certificate Authority
- A Secondary CA that a Superior CA authorized to issue certificates
Trusted Certificate Profile for RADIUS Server CA
This profile is to be configured with the certificate of your RADIUS server certificate issuing Authority, allowing managed devices to trust your RADIUS server by validating the RADIUS server certificate. You can achieve this server validation in the profile configuration by adding the Root and/or Intermediate Certificate Authority (CA) certificates that issued the RADIUS server certificate. When you assign this profile, the Microsoft Intune-managed devices receive the trusted certificates.
SCEP Certificate Profile
A SCEP client certificate profile can be deployed to the device. The device can grant the certificate to the server authenticated to the network connection.
For more information regarding Intune Configuration Profile settings, please look at our Intune Enterprise and our SCEP Configuration documentation articles for more in-depth information on each Intune setting.
Configuring Wi-Fi Profiles for Windows 802.1X User Authentication
First, we will log in to Microsoft Intune and then create a configuration profile to apply to your organization’s devices. This Wi-Fi profile will apply to the device once it connects to your organization’s network.
Intune EAP-TLS
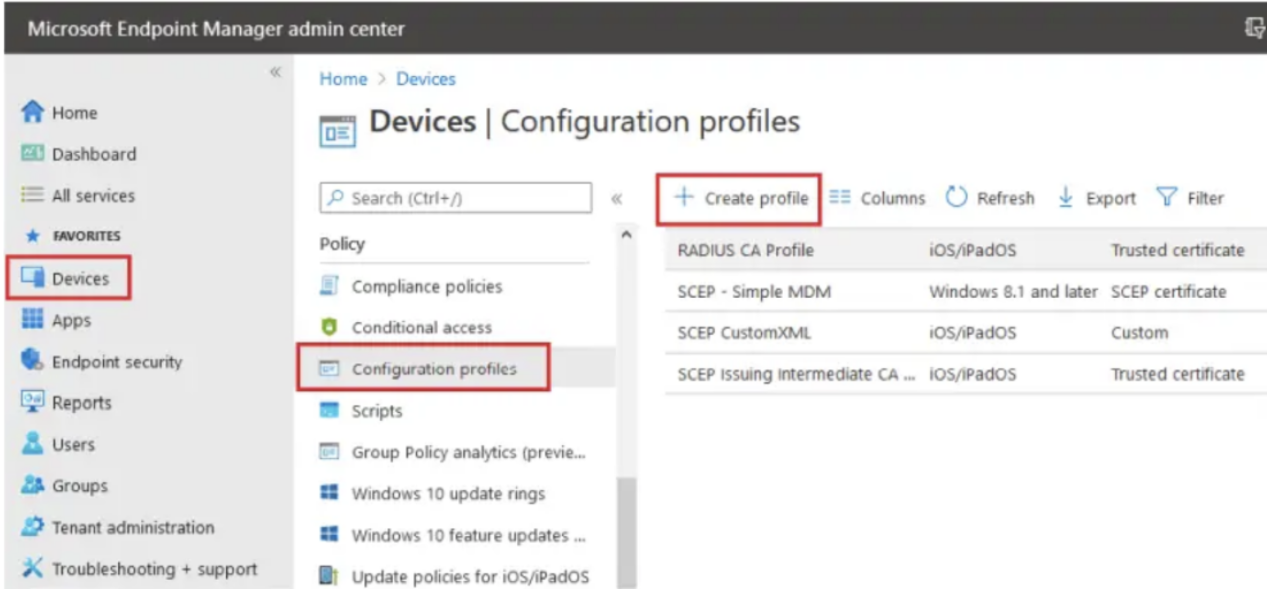
- Sign in to the Intune (Microsoft Endpoint Manager) portal.
- Select Devices > Configuration profiles > Create profile.
- From the Platform dropdown list, select the device platform Windows 10 or later.

- Under the Profile Type, you’ll select Templates and then Wi-Fi .
- Select
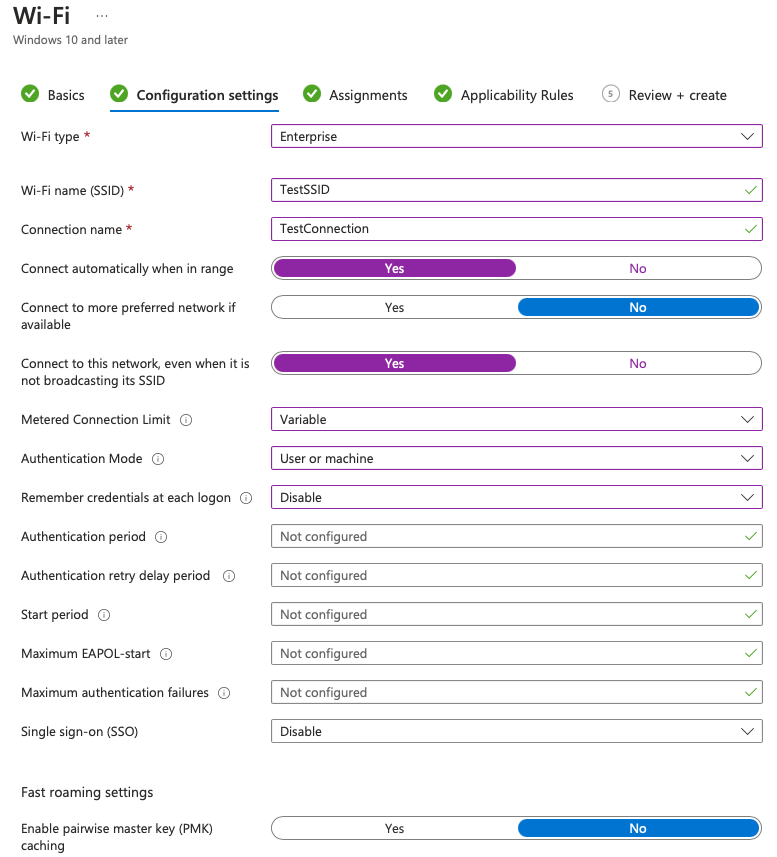
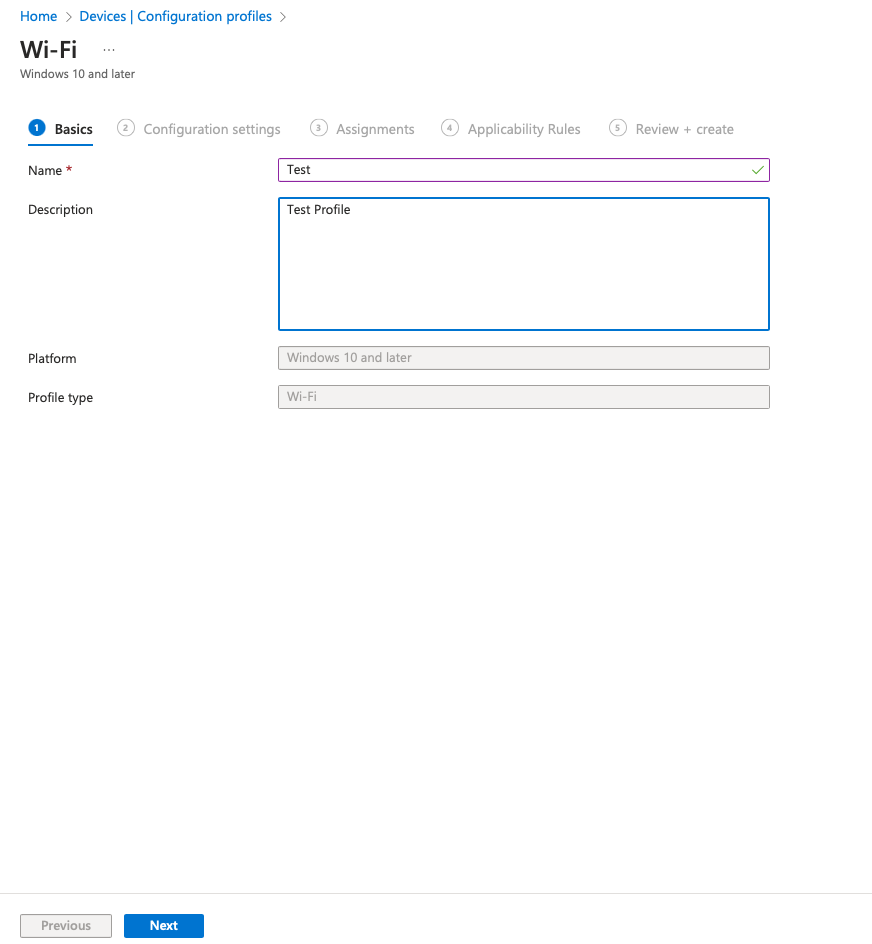
- In Basics, enter the name and description of your Wi-Fi profile.

- Click Next.
- In the ConfigurationSettings tab, you will choose the settings for your organization to configure and the security protocol. Hit Next when finished.
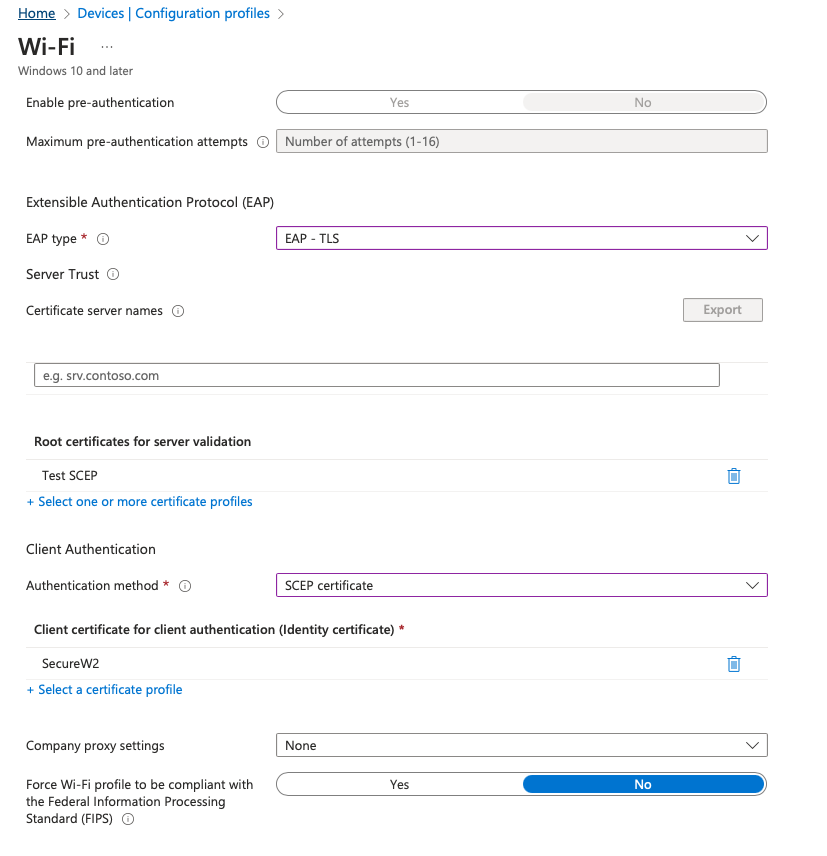
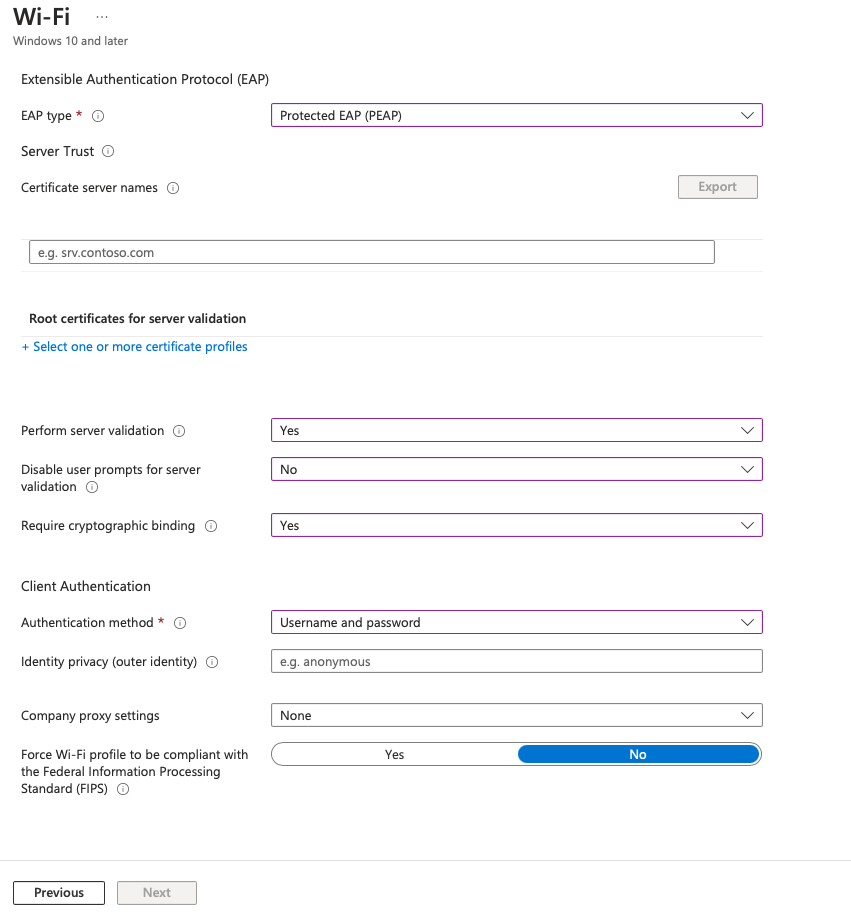
- For EAP-TLS authentication, you’ll want to ensure you have selected the following settings or certificates already created before for a successful configuration.
- Root Certificates for server validation
- You’ll want this already set in place so your profile can deploy the certificates and the device knows what CA to trust.
- EAP Type- EAP-TLS
- This is so it can run the certificate protocol when deploying the Wi-Fi Profile.
- Authentication Method-SCEP (Simple Certificate Enrollment Protocol)
- You’ll want to have this profile already set in place beforehand so that it can run.
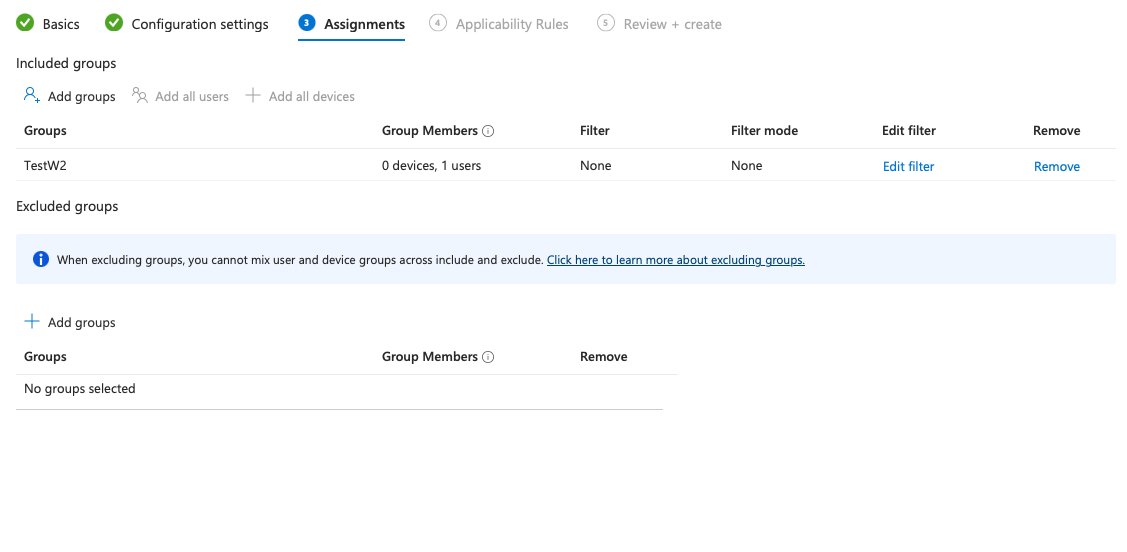
- Once done, proceed to the Assignments Section. There, you will choose the user/groups you want to assign to this Wi-Fi profile to be given to their devices.
- After you’re done with your selection, hit
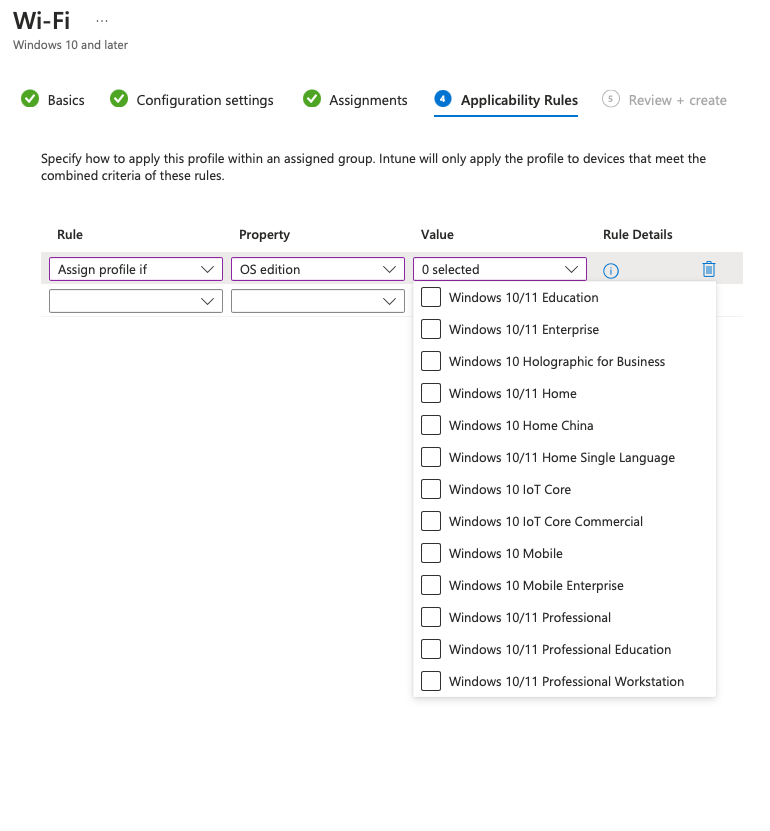
- You will then land on Applicability Rules. Here, you will choose what OS this profile will be assigned to so that it automatically updates when the user signs onto the Wi-Fi.
- Click next for Review+Create. You will then be able to view the Wi-Fi profile you have just created for your organization, which will push out all of your Intune policies as soon as they connect to your Wi-Fi.
Intune PEAP-MSCHAPv2
For PEAP-MSCHAPv2, you’ll want to do the following to have your organization authenticate through credentials.
- Sign in to the Intune (Microsoft Endpoint Manager) portal.
- Select Devices > Configuration profiles > Create profile.
- From the Platform dropdown list, select the device platform Windows 10 or later.
- Under the Profile Type, you’ll select Templates and then Wi-Fi.
- Select Create.
- In Basics, enter the name and description of your Wi-Fi profile.
- Click Next.
- In the Configuration Settings tab, you will choose what settings for your organization to configure and what security protocol, Hit next when finished.
- Once done, proceed to the Assignments Section. There, you will choose the user/groups you want to assign for this Wi-Fi profile to be given to their devices. After you’re done with your selection, hit the next.
- You will then land on Applicability Rules. Here, you will choose what OS this profile will be assigned to so that it automatically updates when the user signs onto the Wi-Fi.
- Click next for Review+Create. You will then be able to view the Wi-Fi profile you have just created for your organization, which will push out all of your Intune policies as soon as they connect to your Wi-Fi.
For more in-depth information regarding Intune and the Wi-Fi Profile Configuration steps settings, check out our article about Intune Enterprise.
Enabling Server Certificate Validation on Windows Devices
Server certificate validation is an added security measure that guarantees your Windows devices will only connect to trusted servers. However, your Windows devices and RADIUS server will need to trust the same root CA to enable this feature. You can take one of three routes:
- You can get your server certificates from a widely known and reputable CA, such as Verisign.
- You can equip your RADIUS server with a self-signed certificate.
- You can utilize user-friendly onboarding software like JoinNow MultiOS to manage the configuration process.
While we discussed how it’s possible to manually configure each of your Windows devices for server certificate validation, the problem is that it takes a high degree of technical knowledge. Much more than the average end user would typically know. It would help if you started by configuring your RADIUS server, configuring your Certificate Authority, and inputting the trusted RADIUS server’s domain information.
This can cause severe liability to organizations because configuring Server Certificate Validation is considered Optional by Windows Devices. This means that end users can omit the settings or enter them incorrectly, and they would have no idea. For substantial organizations, this can amount to hundreds of users sharing credentials over the air to any hacker presenting the correct SSID to them.
The easiest method to combat this issue is to use an onboarding application. Applications like JoinNow allow you to push configuration profiles to all the devices on your network in one fell swoop rather than messing with each device’s settings individually. This not only makes it a much easier end-user experience, but it also prevents users from omitting Server Certificate Validation.
Important Things to Remember When Configuring 802.1X for Windows
When it comes to configuring 802.1x for Windows Devices, keep these things in mind.
Understand Advanced Settings
- If necessary, you can explore the options:
- Make adjustments to timeouts and retry settings to fit your network requirements.
- Customize additional security settings like enabling server certificate validation or specifying trusted RADIUS servers.
Testing and Troubleshooting
- After setting up 802.1X, it is crucial to test and troubleshoot the Configuration:
- Try connecting to the network to ensure that authentication and authorization processes function correctly.
- Utilize tools such as Event Viewer to identify and resolve any potential issues.
Maintenance
- Regularly update your 802.1X configurations with these steps in mind:
- Renew or update certificates as needed.
- Keep usernames and passwords up to date.
- Stay informed about any security updates or patches related to 802.1X.
Hardware Compatibility
- Make sure your equipment is up to date with the latest OS and compatible with the technology.
By following these steps while maintaining your Windows 802.1X configurations, you can guarantee access for your devices on the network, bolstering security measures.
Windows 802.1X Simplified with SecureW2
Configuring Windows OS with SecureW2 requires the user to connect to the onboarding SSID and open an internet browser. The user is then sent to SecureW2’s JoinNow onboarding software. After Selecting JoinNow, a graphic will indicate the progress of the Configuration. The user will then be prompted to enter their credentials, and the device will be authenticated and equipped with a certificate.
It is just that simple.
SecureW2 is trusted by some of the biggest companies in the world to provide the highest level of security and peace of mind. Our software solutions can be integrated seamlessly into your current network infrastructure or stand independently as a fully managed network security service.
We have affordable options for organizations of any size. Schedule a demo to see how we can help you simplify 802.1X for Windows or any OS.
Frequently Asked Questions
How do I find the Wi-Fi certificate on Windows?
To view certificates for a local Windows device:
- Select Run from the Start menu, and then enter certmgr.msc.
- The Certificate Manager tool for the local device appears.
- To view your certificates, under Certificates – Local Computer in the left pane, expand the directory for the type of certificate you want to view.
How do I disable 802.1X on Windows?
- Right Click the network icon on the Windows taskbar and select Open Network and Sharing Center.
- Select Change adapter settings.
- Right Click on the Local Area Connection and select Properties.
- Select Authentication, uncheck Enable IEEE802.1X authentication, and then press OK.
Is 802.1X better than WPA2?
802.1X and WPA2 are not direct competitors. They serve different but complementary purposes and are often used together.
WPA2 is a Wi-Fi security protocol (part of the 802.11i standard) that primarily provides encryption (AES-CCMP) to protect data transmitted over the air.
802.1X is a port-based network access control framework that handles authentication, verifying who or what is allowed to connect to the network.
Is 802.1X wired or wireless?
802.1X works for both wired and wireless networks. 802.1X is very popular for enterprise Wi-Fi security, but many organizations also deploy it on wired networks for stronger Zero Trust-style access control. The same RADIUS server and authentication methods (such as EAP-TLS certificates) can be used for both.
Do Windows devices need both client and root CA certificates for EAP-TLS?
Yes. The root CA (or intermediate) must be in the Trusted Root store for server validation (mutual authentication). The client certificate + private key goes in the Personal store.