Key Points
- Microsoft Intune can push Wi-Fi profiles to endpoints, connecting them securely to 802.1X networks.
- Implementing server certificate validation and employing SCEP for certificate enrollment is essential to mitigate attacks and optimize device authentication.
- EAP-TLS improves the security of 802.1X Wi-Fi. Our PKI and API gateways work with Intune to automatically push certificates to monitored devices.
Microsoft Intune lets admins push Wi-Fi profiles to managed devices, giving users seamless access to 802.1X enterprise networks, with no manual setup required. There’s a catch, though: a misconfigured Intune Wi-Fi profile can be worse than none at all. The wrong EAP type, missing server validation, or a broken SCEP profile can leave your environment exposed to credential theft and Man-in-the-Middle (MITM) attacks.
This guide covers the configuration decisions that matter most when building an Intune enterprise Wi-Fi profile: choosing the right Wi-Fi type, enabling server certificate validation, deploying EAP-TLS with SCEP certificates, and avoiding the common mistakes that cause profile deployment failures across Windows, Android, and iOS/macOS endpoints.
Why Intune Wi-Fi Profile Configuration Matters for 802.1X Security
Intune supports two Wi-Fi profile types: Basic and Enterprise.
A Basic profile uses pre-shared key authentication, like WPA-PSK (Wi-Fi Protected Access – Pre-Shared Key) or WPA2-PSK, where every device shares the same password. This approach is acceptable for guest networks but unfit for corporate environments, where a shared key can be extracted from any enrolled device and reused to access the network from unauthorized hardware.
An Enterprise Intune Wi-Fi profile enables WPA2-Enterprise (or WPA3-Enterprise via custom OMA-URI), which requires 802.1X authentication through a RADIUS server. Each device authenticates individually using its own credentials or certificate. This is the only Wi-Fi profile type that supports EAP-TLS, PEAP, or EAP-TTLS — and the only one that ties network access to individual identity.
This guide is based on the Enterprise Intune profile.
How to Configure Server Certificate Validation in an Intune Wi-Fi Profile
Server certificate validation is the step where the client device confirms the RADIUS server’s identity before sending any credentials. The device checks that the server certificate was issued by a trusted Certificate Authority (CA) and that the server name matches the expected value.

Without this check, attackers can stand up a rogue access point (an “Evil Twin”) that mimics your SSID. Devices that connect automatically will hand over their credentials to the attacker’s RADIUS server. Server certificate validation stops this by rejecting any server whose certificate does not chain to the expected root CA.
Configuring Server Names and Root Certificates
To configure server names, enter the Common Name (CN) or FQDN of your RADIUS server’s certificate. This tells the device which server identity to expect. If your RADIUS server certificate is issued to `radius.contoso.com`, that value goes in the server names field.
To configure root certificates for server validation, select a Trusted Certificate Profile in Intune that contains the root CA certificate of your RADIUS server’s issuing authority. The device uses this to verify the chain of trust.
Both settings are required for server validation to work. Configuring one without the other leaves a gap: either the device trusts any server with a certificate from the right CA (regardless of name), or it checks the name but cannot verify the certificate chain.
Choosing EAP-TLS for Certificate-Based Intune Wi-Fi Profiles
The EAP type you select in the Intune Wi-Fi profile determines how devices authenticate to the RADIUS server. Three options are common:
| EAP Method | Authentication | Known Vulnerabilities |
| EAP-TLS | Mutual certificate exchange | None – requires validate X.509 certificate on both sides server and client. |
| PEAP-MSCHAPv2 | Username + password inside TLS tunnel | MSCHAPv2 hash can be cracked; vulnerable to offline dictionary attacks |
| EAP-TTLS/PAP | Username + password inside TLS tunnel | Sends credentials in cleartext inside the tunnel | |
EAP-TLS is the only EAP method that eliminates passwords from the authentication flow entirely. Both the client and the RADIUS server present X.509 digital certificates during the TLS handshake. No password hash crosses the air. No credential can be phished, intercepted, or replayed.

Another extremely significant decision when configuring a network is the authentication protocol you choose. We’ve compared authentication protocols in detail in another blog, so we’ll just cover the highlights here.
Certificates used in EAP-TLS also bind authentication to a specific device. Unlike a password that can be typed on any machine, a certificate’s private key is stored on the enrolled device (and can be marked non-exportable or bound to a TPM). This means network access is tied directly to device identity — not just user identity.
To use EAP-TLS, you need a Public Key Infrastructure (PKI) to issue and manage client certificates, and a RADIUS server that supports certificate-based authentication. The next section covers how to get certificates onto devices through Intune.
Configuring SCEP Profiles to Deploy Certificates for Intune Wi-Fi
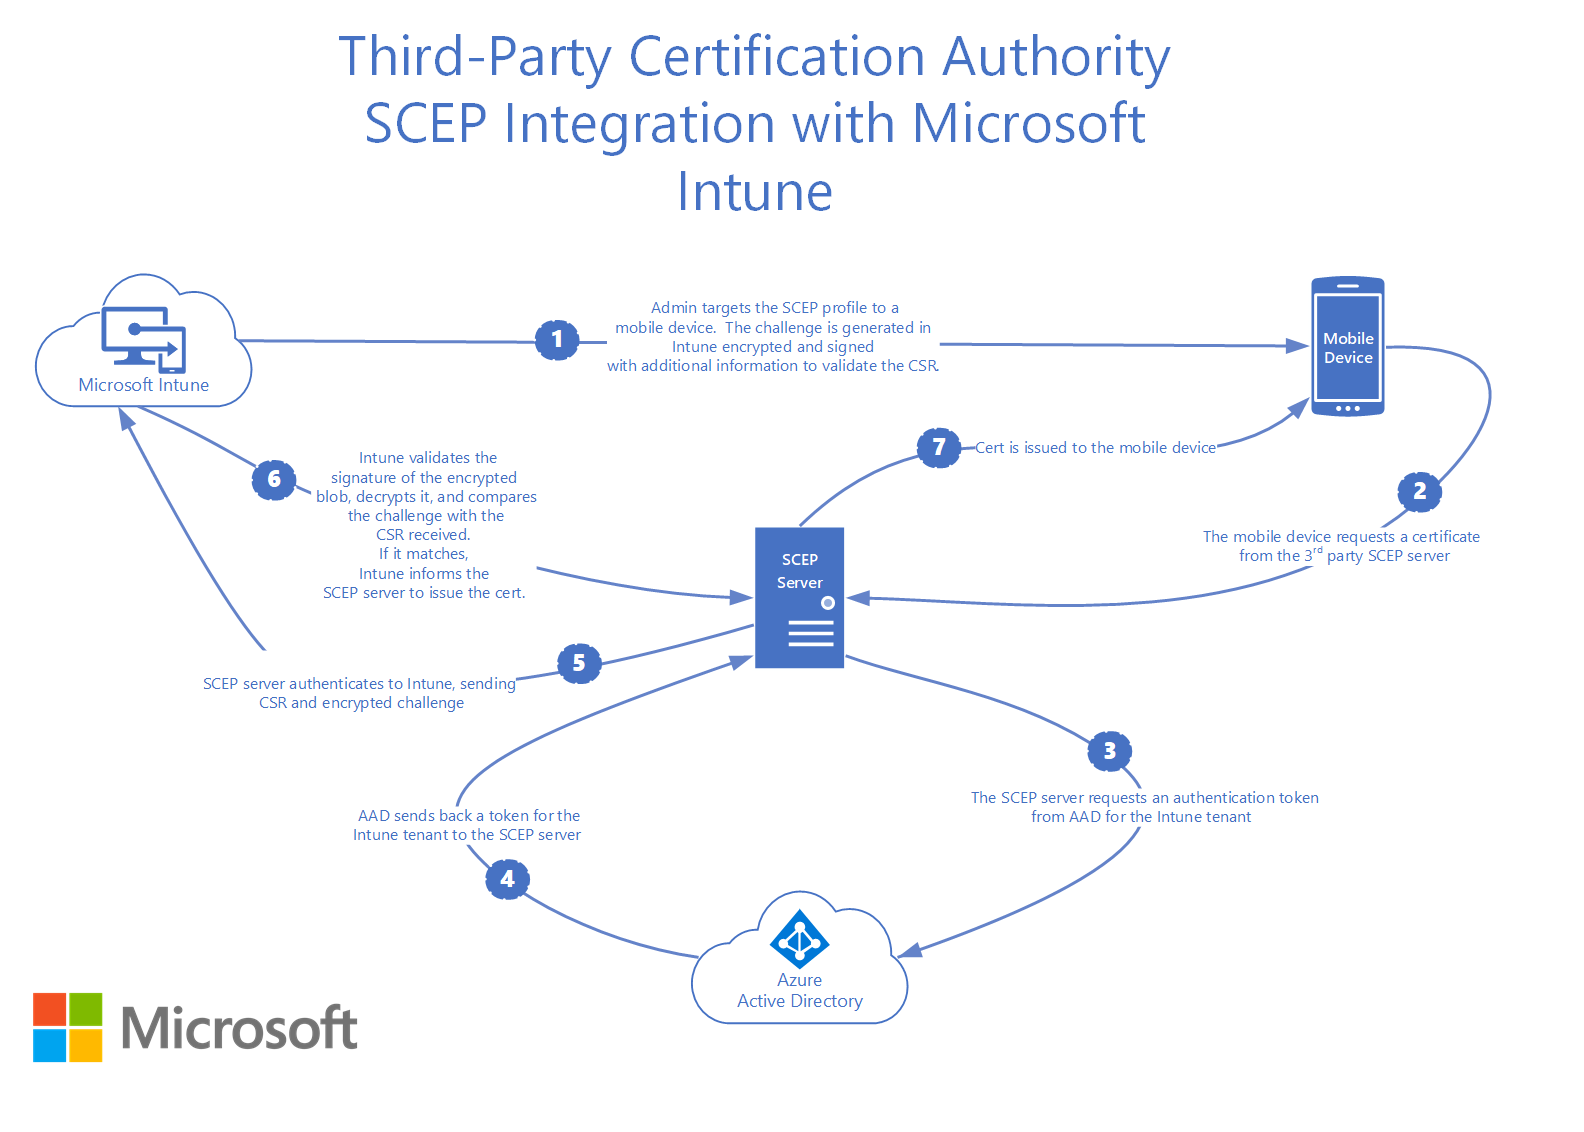
Simple Certificate Enrollment Protocol (SCEP) is the mechanism Intune uses to issue digital certificates to managed devices. A SCEP profile in Intune tells the device how to request a certificate from your CA — which template to use, what subject name format to follow, what key size and hash algorithm to apply, and where to send the certificate signing request.
Intune Wi-Fi profiles with EAP-TLS depend on two other profiles:
- Trusted Certificate Profile — contains the root CA certificate for RADIUS server validation
- SCEP Certificate Profile — issues the client identity certificate used for EAP-TLS
The Wi-Fi profile references both. If either profile has not been delivered to the device when the Wi-Fi profile arrives, the profile will fail to apply. On Android in particular, deploying these three profiles to different security groups is a common cause of failures, since Intune cannot guarantee delivery order across separate group assignments.
It’s a good practice to deploy all three profiles (Trusted Root, SCEP, and Wi-Fi) to the same Entra ID security group. This gives Intune the best chance of delivering them in the correct dependency order.
SCEP configuration best practices
These settings are often misconfigured or overlooked when admins configure SCEP profiles in Intune.
- Subject name format: Use `CN={{UserPrincipalName}}` for user certificates or `CN={{DeviceName}}` for device certificates. This maps the certificate identity to a value your RADIUS server can look up in Entra ID.
- Key storage provider: Use Software KSP rather than TPM if you encounter enrollment failures on older hardware. TPM-based enrollment is more secure but has known firmware compatibility issues on some Windows devices.
- Extended Key Usage (EKU): Include “Client Authentication” (OID 1.3.6.1.5.5.7.3.2). If your SCEP profile includes “Any Purpose” but your CA template does not, enrollment will fail silently.
- Certificate validity period: Match this to your organization’s renewal cadence. Shorter-lived certificates reduce the window of exposure if a device is compromised, but require reliable auto-renewal.
Intune also supports PKCS certificate profiles as an alternative to SCEP. PKCS profiles use a different enrollment flow (the Intune Certificate Connector handles the CSR on behalf of the device), but the Wi-Fi profile configuration is identical — you still select a certificate profile for client authentication.
Intune Wi-Fi Profile Settings: Platform-Specific Configuration
Intune Wi-Fi profiles share a common structure across platforms, but each OS has settings that behave differently or require platform-specific attention. Here’s how to best configure each setting.
Windows
- Connect automatically when in range: Set to Yes for your corporate SSID. This is required for seamless 802.1X — users should not need to manually select the network.
- Connect to more preferred network if available: Set to No unless you have multiple corporate SSIDs with a deliberate priority hierarchy.
- FIPS compliance: Set to Yes if your organization requires FIPS 140-2 validated cryptographic modules. This is common in U.S. federal and defense environments.
- Single Sign-On (SSO): Enable SSO if you want Wi-Fi authentication to occur before or during Windows logon, using the same certificate. This eliminates the gap where a device has no network connectivity during login.
- WPA3: Intune’s built-in Wi-Fi template does not support WPA3-Enterprise natively. To deploy a WPA3 profile, configure it on a reference device, export the XML, and deploy it via a Custom OMA-URI profile.
Android (Enterprise)
- Hidden network: Set to Enable only if your SSID is not broadcast. Enabling this on a broadcast SSID can cause connection delays.
- Certificate selector: On Android, the Company Portal app’s CertificateSelector provider must find a certificate matching the SCEP profile criteria. If the selector finds no match, the Wi-Fi profile will not apply — and Intune will not report an error. Verify SCEP enrollment succeeded independently before troubleshooting Wi-Fi.
- Android 14+ enrollment: Recent Android Enterprise enrollments on Android 14 and later have reported delays or failures in receiving Wi-Fi configuration profiles. If you encounter this, confirm that the Company Portal app and Intune management extensions are up to date.
iOS and macOS
- MAC address randomization: iOS randomizes MAC addresses by default. If your RADIUS server uses MAC-based policies, you may need to set Disable MAC address randomization in the Wi-Fi profile. Be aware that disabling randomization reduces user privacy.
- Proxy settings: iOS supports Manual and Automatic proxy configurations within the Wi-Fi profile. If your network requires a proxy, configure it here — iOS does not inherit system-level proxy settings for Wi-Fi connections.
Troubleshooting Intune Wi-Fi Profile Deployment Failures
When an Intune Wi-Fi profile fails to apply, the root cause is almost always a certificate dependency issue, not a Wi-Fi configuration problem. Work through these troubleshooting checks in order:
- Verify the Trusted Certificate Profile delivered successfully. In the Intune admin center, check the device’s profile deployment status. If the Trusted Root profile shows “Pending” or “Error,” the Wi-Fi profile cannot validate the RADIUS server.
- Verify the SCEP certificate enrolled. On Windows, open `certmgr.msc` and check the Personal store for the client certificate. On Android, check Settings > Security > User Credentials. On iOS, check Settings > General > VPN & Device Management > the management profile.
- Confirm EKU alignment. The SCEP profile’s Extended Key Usage must match the CA certificate template. A mismatch (e.g., “Any Purpose” in SCEP but not in the template) causes silent enrollment failure.
- Check group assignments. All three profiles (Trusted Root, SCEP, Wi-Fi) should target the same Entra ID security group. Misaligned group assignments cause race conditions where the Wi-Fi profile arrives before its certificate dependencies.
- Test manual connection. On a problem device, manually connect to the SSID using the enrolled certificate. If the manual connection succeeds, the issue is in the Wi-Fi profile settings (server names, root CA selection). If it fails, the issue is in the certificate chain or RADIUS server configuration.
- Review Windows event logs. On Windows, Event ID 814 in the WLAN-AutoConfig log shows the authentication result. A rejected authentication points to a RADIUS server-side issue (mismatched certificate, disabled user account, or policy mismatch).
How SecureW2 Simplifies Intune Wi-Fi Profile Deployment
The hardest part of configuring an Intune Wi-Fi profile for EAP-TLS is not the Wi-Fi profile itself — it is the certificate infrastructure behind it. You need a PKI to issue certificates, a SCEP or PKCS connector to deliver them, a RADIUS server to validate them, and an identity provider to tie them to user and device records.
SecureW2 replaces that patchwork with a managed, cloud-native platform.
JoinNow Dynamic PKI issues X.509 certificates to Intune-managed devices through a managed SCEP gateway. There are no on-prem CA servers, and there’s no Intune Certificate Connector to install and maintain.
Certificate enrollment works with the same SCEP profile type you configure in Intune — the only difference is that the SCEP URL points to the SecureW2 gateway instead of an on-prem NDES server.
JoinNow Cloud RADIUS authenticates EAP-TLS connections and performs real-time identity lookups against Entra ID (Azure AD), Okta, or Google Workspace on every authentication. If a user is disabled or a device falls out of compliance in your identity provider, Cloud RADIUS denies access immediately — no waiting for certificate expiration or manual revocation.
Automated certificate lifecycle management handles renewal and revocation. When a device is wiped or unenrolled from Intune, SecureW2 can auto-revoke its certificate. CertIQ ML Anomaly Detection monitors certificate usage patterns and flags suspicious activity, such as a certificate being used from an unexpected location or device.
The result is an Intune Wi-Fi profile backed by EAP-TLS authentication that requires no on-prem RADIUS servers, no AD CS infrastructure, and no manual certificate management. IT teams deploy three Intune profiles (Trusted Root, SCEP, Wi-Fi), point the SCEP URL to SecureW2, and managed devices enroll for certificates automatically.
Schedule your free demo to see how SecureW2 integrates with Microsoft Intune.
Frequently Asked Questions
What is an Intune Wi-Fi profile?
An Intune Wi-Fi profile is a device configuration policy that pushes wireless network settings like SSID, security type, and EAP method to managed devices. Enterprise Wi-Fi profiles enable 802.1X authentication through a RADIUS server, allowing each device to authenticate individually rather than sharing a pre-shared key.
How do I deploy a Wi-Fi profile in Intune?
In the Intune admin center, navigate to Devices > Manage devices > Configuration > Create > New policy. Select your target platform and choose Wi-Fi as the profile type. Configure the SSID, select Enterprise as the Wi-Fi type, choose your EAP method, reference your Trusted Root and SCEP certificate profiles, then assign the policy to an Entra ID security group.
Why is my Intune Wi-Fi profile not working?
The most common cause is a certificate dependency failure. The Wi-Fi profile requires both a Trusted Certificate Profile (for RADIUS server validation) and a SCEP/PKCS Certificate Profile (for client authentication). If either profile has not been delivered to the device, the Wi-Fi profile cannot apply. Check profile deployment status in the Intune admin center and verify that all three profiles target the same security group.
Can Intune deploy WPA3-Enterprise Wi-Fi profiles?
Not through the built-in Wi-Fi template. Intune's native Wi-Fi profile type supports WPA2-Enterprise but not WPA3-Enterprise. To deploy WPA3, configure the Wi-Fi profile on a reference Windows device, export the profile as XML, and deploy it through a Custom OMA-URI policy in Intune.
What is the difference between SCEP and PKCS certificates in Intune?
SCEP (Simple Certificate Enrollment Protocol) has the device generate its own key pair and send a certificate signing request to the CA. PKCS uses the Intune Certificate Connector to generate the key pair and certificate on behalf of the device. Both deliver X.509 certificates that work with EAP-TLS Wi-Fi profiles. SCEP is more widely used for Wi-Fi authentication because it does not require the Intune Certificate Connector for cloud-managed PKI providers like SecureW2.