Key Points
- NPS Reason Code 22 is mainly caused by a misconfigured EAP handshake that results in an incomplete EAP handshake between the client and the NPS server.
- This is mainly caused by faulty, expired, or incorrectly set server certificates and authentication issues caused by improper settings in the clients’ WLAN profiles.
- You can fix this error by using a set of commands suggested by Microsoft in the registry editor and other easy-to-follow instructions in the guide.
Remote Authentication Dial-in User Service (RADIUS) is integral to network infrastructure, especially for authentication, authorization, and accounting (AAA) purposes. NPS (Network Policy Server) is Microsoft’s RADIUS server, replacing its age-old Internet Authentication Service (IAS). Like any other RADIUS, NPS performs the same function and filters out non-compliant network access, assuring the organization’s overall security.
Organizations usually rely on 802.1X, an IEEE Standard for Port-Based Network Access Control (PNAC), for robust Wi-Fi authentication. This standard protocol primarily uses the Extensible Authentication Protocol (EAP). However, if the EAP handshake with NPS fails, you might encounter some errors.
Microsoft Public Key Infrastructure (PKI) is crucial to enhancing network security and NPS’s function as a RADIUS server. Microsoft PKI (Public key infrastructure) improves network authentication procedures by offering a framework for handling encryption keys and digital certificates. Microsoft PKI guarantees that authentication methods like PEAP-MS-CHAP v2 or EAP-TLS follow strict digital certificate criteria when smoothly integrated with NPS. This strengthens network security by preventing possible vulnerabilities. Thus, it becomes essential for organizations to comprehend the specifics of both Microsoft Cloud PKI (Public Key Infrastructure) and NPS to maintain robust network authentication procedures and successfully minimize issues such as NPS Error 22.
Here, we will address one of the most frequent errors you might encounter while using NPS as a RADIUS server or proxy: NPS Error 22.
Public Key Infrastructure
Modern network security relies heavily on Public Key Infrastructure (PKI), which offers a reliable framework for handling digital certificates and cryptographic keys. Secure public key exchange, made possible by PKI Infrastructure, enables secure network authentication and secure communications. It uses a mix of public and private keys, with every network node having a unique private key and matching public key. While the public key is shared publicly for information decryption and signature verification, the private key is utilized for data encryption and digital signatures and is kept secret by the owner. For instance, if an encrypted message for Bob, only Bob’s private key may decrypt it, guaranteeing critical information security while it is being transmitted. This dual-key technique improves security by reducing the chances of a key compromise and eliminating the need for a single secret key. Organizations may improve their network authentication procedures by putting PKI Infrastructure into place, guaranteeing that only authorized users with the right cryptographic keys can access sensitive resources.
Delving Into Extensible Authentication Protocol
Extensible Authentication Protocol (EAP) is a critical component of network authentication. Fundamentally, EAP is a framework that permits using different authentication techniques in a network context. EAP provides versatility by integrating several authentication mechanisms, from username/password authentication to more sophisticated techniques like certificate-based authentication, in contrast to specialized authentication protocols that only support one approach. Because of its adaptability, EAP is a vital tool for guaranteeing safe access to network resources and meeting the various authentication needs of modern networks.

EAP has various functions in the context of network authentication. Its primary function is a bridge, allowing the exchange of authentication credentials and assuring the secure establishment of network connections between the client device and the authentication server. Furthermore, EAP facilitates the deployment of many security protocols, including key derivation and mutual authentication, improving the network’s overall security posture.
Additionally, EAP makes seamless integration with already-existing authentication infrastructures possible, letting businesses benefit from their investments in authentication technologies while adjusting to changing security requirements and standards.
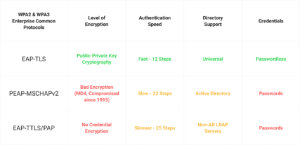
Several variations of EAP are suited to particular security concerns and authentication techniques. PEAP (Protected Extensible Authentication Protocol), EAP-TTLS (Tunnelled Transport Layer Security), EAP-FAST (Flexible Authentication via Secure Tunnelling), and EAP-TLS (Transport Layer Security) are examples of common variations. Every variation presents unique benefits and may be chosen according to factors like deployment simplicity, security needs, and compatibility with current infrastructure. Comprehending the subtle differences between these variations is vital for proficiently installing NPS and guaranteeing smooth authentication in the network setting.
What is Error: NPS Reason Code 22?
NPS Reason Code 22 is one of the common issues users face when using the Extensible Authentication Protocol (EAP) type on the client’s computer. In short, it typically means that NPS could not complete the EAP handshake with the client device, usually because NPS or the client were misconfigured.
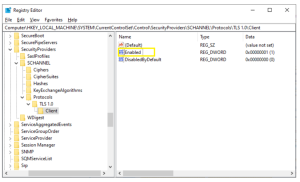
NPS works with both credentials and digital certificates. While using digital certificates, authentication protocols such as PEAP-MS-CHAP v2, PEAP-TLS, or EAP-TLS must meet the requirements for X.509 certificates and work for connections that use Secure Socket Layer/Transport Level Security (SSL/TLS). Although the NPS must meet the requirements of both server and client certificates, manually tampering with the TLS in the Windows Registry can have dire consequences, particularly in the Registry path:
HKLM SYSTEM\CurrentControlSet\Control\SecurityProviders\SCHANNEL
If you’ve disabled the TLS 1.0 server by manually customizing the TLS registry paired with Group Policy, it can cause the NPS server to malfunction, resulting in NPS Error 22. If you are keen to resolve this issue, we advise you to check the log files associated with the NPS errors.
Figuring Out the NPS Reason Code 22
Error 22, which is represented by Event ID 6273, is a message that the client authentication failed because there was a problem with the RADIUS server’s processing of the Extensible Authentication Protocol (EAP). There are several possible causes for this issue. The EAP authentication procedure is mostly disrupted by digital certificate errors, such as faulty, expired, or incorrectly set server certificates. In this instance, the RADIUS server’s expired domain certificate was the initial cause of the issue; despite being replaced, it continued because of possible misconfigurations or compatibility issues.
Configuration problems can mainly cause error 22. Authentication problems may be caused by improper settings in the client’s WLAN profile or configuration errors in the RADIUS server’s Network Access Policy. Mismatched EAP settings or limitations that aren’t configured appropriately to use the new digital certificate for authentication are examples of these misconfigurations. Authentication failures can also be caused by incompatibilities between the client’s EAP settings and those on the RADIUS server. The issue can be made worse by the client’s usage of outdated or outdated EAP methods, in which case server configurations or client settings would need to be updated to ensure smooth authentication.
You can follow the instructions from Microsoft documentation to locate the NPS log files associated with the error. The following steps will help you confirm that you are, indeed, experiencing NPS Error 22 and not another issue:
- Open the NPS console or the NPS Microsoft Management Console (MMC) snap-in.
- Click Accounting in the console tree.
- In the details pane, click Change Log File Properties in Log File Properties.
- In the Log File Properties dialog box, click the Log File.
- You can locate these files by typing the NPSLogFile in the Log File Directory. The file is located at %systemroot%\System32\NPSLogFile.
- Keeping the other settings in default mode is recommended to minimize unnecessary headaches.
- For XML descriptions of the log files, click DTS Compliant in Format.
Once you’ve located the log files, you can verify the last lines of the log files and check if it look like “<Reason-Code data_type=”0″>22</Reason-Code>.” This line confirms that the error you are facing is Reason Code 22.
There’s a possibility you might see an error code other than the one described in this guide. If you are confused about the NPS errors you are encountering and can not figure out the root cause for the same, then we recommend checking out Microsoft’s reason code chart.
How to Fix NPS Reason Code 22
For the Windows implementation of the TLS and SSL protocol, use Group Policy or other Windows tools such as the Microsoft Management Console (MMC) instead of editing the registry directly. We recommend that you avoid directly editing the registry unless there are no other alternatives. If you have decided to edit the registry, be extra cautious.
Now, if you have already disabled the TLS 1.0 server, you need to enable it by following the given commands in the registry:
[HKEY_LOCAL_MACHINE\SYSTEM\CurrentControlSet\Control\SecurityProviders\SCHANNEL\Protocols\TLS 1.0\Server] “Enabled”=dword:00000001
“HKLM\SYSTEM\CurrentControlSet\Control\SecurityProviders\SCHANNEL\Protocols\TLS 1.0” /v Server /t REG_DWORD /d 0xffffffff /f
The following example shows the TLS 1.0 client set to the Enabled state:
Sometimes, Microsoft Point-to-Point Encryption (MPPE ) is used by NPS for encryption. If there’s a possibility you disabled this in the past by mistake, you can check it now. Should it be disabled, you can re-enable RC4-128 Bits using the given commands:
[HKEY_LOCAL_MACHINE\SYSTEM\CurrentControlSet\Control\SecurityProviders\SCHANNEL\Ciphers\RC4 128/128] “Enabled”=dword:00000001
“HKLM\SYSTEM\CurrentControlSet\Control\SecurityProviders\SCHANNEL\Ciphers\RC4 128/128” /v Enabled /t REG_DWORD /d 0xffffffff /f
Sometimes, there might be authentication time-outs or delays, known as MaxConcurrentApi bottlenecks in an environment. You can resolve the problem by raising the maximum allowed worker threads in the server using the following steps:
- Click Start, click Run, and type Regedit.
- Click OK.
- Locate and then click the following registry subkey: HKEY_LOCAL_MACHINE\SYSTEM\CurrentControlSet\Services\Netlogon\Parameters
- On the Edit menu, navigate to New and click DWORD Value.
- Type MaxConcurrentApi, and then press Enter.
- On the Edit menu, click Modify.
- Set the new MaxConcurrentApi setting to 5(or any desired decimal value).
- Click OK.
When you authenticate the client computer using SSL or TLS, the server sends a list of trusted certificate issuers. This list contains the set of digital certificate issuers that the server usually trusts and assists client computers in selecting specific client certificates from multiple certificates. It is always a healthy practice to minimize the number of certificates in the system by disabling the SendTrustedIssuerList.
The default value of the SendTrustedIssuerList is generally 0 (off by default), but you must verify that and disable it. You can use the given instructions to disable the SendTrustedIssuerList:
Click the following registry subkey:
HKEY_LOCAL_MACHINE\SYSTEM\CurrentControlSet\Control\SecurityProviders\SCHANNEL
- On the Edit menu, navigate to New and click DWORD Value.
- Type SendTrustedIssuerList, and then press Enter.
- A new DWORD value SendTrustedIssuerList is created.
- Now, set it to 0 (disable).
Troubleshooting Authentication Issues
The complexity of digital certificate management and configuration settings may be the source of the authentication problems affecting the network when attempts are made to fix them. As the search progresses, a step-by-step methodology is suggested, starting with the client device’s WLAN profile being deleted and recreated. This introduction aims to lay the groundwork for a methodical investigation of troubleshooting techniques to resolve the suspected certificate problem and bring back seamless authentication capability.
- Delete the WLAN profile from the client device.
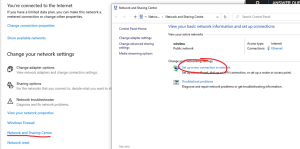
- Open the Sharing and Networking Centre.
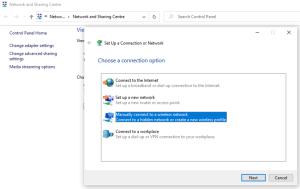
- Make a fresh WLAN profile.
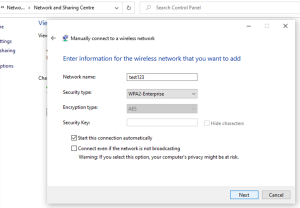
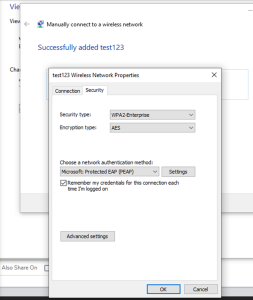
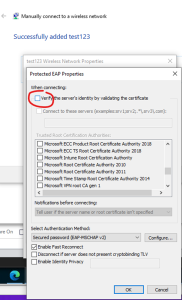
- Set up the WLAN, ensuring the correct certificate validation choices and EAP type.

- To change the PEAP settings, edit the WLAN settings.
- Try to establish a wireless network connection.
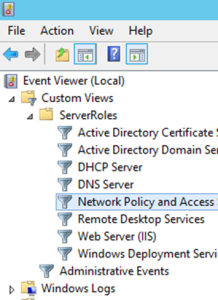
- From the Custom Logs section of Event Viewer, retrieve the NPS server log.
Drawbacks of NPS
NPS is an on-premise RADIUS server that is located physically within your organization. It might appear advantageous to you, considering you can have complete control due to its physical presence, but that’s not always true. NPS was designed to work with Active Directory (AD) in on-premise environments long before cloud servers existed.
What’s more, NPS can be complex to configure. There are many ways to misconfigure it accidentally or the client devices it authenticates, leading to error codes such as NPS Error 22.
Of course, you can still rely on NPS if you want to work on outdated on-premise directories, but the paradigm shift in the IT landscape has threatened the utility of NPS in the future. Also, the on-premise nature of the NPS server is prone to various security threats, considering its easy physical accessibility.
Even if you decide to authenticate NPS with cloud infrastructure, a proxy will be required to convert the sensitive data from the cloud app to a format readable by NPS back and forth. These steps are very tedious and complex and heavier on the budget side.
NPS also has integration issues with other Microsoft-owned applications operating in the cloud, such as Azure AD, since Azure is a cloud solution and is incompatible with NPS. If you want to deploy Azure, a different authentication server or proxy will need to facilitate the process. You might need third-party solutions that allow you to use your Active Directory with a cloud RADIUS server like Cloud RADIUS.
Overcoming Errors with SecureW2
Organizations facing NPS Error 22 might benefit greatly from SecureW2’s Cloud RADIUS, which offers a comprehensive approach to network authentication. Fundamentally, Cloud RADIUS advocates for a passwordless authentication model, departing from conventional password-based techniques that are vulnerable to security flaws. Cloud RADIUS strengthens network security and streamlines end-user authentication by using certificate-based authentication. This change lowers the danger of credential theft and lessens the chance of running into issues like NPS Error 22, which are caused by misconfigurations or failed authentication. Additionally, Cloud RADIUS’s focus on passwordless authentication aligns with industry best practices and guidelines, putting businesses in a position to implement strong security measures and strengthen their defense against changing cyber threats.
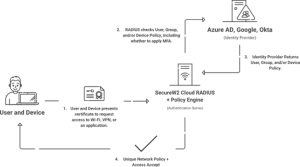
SecureW2’s Cloud RADIUS provides smooth integration with top cloud identity providers, such as Azure AD, Okta, and Google environments, and its sophisticated authentication techniques. Organizations may use the infrastructure and identification policies already in place thanks to this native integration, which promotes uniformity and interoperability across various platforms. Cloud RADIUS improves organizational agility and makes deployment easier by seamlessly interacting with cloud identity providers. This allows for quick adaption to evolving authentication standards and needs. In addition, Cloud RADIUS’s real-time intelligence technology helps organizations proactively protect the network from possible security breaches and unauthorized access attempts by enforcing regulations and responding quickly to security issues.
Transform Your Organization’s Network Security Today
We have looked at the challenges posed by NPS Error 22 and the importance of solid network authentication in the current digital environment. We discussed how issues such as NPS Error 22 might impair network performance and jeopardize security, emphasizing the need for contemporary authentication methods. We have shown how SecureW2’s Cloud RADIUS solves the drawbacks of conventional RADIUS servers and enables enterprises to move through challenging authentication procedures confidently through a thorough analysis.
SecureW2’s Cloud RADIUS is a shining example of innovation in the network authentication space, providing organizations with a comprehensive solution to issues such as NPS Error 22. Cloud RADIUS helps businesses improve network security while streamlining end-user authentication procedures. It promotes advanced passwordless authentication techniques and seamless interaction with top cloud identity providers. Focusing on security, scalability, and interoperability, SecureW2’s Cloud RADIUS gives organizations the tools to manage the changing network authentication landscape with resilience and agility, guaranteeing strong defense against new cyber threats.
Check out our pricing page to see if SecureW2’s Cloud RADIUS solutions meet your organization’s authentication needs.