Key Points
- While Azure AD offers granular access control, it lacks the ability to easily incorporate Device Trust into its Conditional Access Policies
- Combining Azure Conditional Access Policies with Certificate-Based Authentication (CBA) provides a robust solution.
- SecureW2 seamlessly connects with Azure to provide certificates for CBA, and eliminates the need for organizations to build a costly and time-consuming PKI from scratch.
Conditional Access Policies, the If-Then statements available in Microsoft Azure AD (Entra ID), enable a much more granular level of access control over the resources managed with Azure AD / Entra ID. It can be used to assess a user’s authorization in real-time against specific conditions to grant them access appropriately.
When Conditional Access Policies are combined with Certificate-Based Authentication, it provides the ability for organizations to factor Device Trust into their Azure AD / Entra ID security. Given that policies available in Azure Conditional Access can be a lot to learn initially, let us explore this setup with an example configuration with our SecureW2 Certificates.
Prerequisites:
⦁ Have a client certificate enrolled on your device that contains the attribute User Principal Name
How to enroll unmanaged devices for certificates using Azure AD
How to auto-enroll managed devices for certificates using Intune
⦁ A Root CA and Intermediate CA (we create ours in SecureW2)
⦁ An active Azure environment and Microsoft Entra ID Subscription
⦁ Ideally as a Global Administrator
Overview of the Configuration:
⦁ Exporting and/or Creating a SecureW2 Certificate Authority
⦁ Uploading your Root and Intermediate CAs and CRL to Azure Security
⦁ Creating a Conditional Access Policy in Azure for CBA
⦁ Creating CBA Policy in under Authentication settings in Azure
⦁ Issuing Client Certificates to Users & Devices
Exporting and/or Creating a SecureW2 Certificate Authority
To set up Azure AD CBA with Conditional Access control, you’re going to need a Certificate Authority (CA) to link to your Azure. Our management portal automatically generates Root and Intermediate CAs that you can use, otherwise you are free to create your own in our portal.
Exporting an Existing Certificate Authority
If you already have a Root and Intermediate CA in SecureW2, here’s how you can export them:
⦁ Log in to the JoinNow Management Portal.
⦁ Go to PKI Management > Certificate Authorities.
⦁ In the Certificate Authorities section:
⦁ Download the Root CA you’d like to use for Azure CBA set-up
⦁ Download the respective Intermediate CA as well
⦁ Click View on each CA, to find the respective CRL URLs. Save the Base and Delta CRL for each CA.
Creating a New Certificate Authority
If you’d like to create a new Certificate Authority to use for Azure AD CBA, here’s how to do it:
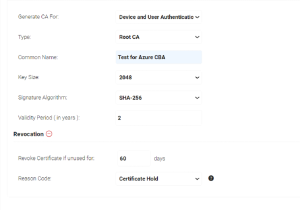
Creating a CA in the SecureW2 Management Portal
⦁ Go to PKI Management > Certificate Authorities.
⦁ In the Certificate Authorities section, click Add Certificate Authority
⦁ Create a Root and/Or Intermediate CA, configure settings as desired, and click Save.
⦁ Once it’s been created, navigate back to Certificate Authorities, and click View on your newly created CAs. Save the Base and Delta CRL for each of them.
⦁ Download the CAs as well as they would need to be uploaded onto Azure Security under Certificate Authorities.
Importing the Certificate Authorities to Azure
Now that we have our Certificate Authorities handy, we can import them into Azure.
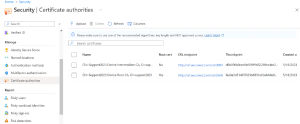
Certificate Authorities in Azure Security
⦁ Login to Azure with the right Admin credentials
⦁ Navigate to Security > Manage > Certificate authorities
⦁ Click Upload
⦁ Upload your Root CA
⦁ Check Yes under Is Root CA certificate option as it’s a Root CA
⦁ Paste your Base and Delta CRL URLs
⦁ Click Add
⦁ Do the same Upload process for Intermediate CA as well and check the NO option under Is Root CA certificate option as it’s not a Root CA
Note: Certificate Revocation List URL is where you upload your Base CRL.
Creating a Conditional Access Policy for setting up CBA Azure
Now you will have to move to the Conditions Access Policy blade.
⦁ Go to Conditional Access -> Create New Policy and give the appropriate name to the policy
⦁ Under Assignments
⦁ Users – Include/Exclude the required users/groups to whom this policy is required to be applied on
⦁ Target Resources -> Select what this policy applies to keep the option as Cloud Apps and Include/Exclude the required cloud applications. This step defines the cloud applications on which CBA policy is required to be applied to, hence it’s very important to define them accurately here.
⦁ Conditions – Azure offers a plethora of conditions an organization might want to use to meet their individual IT Security requirements. Choose the relevant conditions that you need to run along with CBA. We have chosen Device platforms as an example here.
⦁ Access Controls – again you can configure the settings here depending on their requirements. In this example, we have used Grant access -> Require Authentication Strength -> Phishing-resistant MFA. There is no Session control in our example.

Conditional Access policy set in Azure
Note: CBA is one of the Phishing-resistant authentication methods available in Azure

Phishing-resistant authentication methods available in Azure
Creating a CBA Authentication Policy in Azure
After setting up the required conditions in the Conditions Access policy blade, you will have to move to the Certificate-Based Authentication policy.

Certificate-based authentication configured under Authentication policies
⦁ Goto Authentication methods -> Policies -> Certificate-based authentication
⦁ Under Enable and Target
⦁ Include/Exclude the groups/users to which CBA policy must be applied to
⦁ To create authentication binding rules, go to Configure -> Authentication binding -> Add Rule and do the following settings
⦁ Certificate attribute, select Certificate Issuer
⦁ Select the appropriate CA through which you want to establish trust under the drop-down Certificate Issuer Identifier
⦁ Check on the Authentication Strength. Multi-factor authentication in this case as we had forced ‘Require phishing-resistant MFA’ under Grant control in Conditional Access policy
⦁ Keep the Affinity binding as Low

Authentication binding policy rule in Certificate-based authentication setting
Note: While Username binding policy rules could be customized, for this use case we didn’t have the need to do anything here.
Issuing Certificates to Users

If your organization uses an MDM such as MEM Intune, SecureW2 can integrate with your infrastructure directly to automatically enroll end-users for certificates through our gateway APIs. This ensures that the managed devices on your certificates can self-enroll for certificates without any input from the end-users themselves, avoiding any potential misconfigurations.
Even if your network consists of unmanaged devices, issuing certificates doesn’t need to be complicated, thanks to our onboarding software, JoinNow MultiOS. With JoinNow MultiOS, enrolling for certificates is as simple as end-users navigating to your customized onboarding portal, entering their existing credentials, and letting our dissolvable client handle the rest. You can read more about this process in our guide.
Deploy Conditional Access for Azure CBA with SecureW2
The greatest challenge to the widespread implementation of digital certificates has been the difficulty associated with managing them. Building a PKI to create, issue, and revoke certificates required an enormous amount of expertise that few network administrators had.
However, infrastructure like Microsoft Entra ID (Azure AD) provides a clear path to CBA and managed PKIs like JoinNow Connector further paves the way to secure passwordless authentication. There’s no need to build your own PKI from scratch, pouring time, money, and expertise into the endeavor when you can utilize an already existing MPKI that was created to integrate with your existing infrastructure.
If you’d like to see exactly how your network would look with SecureW2, we’d be happy to demonstrate. Set up a free demo with our team to see firsthand how easy it can be to go passwordless.