There are a number of Certificate Enrollment settings available for configuration with SecureW2, for an incredibly easy and customizable end-user experience.
To configure these settings:
- Navigate to Network Profiles.
- Click Edit on the Network Profile you created in the Getting Started Wizard.
- Click Edit on Network Settings.
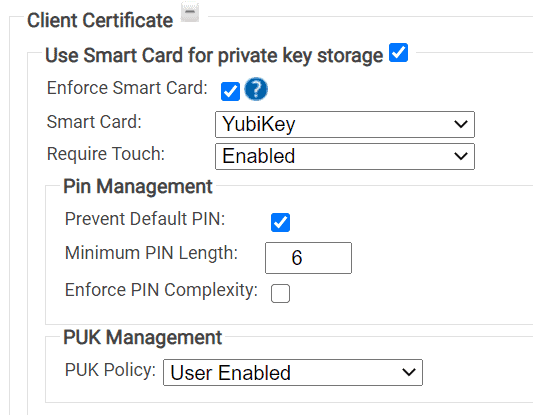
- Under the Client Certificate section, configure the following settings:

- Select the Enforce Smart Card checkbox.
- Select YubiKey from the Smart Card drop-down list.
- Select Enabled from the Require Touch drop-down list, if you want the users to touch their YubiKeys.
- Optionally, configure PIN Management.
- Select the Prevent Default PIN if you want to prevent YubiKeys with default PINs from
enrolling for certificates. - Minimum PIN Length allows you to require a minimum PIN length.
- Enforce PIN Complexity enforces the following PIN complexity conditions. Contain characters from the following categories:
- English uppercase characters (A through Z).
- English lowercase characters (a through z).
- Base 10 digits (0 through 9).
- Select the Prevent Default PIN if you want to prevent YubiKeys with default PINs from
- Optionally, configure PUK Management.
- PUK Policy:
- Select Disable PUK to prompt only for resetting YubiKey PIN.
- Select User Enabled to prompt for resetting both YubiKey PIN and PUK.
- PUK Policy:
- Click Update.
- Click Update.
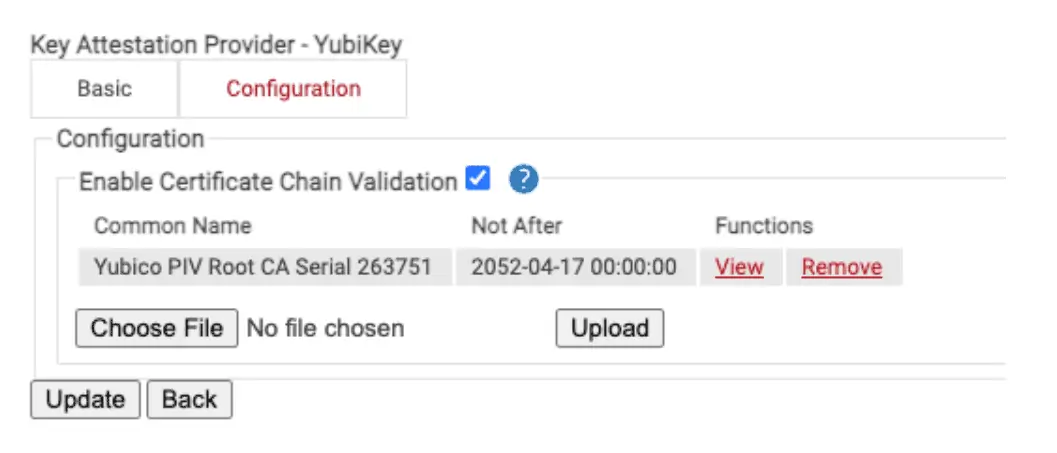
SecureW2 offers the ability for YubiKeys to perform Key Attestation, attesting that the private key was generated on the YubiKey itself. This allows administrators to create high security clearance access policies specifically for YubiKeys.
YubiKeys come by default with an attestation certificate signed by the standard Yubico PIV CA. Some YubiKeys, when ordered as a large custom batch, come with attestation certificates issued via a custom Root CA. If your YubiKeys have a custom attestation Root CA, you can also upload that here.
- Navigate to Identity Management > Key Attestation Providers.
- Click Add Key Attestation Provider.
- Create a Name.
- Select Type as YUBIKEY.
- Click Save.
- Navigate to the Configuration tab. To upload your custom Key Attestation Root CA:
- Select Choose File.
- Upload your CA. Allowed certificate file extensions are .cer, .crt, and .pem.
- Click Upload.

- Click Update.
- Now, your Key Attestation Provider will be a configurable setting when creating Device Policies.
Ensuring YubiKeys are not using default PIN and PUKs are extremely important. The JoinNow client can enforce any PIN/PUK complexity rules, detect if the user is using a default PIN/PUK, and prevent certificate enrollment until they have configured a secure and unique PIN/PUK.
Note: For security reasons, you can disable PUK reset YubiKeys from enrolling for certificates. To do this, navigate to step 4.e in the “Configuring YubiKey Certificate Enrollment Settings” section.
If you have forgotten or need to reset your PIN, follow these steps:
- In the SecureW2 client, click Forgot PIN?
- You are prompted to Use my (default) PUK or Reset your Yubikey.
- If you choose use my (default) PUK:
- Enter your PUK.
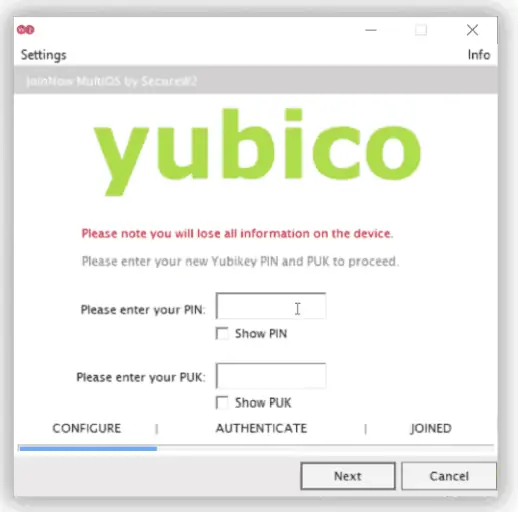
- Upon successful authentication, a new screen appears. This screen notifies you that resetting your YubiKey will erase all existing information stored on the YubiKey.

- Enter your new PIN and PUK, and then click Next. A screen confirming you have set a new PIN and PUK appears.
- Certificate enrollment resumes per the instructions in the next section.
- If you choose Reset your YubiKey:
- A new screen appears. This screen notifies you that resetting your YubiKey will erase all existing information stored on the YubiKey.
- Enter your new PIN and PUK, and then click Next.
- A screen appears confirming you have set a new PIN and PUK.
- Certificate enrollment resumes per the instructions in the next section.
- If you choose use my (default) PUK:
Note: If you enter your default PIN/PUK, you will be prompted to reset your YubiKey.
Not only are YubiKeys enrolled for certificates with SecureW2, they are also configured for certificate applications such as desktop logon. After running the client, users can immediately start using their YubiKey for desktop logon.
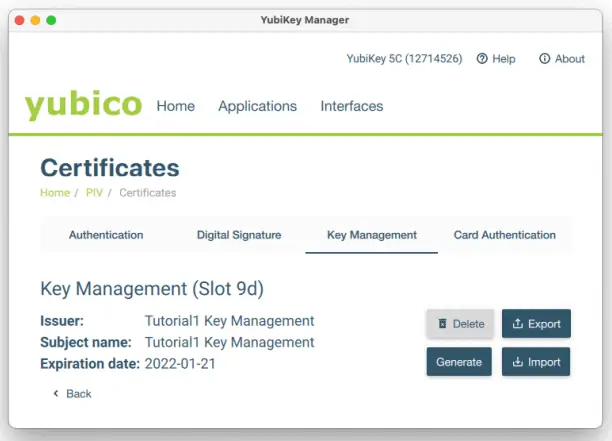
In order to unlock the keychain in macOS, which is necessary for desktop logon, a self-signed certificate must be configured in Slot 9d. The client automatically does this, which can be seen by opening up the YubiKey Manager client.
Ensuring YubiKeys are not using default PIN and PUKs are extremely important. The JoinNow client can enforce any PIN/PUK complexity rules, detect if the user is using a default PIN/PUK, and prevent certificate enrollment until they have configured a secure and unique PIN/PUK.
Note: For security reasons, you can disable PUK reset YubiKeys from enrolling for certificates. To do this, navigate to step 4.e in the “Configuring YubiKey Certificate Enrollment Settings” section.
If you have forgotten, or need to reset your PIN, follow these steps:
- In the SecureW2 client, click Setup YubiKey/Forgot PIN.
- You are prompted to Use PUK or Reset YubiKey.
- If you choose Use PUK:
- Enter your PUK.
- Upon successful authentication, a new screen appears prompting you to enter your new PIN and PUK.

- Enter your new PIN and PUK, and then click Next. A screen appears confirming you have set a new PIN and PUK.
- Certificate enrollment resumes per the instructions in the next section.
- If you choose Reset YubiKey
- A new screen appears. This screen notifies you that resetting your YubiKey will erase all existing information stored on the YubiKey.
- Enter your new PIN and PUK, and then click Next. A screen appears confirming you’ve set a new PIN and PUK.
- Certificate enrollment resumes per the instructions in the following section.
- If you choose Use PUK:
Note: If you enter your default PIN/PUK, you will be prompted to reset your YubiKey.