

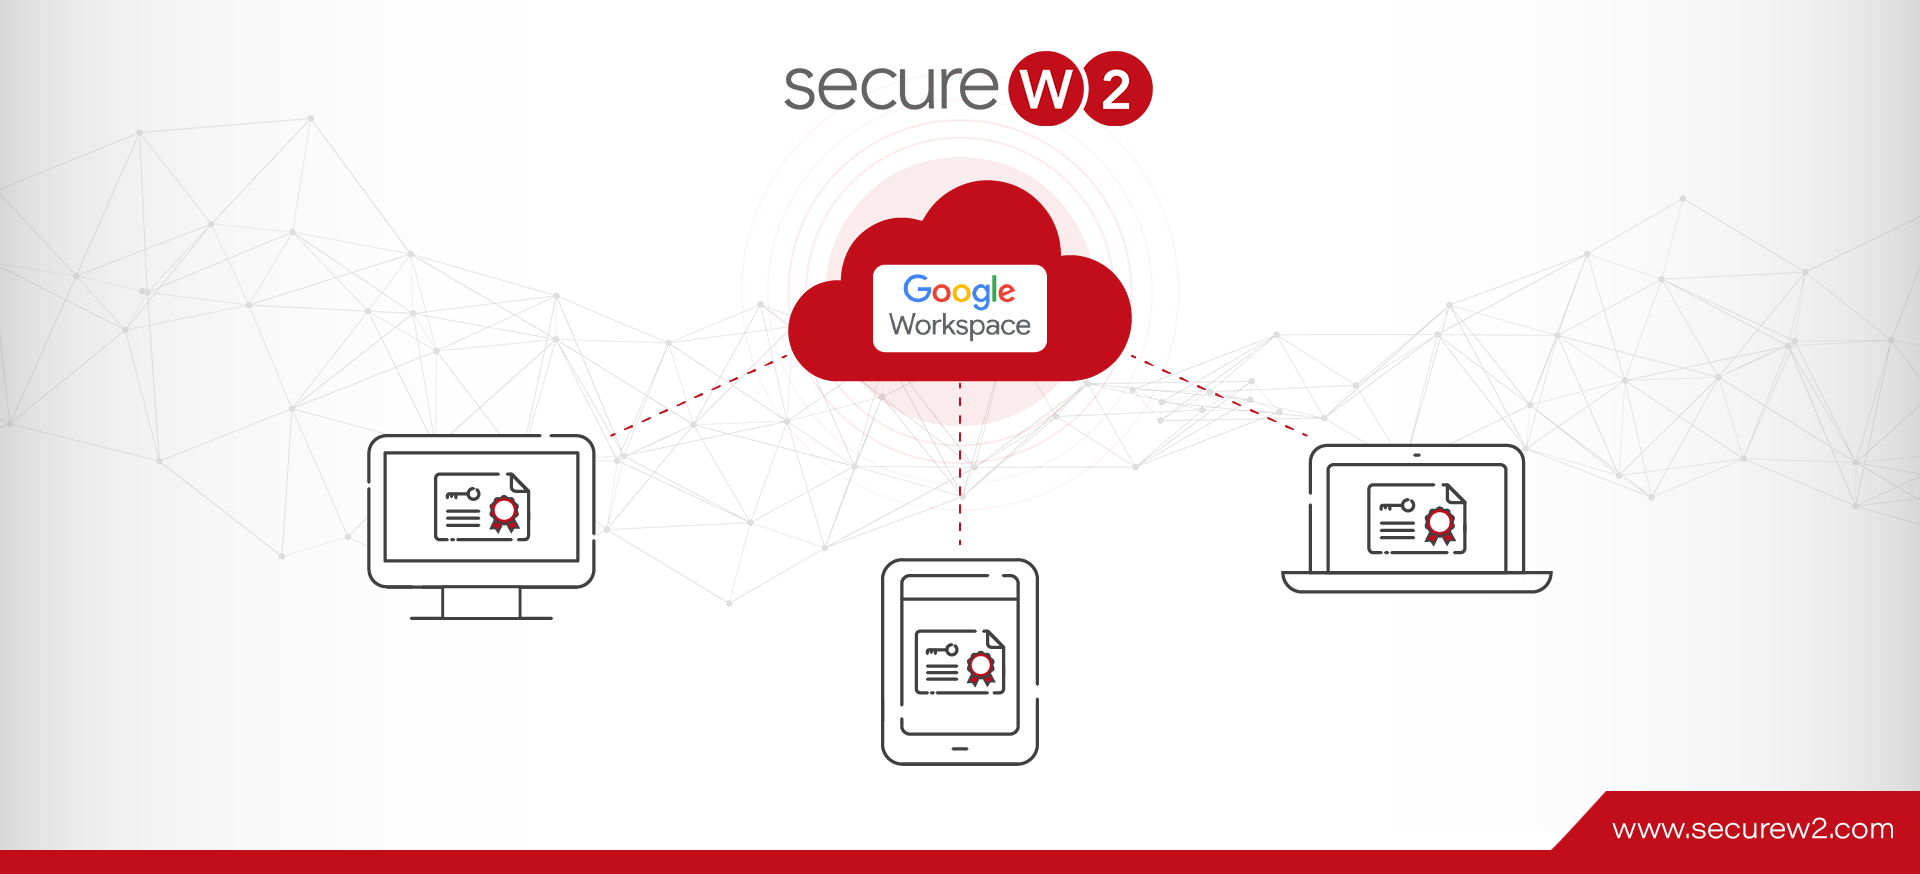
Google Workspace is one of the most common Identity Providers used by enterprises today. The Google ecosystem includes a number of easy tools organizations can use in their daily operation, including user-friendly devices like Chromebooks.
Many organizations with a Google Workspace network continue to use credential-based authentication for network access because it’s also easy to implement. However, this exposes your enterprise’s network to major risks. Your Google credentials are vulnerable to a number of cyber attacks, and Google themselves have looked to alternatives for passwords.
Digital certificates are a secure alternative to passwords, and with the right tools, you can even leverage the information in your Google Workspace for network access policies enforced by certificate-based authentication. We’ll explore how digital X.509 certificates can enhance your security, how Google Workspace can be used to manage them, and how certificate-based authentication can improve the user experience.
How Does Certificate Authentication Work with Google Workspace?

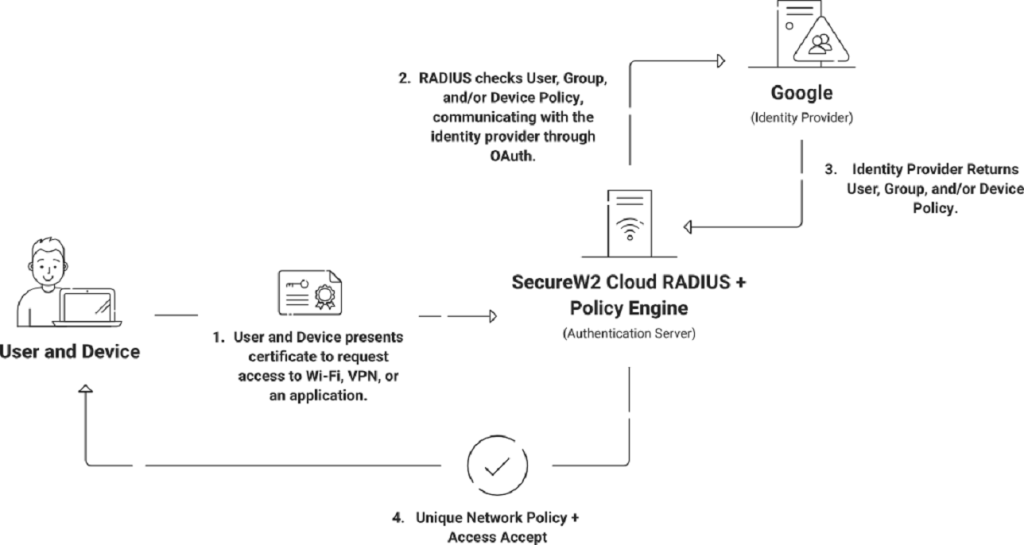
The ultimate security standard for wired and Wi-Fi connections is 802.1X, which uses a RADIUS server to authenticate individual credentials or certificates as users access your network. Digital certificates fit seamlessly into this process, which resembles the above diagram.
A user first attempts to access your network and their device presents a certificate to the RADIUS server. The RADIUS server then confirms that the certificate isn’t expired, then checks the Certificate Revocation List (CRL) to ensure the certificate hasn’t been revoked. Cloud RADIUS, a RADIUS server built to integrate with cloud identity infrastructure such as Google Workspace, takes this process further by checking the Identity Provider to verify the user exists in Google via a process called Identity Lookup.
Before any of this can be done, however, you first need to figure out how you’re going to distribute certificates from your Public Key Infrastructure (PKI) to your devices. Historically, this has been one of the greatest challenges to deploying certificates, but the key to this challenge is onboarding technology.
Deploying PKI Certificates in G-Suite for Managed Devices & BYODs
A PKI is required to deploy and manage certificates, but you also need to determine how to distribute certificates to end-user devices. The strategy for this varies depending on whether the device is managed or unmanaged. Additionally, the operating system can impact certificate enrollment; Chromebooks, for example, generally can’t install just any software, which can make using onboarding applications challenging.
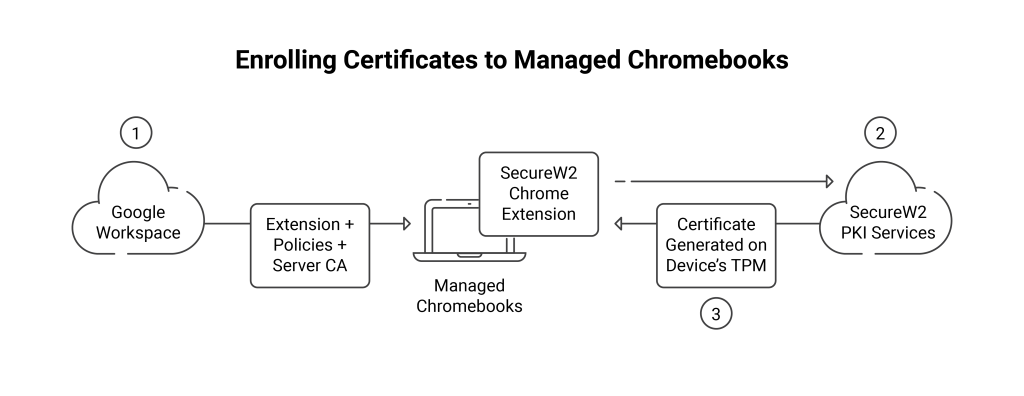
For managed devices, SecureW2 has developed gateway APIs that can automate certificate enrollment through a number of protocols. In a Google Workspace environment, certificate enrollment for a managed device uses the JSON protocol. There’s no end-user input required and devices are enrolled automatically.
Unmanaged devices and BYODs, on the other hand, follow a self-service procedure. Rather than rely on end-users to configure their own devices (and potentially miss vital security steps), we’ve created a self-service, dissolvable onboarding client that configures BYODs in minutes. You can watch the video below to see how self-service certificate enrollment looks for Chromebooks using our onboarding client.
If your ecosystem includes Chromebooks, we’ve developed a solution for that, as well. Chromebooks can’t install onboarding applications, but they can use our Chromebook extension, which functions the same way as our self-service onboarding client without requiring installation on the device.
Generating Certificates for G-Suite Users with SecureW2
Below is a brief overview detailing how G-Suite customers can generate and deploy certificates. We’ll be using SecureW2’s Managed PKI services for our documentation. You will need an active SecureW2 account and a Cloud Connector subscription to complete the process.

Use SecureW2’s Getting Started Wizard to integrate G-Suite. Our PKI services are completely turnkey. The Getting Started Wizards provides G-Suite admins with everything they need and setup can be done in less than an hour.
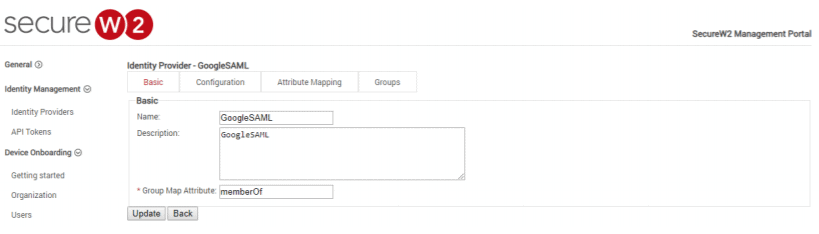
Create an Identity Provider in SecureW2
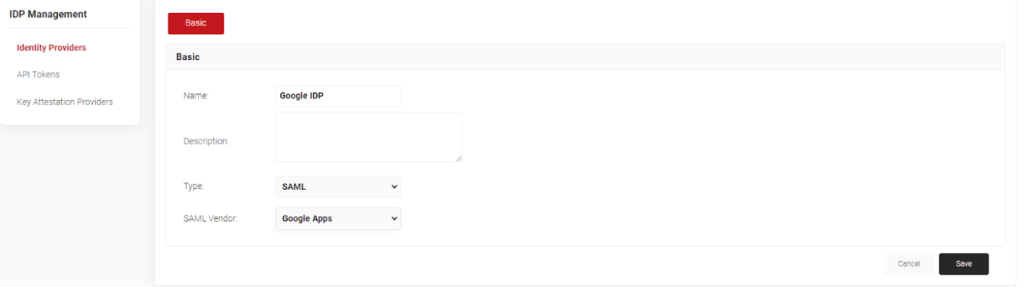
An identity provider (IDP) is the system that proves the identity of the end user and device. Creating an IDP in SecureW2 tells the Cloud Connector system how to connect to the G-Suite user database, verify user credentials, and issue certificates.
- Log in to your SecureW2 Management Portal.
- Navigate to Identity Management > Identity Provider.
- Click Add Identity Provider. The following screen appears.
- Enter Name and Description and select SAML from the Type drop-down list.
- Click Save.
Create a SAML Application in the Google Admin Console
Your SAML application allows a user to enter their Google Workspace credentials in SecureW2’s software, which are then passed to your IDP for verification. Your IDP verifies the user’s identity and then sends attributes to your SAML application, which then passes the attributes to SecureW2 to configure devices for secure network access and enroll for certificates.
- Log in to your Google Admin Console.
- From the menu on the left, click Apps.
- In the Applications screen, click SAML apps.
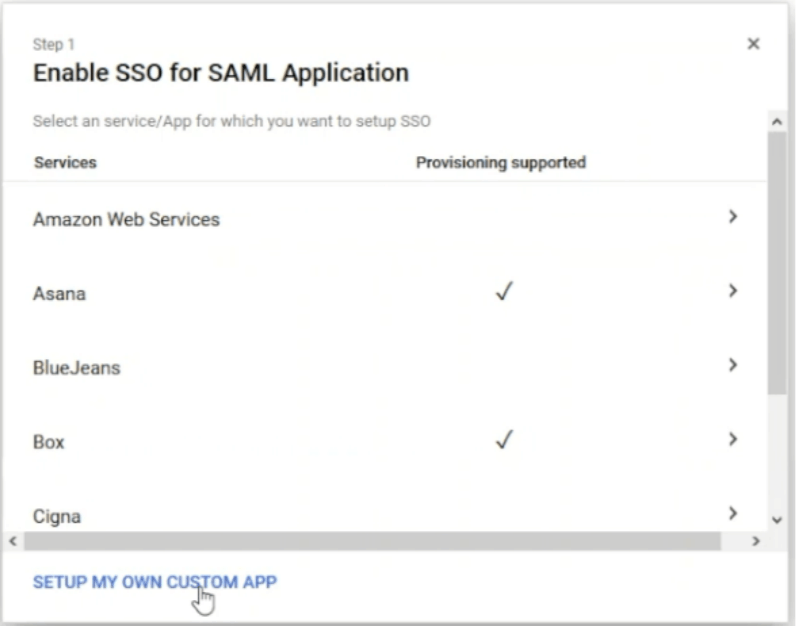
- Click the yellow circle on the bottom-right side of the screen. When you hover your mouse over the circle, it shows Enable SSO for a SAML Application.
- Click SETUP MY OWN CUSTOM APP. The following screen appears.
- Under Option 2, click the DOWNLOAD button against the IDP metadata and save the metadata file (.XML) on your computer. You need to import this metadata file to SecureW2 Management Portal.
- In your SecureW2 Management Portal, navigate to Identity Management > Identity Providers.
- Click on Edit against the SAML application that you created earlier. The following screen appears.
- Click on the Configuration tab. The following screen appears.
- Under Identity Provider (IDP) Info, click the Choose File button against Metadata and select the metadata (.XML) file that you downloaded from Google Workspace earlier.
- Click Upload and then click Update.
- Return to your Google SAML App setup and on the Basic information for your Custom App page, enter the Application Name and Description. Then, click Next.
- On the Service Provider Details screen, enter the ACS URL and the Entity ID.
- Select the Signed Response option.
- Click Next.
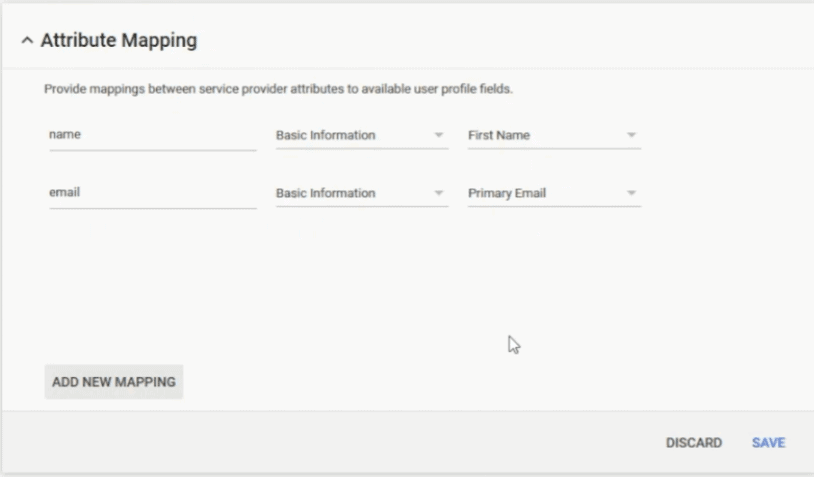
- Click Finish on the Attribute Mapping screen.
NOTE: To get the ACS URL and the Entity ID, login to you SecureW2 Management Portal. Navigate to Identity Management > Identity Providers > click Edit against your Identity Provider > Configuration. Copy the ACS URL and the Entity ID and paste them in the relevant fields on the Service Provider Details screen in Google SAML Apps.
Configure Attribute Mapping
Attribute mapping lays out the attributes that are returned by your IDP and used for granting access to users. Once your IDP identifies a user, it sends attributes to your SAML application, which then sends the attributes to SecureW2. SecureW2 encodes these attributes onto the certificate it issues. To set up SAML authentication, you need to configure attribute mapping in your Google admin console, as well as in SecureW2.
- In the Google Admin Page, scroll down to Attribute Mapping.
- Click on ADD NEW MAPPING to configure the attributes to be encoded into the certificate.
NOTE: It is likely that your directory will have a name and an email.
- In the Enter the application attribute field, enter name.
- From the Select category drop-down list, select Basic Information.
- From the Select user field drop-down list, select First Name.
- Click Save.
- Click Add New Mapping again.
- In the Enter the Application Attribute field, enter email.
- From the Select category drop-down list, select Basic Information.
- From the Select user field drop-down list, select Primary Email.
- Click Save.
Once Google will identify the end users, it will send their name and email to SecureW2. SecureW2 can then populate the credentials into the variables in the certificates.

- In your SecureW2 Management Portal, navigate to Identity Management > Identity Providers.
- Click on Edit against the SAML application that you created earlier. The following screen appears.
- Click on the Attribute Mapping tab. The following screen appears.
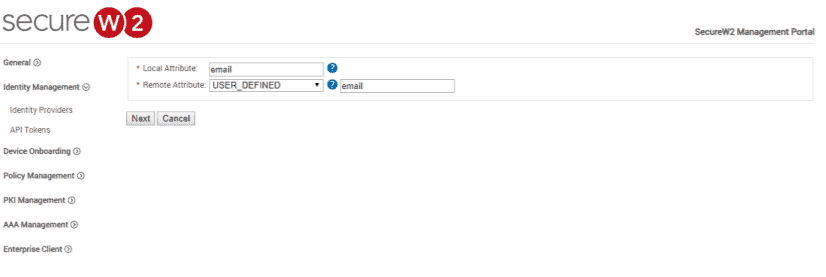
- Click Add.
- In the Local Attribute field, enter email as the name of the variable.
- From the Remote Attribute drop-down list, select the USER_DEFINED. Enter email in the field that appears next to Remote Attribute field when you select USER_DEFINED.
- Click Next.
- Click Add.
- In the Local Attribute field, enter displayName as the name of the variable.
- From the Remote Attribute drop-down list, select USER_DEFINED. Enter the name in the field that appears next to the Remote Attribute field when you select USER_DEFINED.
- Click Next.
- Click Add.
- In the Local Attribute field, enter upn as the name of the variable.
NOTE: upn stands for User Principal Name. It is the first thing that is authenticated against in the RADIUS server. This is useful when the user connects to your network and wants to use eduroam because then it can find the university name in the email address.
- From the Remote Attribute drop-down list, select USER_DEFINED. Enter email in the field that appears next to Remote Attribute field when you select USER_DEFINED.
- Click Update.
The attributes are now configured and you can view them under certificates.
Best Practices for Managing PKI Certificates on G-Suite
Understand Certificate Templates for G-Suite
Certificate templates are designed for IT admins to set the guidelines for network access. After configuring group policies, admins can customize specific certificate templates to issue to each network group. Once this is set up, when a network device requests a certificate, the CA is able to determine what type of certificate the device is allowed to have based on the end user’s permissions.
Attribute mapping is incredibly helpful for creating custom certificates and network policies because it allows admins to map user details to a certificate. That helps the RADIUS server better determine what a device is authorized to access when signing on to the network.
Certificate templates are also used to configure access for VPNs, Wi-Fi, and web apps. The ability to configure VPN access is particularly relevant since more and more users are working remotely.
Learn About the Certificate Management Lifecycle and Tools to Utilize it
A certificate revocation list (CRL) is a security measure that allows RADIUS servers to view all the certificates revoked by the CA. The RADIUS server periodically downloads the list and checks it every time a device requests access. If a device is lost or stolen and still equipped with a certificate, revoking the certificate and placing it on the CRL will ensure that specific device will not be allowed network access.
There are two types of CRLs and the difference lies in how often they update. The Base CRL updates weekly and the Delta CRL daily. However, the Delta CRL can be configured to update every 15 minutes to enhance security, a feature possible with SecureW2.
SecureW2 also provides another layer of security with Dynamic RADIUS that uses industry-first technology to make runtime-level policy decisions based on user attributes in the directory. Dynamic RADIUS removes the possibility of a breach that could come from human error, like forgetting to revoke a certificate, that could lead to a slight window of opportunity for those with ill intent to gain access to your network.
Use Your MDM for Managed Device Onboarding
IT professionals know how monotonous it is to manually configure every device for network access – and how risky it is to leave manual configuration up to the end user. Luckily, integrating powerful gateway APIs onto the network makes it easy for admins to send out configuration payloads to every managed device.
For G-Suite customers, SecureW2 allows admins to build a gateway they can then use to push out configuration policies. Once the configuration policy makes it to the device, the device will then automatically request a certificate. This removes the end user entirely from the process and is much faster than manually configuring each device.
Determine How to Handle Unmanaged Devices
For unmanaged devices and BYODs, you’ll need a different onboarding strategy. Onboarding applications can greatly simplify this process when it comes to non-Chrombook OS devices. Solutions like JoinNow MultiOS can empower end-users to configure their own devices in just a matter of minutes. We recommend setting up an onboarding SSID that directs them to your SecureW2 landing page, where they can use their Google Workspace credentials to enroll for a certificate.
For Chromebooks, you’ll need a solution that doesn’t require users to install applications directly on their device. Our Chromebook extension achieves this goal by having users install an extension in their browser instead, which communicates with our PKI to enroll for certificates.
Leverage Information from G-Suite for Authentication
Many IT admins have issues identifying who is on the network, especially admins with MDMs that won’t allow emails to be input into RFC on certificate templates. That’s why SecureW2 offers industry-unique Identity Lookup integration to quickly find certificates and identify the user device.
Store Private Keys Securely
PKIs use asymmetric encryption, which consists of pairs of security keys called public and private keys for every certificate. While the public key can be freely sent out to anyone, the private key – as the name implies – needs to be kept private.
To ensure the greatest security, private keys should be stored in a Trusted Platform Module, which is a hardware cryptoprocessor built into many devices.
Simple Certificate Authentication for Google Workspace with SecureW2

Integrating SecureW2’s Cloud RADIUS with G-Suite is simple because Cloud RADIUS already comes with a Managed PKI and EAP-TLS authentication.
SecureW2’s onboarding software simplifies the onboarding process for both BYODs and managed devices. With the JoinNow Suite, BYOD end users can sign on to the network in just a few clicks. Our Gateway APIs can be configured to provision every device with a certificate, completely eliminating the need for manual configuration.
Deploying certificates to your network increases security and relieves the IT department from time spent configuring each device manually. Integrating Cloud RADIUS and SecureW2’s onboarding software streamlines the device authentication process and ensures all devices are equipped with a certificate and easily visible on the network. All of this comes at an affordable cost, click here for pricing.
 Anusha Harish