Key Points
- A Public Key Infrastructure (PKI) is something that is incredibly complex to setup and manage. Typically only large enterprises run them internally.
- If configured or managed incorrectly, a PKI can become a liability as untrusted users/devices will gain access to critical infrastructure.
- SecureW2’s Managed PKI provides a turnkey solution for PKI setup, eliminating much of the historical risks associated with PKI, while providing all of the phishing-resistant benefits.
A Managed Public Key Infrastructure (PKI) is a vital part of any comprehensive network security strategy. It allows you to use digital certificates for authentication, a form of credential that’s much more secure and widely-applicable than passwords.
Configuring a PKI will strengthen your network perimeter and securely authenticate users for network resources. According to Verizon’s 2019 Data Breach Investigations Report, the top three threat actions involved in breaching protected networks are phishing, stolen credentials, and privilege abuse. SecureW2’s Managed PKI is turnkey and gives admins everything they need to configure EAP-TLS authentication, the strongest 802.1X authentication protocol, to eliminate over-the-air credential theft. Learn from one of our customers the benefits of EAP-TLS and how easy it was to configure with SecureW2.
This article breaks down the basics for setting up your own PKI and CloudRADIUS with SecureW2.
Components of a PKI
The purpose of a PKI is to manage the public keys used by the network for public key encryption, identity management, certificate distribution, certificate revocation, and certificate management. Once enabled, users who enroll for a certificate are identified for later authentication or certificate revocation.
The PKI allows users and systems to verify the legitimacy of certificate-holding entities and securely exchange information between them over the air. The introduction of a PKI enables stronger, certificate-based security, as well as identity services and management tools to maximize network efficiency and security.
- Public key
- Private key
- Certificate Authority
- Certificate Store
- Certificate Revocation List
- Hardware Security Modules
- Certificate Templates
- Certificate Delivery Mechanisms
- Certificate Enrollment and Expiration Policies
- Certificate Management Software (optional)
Historically, you would need to create all of these individually, but with SecureW2 it’s actually really easy and you only need to create your Certificate Authorities (CA), Policies, and customize your delivery mechanisms and you’re done! Most administrators have their PKI setup in a matter of minutes. Below we will show you how to build and set up your own PKI using SecureW2.
Creating Certificate Authorities

First, we will show you how to create CAs, which admins can use to issue network certificates to users, devices, workstations, etc. Creating CAs in SecureW2 is beneficial because they automatically create Base and Delta CRLs, making the process even easier.
Generate Root and Intermediate CAs
- On the left hand menu, go under PKI Management and select Certificate Authorities.
- Select Add Certificate Authority.
- A Basic setup screen will appear. This is where you can configure your custom CA.
- Under Type, select the type of CA from the dropdown menu:
- Local CA
- Root
- Intermediate
- Thirdparty CA
- InCommon CA
- Digicert CA
- AD CS CA
- Local CA
- Under Common Name, enter the CA’s common name.
- For our instance, we’re naming it Demo 11 CA
- Select the Key Size. We recommend at least 2048.
- Select the Signature Algorithm. We recommend SHA-256.
- Set the Validity Period.
- Click Save.
How to See Certificates Issued by Your CA
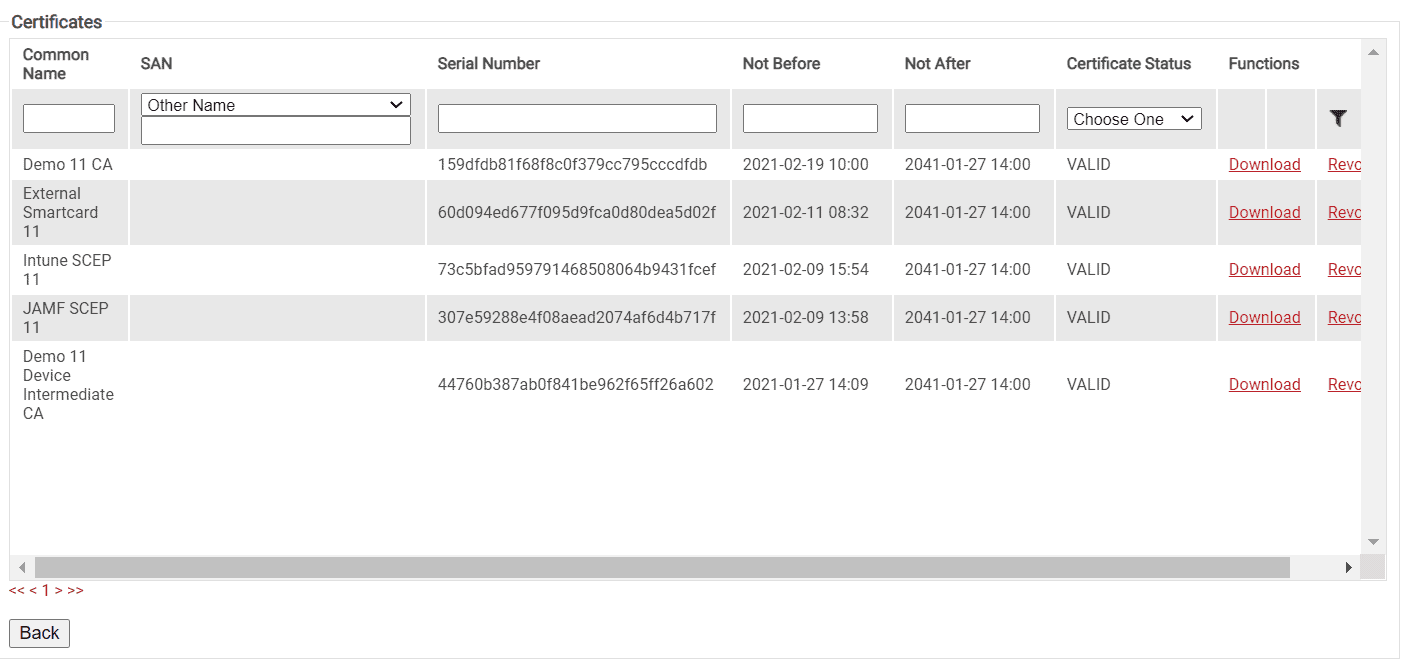
- On the left hand menu, go under PKI Management and select Certificate Authorities.
- Scroll down to your custom CA.
- On the far right, click Certificates.
- You will then be taken to a screen showing all the certificates issued by the CA and categorized based on the following attributes:
- Common Name
- SAN
- RFC822
- DNS
- Other Name
- Serial Number
- Time Constraints
- Not Before [date and time]
- Not After [date and time]
- Certificate Status
- Valid/Invalid
- Revoked/Waiting to be Revoked/Revoke Failed
- Expired
- Renewed
How to View the CRLs
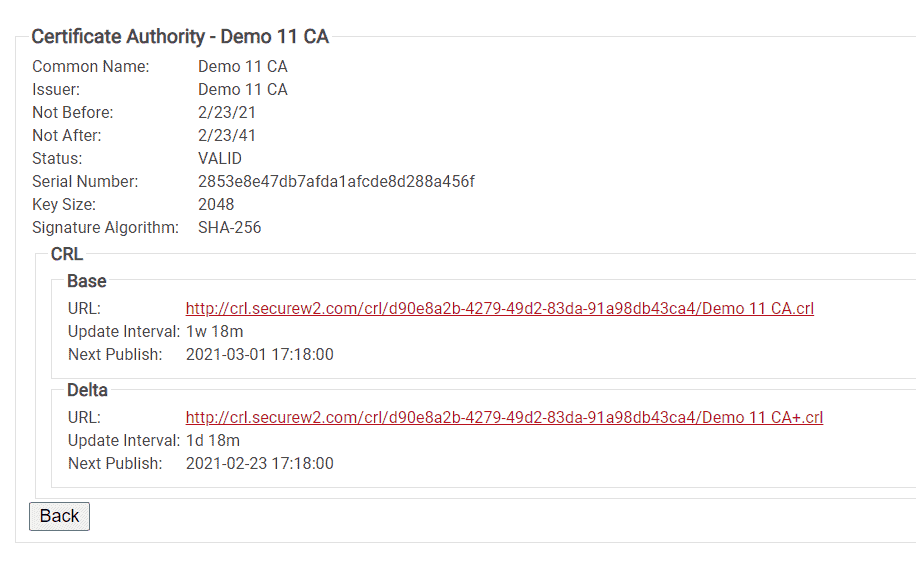
To view both the Base and Delta CRLs, click Certificate Authorities:
- Find your CA in the list of Certificate Authorities
- Next to your CA, click View.
- You will now see both the Base and Delta CRL URLs, update intervals, and next publish times.
Creating a PKI Certificate Template

Next, we will be showing you how to create certificate templates. Here you can create certificates based on security groups in your organization. You can create different templates for users, the IT team, the Finance dept, HR, etc. Creating separate certificate templates for different groups follow a Zero Trust philosophy because admins have better control over who has access to what.
Here’s an overview:
- In the Certificate Authorities section, right under the list of CAs, there’s a Certificate Template section.
- Click Add Certificate Template.
- You will be taken to the Basic page, where you can configure your custom certificate template.
- For Name, enter desired name.
- For Subject, you can list attributes that the certificate can be identified by.
- Here’s an example of how to format the subject, we’re using a common name.
- CN=${/auth/displayName:/device/identity}
- Here’s an example of how to format the subject, we’re using a common name.
- For Display Description, enter your desired description.
- For Validity Period, enter how long you’d like the certificate to be valid. Be sure to use “d m y” format.
- Select 2048 for Key Size and SHA-256 for Signature Algorithm
- Under the SAN section, you should see most of the attributes already added:
- For DNS, you should see ${/device/computerIdentity:/device/buildModel}.
- For RFC822, you should see ${/auth/email:/device/identity}
- Leave URI blank.
- For Other Name, you should see ${/auth/upn:/device/identity}
- Under Extender Key Usage, you can choose what type of authentication your certificate will be used for.
- Server Authentication
- Client Authentication
- Email Protection
- Smart Card Logon
- KDC Authentication
- The last section, Microsoft, has two options for you to choose: Certificate Template Name and Certificate Template OID.
- You can either identify to template by the name you gave it or the OID number, like 1.3.6.1.4.1.311
- Click Update. Your new template will appear in the Certificate Templates section.
Certificate Enrollment Policies
The Enrollment Policy makes use of the validations of the User Role and Device Role policies before issuing a certificate. An enrollment policy is where you define the following:
- CA that issues certificates.
- Where the users can obtain a certificate. By default, there is no restriction for the number of certificates than can be issued to a user.
- Certificate templates that are used.
- Enables the users to request certificates from certification authorities.
- (For BYOD) Number of device certificates per user.
- (For BYOD JoinNow Client-based enrollments) Automatic re-enrollment.
- Use existing valid certificate to authenticate user and re-enroll for a new certificate.
- Certificate Revocation
- There are three options for revoking certificates:
- Automatically
- Client Requested
- Never
- There are three options for revoking certificates:
Setting Up an Enrollment Policy
- Navigate to Policy Management > Enrollment.
- Click Add Enrollment Policy.
- In the Basic tab, enter the Name and Description for the enrollment policy in the fields provided.
- Click Save. The page refreshes and displays the Conditions tab.
- Select a role policy from the drop-down menu. Both User Role Policy and Device Role Policy are required for Enrollment process.
- Click Update.
- In the Settings tab, configure the parameters as shown below:


Issuing Certificates to BYODs
With SecureW2’s PKI, issuing certificates to BYODs is a rather simple process, no matter which OS is on the device. After downloading the JoinNow app, your users can enroll for certificates themselves. We’ve included a general setup guide, followed by OS-specific setups following.
General Setup Guide
- Connect to your WiFi.
- Open your browser to be redirected to the onboarding client → Click JoinNow.
- An application will be downloaded → Open the application.
- A pop up will appear that will bring you to your account provider website to sign-in → Click Next.
- Sign-in using your credentials.
- Your device will automatically be enrolled, issued, authenticated, and connected in just a few seconds.
Windows

The process for configuring Windows OS with SecureW2 requires the user to connect the onboarding SSID and open an internet browser. The user is sent to SecureW2’s JoinNow onboarding software. After clicking JoinNow, a graphic will indicate the progress of the configuration. The user will then be prompted to enter their credentials and the device will be authenticated and equipped with a certificate.
macOS
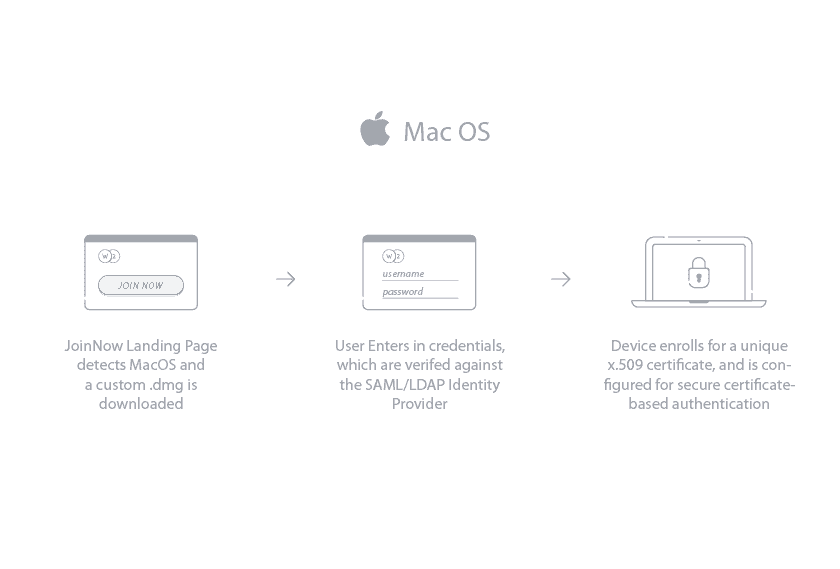
Download the SecureW2 JoinNow for macOS devices to enable 802.1x authentication . The setup is similar to Windows OS; the end user starts by connecting to the onboarding SSID and opens a browser. After downloading the .DMG file and entering their credentials, the configuration process begins. The entire configuration and authentication requires only a few steps, allowing the end user to sit back while the device configures.
iOS
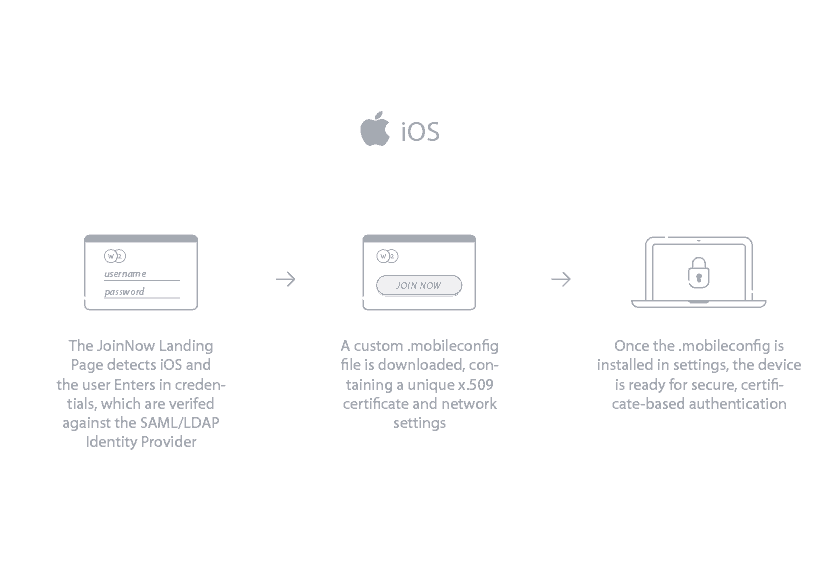
Installing 802.1x EAP-TLS certificates onto Apple smartphones is a simple process since the configuration software does almost all of the work. Similar to macOS configuration, the end user is required to connect to the onboarding SSID and open their browser app. After entering their login credentials, the JoinNow option becomes available. Once clicked, the device will automatically install a profile and enroll a certificate. The end user is automatically connected to the correct Wi-Fi and doesn’t have to worry about misconfiguration or password-change policies.
Android
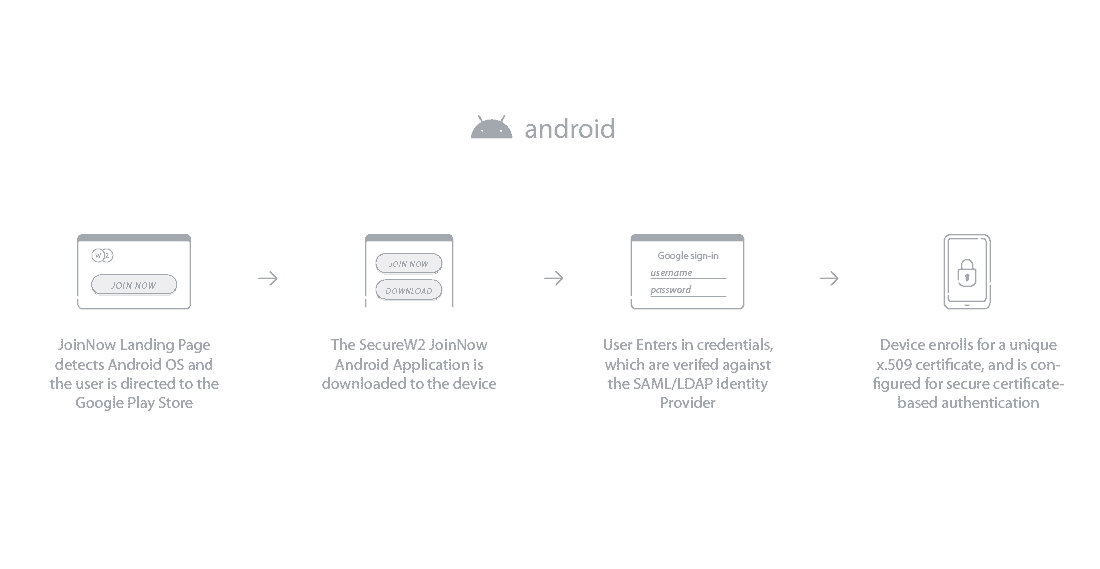
The process for enrolling certificates on Android devices is incredibly quick with SecureW2. All the end user needs to do is open their browser and they will be required to download the SecureW2 app. After entering the device lock code, the certificate will be installed and the end user can input their credentials. Then the device will automatically configure and authenticate. SecureW2 can cut the onboarding process exponentially.
Issuing Certificates to MDM Managed Devices with SCEP

Here’s a high-level overview listing the steps with a guide below:
- Create an Intermediate CA for SCEP Gateway Integration
- Create a Signing Certificate
- Generate an SCEP URL and Secret
- Add the Intermediate CA-ID to the SCEP URL
- Create a User Role Policy
- Create an Enrollment Policy
- Here’s some links to some common guides:
- Intune
- Jamf
- Meraki
- Addigy
Managing Certificates with SecureW2
Below, we’ve listed a few features of certificate-based networks and how they simplify network management.
Configuring Templates for Certificate Issuance
Certificate templates are designed for IT admins to set the guidelines for network access. After configuring group policies, admins can customize specific certificate templates to issue to each network group. Once this is set up, when a network device requests a certificate, the CA is able to determine what type of certificate the device is allowed to have based on the end user’s permissions.
Attribute mapping is incredibly helpful for creating custom certificates and network policies because it allows admins to map user details to a certificate. That helps the RADIUS server better determine what a device is authorized to access when signing on to the network.
Certificate templates are also used to configure access for VPNs, Wi-Fi, and web apps. The ability to configure VPN access is particularly relevant since millions of users are working remotely during the current COVID-19 pandemic.
Certificate Revocation
A certificate revocation list (CRL) is a security measure that allows RADIUS servers to view all the certificates revoked by the CA. The RADIUS server periodically downloads the list and checks it every time a device requests access. If a device is lost or stolen and still equipped with a certificate, revoking the certificate and placing it on the CRL will ensure that specific device will not be allowed network access.
There are two types of CRLs and the difference lies in how often they update. The Base CRL updates weekly and the Delta CRL daily. However, the Delta CRL can be configured to update every 15 minutes to enhance security, a feature possible with SecureW2.
Managed Device Gateways
IT professionals know how monotonous it is to manually configure every device for network access – and how risky it is to leave manual configuration up to the end user. Luckily, integrating powerful gateway APIs onto the network makes it easy for admins to send out configuration payloads to every managed device.
For G-Suite customers, SecureW2 allows admins to build a gateway they can then use to push out configuration policies. Once the configuration policy makes it to the device, the device will then automatically request a certificate. This removes the end user entirely from the process and is much faster than manually configuring each device.
Cloud RADIUS Dynamic Identity Lookup
Many IT admins have issues identifying who is on the network, especially admins with MDMs that won’t allow emails to be input into RFC on certificate templates. That’s why SecureW2 offers industry-unique Identity Lookup integration to quickly find certificates and identify the user device.
Easy Setup and Implementation with a Managed Cloud PKI
Deploying a PKI can be much easier than you think. Managed PKI is just that – managed for you, so you can reap the benefits it provides without having to undertake the burden of maintaining the necessary infrastructure and staff. SecureW2 has an industry-leading managed cloud PKI service that’s affordable for organizations of all sizes. Click here to see our pricing form.