Key Points
- 802.1X is a crucial network authentication framework, ensuring only authorized devices can access your network.
- Protocols like PEAP and EAP-TTLS/PAP come with vulnerabilities, such as transmitting credentials in cleartext, making them easy targets for interception in Man-in-the-Middle attacks.
- EAP-TLS offers superior security with digital certificates, unlike PEAP and EAP-TTLS/PAP, which rely on insecure credentials. EAP-TLS encrypts all communications with certificate-based authentication, eliminating credential-based risks and preventing over-the-air attacks.
- SecureW2's Managed PKI and Cloud RADIUS simplify EAP-TLS certificate enrollment and management, ensuring smooth deployment and robust protection for your MacOS environment.
Implementing robust authentication protocols is paramount in today’s hyper-connected digital environment, where data security and network integrity are paramount. MacOS 802.1X authentication stands out among these protocols as a crucial mechanism for enhancing network security. Any individual or organization attempting to fortify their MacOS-based network infrastructure must thoroughly understand its complexities and how to maximize its capabilities. This article is intended to demystify MacOS 802.1X by illuminating its significance, functionality, and implementation, empowering readers to utilize its potential for protecting their digital environments.
Click here for a case study in which SecureW2 secured a customer’s managed MacOS devices using our Managed Device Gateways and Jamf.
Understanding 802.1X Authentication
802.1X authentication is a standard IEEE framework for controlling network access, requiring users to authenticate before network access. This mechanism is a barrier against unauthorized access, enhancing the network’s security. The 802.1X protocol ensures that only authenticated and authorized devices can connect to the network, drastically reducing the risk of data breaches and other security threats.
Key Components of 802.1X Authentication
To comprehend the operation of MacOS 802.1X, it is essential to understand its fundamental components. Typically, these consist of the supplicant, authenticator, and authentication server. The supplicant is the client device requesting network access, the authenticator is the network device controlling access, and the authentication server verifies the supplicant’s credentials before granting network access.
Authentication Methods in 802.1X
EAP-TLS (Transport Layer Security), EAP-TTLS (Tunnelled Transport Layer Security), PEAP (Protected Extensible Authentication Protocol), and EAP-FAST (Flexible Authentication via Secure Tunnelling) are among the authentication methods supported by 802.1X. Understanding the distinctions between these authentication methods is crucial for customizing the authentication process to meet specific network security needs.
Advantages of Implementing 802.1X
Implementing 802.1X authentication has several advantages, including:
⦁ Increased network security
⦁ Enhanced control over network access
⦁ Enhanced protection against unauthorized intrusions and data disclosures.
In addition, it enables the construction of secure and segregated network environments, ensuring that only authorized users and devices have access to sensitive data.
Securing MacOS with 802.1X
Implementing 802.1X authentication is the best approach for securing network environments on MacOS. By enforcing this standard, MacOS devices can establish secure connections to the network, preventing unauthorized access and ensuring the integrity and confidentiality of all network-transmitted data. The comprehensive security features of 802.1X make it an indispensable tool for organizations seeking to safeguard their MacOS-based network infrastructure from potential security vulnerabilities and attacks.
How Does it Work?
802.1X is a port-based network access control IEEE standard that offers an authentication framework for devices seeking to join a LAN or WLAN. It is frequently used in wired and wireless networks to guarantee safe access control and to keep unauthorized users out of the network.
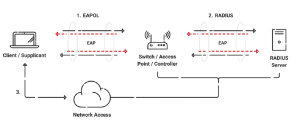
The diagram below is a simple yet thorough illustration of the steps that make up 802.1X authentication (for any operating system). The user or device requesting network access sends their key, typically either a credential (such as passwords) or a digital certificate, to the Access Point they are attempting to connect to. That information is relayed to the RADIUS server, which can use several methods to determine if the credentials are valid and if the user is authorized to access the network. The RADIUS sends an Accept or Denial of access, passed back through the AP, to the user attempting to connect.
What Is 802.1X EAP Security?
While 802.1X is the channel in which authentication information is sent from user to server, it must be protected from over-the-air attacks during this process. A common and highly secure method of protecting authentication is to use EAP (Extensible Authentication Protocol).
The EAP protocol creates an encrypted EAP tunnel around the authentication communication, preventing outside users from viewing the transaction. There are several versions of EAP, such as EAP-TLS or PEAP-MSCHAPv2. These versions can support different authentication methods (credentials, certificates, etc.) and provide varying levels of defense, but they all perform the essential duty of securing the authentication process.
Is a RADIUS Server Needed for 802.1X on MacOS?
A RADIUS server is the central component of 802.1X authentication on MacOS (and any operating system). It provides the integral services of Authorization, Authentication, and Accounting – which is why they’re sometimes called AAA servers.
What 802.1X Protocol Should I Use for MacOS?
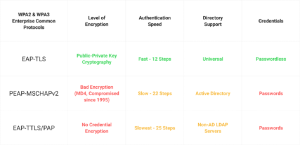
While dozens of 802.1X authentication protocols exist, only a handful see regular use. Let’s examine the three most common MacOS authentication protocols:
PEAP-MSCHAPv2 for MacOS
PEAP is probably the single most used 802.1X protocol for a simple reason: it was built specifically to authenticate devices via LDAP in a Microsoft Active Directory environment. This scenario is far and away the most common as Microsoft has had a soft monopoly on server architecture for decades; only within the last 10 years has cloud options disrupted their iron grip.
If authenticating your MacOS devices through a mandatory Microsoft Identity Provider makes you hesitant, you’re not alone. It’s possible, just unwieldy – an issue compounded by the fact that AD and PEAP-MSCAHPv2 are both antiquated and restricted to on-premise environments.
We haven’t even mentioned how this PEAP protocol suffers from several known vulnerabilities, primarily that it does not support digital certificate authentication and relies on insecure credentials. This protocol is an easy pass for MacOS admins.
EAP-TTLS/PAP for MacOS
Another common authentication protocol due to its ease of use, the EAP-TTLS/PAP method is no better than PEAP, unfortunately. While it does support server certificate validation – a crucial component that defends against Man-in-the-Middle attacks, it’s not mandatory.
Given that the reason most admins opt into TTLS/PAP is to avoid configuring their networks to generate and distribute certificates, you can imagine that server certificate validation is rarely used. This is a glaring mistake since this protocol sends credentials over the air in plaintext, making it laughably easy to harvest credentials with a spoofed access point.
EAP-TLS for MacOS
EAP-TLS is the undisputed champion of 802.1X authentication protocols, whether you’re talking Macs or any other operating system. In addition to utilizing the critical server certificate validation step, EAP-TLS requires authentication via X.509 digital certificates instead of credentials.
Certificates offer a host of user experience improvements, such as:
⦁ They send and authenticate automatically, with no need to enter any credentials
⦁ No need to reset them every six months
⦁ Can’t be stolen, lost, or shared (no need to remember either!)
⦁ Simple to issue and revoke without end-user input
That doesn’t even cover the massive increase in security intrinsic to certificates as a result of their public-private key cryptography underpinnings.
Historically, admins have avoided deploying digital certificates for authentication because it was perceived too difficult. Still, with onboarding tools like our JoinNow MultiOS, you can manage every aspect of the certificate lifecycle from generation to revocation in one intuitive single-pane management interface.
Requirements for 802.1X Authentication on MacOS
Ensuring MacOS Compatibility with 802.1X
It is important to ensure your MacOS device works with 802.1X security before setting it up. The first step to a smooth setup process is to check the loaded version of MacOS and ensure it works with 802.1X protocols.
Configuring Network Settings and Checking for Software Updates
To make a safe and stable connection, ensure your MacOS device’s network settings have been configured correctly. This includes setting up the network options, ensuring the right network protocols are turned on, and entering the login information given by the network controller.
Also, checking for and installing MacOS software updates regularly is important to ensure you have the latest security fixes and improvements, protecting your device from possible security holes and risks.
The requirements for 802.1X authentication on macOS devices are not very different from the general requirements of all operating systems. A RADIUS Server, Identity Provider / Directory, and enterprise-grade Access Points and Switches are typically required.
The following requirements for deploying 802.1X for a MacOS device are in detail:
⦁ A wireless access point and switch capable of supporting 802.1X.
⦁ A cloud Identity Provider (Azure AD, Okta, Google Workspace) or an on-premise LDAP Server (Active Directory, OpenLDAP) with users registered for network access.
⦁ A RADIUS server configured for 802.1X, the chosen EAP method, and the chosen authentication format.
⦁ A Certificate Authority (CA) to use as a Server Certificate for the RADIUS Server
⦁ An IT team familiar with 802.1X and prepared to support users through the process.
⦁ Mobile Device Management (Jamf, Intune, Google Workspace..etc.), or 802.1x Onboarding Clients (SecureW2) to enroll certificates and configure Wi-Fi settings on devices
This may sound like a lot. Still, it is quite simple in practice, as software services there provide much of what is needed for 802.1x. For example, SecureW2 provides Cloud RADIUS, Certificate Authorities, and Onboarding Clients. This means an organization would only need an Identity Provider (which most already have) and enterprise-grade infrastructure (which has also become significantly easier to obtain and set up).
How to Configure Certificate Authorities on MacOS
Configuring a Certificate Authority trusted by the network and end-user is vital for a secure authentication process. The following are steps to configure a CA for MacOS:
⦁ In the Keychain Access app on your Mac, choose Keychain Access > Certificate Assistant > Create a Certificate Authority.
⦁ Enter a Name for the certificate authority.
⦁ Choose an Identity Type and the type of User Certificate to be issued by the CA.
⦁ To change how key pairs are generated or manually specify certificate values, select Let me override defaults.
⦁ Select Make this CA the default.
⦁ Enter your email address in the Email From field.
⦁ Click Create.
In theory, this can seem difficult and likely overwhelming for end users who aren’t strong technically, but in practice, this is quite simple. Your typical MDM or 802.1x Onboarding software will automatically install the CA used for Server Certificate Validation while simultaneously picking it (as well as configuring the domain the CA is issued to) in the Network Settings.
Enabling Server Certificate Validation on MacOS Devices
The last thing you want is to connect to the wrong network. Hackers often set up false networks for MITM attacks to swipe sensitive data and credentials from users’ devices automatically connecting to them. Server certificate validation prevents this by having the RADIUS server present a certificate to your MacOS device’s supplicant to prove its identity.
Unfortunately, configuring a MacOS device for server certificate validation isn’t an effortless, automatic process. There are two ways to configure your MacOS device properly. The first way is to manually trust the RADIUS server’s certificate the first time you connect to the 802.1X Wi-Fi network. However, relying on all your end users to do this on their own leaves each configuration open to user error, creating a vulnerability that exposes your whole network.
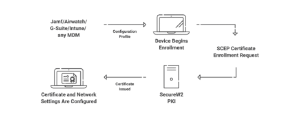
The second method is to create a configuration profile that is pushed to each device. You can do so using an MDM such as Jamf or Apple Configurator 2. In the configuration profile, you can enter the names of trusted server certificate names. That way, the supplicant will only connect to RADIUS servers that can provide a certificate with one of the trusted names.
SecureW2’s Cloud RADIUS and managed PKI are vendor-neutral. They can integrate with MDMs such as Jamf to automatically push configuration profiles to your organization’s company-owned devices. Using our managed device gateway APIs, each device will be auto-enrolled for certificates, preventing the risk of end-user misconfiguration and offering a better user experience to boot! Devices can be auto-revoked if they are not compliant, out of commission, or given any other signal indicating access should be revoked.
How to Configure 802.1X Manually on a MacOS Device
If your organization requires users to configure 802.1X manually, it’s vital to provide a configuration guide. Configuring MacOS for 802.1X will require actions that the average user is not accustomed to.
Manually Joining the SSID:
⦁ Select the Wi-Fi you’d like to join.
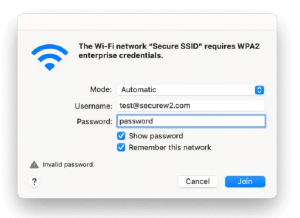
⦁ If your device is configured for EAP-TLS, you will see a screen like this. Select the certificate (in Identity) your organization provided you (it will most likely be associated with your organization’s email address).
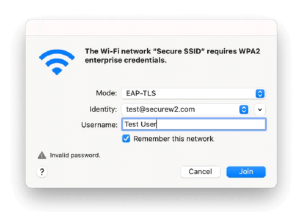
If your device is configured for PEAP-MSCHAPv2 or EAP-TTLS/PAP, you will see a screen that looks like this. Enter the credentials provided to you by your organization.
How to Find the Wi-Fi Certificate on MacOS
To view certificates on a MacOS device:
⦁ Click the Keychain Access app
⦁ Select a keychain and click either the My Certificates or Certificates category to view certificates in that keychain
⦁ Select a certificate to view
Oftentimes, your organization will ask you to connect to a Wi-Fi network that asks you for a “Wi-Fi Certificate.” If you don’t see a certificate that belongs to your organization or hasn’t recently installed any certificate you see in your Trusted Credentials, reach out to your organization, and they will help you.
Implementing ACME Protocol for Apple Devices
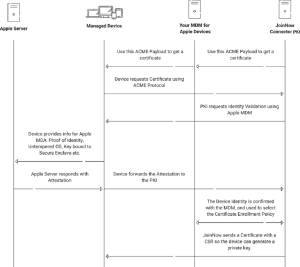
SecureW2 offers extensive support for deploying the ACME protocol on Apple devices, enabling organizations to improve their network security measures effectively. ACME improves organizations’ overall security posture by enforcing stringent protocols that ensure only trusted and managed devices can access vital resources. It surpasses the conventional SCEP RA process by allowing PKI providers to validate identities with high assurance before issuing certificates. This ensures that only authorized devices can access vital certificates required for network connectivity. Using Apple Managed Device Attestation (MDA), SecureW2’s ACME service cryptographically verifies the authenticity of Apple devices, bolstering the integrity of the connected network and ensuring that only authentic, managed devices can enroll for certificates.
In addition to facilitating seamless authentication via MDM and Apple servers, SecureW2’s ACME solution streamlines the entire certificate lifecycle management. From enrollment to efficient revocation and expiration administration, the solution enables administrators to maintain strict control over certificates, enhance network security, and reduce administrative complexities.
Safeguarding Your MacOS 802.1X Network
Understanding and using strong security methods for MacOS devices is very important. The goal of this guide was to give you a full picture of MacOS 802.1X authentication by explaining its value, components, verification methods, and perks. Now that readers know how important 802.1X protocols are for improving network security, they can safely use them to protect their MacOS-based network infrastructure from possible security risks.
SecureW2’s JoinNow MultiOS solution, intended to prevent the risks associated with end-user misconfigurations, streamlines and simplifies the onboarding process for unmanaged devices and BYODs. This solution assures optimal device setup by providing a guided user path and the ability to push unique network profiles while enrolling for certificates, allowing safe passwordless authentication. SecureW2’s experience implementing the ACME protocol further increases network security, making the onboarding process smooth and fast.
Click here to see our pricing.