Key Points
- Client Certificate Authentication (CBA) allows passwordless access to Okta apps utilizing digital certificates and smart cards for increased security.
- Using passwordless Okta application security reduces the risk of credential theft, improves the end-user login experience, and can be simple with the right managed PKI.
- SecureW2’s cloud-based PKI services make it easy for your organization to switch to certificate-based authentication.
Many firms have switched to the cloud due to the emergence of a remote work culture. They want to allow their employees remote access to critical data and network resources via BYOD and IoT devices. With these developments, hackers continue to find new ways to exploit system weaknesses, often targeting password-based authentication, which is usually considered the system’s weakest link.
Cybercrime has been a source of concern for many corporations, particularly those operating remotely. Even world leaders have voiced alarm about the recent spike in cybersecurity threats. Here’s a classic case study of how a private university migrated to certificate-based authentication using smart cards.
This article will explain a better solution to switch to password-less authentication, using digital certificates, and how you can integrate certificates with one of the leading identity providers, Okta.
What is Okta Client Certificate Authentication?
Okta is one of the top Identity and Access Management (IAM) service providers for enterprises around the globe. You can manage each employee’s access to any application or device with the help of Okta.
Okta operates in the cloud on a safe, dependable platform and has undergone significant auditing. It also natively integrates with applications, directories, and identity management systems that are installed locally.
Okta is unique because it’s the only identity provider that allows end-users to use PIV Certificate Authentication as the first form of authentication. Organizations that use PIV for authentication distribute a physical smart card configured with identifying information used for authentication. It significantly improves protection against phishing attacks.
Okta enables one set of credentials to log in to various web applications within a network. Considering that (55%) of IT security respondents and individuals would prefer a method of protecting accounts that doesn’t involve passwords, it’s safe to say people forgetting their passwords or losing their credentials is a major hassle.
These drawbacks can be totally eliminated by configuring users to authenticate with certificates. Digital certificates vastly improve network security, efficiency, and user experience. They have opened new options for organizations to feel more secure, and it’s easier than ever to make a seamless migration from credential-based protections.
Advantages of Certificate-Based Authentication for Okta
A digital certificate is an electronic document that uses public-key pairs as proof of ownership of entities like websites, apps, etc., in a cryptography format. Certificates simplify configuration and relieve the end user of responsibility. It also eliminates the need for any kind of password reset policy. Once a user has a certificate, they are given access to the network until it expires.
Certificates can quickly put a name on every network connection. Numerous identifying details, like MAC addresses, email addresses, usernames, and any other attributes that are part of your identity provider, can be stored in certificates.
The benefits of certificates for the IT department and the clients are even more significant. A network that relies on certificates may reduce the amount of work that IT has to do, improve the security of a company’s data, and make it simple for end users to log in.
Using digital certificates for authentication is a substantial upgrade over credential (password) authentication, but it necessitates sufficient support infrastructure. To reap the benefits of certificates, they must be appropriately handled at all stages of their lifespan.
Also, many administrators find the Public Key Infrastructure (PKI) tedious due to the intricate management required for its operation. This is where SecureW2’s user-friendly and distinctive Managed PKI Services can help.
We will now focus on a high-level overview of integrating passwordless Okta auth with SecureW2 for smooth certificate-based authentication.
Okta Integration Process Overview
Prerequisites:
To set up Certificate-based SSO authentication:
- The user should have Super Admin access to the Okta Account.
- A certificate Authority to issue certificates must be set up in the JoinNow MultiOS Management Portal.
Setting up a Smart Card IDP and Configuring With SecureW2 MultiOS Management Portal for Certificate Issuance
The following are the high-level steps to set up certificate-based SSO in Okta using Smart Card IDP and assign applications with sensitive information to groups so that only the members of the group can access the applications:
- Setting up Smart Card IDP in Okta.
- Creating and Applying an Authentication Policy to the Desired group(s).
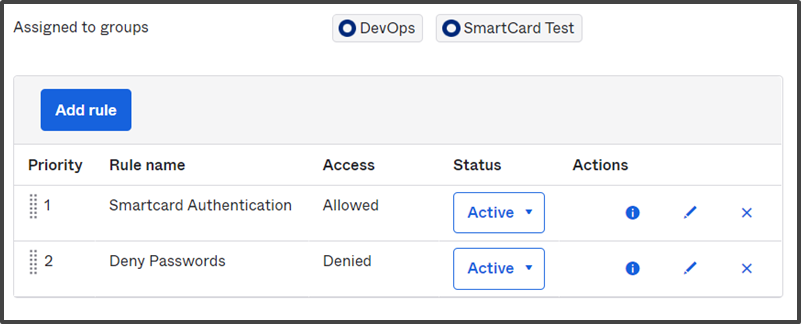
- Create a Rule to Allow Smart Card IDP Authentication.
- Create a Rule to Deny Okta IDP Authentication.
- Assign Applications to Desired Groups.
Setting up Smart Card IDP in Okta.
To set up a Smart Card Identity Provider:
- Log In to your Okta account.
- Navigate to Security > Identity Providers on the console.

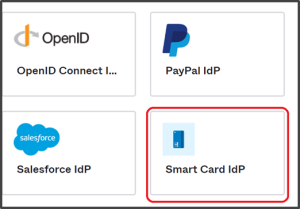
- Click on Add Identity Provider.

- Click on Smart Card IdP.
- Click Next, you will be routed to the Configure page.
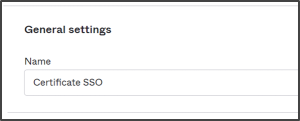
- Under General settings, in the Name field, enter a name for your Smart Card IDP (We suggest you use a user-friendly name. E.g, Certificate SSO).
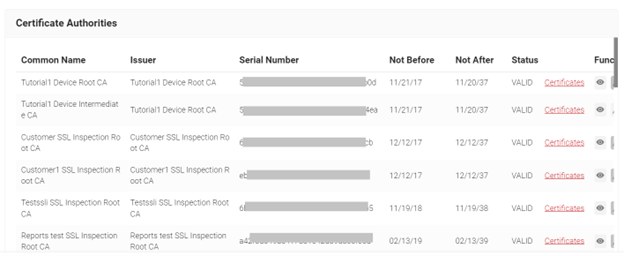
- Navigate to PKI > Certificate Authorities in the JoinNow Management Portal.
- Download the Root certificate and Intermediate certificate of your Organization by clicking the button.
- Navigate back to the Okta portal. Under the Certificate chain section, click on Browse files and upload the Root certificate.
- Click Add Another. In the additional box that opens, click Browse Files. Upload the Intermediate CA certificate as shown below:

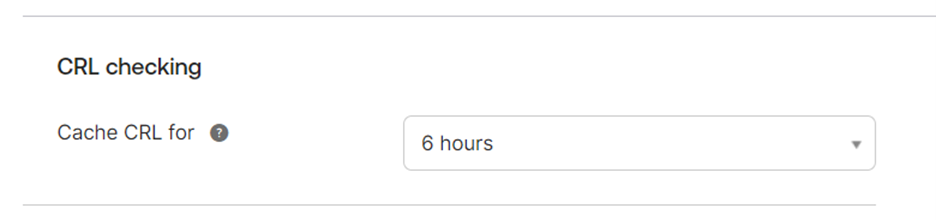
- Under CRL checking, click the Cache CRL for drop-down and select the number of hours.
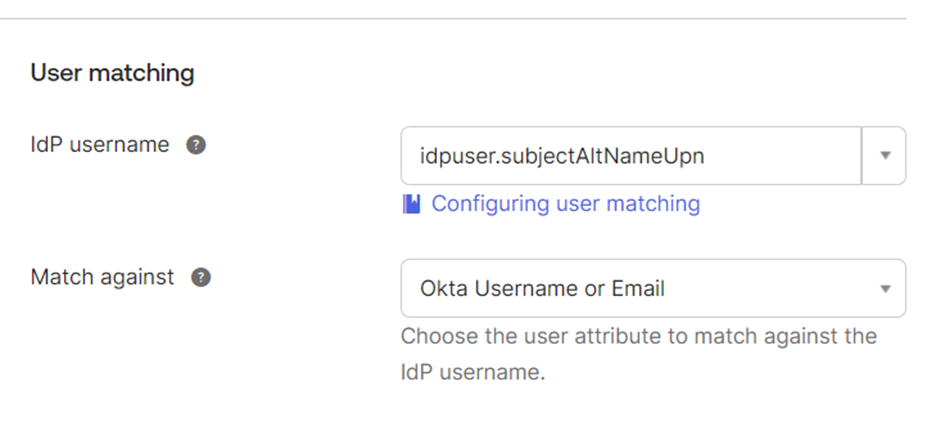
- Under the User matching section, click the IdP username dropdown to select the desired attribute to be used to locate the Okta user.
- From the Match against drop-down, choose the user attribute to match against the IdP username.
- Click Finish.
Creating an Authentication Policy and Applying it to Desired group(s).
- Navigate to Security > Authentication.

- Click on the Sign On tab.
- Click Add New Okta Sign-on Policy.

- In the Add Policy pop-up. In the Policy Name field, enter a policy name.
- In the Policy description field, enter a Description.
- In the Assign to groups field, enter the name of the group you want to apply the sign-on policy for.

- Click on Create policy and add rule. The Add Rule window opens. (Continuation in the next section)
Adding a Rule to Allow Smart Card IDP Authentication:
- In the Rule Name field, enter a Rule name.
- Under Policy Settings, from the User’s IP is drop-down, select Anywhere.
- From the Identity Provider is drop-down, select Specific IdP. A new field opens below. Enter the name of the Smart Card IDP you created and click on it.
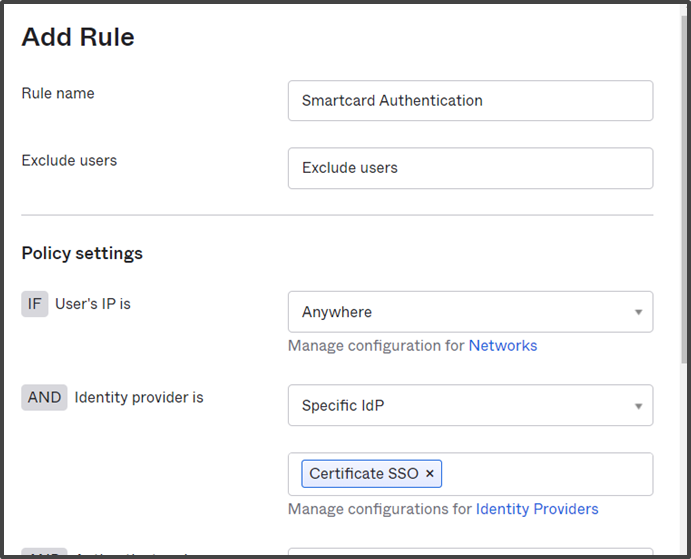
- From the Authenticate via drop-down, select Any.
- In the Behavior field, enter a behavior and choose behavior from the list based on which this rule should be applied.
- From the Risk drop-down, select the level of Risk you wish to apply for the rule.

- From the Access Is drop-down, select Allowed.
- For Multifactor authentication (MFA) is, check Not required.
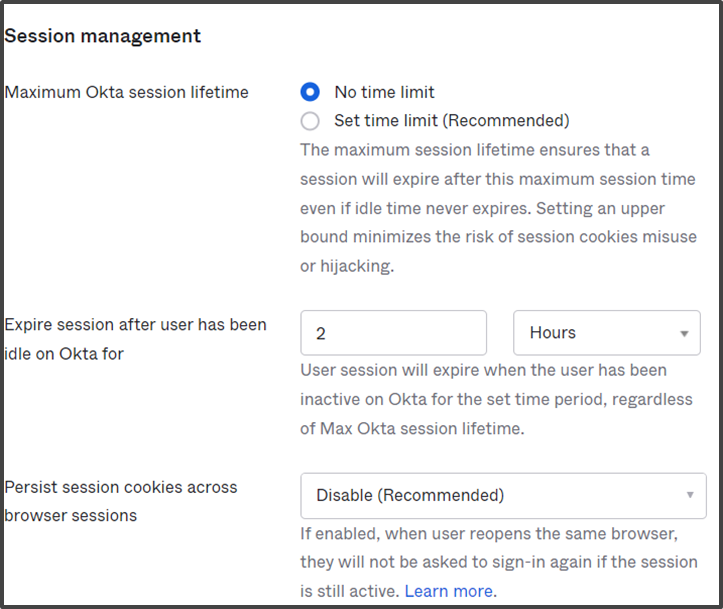
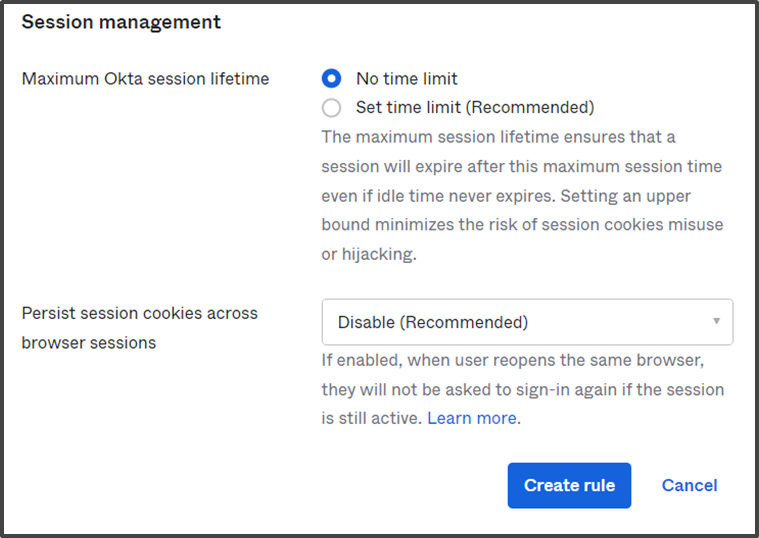
- Under the Session management section, configure the session time settings according to your needs.
- Click Create rule. A rule to allow Smart Card IDP Authentication is created.
Create a Rule to Deny Okta IDP Authentication
- In the Rule Name field, enter a Rule name.
- Under Policy Settings, from the User’s IP drop-down, select Anywhere.
- From the Identity Provider drop-down, select Okta.
- From the Authenticate via drop-down, select Any.
- In the Behavior field, enter a behavior and choose a behavior from the list based on which this rule should be applied.
- From the Risk drop-down, select the level of Risk you wish to apply for the rule.
- From the Access Is drop-down, select Denied.
NOTE: Denying Okta access essentially blocks users of the groups from using Okta passwords and the applications can only be accessed through certificate-based authentication using their Smart Cards.
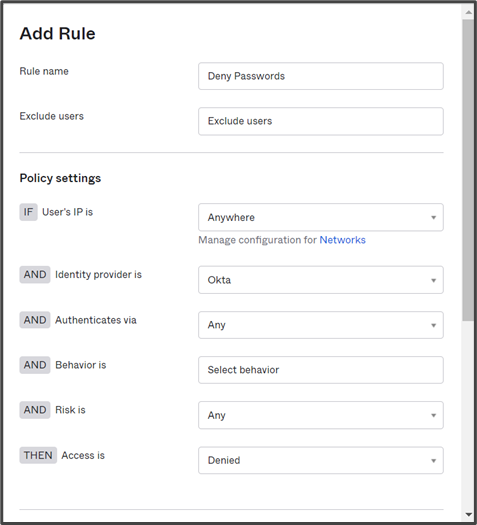
- For Multifactor authentication (MFA) is, check Not required.
- Under the Session management section, configure the session time settings according to your needs.
- Click Create rule.
Assign Applications to Desired Groups
Applications that contain sensitive/privileged information can be assigned to groups thereby only the members of the group can access the applications via certificate-based authentication.
To Assign applications to the group:
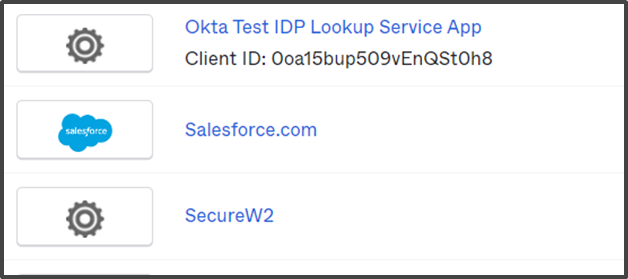
- Navigate to Applications > Applications on the Okta console.

- In the Applications page, search or scroll and select the application that is to be assigned to the groups for which Smart Card authentication is created.
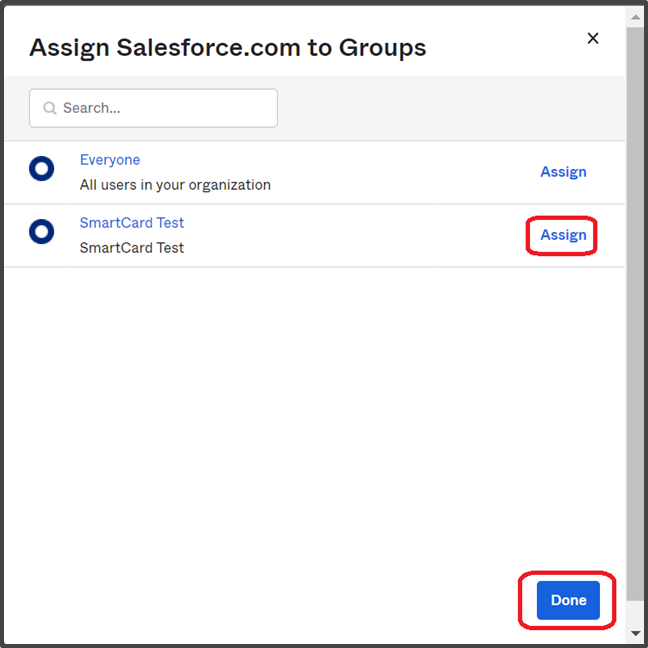
- Click on the Assign drop-down and click on Assign to Groups.

- In the Assign to Groups pop-up, search for the group with your assigned certificate-based authentication policy.
- Click on Assign for the group and click Done.
The members of the groups can now access the application with the certificates issued by SecureW2 on their devices.
With this method of certificate-based SSO authentication, SecureW2 leverages Okta’s security range. The applications can be accessed with a PIV/Smart Card embedded with a certificate or by using an issued certificate on your browser.
Configure SecureW2’s Cloud RADIUS with your Access Points / Wireless Controller
SecureW2 comes built with Cloud RADIUS, a turnkey RADIUS Server designed for certificate-based authentication in the cloud. When you use SecureW2’s PKI Services, Cloud RADIUS comes included and works out of the box with the certificates that you generate using SecureW2. All that you need to do is input a shared secret and IP address in your AP / Controller, and you’re all set.
Our Cloud RADIUS also has the capability to authenticate dynamically. A Dynamic RADIUS server can communicate with the directory to enforce user and group policies at the time of authentication. Cloud RADIUS is the only RADIUS server that can communicate securely with Cloud Identity Providers and empower organizations with certificate-based authentication. Now, you can change users’ permissions and have network security reflect these changes without having to reissue new certificates.
Integrating Cloud RADIUS:
- Navigate to AAA management in the management portal
- Locate and save your primary and secondary IP addresses and shared secret
- Navigate to your AP
- Create a secure
- Input your primary IP and your shared secret.
- Input your secondary IP and shared secret as a backup radius server.
Okta Certificate Authentication with SecureW2
Any misconfiguration is a potential attack vector. A secure identity provider is crucial since it stores the organization’s users’ and devices’ most sensitive data. However proper integration with the identity provider is the real challenge, so you must use an onboarding solution that natively integrates with Okta and smooths the onboarding process with digital certificates.
SecureW2 offers an innovative solution that provides everything you need to deploy certificate-based 802.1X network authentication in an all-cloud environment. Our advanced policy engines and dynamic Cloud RADIUS can natively communicate with your cloud directory and enforce user policies at the time of authentication.
SecureW2’s Cloud PKI services integrate directly with Okta, allowing customers to enroll their devices for certificate distribution quickly. You can utilize certificates with SecureW2 and Okta SSO without having to deal with complex configurations.
We also have a fantastic support team that’s ready to assist you with any help you may need. We work with all cloud-based SAML providers to eliminate any headaches traditionally associated with integration. Check out our Okta Solutions page to see how we can boost your network security.