Key Points
- Students crack or share Wi-Fi passwords, giving them unauthorized access to staff networks.
- You can replace shared passwords with unique, device-bound certificates that can’t be copied or shared.
- With network segmentation, staff devices authenticate with certificates to staff VLANs, while student devices are automatically directed to student Wi-Fi.
Keeping your students off the staff network is among the daily challenges IT administrators face monitoring their domain. Especially as we continue to integrate technology with education, many institutions are adopting methods such as 1:1 to assist students further in completing their homework and efficiently completing daily tasks and learning assignments. However, implementing these additional teaching methods can also lead to issues outside the classroom, such as students accessing the staff network.
Allowing students on the staff network can compromise various categories of intellectual property and information that could affect the school district, setting back teachers’ curriculums and district plans. SecureW2 has a mutual understanding of upholding educational standards to keep students and faculty in a promising environment without malicious acts to disrupt education. Here is a guide to using our solutions to Keep students off the staff network and segment them into multiple VLANs on the same SSID.
Creating Automated Policies for Segmenting Students and Staff Devices on the Network
To start automating network segmentation for your organization, we’ll need to create two to three policies based on the IDP you’ll be using with SecureW2, whether for BYOD enrollment or the Identity Lookup Provider Feature.
Segmentation from this policy works in two different ways:
- Identity Lookup searches for the groups that we mapped in the Identity lookup provider and segments users based on their dynamic user attributes
- If you’re not using an Identity Lookup, segmentation can be done using the static attributes encoded in your certificates. SecureW2 Network Policies can look into the attributes in the cert or the user’s email domain and segment based on what it sees there.

This may raise the question of what is better overall. We recommend using the Identity Lookup Provider because it uses dynamic attributes and provides a more convenient means of updating devices in real-time. If a user were to become noncompliant or have a status change, there would not be a lapse in security. So, in this guide, we will show you how to configure segmentation using SecureW2’s Identity Lookup Provider.
Setting up an Identity Lookup Provider
SecureW2 can look up the real-time status of users and devices when a network authentication request comes in. To set this up, we must create an Identity Lookup Provider. This is what establishes an API connection between SecureW2 and your identity system.
Depending on your organization’s identity system, you must upload specific files/information to link SecureW2 with that IDP. For example, Azure requires the Provider Secret, Client ID, and Client Secret, and Google Workspace requires Service Account Key FIle and Delegated Domain Authority Email. Here’s a list of IDPs with which our Lookup Provider is compatible.
- Azure
- Okta
- Google Workspace
- OneLogin Generic OAuth
- JAMF Generic HTTP
Once this step is completed and you’ve successfully linked SecureW2 to the IDP, we have to configure Cloud RADIUS to look up the user within your IDP and validate the user’s attributes and group. To do this, navigate to Attribute Mapping and configure The following:
- Local Attribute: What name will the attribute have encoded in the certificate
- Commonly, this will be UPN and email.
- Remote Attribute: For most, you will select User Defined and have the value be equal to email.

Attribute mapping allows Cloud RADIUS to search for users when they connect to the network. Next, we will map Groups. This will enable us to check who is a student and who is a staff user and then apply a different network policy to each group. You’ll see two options for the Local Group and Remote Group. In the remote group, you’ll input the same group name you have in place in the directory, and locally, you’ll just match it and input the group’s name, such as Seniors, Juniors, Math Department, etc. For this example, we will keep it simple as students and Staff.

So whenever a student named John Smith attempts to connect to the network, Cloud RADIUS will check against the IDP to validate that the user with the email johnsmith@k-12school.org is an active student or staff member. Once that is complete, the Policy Engine Workflow process will begin to invoke set policies for that designated group the user is in.
Create the Account Lookup Policy
After setting up our Identity Lookup Provider, we will configure the RADIUS server to perform a lookup during authentication. To identify when users attempt to connect to the network, we’ll need to head to the Account Lookup Policy Module, select our Identity Provider, choose Certificate-SAN-Email, and enter our domain email.

You may also use Username, CommonName, and UPN as attributes. For this example, we decided on email because of what we chose earlier when configuring the value for the IDLP to search for. Once this step is complete, we’ll move on to settings.

In the settings, you’ll configure the search method. You’ll select the Identity Provider Lookup, lookup type, lookup purpose, and the option to revoke your certificates on failure if the user account is found to be inactive or not in compliance with your MDM/IDP.
Here, we’ll specify the IDLP we’ll use and the lookup type that occurs during authentication. First, we have Auto.

You’ll see in Auto that it automatically searches for the user based on the email address and checks the IDP during authentication. But if you choose custom instead, you can filter even further and create lookup conditions to designate what to do for the Cloud RADIUS when looking up the user identity to specify what to search for. For example, by doing this sort of search, the user connects to the network using their username.

Cloud RADIUS will ensure that the user using that username contains a matching email value attribute to that user based on the conditions. Once we’ve established the account lookup policy, we will create the Policy Engine Workflow.
Create Policy Engine Workflow
A policy engine workflow assigns roles and designates user access to domain resources during RADIUS authentication. The Policy Engine maps this, either matching a user’s regular expression input or assigning the role based on the user input that equals the IDP attribute. To direct the RADIUS server later on on how to segment our two groups of users, we will need to create two separate policy workflows—one for students and one for Staff.
Student Policy Engine Workflow
We will create a workflow for the user groups, starting with students. To set up the student policy, select the IDP, IDLP, or API token you have set up in the management portal and select the student attribute.

Staff Policy Engine Workflow:
Now that we’ve created the student workflow, we’ll need to make the Staff workflow so that Cloud RADIUS enforces the staff-set policies. Like how we created the Student Policy Engine, you’ll create another policy workflow, selecting the same IDP/IDLP or API token and choosing Staff as the group in conditions.

From a bird’s eye view, this is what we’ve created so far in the management portal to tell the RADIUS server what information to look for when checking against the IDP when a user uses their email.

Now that we have completed making the workflows, we must apply them to the network policies.
Create Network Policies
A Network Policy ties identifying Conditions about users/devices and associates them with Access and Authorization Settings. In this example, Conditions will be the Policy Engine Workflows that specify which Identity Provider is used during our Lookup and what group they are in.
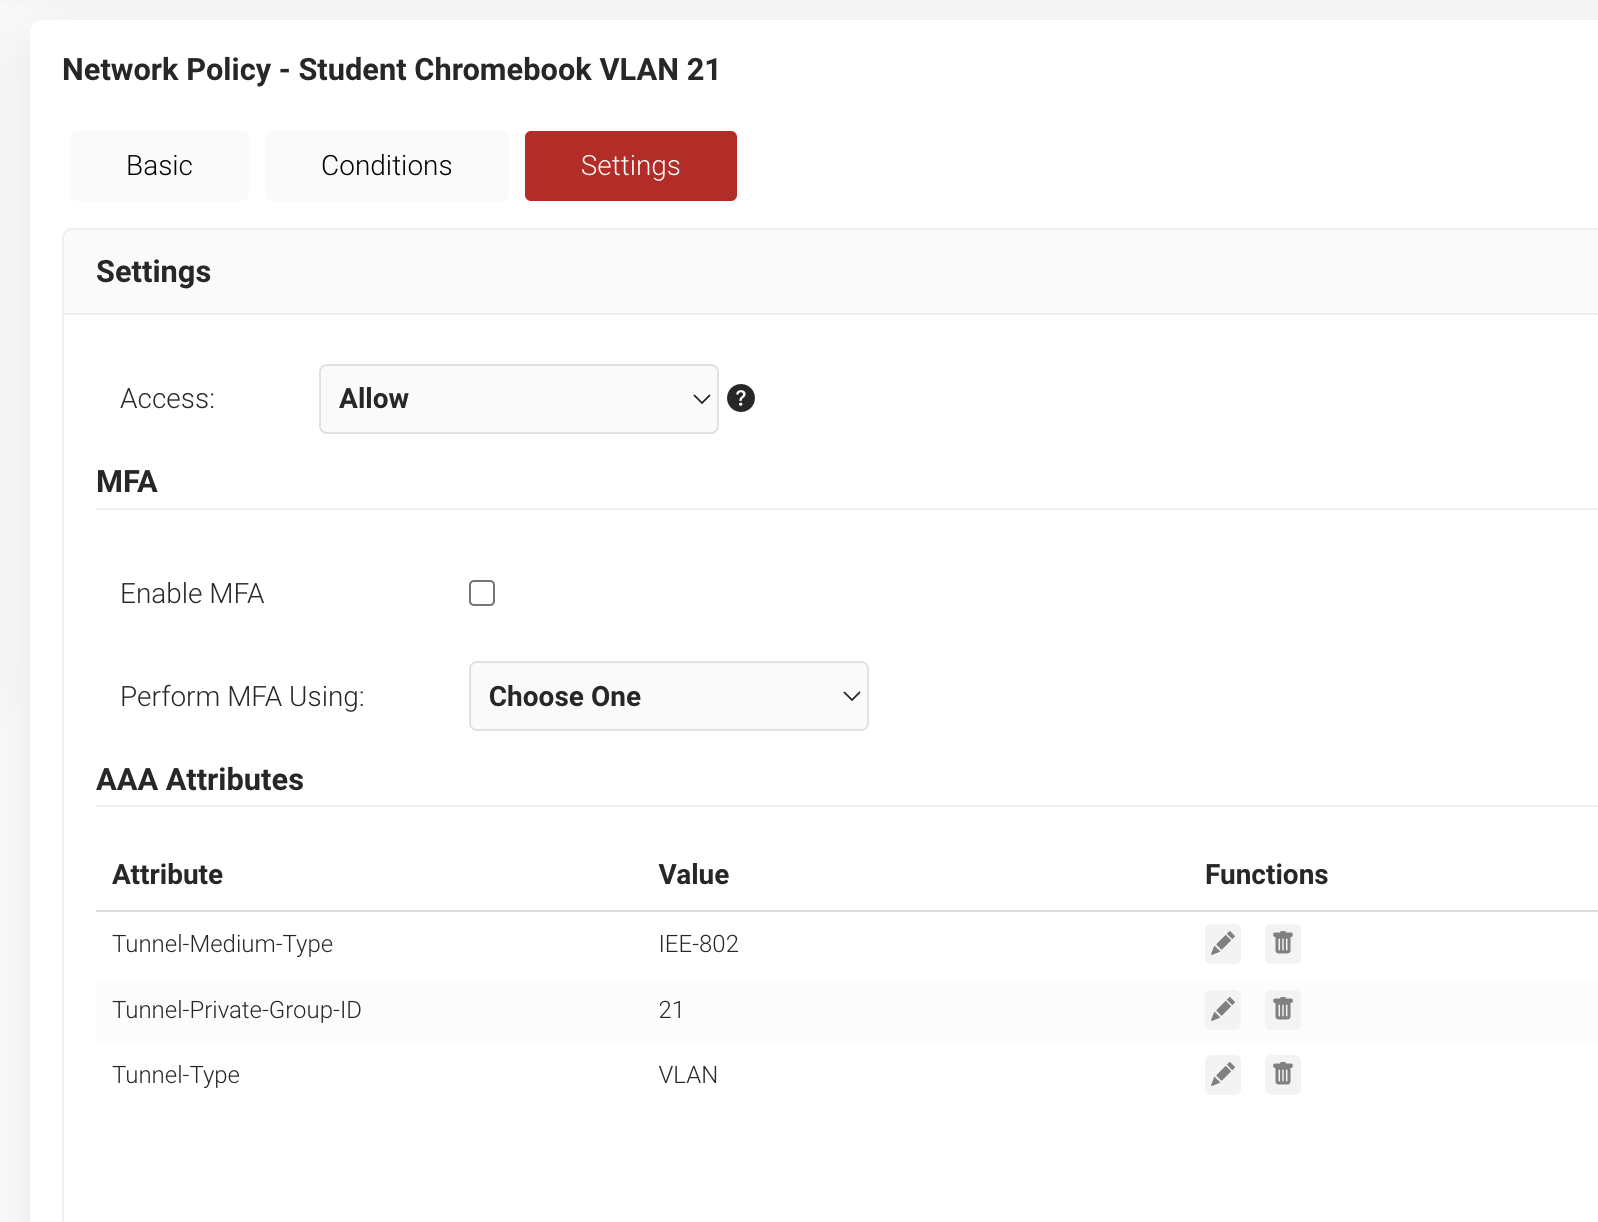
Student Network Policy
First, we will use the Student Policy Engine Workflow to identify the Conditions for our Student Network Policy. In Settings, we will be configuring the RADIUS attributes necessary to put them into their own VLAN.

The Settings in this scenario will specify whether our users/devices should be Allowed/Denied into the network and what RADIUS Attributes we will return, which will be the ones necessary to put them into unique VLANs.
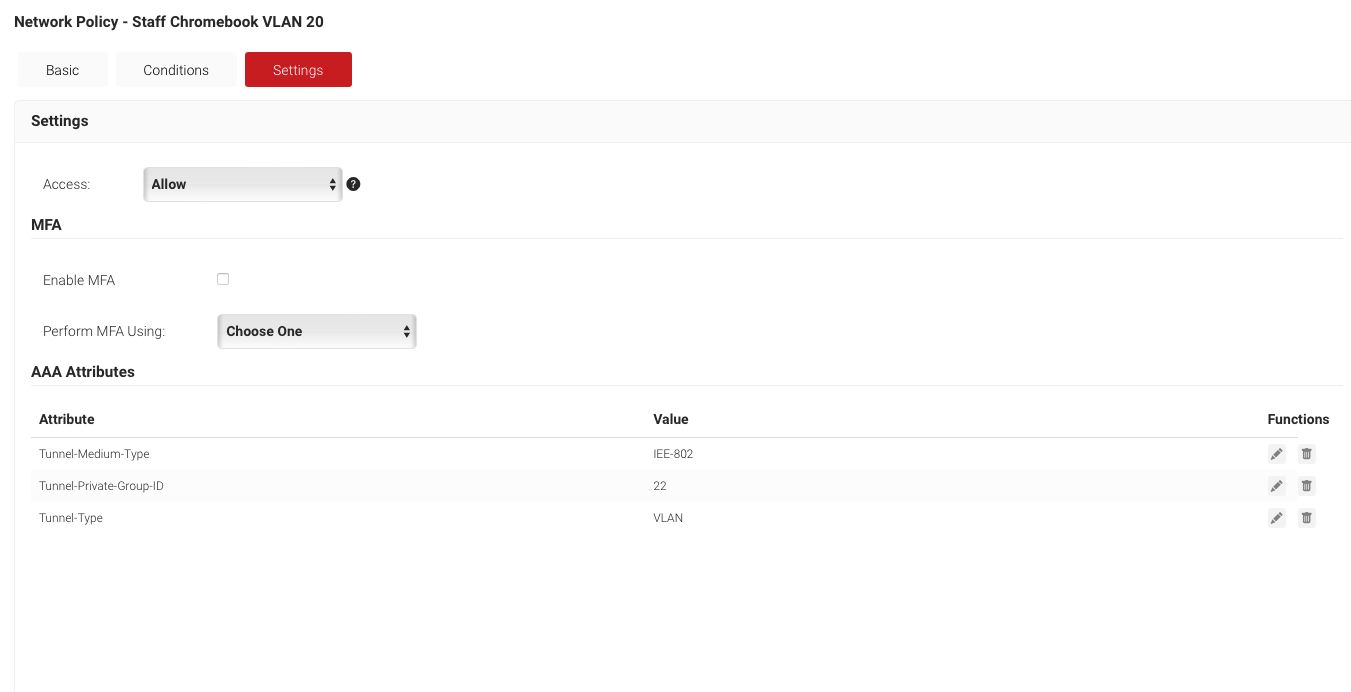
Staff Network Policy
Like the Policy Engine, you’ll create a separate network policy for the Staff. Then, you’ll use the Staff workflow you created, add a group, make a rule, and select the staff policy workflow.

Then again, we’ll configure what attributes to return to segment those staff devices.
Once we’ve completed these steps, your domain will be ready to perform Identity Lookup and segment your network! Here’s a review of what we covered today with the setup process
- Created the Identity Lookup Provider to check for the local attribute
- Created an Account Lookup Policy to instruct Cloud RADIUS on how to search the IDP
- Created the Policy Engine Workflow to designate access to resources
- Created the Network Policy to enforce the configured rules to assign to that VLAN
- Cloud RADIUS validates the user’s identity and clears it for the wireless controller to grant the user access
Suppose you’re curious about other ways to segment your network besides just Staff and network to see what else the Cloud RADIUS is capable of. In that case, we’ll cover some of the most popular ways we’ve seen our software configured for K-12 institutions.
Popular Ways to Segment Your Network
We’ve seen our K-12 clients segment their networks in many ways. The most popular method is Student Vs. Staff. This method is further deviated by the student’s grade at the time, what department a teacher lies in, and IT administrators in their own completely separate VLAN.
Another method they’ve used is segmentation by the corresponding CA. By creating a rule that this group of users enrolled to this Intermediate CA signature are to be assigned to this VLAN, Cloud RADIUS can effectively ensure that only certificates matching the root CA signature can gain access to the network and network infrastructure organized.
You can further enhance the network’s security by segmenting your IoT devices from students acting “senior pranks” and compromising them. Teachers will see a massive benefit from this by not allowing their lessons to be interrupted by students taking control of their laptops, smart boards, and Apple device displays. Enrolling devices through their Mac Addresses ensures that only users with Teacher Roles can access these devices.
Conclusion
Segmentation is vital to cultivating a safe and secure student environment. It ensures malicious actions are actively mitigated, located, and resolved quickly. Because of how the network infrastructure is constructed, having all users and devices under the same umbrella can delay responses and significantly increase future risks.
Our support team is renowned for helping our clients through any issues promptly so that using our services can be said to run by itself. If you want to learn more about SecureW2 solutions, schedule a demo with us today to learn more about how we help organizations stay secure and stress-free!