


Network administrators often feel certificate management to be challenging at times, especially in finding the right PKI for certificate deployment. They either end up paying for a pricey PKI with minimal features or a complex PKI demanding deep technical expertise. Even Microsoft Endpoint Manager Intune (MEM: Intune), which is used alongside AD CS and on-prem PKI, can be a bit expensive and complex in the long run. This can also limit your organization’s future chances of smooth migration to the cloud.
You need a trusted certificate authority to easily integrate MEM Intune with various APs and RADIUS servers to tackle these issues, whether on-prem or cloud. SecureW2, with its innovative PKI solutions, allows organizations to integrate with multiple MDMs such as MEM Intune smoothly. It helps organizations extend their infrastructure to a more secure certificate-based authentication platform.
This guide will tell you how to manage certificates with MEM Intune through SecureW2.
Prerequisites

The following are the prerequisites for setting up MEM Intune to allow devices to enroll for digital certificates using Simple Certificate Enrollment Protocol (SCEP):
- A Microsoft Online Services account with Microsoft Endpoint Manager Intune subscription.
- Users are assigned MEM Intune licenses before enrolling their devices in Microsoft Endpoint Manager.
- JoinNow Cloud Management Portal has been set up for TLS (Root and Intermediate Device CAs are present).
Device Profiles in Microsoft Endpoint Manager
Devices profiles allow you to add and configure settings and then push those settings to devices in your organization. The following profiles need to be created for end-user devices to successfully connect to the secured network using user certificates.
- Step 1. Trusted certificate profile for RADIUS server Root and Intermediate CA certificates.
- Step 2. Trusted certificate profile for SecureW2 Issuing C.
- Step 3. SCEP certificate profile for SecureW2 SCEP certificate requests.
- Step 4. Wi-Fi profile for secure SSID configuration.
Note: You must create a separate profile for each platform.
Prerequisite: Generate SCEP URL, Policies, and Attributes
- Navigate to API Tokens under Identity Management
- Click Add API Token
- Enter in a Name and Vendor and click Update
- A CSV file will be downloaded that contains a shared secret and a SCEP URL.
User Role and Enrollment Policies
Setting up Microsoft Endpoint Manager Intune requires two separate policies in the SecureW2 management portal: a User Role Policy and an Enrollment Policy. MEM Intune does not need a dedicated Device Role policy. You can use the Default Device Role policy if the settings are default.
Configuring the Role Policy:
- Navigate to Policy Management
- Click Add Role
- Navigate to the Conditions tab
- Select Intune as your Identity Provider
- Click Update
Configuring the Enrollment Policy:
- Navigate to Policy Management
- Click Enrollment Policy
- Add Enrollment Policy
- Create a Name
- Click Save
- Navigate to the Conditions tab
- Select the User Role (whatever you named your Role Policy) that was just created in Role Policy
- Leave Device Role as DEFAULT DEVICE ROLE
- Click Update
- Navigate to the Settings tab
- Select the Intermediate CA that will be used
- Select the Certificate Template we created earlier under Use Certificate Template
- Leave Revoke Certificate as Automatically
- Click Update
Step 1. Trusted Certificate Profile for RADIUS Certificate
This profile should be configured with a certificate from your RADIUS server certificate’s issuing authority. This ensures that devices trust your RADIUS server by validating the RADIUS server certificate. We achieve this server validation in the profile configuration by adding the Root and/or Intermediate Certificate Authority certificates that issued the RADIUS server certificate. When you assign this profile, the MEM Intune managed devices receive the trusted root certificate.
You must create a separate profile for each OS platform. The steps to create trusted certificates are similar for each device platform.
1.1 Export RADIUS Server Root CA
First, you need to obtain the RADIUS Server Root CA. In this guide, we will be configuring MEM Intune with the SecureW2 RADIUS Server, so we will export the RADIUS Server Root CA from the SecureW2 management portal.
To Export the SecureW2 RADIUS Server Certificate:
-
- Click Network Profiles
- Click Edit on the Network Profile you configured earlier
- Click Add/Remove Certificate in the Certificates section
- Check the box next to DigiCert Global Root CA (Mon Nov 10 00:00:00 UTC 2031)

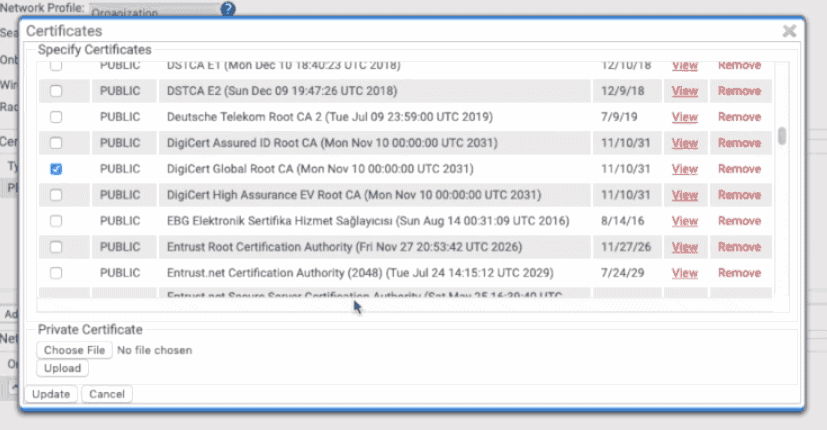
- Click Update
- The CA will appear in the Certificates section
- Click Download
1.2 Create a Trusted Certificate Profile
Now that we’ve downloaded the RADIUS Server certificate, we need to create a Trusted Certificate Profile in Azure to push this certificate to our devices.
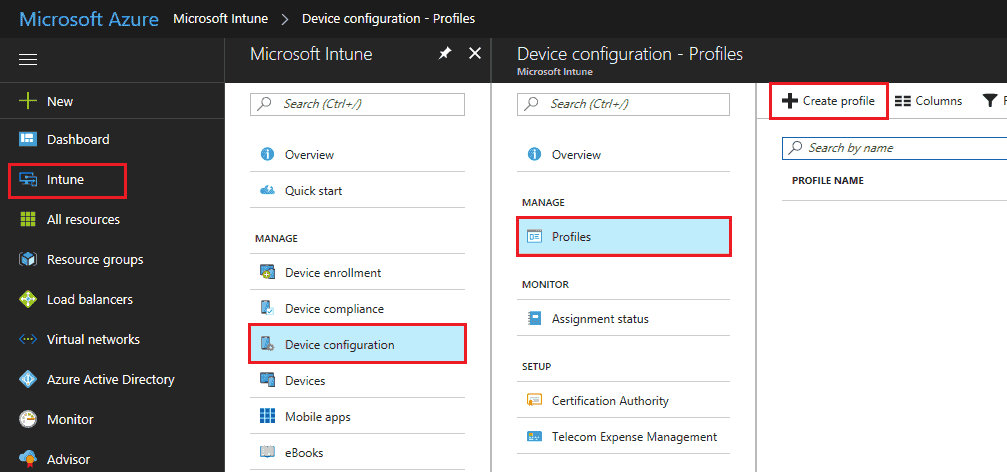
- Sign-in to the Azure portal
- Select All services, filter on MEM Intune, and select MEM Intune
- Select Device configuration—> Manage—> Profiles—> Create profile
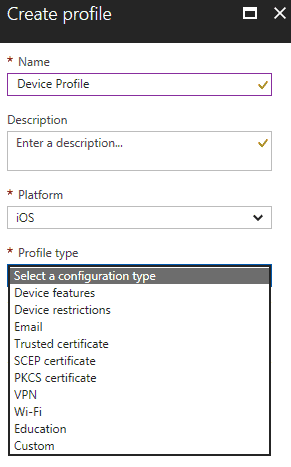
- Enter a Name and Description for the trusted certificate profile
- From the Platform drop-down list, select the device platform for this trusted certificate
- Android
- iOS
- macOS
- Windows 10 and later
- Note: You must create a separate profile for each OS platform. The steps to create trusted certificates are similar for each device platform.
- From the Profile type drop-down list, choose Trusted certificate
- Navigate to the certificate you saved in 1.1 Export your trusted Root and Intermediate CA certificates, then select OK
- For Windows 8.1 and Windows 10 devices only, select the Destination Store for the trusted certificate from: Computer certificate store – Root
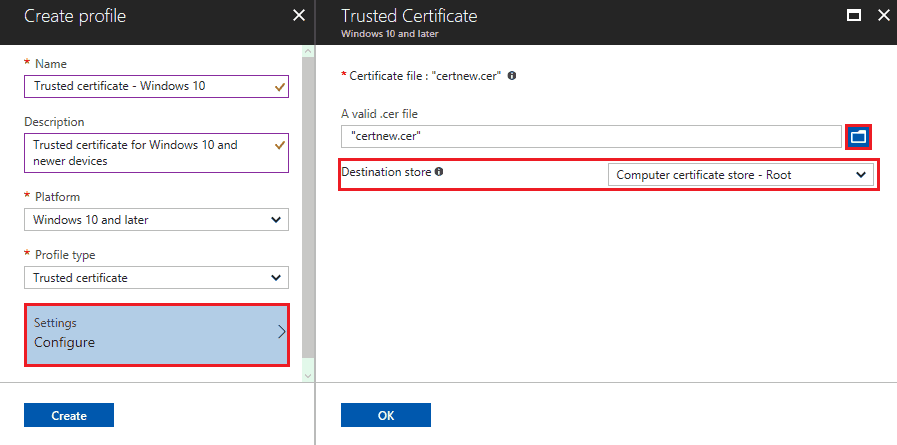
- When you’re done, choose OK, go back to the Create profile pane, and select Create
- The profile is created and appears on the list
- To assign this profile, see Assign device profiles
Step 2. Trusted Certificate Profile for SecureW2 Issuing CA Certificate
This profile is required to map the SecureW2 Issuing CA certificate to the SCEP certificate profile. This CA certificate must be the certificate that issues the end-user certificates.
You must create a separate profile for each OS platform. The steps to create trusted certificates are similar for each device platform.
2.1 Export Your SecureW2 Issuing CA certificate
Export the SecureW2 Issuing Certification Authority (CA) certificate as a public certificate (.cer) from the SecureW2 management portal.
- Log in to SecureW2 management portal
- Navigate to PKI Management—> Certificate Authorities
- Under the Certificate Authorities section, beside the Issuing Intermediate CA certificate, click Download
This certificate is imported when you set up the trusted certificate profile below.
2.2 Create Trusted Certificate Profile
Please follow all the steps from previous section 1.2 Create trusted certificate profile except for the following step:

- Locate the certificate you saved in 2.1 Export your SecureW2 Issuing CA certificate, then select OK.
Note: You must create a separate profile for each OS platform. The steps to create trusted certificates are similar for each device platform.
Step 3. SCEP Certificate Profile for SecureW2 SCEP Certificate Requests
This profile is required for end-user devices to communicate with the SecureW2 Issuing CA certificate for the enrollment of end-user certificates. Once the end-user certificate is enrolled successfully, the certificate is used to connect to the Wi-Fi network.
You must create a separate profile for each OS platform. The steps to create trusted certificates are similar for each device platform.
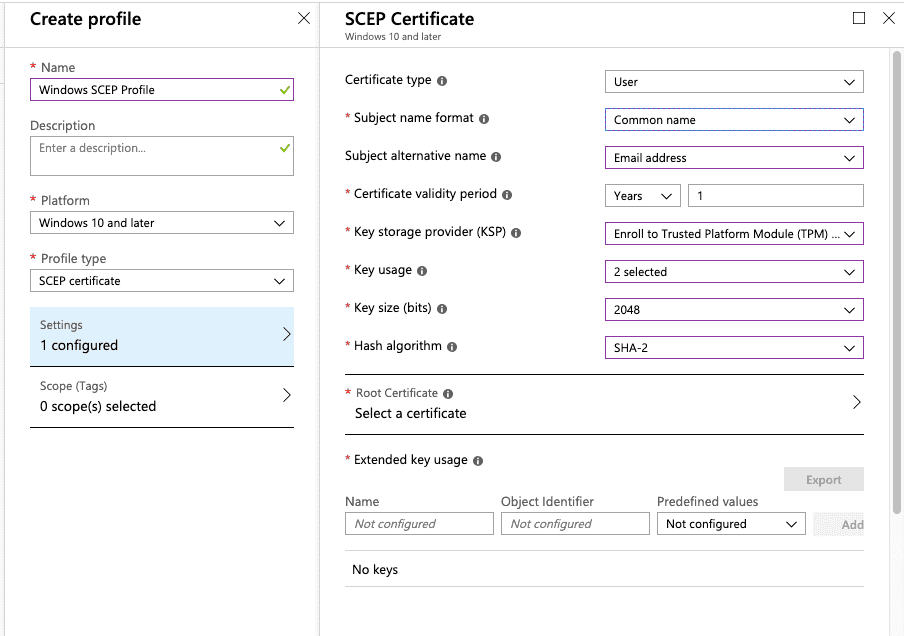
3.1 Create a SCEP Certificate Profile
- In the Azure portal, select All services, filter on MEM: Intune, and select MEM: Intune
- Select Device configuration—> Profiles—> Create profile
- Enter a Name and Description for the SCEP certificate profile
- From the Platform drop-down list, select the device platform for this SCEP certificate. Currently, you can select one of the following platforms for device restriction settings:
- Android
- iOS
- macOS
- Windows 10 and later
- Note: You must create a separate profile for each OS platform. The steps to create trusted certificates are similar for each device platform.
- From the Profile type drop-down list, select SCEP certificate. Enter the following settings:
- Certificate type: Choose User for user certificates. Choose Device for scenarios such as userless devices (device kiosks), or for Windows devices, which places the certificate in the Local Computer certificate store.
- Note: Certificate Type is not a setting on Android SCEP Profiles
- Subject name format: Select how Microsoft Endpoint Manager: Intune automatically creates the subject name in the certificate request. The options change if you choose a User certificate type or Device certificate type. Choose from:
- Common name
- Common name including email
- Common name as email
- Subject alternative name: Select how Microsoft Endpoint Manager: Intune automatically creates the subject alternative name (SAN) in the certificate request. The options change if you choose a User certificate type or Device certificate type. The following attributes are selected:
- Email address
- User principal name (UPN)
- Key storage provider (KSP) (Windows Phone 8.1, Windows 8.1, Windows 10): Enter where the key to the certificate is stored. Choose the following value:
- Enroll to Trusted Platform Module (TPM) KSP if present, otherwise Software KSP
- Key usage: Enter the key usage options for the certificate. Select both options:
- Key encipherment: Allow key exchange only when the key is encrypted
- Digital signature: Allow key exchange only when a digital signature helps protect the key
- Key size (bits): Select the number of bits contained in the key and select the largest bit size
- Hash algorithm (Android, Windows Phone 8.1, Windows 8.1, Windows 10): Select the strongest level of security that the connecting devices support
- Root Certificate: Choose the profile created in 2.2 Create Trusted Certificate Profile. The Root CA certificate profile you previously configured and assigned to the user and/or device.
- Extended key usage: Add values for the certificate’s intended purpose. In most cases, the certificate requires Client Authentication so that the user or device can authenticate to a server.
- Enrollment Settings
- Renewal threshold (%): Enter the percentage of the certificate lifetime that remains before the device requests renewal of the certificate.
- SCEP Server URLs: Enter the SCEP URL that we created in the Prerequisite section.
- Select OK, and Create your profile
- The profile is created and appears on the profiles list pane. Next, Assign a device profile.
- Certificate type: Choose User for user certificates. Choose Device for scenarios such as userless devices (device kiosks), or for Windows devices, which places the certificate in the Local Computer certificate store.
Step 4. Wi-Fi Profile for Secured SSID Configuration
Microsoft Intune includes built-in Wi-Fi settings that can be deployed to users and devices in your organization. This group of settings is called a “profile” and can be assigned to different users and groups. Once assigned, users obtain access to the network without configuring it themselves.
4.1 Create a Wi-Fi Profile
- In the Azure portal, select All services
- Filter on Microsoft Endpoint Manager: Intune
- Select Microsoft Intune.
- Select Device configuration—> Profiles—> Create profile
- Enter a Name and Description for the Wi-Fi profile
- In the Platform drop-down list, select the device platform to apply the Wi-Fi profile from the following options:
- Android
- iOS
- macOS
- Windows 10 and later
- Note: You must create a separate profile for each OS platform. The steps to create trusted certificates are similar for each device platform.
- In Profile Type, choose Wi-Fi
- The Wi-Fi profile is different for each platform. To see the profile for a specific platform, choose:
- Android
- iOS
- macOS
- Windows 10 and later
- When finished adding your Wi-Fi profile, select Create Profile—>Create to add the configuration profile. The profile is created and is shown in the profiles list (Device configuration—> Profiles).
- Next, Assign a device profile
4.2 Assigning a Device Profile
- In the Azure portal, select All Services—> filter on MEM: Intune—> select MEM: Intune
- Select Device configuration—> Profiles where all the profiles are listed
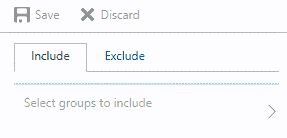
- Select the profile you want to assign—> Assignments
- Choose to Include groups or Exclude groups, and then select your groups. When you select your groups, you’re choosing an Azure AD group. To select multiple groups, hold down the Ctrl key, and select your groups.
- Save your changes
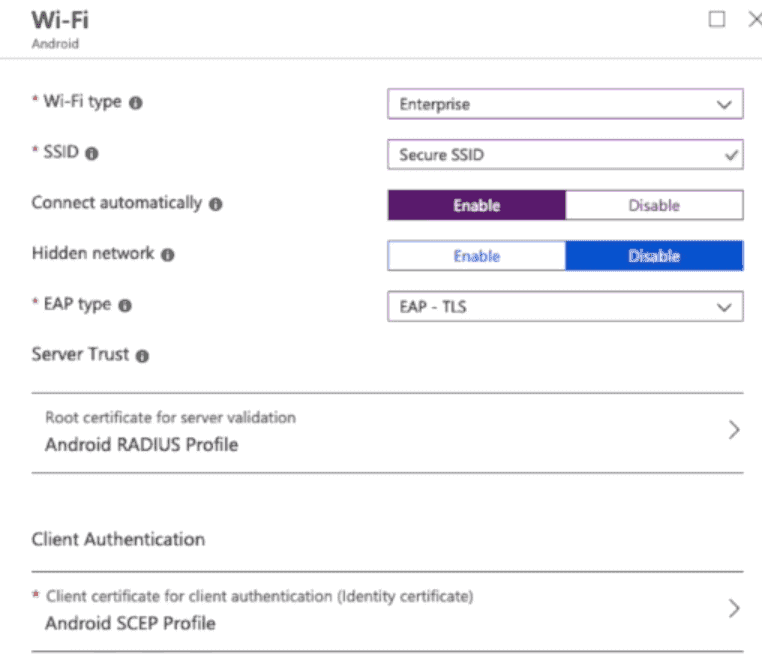
4.3 Add Wi-Fi Profile for Devices Running Android
You can create a profile with specific settings as per the image below, then deploy this profile to your Android devices.
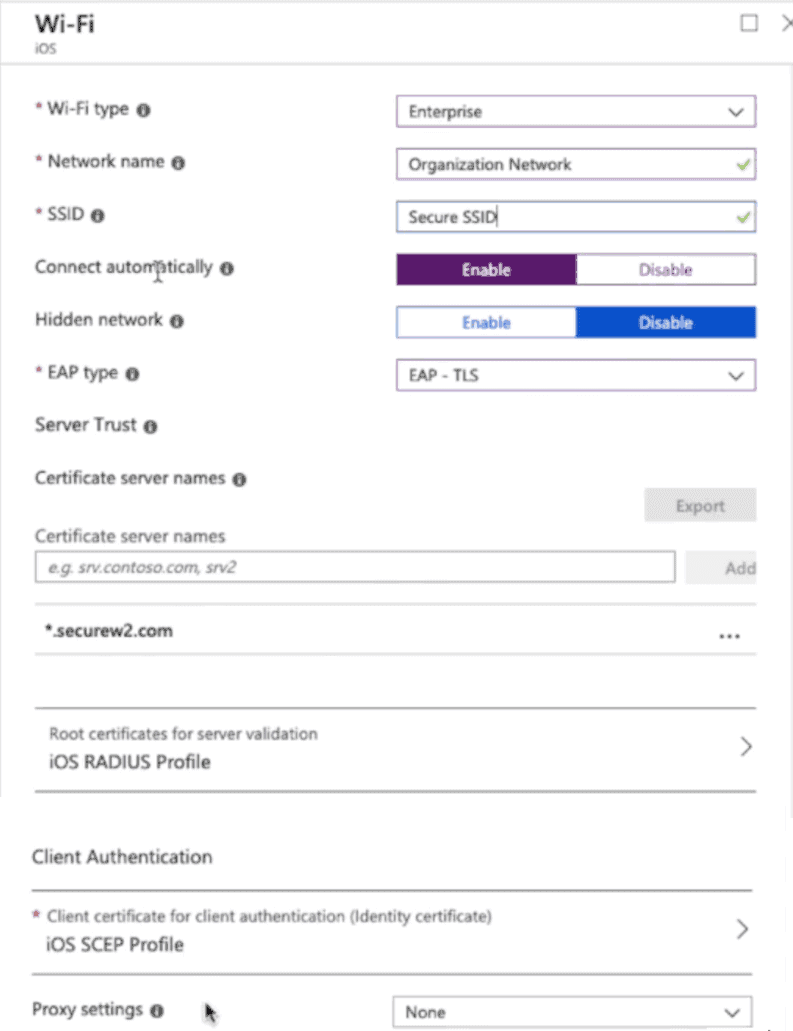
4.4 Add Wi-Fi Profile for iOS Devices
You can create a profile with specific settings as per the image below, then deploy this profile to your iOS devices.
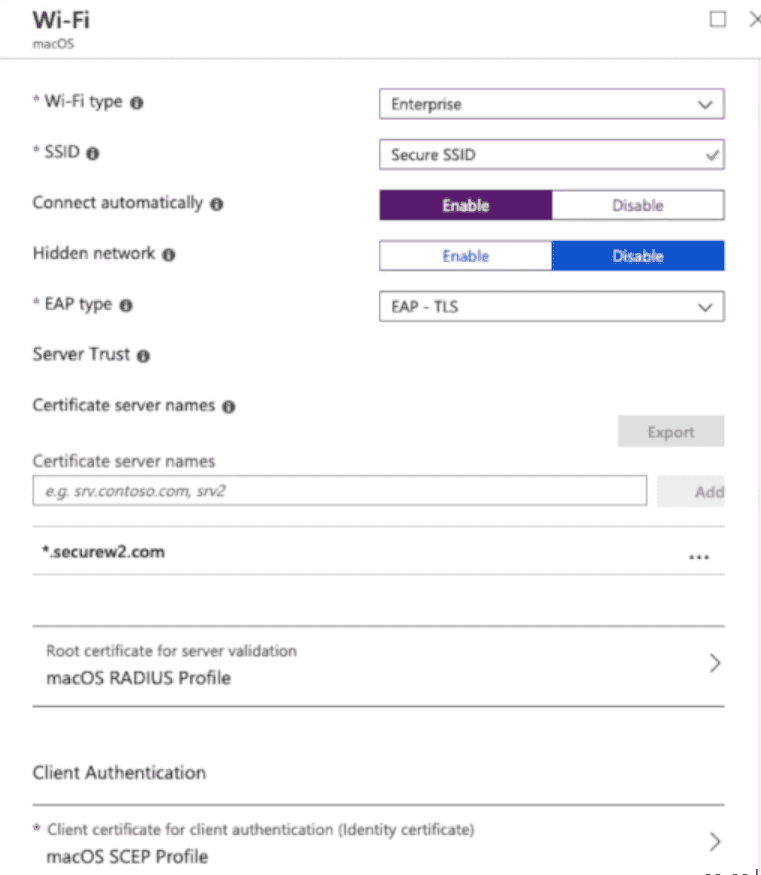
4.5 Add Wi-Fi Profile for macOS Devices
You can create a profile with specific settings as per the image below, then deploy this profile to your macOS devices.
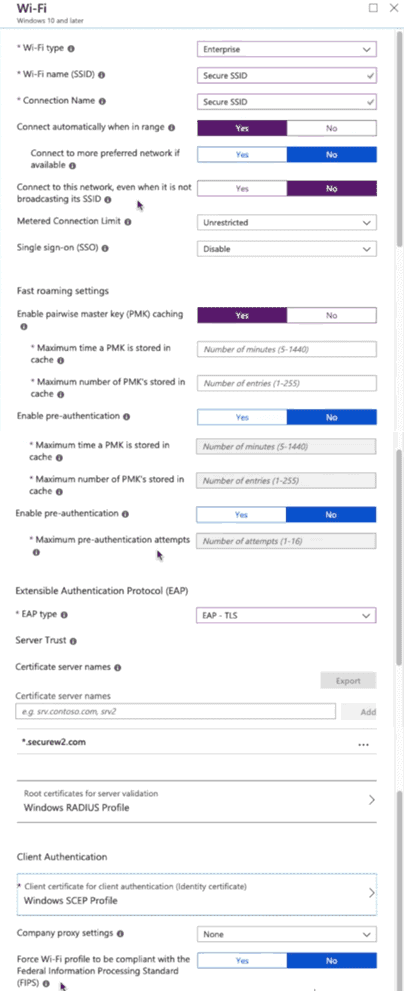
4.6 Add Wi-Fi Profile for Windows 10 and Later Devices
You can create a profile with specific settings as per the image below, then deploy this profile to your Windows devices.
Once this is completed, the network is ready to authenticate managed devices using digital certificates. Now we can talk about how you can manage those certificates.
Automating Certificate Generation for Managed Devices with MEM Intune
After setting up Microsoft Endpoint Manager: Intune to deploy certificates, let’s talk about why the setup was necessary and how it can help you out in the long run.
SCEP (Simple Certificate Enrollment Protocol) can simplify the enrollment process so administrators can automatically enroll any device for a certificate without any end-user action. This is great because you don’t have to go to each device individually and enroll for a certificate, all the devices will automatically enroll and configure themselves.
SCEP is a protocol that allows devices to easily enroll for a certificate by using a URL and a shared secret with the CA to communicate with a PKI. Mobile Device Management (MDM) software commonly uses SCEP for devices by pushing a payload containing the SCEP URL and shared secret to managed devices.
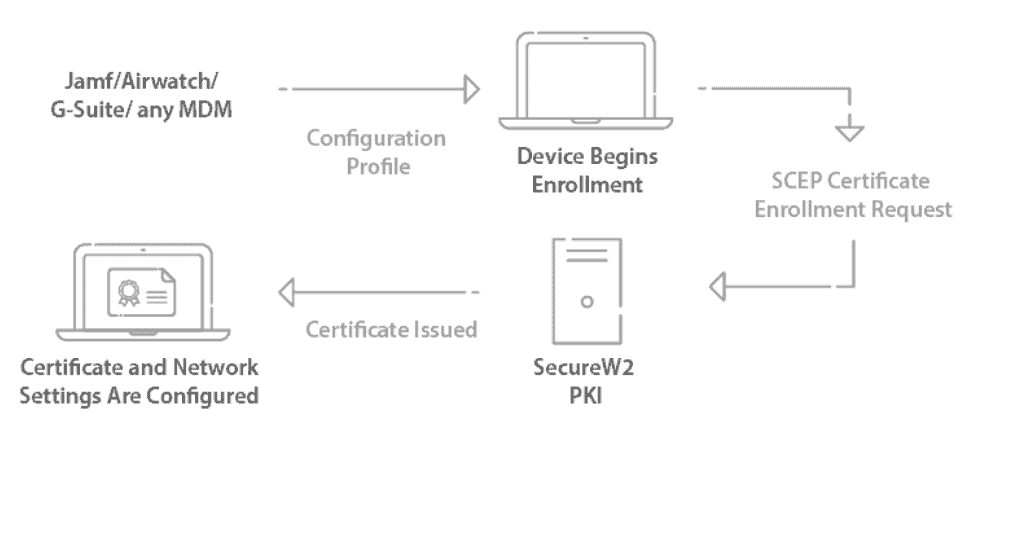
The SecureW2 Management Portal has the necessary components to deploy a SCEP Gateway with any major MDM, like MEM Intune, in less than an hour. You can easily:
- Create a Custom Private Intermediate CA
- Create a Signing CA, signed by the Intermediate CA
- Generate the SCEP Gateway API URL and Shared Secret
- Optional: Configure Custom Certificate Templates and Enrollment Policies
Using SecureW2 to Easily Manage Certificates With MEM Intune

SecureW2 allows you to easily manage the entire certificate lifecycle, from issuance to revocation. Our enhanced SCEP (Simple Certificate Enrollment Protocol) solutions enable MDM providers like Microsoft Endpoint Manager Intune to be equipped with certificates with minimal end-user interaction.
SecureW2’s management portal has an intuitive single-pane interface that allows managed devices to enroll for certificates independently without any hassle. It addresses the entire lifecycle of certificates with auto-revocation on expiry and provides in-depth reporting to the device level. Also, its robust AI-powered anomaly detection reduces the dependencies on network admins’ vigilance.
You can check our pricing here to manage and secure your Intune devices with ease.
 Vivek Raj