Key Points
- 802.1X authentication enhances network security by allowing only authorized Android devices to access the network.
- EAP-TLS and RADIUS protocols protect against unauthorized access by encrypting and verifying user credentials.
- SecureW2's JoinNow onboarding solution streamlines the configuration of Android devices for 802.1X authentication, ensuring secure and efficient network access.
In this article, we’ll examine a crucial authentication method for keeping your Android devices secure while connecting to networks. It’s called 802.1X authentication. This specific security approach ensures only the designated devices can access a network. Consider it a secret passkey your phone or tablet must know before connecting to a Wi-Fi network. It is critical to ensure that only trusted devices can connect, keeping your data secure from intruders.
Our phones and tablets have evolved into treasure chests, storing everything from personal messages to crucial professional information. As a result, ensuring they are safe while connected to the internet is more critical than ever. This article will demonstrate how to utilize 802.1X authentication on your Android devices. By the end, you’ll be an expert at keeping your device secure and your information secret when utilizing different networks.
Read this case study and learn how SecureW2 helped a senior care provider set up and jump to 802.1X.
Understanding 802.1X
802.1X acts as a network bouncer, allowing only acceptable devices to enter. It is a security standard that is a barrier, requiring a unique password or credentials before enabling a device to connect. This helps to prevent unauthorized access and protects your data from attackers.
Key Components of 802.1X
The essential 802.1X components are:
⦁ Supplicant (your device)
⦁ The Authenticator (such as a switch or access point)
⦁ The Authentication Server
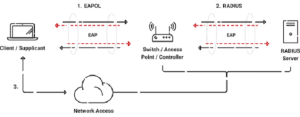
This occurs in three steps: first, your device (supplicant) seeks access, then the authenticator requests your credentials, and lastly, the authentication server confirms your identity. Only once this chain of trust is established will your device be allowed to connect to the network.
Authentication Methods
802.1X employs several authentication techniques, including Remote Authentication Dial-In User Service (RADIUS) and Extensible Authentication Protocol (EAP). RADIUS functions as a bridge between your device and the authentication server, authenticating your identity.
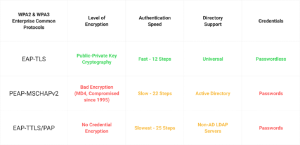
On the other hand, EAP functions as a messenger, securely transporting your credentials throughout the authentication procedure. EAP comes in many versions, including EAP-TLS (Transport Layer Security), EAP-TTLS (Tunneled Transport Layer Security), and PEAP (Protected EAP), with varying degrees of security and compatibility.
Advantages of 802.1X
Using 802.1X authentication has many benefits, such as making the network safer by blocking unauthorized entry and possible data breaches. It also provides greater control over who may access the network, allowing administrators to manage access permissions more efficiently. Furthermore, it provides better data secrecy, guaranteeing that sensitive information is secured throughout network transfer.
The Role of RADIUS Server in 802.1X Authentication
The RADIUS (Remote Authentication Dial-In User Service) server is an important part of the 802.1X authentication process. It connects the authenticator, the authentication server, and the network access server. The authenticator sends the identification request to the RADIUS server whenever a device tries to connect to the network.
The RADIUS server then uses several verification methods to check the details the requester gave it, such as a username and password. Following successful validation, the RADIUS server returns the authorization decision to the authenticator, granting or refusing network access as appropriate. This procedure guarantees that only authorized users have access to the network, thus improving network security.
How Does 802.1X Work?
Users connecting to wireless networks have their authentication communications shielded by protocols such as 802.1X. In a nutshell, 802.1X opens network access ports, allowing organizations to authenticate a user’s identity and authorize them for network use. It is very critical to first understand the details of 802.1X, its components, and its role in secure network authentication.
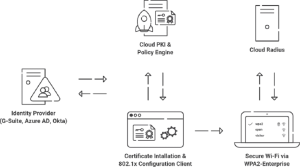
Setting up 802.1X requires a few different components. Generally, you’ll need the following elements to use 802.1X on your network:
⦁ An AP and Switch compatible with 802.1X
⦁ A RADIUS server that handles authentication, authorization, and accounting
⦁ A directory/Identity Provider containing user and device information
⦁ In-depth understanding of 802.1X
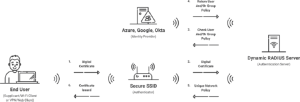
The authentication process with 802.1X is straightforward, as portrayed in the diagram below. A user accessing the network first sends their credentials or certificate over the air through the access point to the secure SSID. That information is then given to the RADIUS server, which determines whether the user is authorized for network access. Based on the initial identifying information the user provided, the RADIUS sends an Access_Accept or Access_Deny that is relayed to the end user.
What is 802.1X EAP Security?
802.1X may function as the channel through which authentication information is sent, but this information requires protection. Without protection, identifying information can be easily intercepted in MITM attacks. A common and highly secure method of protecting authentication is using EAP (Extensible Authentication Protocol), which you can imagine as a tunnel that shields your information from view through various means.
There are several versions of EAP, such as EAP-TLS or PEAP-MSCHAPv2. Each one is its protocol under the EAP umbrella. These versions can support different authentication methods (credentials, certificates, etc.), but they all perform the essential duty of securing the authentication process by creating the aforementioned tunnel.
Which 802.1X Protocol Should I Use for Android?
Before choosing one protocol or another, organizations should consider which authentication method is best for their needs. Traditionally, organizations have used usernames and passwords – an authentication method employed by PEAP-MSCHAPv2 – but it’s easy to see where this authentication method falls short. Not only is it inconvenient when you consider how many different workplace resources require a username and password, but it’s simply insecure, given that stealing credentials can be accomplished with little technical knowledge.
The alternative to dated username/password combinations is digital certificates. Unlike credentials, credits are tied directly to a device and cannot be shared between multiple users. Similarly, they cannot be stolen. They’re even an enticing proposition for the end-user, who no longer has to worry about remembering a username and complex password.
Certificates are a wise choice for improving your authentication security. To use them, however, you’ll also need to use EAP-TLS, an EAP protocol that falls under the EAP umbrella we discussed previously. It is faster than other EAP alternatives and works without user input when they’re in the network’s range.
Network Infrastructure Setup for Android 802.1X Authentication
Preparing Your Network
To get your network ready for 802.1X authentication, ensure all its devices, like switches and access points, can handle the 802.1X protocol. Ensure the network is set up correctly so the identity server can talk to both the authenticator and the supplicant. This could mean setting up the right ports and VLANs (Virtual Local Area Networks) and correctly setting up the network rules and settings.
The Role of the Network Authenticator
An important part of the 802.1X identification method is the network authenticator, usually a switch or access point. For the sharing of authentication messages, it works as an intermediary for the requester and the authentication server. Setting up the authenticator means deciding who can and cannot join the network. This is done by describing the access rules, including login methods and access control groups.
Integrating with Current Security Measures
When you add 802.1X authentication to your current security measures, you must ensure that the authentication protocol works with your other security protocols, like firewalls, intruder detection systems, or antivirus software. Setting up the network to support multiple login methods simultaneously, making sure that different security components can talk to each other without any problems, and regularly updating and fixing the security systems to keep them safe from new threats may be needed for this combination.
Requirements for 802.1X Authentication on Android
The requirements for 802.1X Authentication on Android devices are not very different from the general requirements of all operating systems. A RADIUS Server, Identity Provider/Directory, and enterprise-grade Access Points and Switches are typically required.
Here are the requirements for 802.1X on Android:
⦁ A wireless access point and switch capable of supporting 802.1X
⦁ A cloud Identity Provider (Azure AD, Okta, Google Workspace) or an on-premise LDAP Server (Active Directory, OpenLDAP) with users registered for network access
⦁ Certificate Authorities prepared to enroll servers with server certificates and users with device certificates (as needed)
⦁ A RADIUS server configured for 802.1X, the chosen EAP method, and the chosen authentication format
⦁ A Certificate Authority (CA) to use as a Server Certificate for the RADIUS Server
⦁ An IT team familiar with 802.1X and prepared to support users through the process
⦁ Mobile Device Management (Jamf, Intune, Google Workspace, etc.), or 802.1X Onboarding Clients (SecureW2) to enroll certificates and configure Wi-Fi settings on devices
Android devices are one of the few operating systems requiring an app to install 802.1X settings and certificates properly on a large organizational scale. If you are a large organization that wants non-managed BYOD devices to use 802.1X, you will need an Android Application such as SecureW2’s JoinNow.
How to Configure Certificate Authorities on Android
It is vital to have a CA that the end user trusts to authenticate them for network use securely. The following are the steps for configuring a CA certificate on Android 13:
⦁ Open Settings and navigate to Security
⦁ Go to Encryption & Credentials, then Install from storage
⦁ Select a CA Certificate from the available list
⦁ Android 13 provides a warning for installing a CA certificate that should be Accepted
⦁ Browse to find the certificate file desired and open it
⦁ Confirm the certificate install
Setting up Certificate Authorities (CAs) on Android is difficult, especially for end users who aren’t very tech-savvy. But in practice, the process is easier, especially for devices brought in by the user (BYOD) or unmanaged devices, like smartphones.
Most Mobile Device Management (MDM) or 802.1X onboarding tools can install the CA immediately. This is needed for Server Certificate Validation. Such software can also help you choose the right CA and set up the network settings to configure the domain to which the CA is issued. This automated process ensures that end users can easily connect to safe networks without knowing much about technology.
Enabling Server Certificate Validation on Android Devices
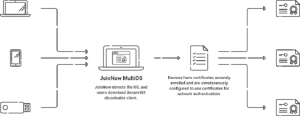
Server certificate validation is a vital part of WPA2-Enterprise. Put simply, it ensures your Android devices connect to the correct network by having the 802.1X network’s RADIUS server present a certificate to each connecting device. For this to work smoothly, both the Android device and the RADIUS must trust the root CA that issued the server certificate in the first place.
One option is to configure an Android device for server certificate validation manually. Here are the steps to follow:
⦁ Download the RADIUS server’s root CA certificate.
⦁ You can download it from the web, email, or onto a PC and then transfer it to your Android device with a USB.
⦁ Navigate to the Security settings on your Android device.
⦁ Find the Credential Storage section, then select Install from Phone Storage or Install from SD Card, depending on where you downloaded the certificate.
⦁ Access the device’s Wi-Fi or Wireless Network settings.
⦁ Hold down the name of your SSID, then choose Modify.
⦁ Choose the certificate you downloaded in the CA Certificate field and save the settings.
While the process only consists of several steps, an inexperienced user still has plenty of opportunities for misconfiguration. The easiest way to configure Android devices for server certificate authentication is to use simple onboarding software like SecureW2’s JoinNow MultiOS.
With JoinNow MultiOS, end users can configure their own devices in seconds. JoinNow will automatically detect which OS they’re using and download SecureW2’s dissolvable client for quick configuration.
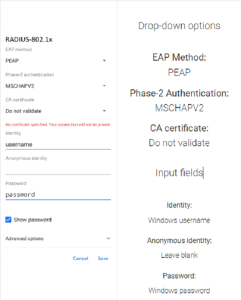
How to Configure 802.1X Manually on an Android Device
A configuration guide is vital if your organization requires users to configure 802.1X manually. The steps required to configure Android for 802.1X will require actions that the average user is not accustomed to.
⦁ Navigate to Settings > Network & Internet > Wi-Fi > Add Network
⦁ Enter the Network SSID name
⦁ Open the Security drop-down menu and select 802.1X EAP
⦁ Choose the EAP method that will be used
⦁ Choose the Root CA certificate and determine the domain listed in the server certificate from the CA Certificate drop-down menu
⦁ In the Identity field, enter the email address associated with the user profile
⦁ Enter the password that corresponds to that user profile
⦁ Click Save to save the changes made
How to Find the Wi-Fi Certificate on Android
To view the certificates on an Android device:
⦁ Open Settings and navigate to Security & Locations
⦁ Click Encryption & Credentials > Trusted Credentials
⦁ This will display the trusted certificates on the device
Oftentimes your organization will ask you to connect to a Wi-Fi network that asks you for a “Wi-Fi Certificate.” If you don’t see a certificate that belongs to your organization or hasn’t recently installed any certificate you see in your Trusted Credentials, reach out to your organization, and they will help you.
Rest assured that our professional support staff is available to assist you. Any misconfigurations or certificate-related difficulties can be quickly handled with their experience and timely support, ensuring you can connect safely and smoothly to your organization’s network.
Configuring 802.1X on Android with SecureW2
As this complete guide to Android 802.1X ends, it’s clear that protecting network connections on unmanaged devices is an important digital habit these days. Misconfiguration can pose serious security risks, so it’s important for businesses to focus on choosing an efficient onboarding solution.
JoinNow MultiOS by SecureW2 is an easy-to-use and effective option that eliminates the hassles of setting up unmanaged devices and ensures that registration is smooth and safe. It is the best self-service training software because it works with all major operating systems and has features that can be changed to fit the needs of each organization.
Contact us today and discover a better way to manage your network authentication.