Key Points
- Password-based and OTP logins in Ping leave organizations exposed to phishing, replay, and MFA fatigue attacks.
- Client certificate authentication delivers passwordless, device-bound security, ensuring only trusted devices gain access.
- SecureW2 integrates seamlessly with Ping, using a PKI and Cloud RADIUS to automate certificate issuance, lifecycle management, and enforce policy-driven authentication.
As many organizations shift to the digital mode in the post-pandemic era, there is an exponential increase in cloud-based network solutions. Surprisingly, numerous cutting-edge wireless technologies, such as 5G, virtual reality, and artificial intelligence, are altering the data usage pattern with each passing day. This trend is expected to continue into the future, considering the superiority of cloud technologies.
With each development in security technology, more complex hacking tactics emerge. Credentials need password change procedures, are readily deciphered, and are a defunct security measure. All of these difficulties are addressed by using digital certificates for authentication instead. However, certificates must be managed by a Public Key Infrastructure (PKI), which can be tough to set up unless you have a Managed PKI service.
Click here to read how simple it was for our customers to transition from passwords to certificates. In this article, we are going to discuss the vulnerabilities of credentials and how you can mitigate them using a leading identity solution, Ping.
Problems with Password-Based Authentication
Password breaches have been one of the single biggest reasons for cyber attacks in recent times, such that they have forced us to discuss the vulnerabilities of passwords umpteen times. Still, we would like to give you a brief summary of how they can impact your organization’s security and make it vulnerable in the long run.
Credential-based authentication puts end users in charge of network security, mostly through password-change policies that specify when passwords expire. These regulations can cause an IT staff to become overburdened with support tickets, diverting time away from value-added work.
A key problem in credential-based networks may be traced back to human behavior. Many individuals use and re-use weak passwords. A man-in-the-middle (MITM) attack might easily infiltrate a credential-based network, extract a password, and then get access to all of the victim’s other accounts using the same password. MITM attacks are insidious and can result in losing important data; however, certificates can minimize that danger.
 MITM attacks generate a fraudulent access point that harvests credentials from legitimate victims. Certificates are encrypted and can only be decoded with the private key pair, so even if the victim inadvertently authenticates to a fraudulent network, the data delivered is useless to the attacker.
The perceived complexity and high expense of certificate-based infrastructure was an accurate assessment 10 years ago, but the advent of cloud computing has made that a thing of the past. Certificates and certificate lifecycle management have become more streamlined and cost-effective as a result of automated processing.
Advantages of Certificate-Based Authentications
Certificate-based (passwordless) authentication is a one-stop solution for all these issues. Digital certificates have strengthened network security by minimizing end-users’ involvement and password-based authentication. It has also reduced the burden on network admins as various native applications and networks support it.
A digital certificate is an electronic document that uses public-key pairs as proof of ownership of entities like websites, apps, etc., in a cryptography format. They require a Public Key Infrastructure (PKI) for generation and management, which is considered tedious by many admins due to the complex and potentially risky configuration involved in the process. This is where SecureW2 comes to the rescue with its user-friendly and unique Managed PKI Services.
Certificates relieve the end user of the burden and simplify authentication configuration. Certificates remove the need for any kind of reset policy. Users who receive a certificate are permitted network access until the certificate expires. Many campuses, for example, will issue new students four-year certificates because they will need network access over their four years of study.
We will now focus on a high-level overview of the process of integrating passwordless Ping auth with SecureW2 for smooth certificate-based authentication.
What is Ping Identity?
Ping Identity is an identity and access management (IAM) solution that allows organizations to control and protect access to the wireless, cloud, and on-premise apps by guaranteeing compliance with statutory restrictions and detection of abnormal activities using artificial intelligence (AI) technology.
PingId creates identity protection for their customers with an innovative identity solution that has a wide range of features, including single sign-on (SSO), multi-factor authentication (MFA), directory, and much more. It assists organizations in balancing security and user experience for their users, customers, and partner identity solutions by supporting both support and development teams.
It allows network admins to set up products and installation platforms and design unique processes for dealing with requests for enrollment and authentication by adding users through a self-service portal. It also allows them to allocate and modify resource ownership data via the PingCentral application, as well as obtain access to 0Auth and OIDC clients and accessible apps.
Setting up PingIdentity Wi-Fi Authentication
The Ping Identity Wi-Fi Authentication can be set up with the help of SAML Authentication, where the end-user can enter the credentials. The credentials will be sent to and verified by PingId. After verification, The PingId sends the attributes to the SAML App and shares them with SecureW2 PKI To issue Ping certificates.
Configuring an Identity Provider for PingID
An Identity Provider is the type of system that verifies the User/Device profiles.
The following steps to create an IDP for Ping Identity:
- Log in to the SecureW2 Management Portal.
- Navigate to Identity Management > Identity Providers.

- On the Identity Providers page, click Add Identity Provider.
- Navigate to the Basic section:
- Enter the Name and Description of the IDP in the corresponding fields.
- From the Type drop-down list, select SAML.
- From the SAML Vendor drop-down list, select Ping Identity.
- Click Save.
- On the displayed page, click the Configuration tab.
- In the Service Provider (SP) info, copy the ACS URL and Entity ID values and save them on a word or text file.

Configuring a SAML App in the PingIdentity Portal
The SAML App will allow users to enter their credentials in Pingid, which later passes to the user IDP for verification.
Steps to create a SAML App for the PingIdentity Portal.
- Log in to the PingIdentity portal with your credentials.
- On the left pane, click on the icon.
- On the displayed page, click Add a SAML app and then click the Connections icon on the left pane.

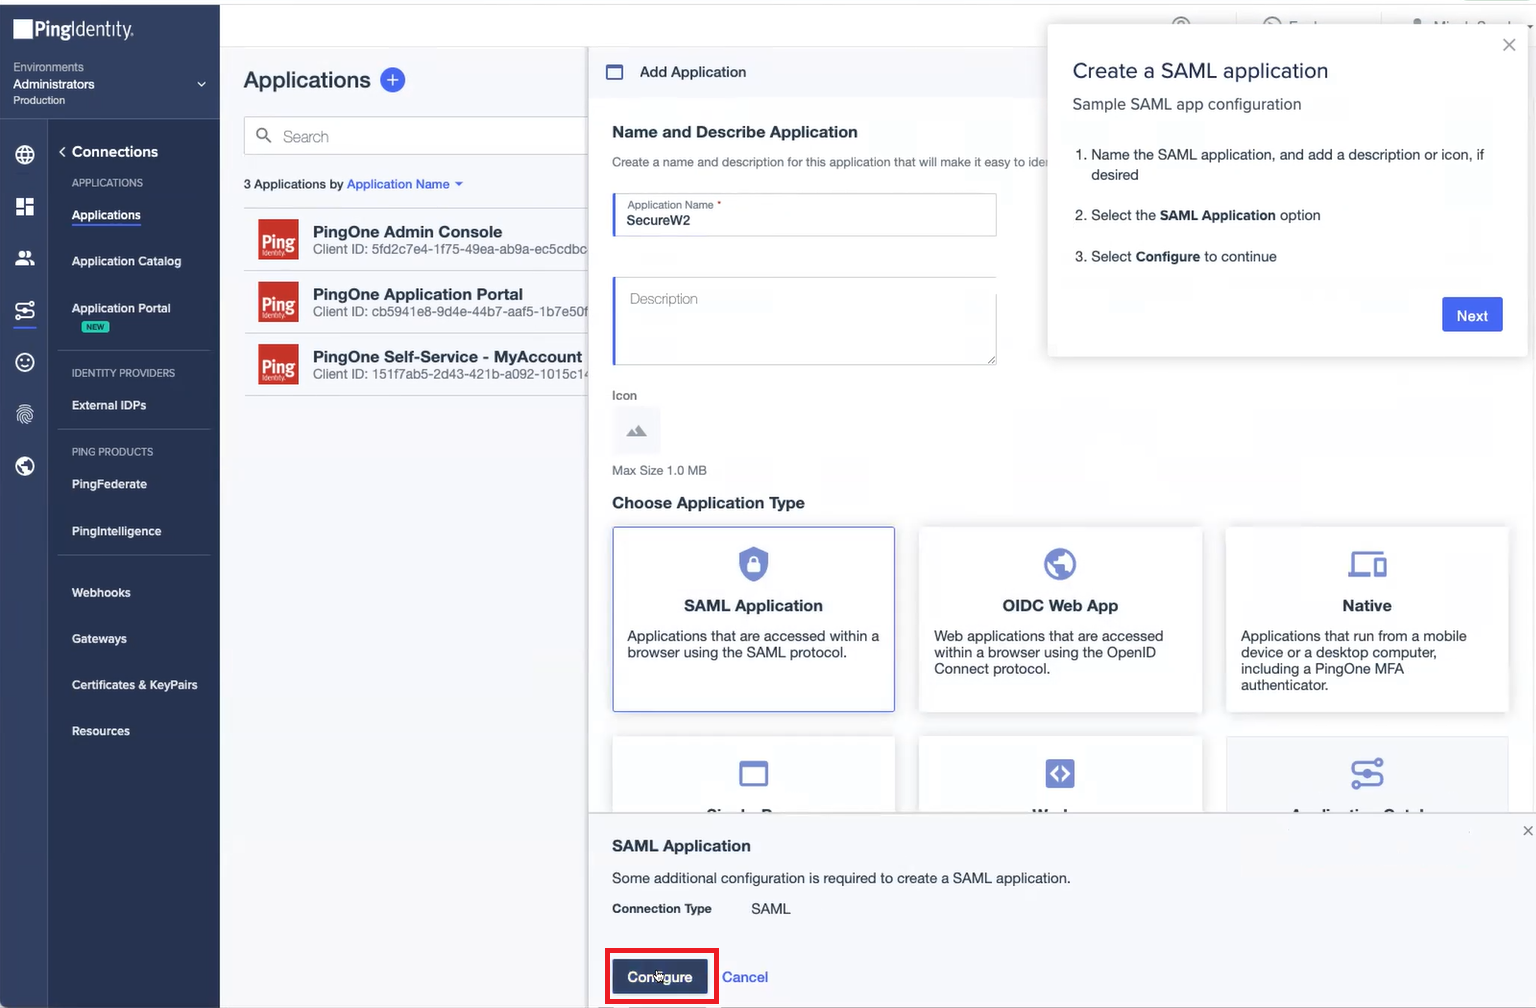
- On the Applications page, click the icon. The Add Application dialog box appears.
- Enter the Name and Description for the application in the corresponding fields.
- In the Choose Application Type section, select SAML Application.
- Click Configure.

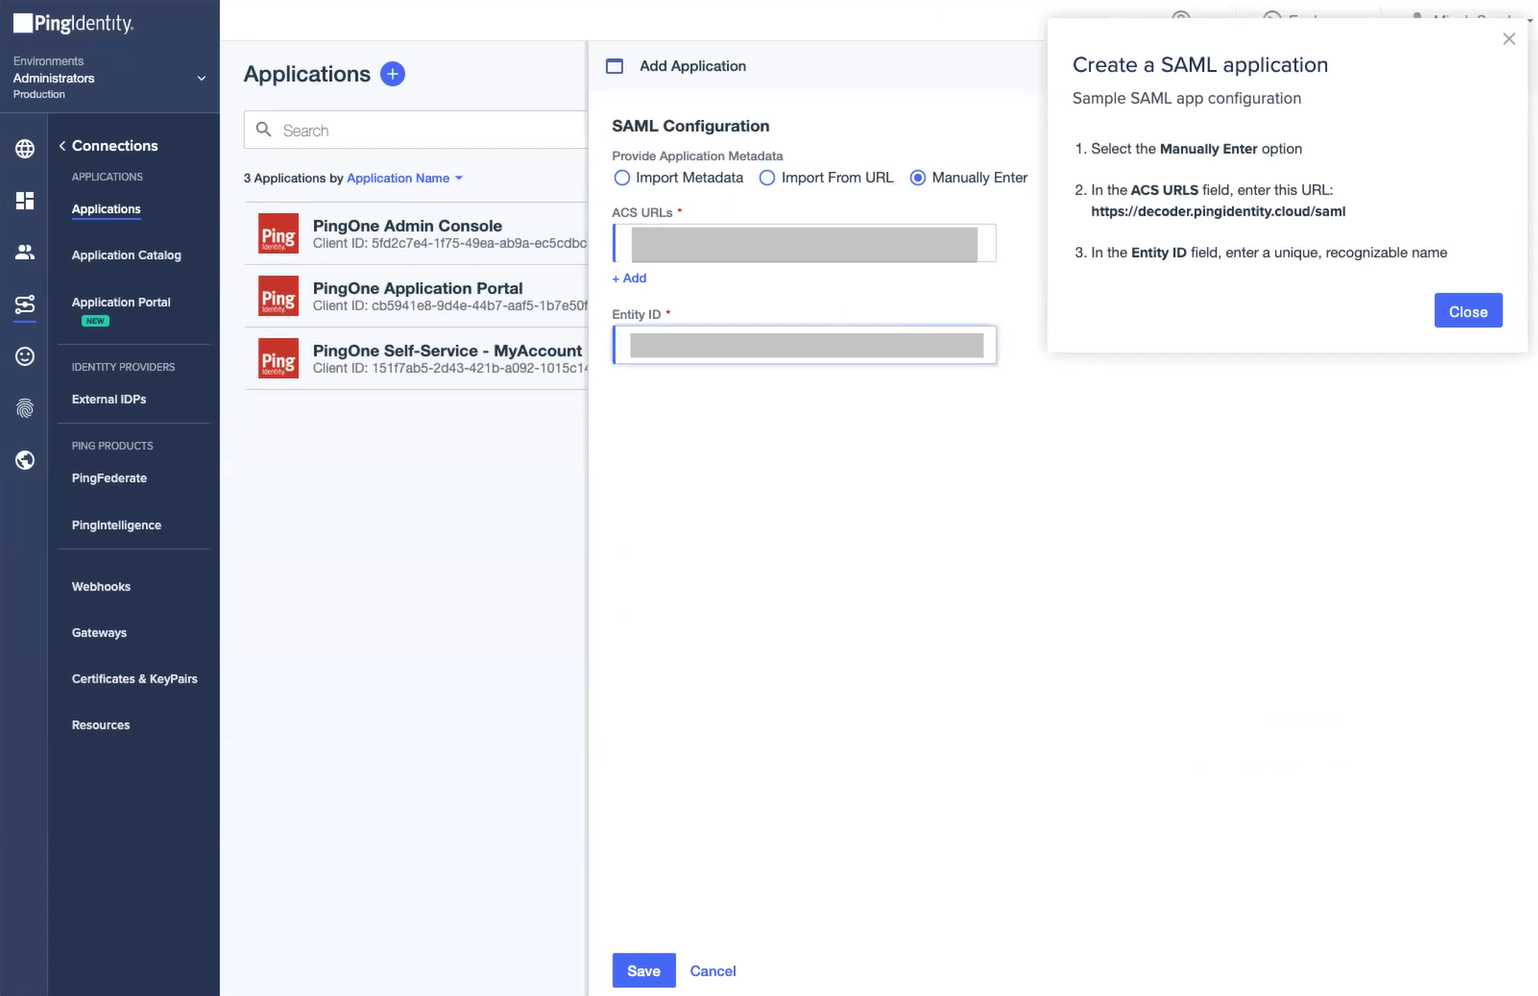
- In the SAML Configuration dialog box:
- Select the Manually Enter option.
- In the ACS URLs field, enter the ACS URL value obtained from the SecureW2 Management Portal.
- In the Entity ID field, enter the Entity ID value obtained from the SecureW2 Portal.
- Click Save.

- From the left pane, select Identities. The Users page is displayed.
- Click the +Add User button on the right side.
- In the Add User window, under the PERSONAL section, enter a suitable name in the GIVEN NAME field.
- In the COMPANY INFORMATION section:
- From the Population drop-down list, select Technical Administrators.
- In the USERNAME field, enter the username.
- Click Save.
- In the left pane, click Connections.
- On the Applications page, select the SAML app you created earlier (see the Configuring SAML App section).
- Click the Configuration tab and then click the Download Metadata button.


Uploading Metadata to SecureW2
- Log in to the SecureW2 Management Portal.
- Go to Identity Management > Identity Providers.
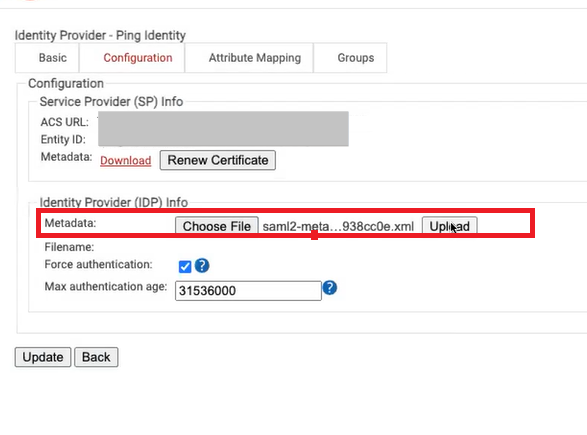
- On the Identity Providers page, select the IDP created for PingID (see the Configuring an Identity Provider for PingIDe section) and click the Edit link.
- Click the Configuration tab and in the Identity Provider (IDP) Info section:
- For the Metadata field, click Choose File and select the Metadata file downloaded from the PingID portal.
- Click Upload.
- Click Update.

Configuring Attribute Mapping In the PingId
Steps to configure the Attribute Mapping PingId portal.
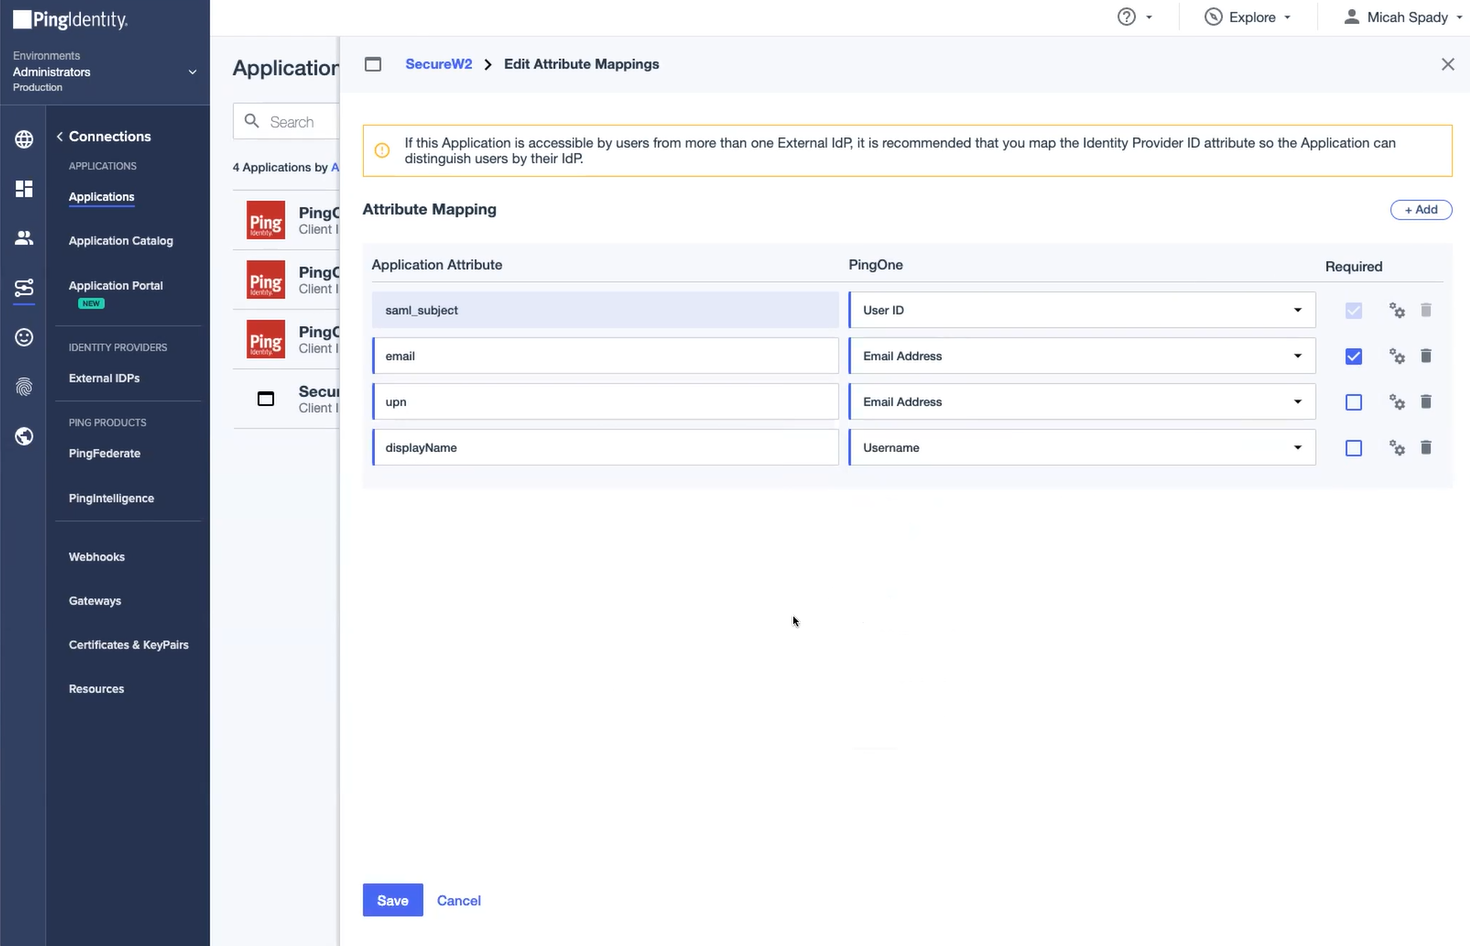
- In the PingIdentity portal, click the SAML app created earlier.
- The Overview window is displayed. Go to Attribute Mapping, and click the Attributes button to edit the attribute mappings.
- In the Edit Attribute Mappings window, click the + Add button to add the required application attributes under the Attributes column and select relevant PingOne Mappings from the drop-down list.
- For Email Attributes, under the Applications column, enter email and select Email Address from the drop-down list.
- For User Principal Name (UPN), enter upn and select Email Address from the drop-down list.
- For displayName, enter a display name and select Username from the drop-down list
- Click Save.

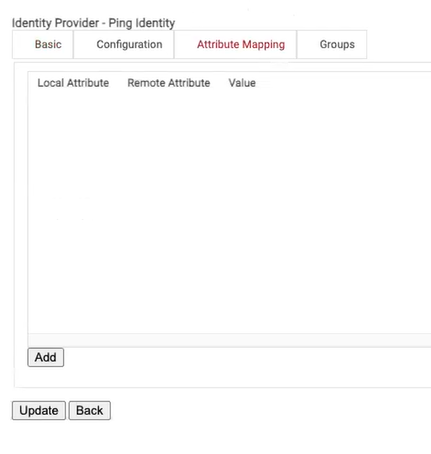
Configuring the Attributes in the SecureW2 Management Portal
- In the SecureW2 Management Portal, go to Identity Management > Identity Providers and click the Edit link of the PingID IDP you created.

- On the displayed screen, click the Attribute Mapping tab.
- On the displayed screen, click the Add button.
- In the Local Attribute field, type email to identify the attribute locally. From the Remote Attribute drop-down list, select User Defined. In the adjacent text box, type email, and then click Next.

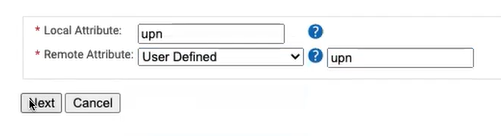
- In the Local Attribute field, type upn to identify the attribute locally. From the Remote Attribute drop-down list, select User Defined. In the adjacent text box, type upn, and then click Next.

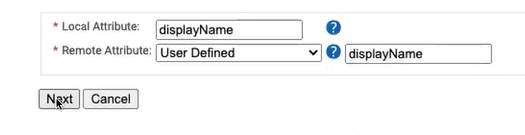
- In the Local Attribute field, type displayName to identify the attribute locally. From the Remote Attribute drop-down list, select User Defined. In the adjacent text box, type DisplayName, and then click Next.

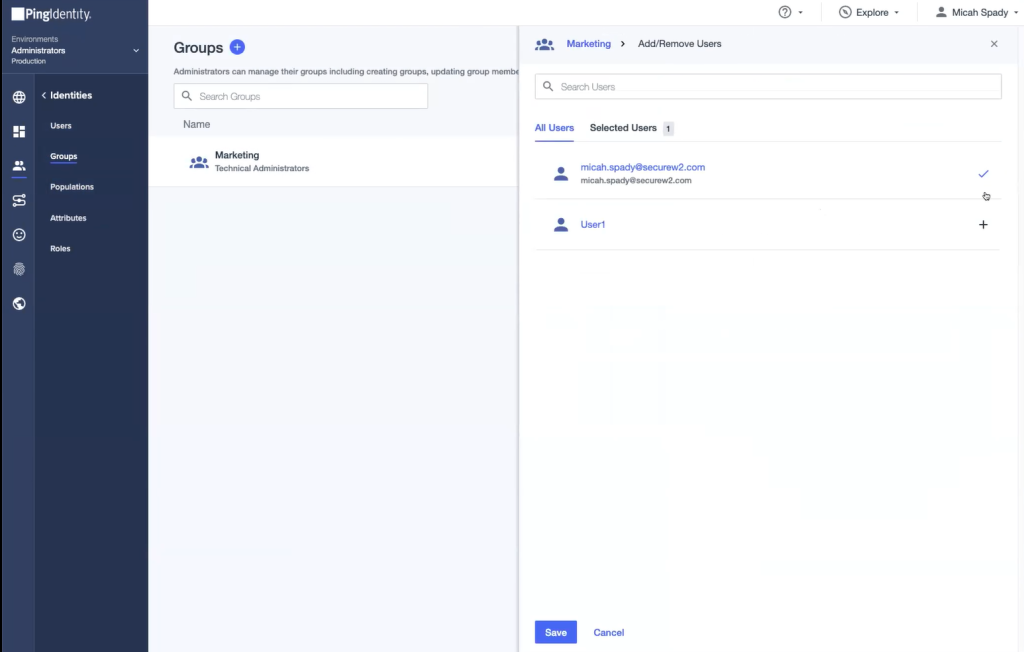
Creating a Group in the Ping Identity Portal
- Navigate to the PingIdentity portal. In the left pane, click Identities > Groups.
- Click the icon on the Groups page to add a new group.
- In the Group Name field, enter the name of the group.
- From the Population drop-down list, select Technical Administrators.
- Click Save. The group is successfully created.
- On the displayed window, click the Users tab and then click the + Add Users Individually button.
- The list of users is displayed. Select the users by clicking the + icon.
- Click Save.

Configuring Policies in SecureW2
Now that we’ve set up the connection between SecureW2 and PingIdentity, we need to configure a few policies so we can enroll our users for certificates.
Creating an Authentication Policy
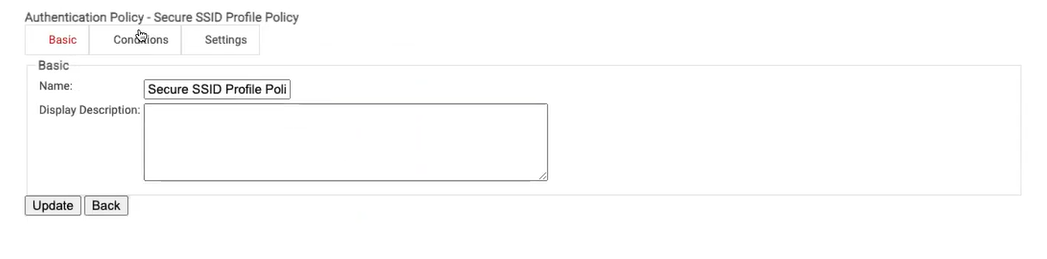
- In the Management Portal, go to Policy Management > Authentication and click Add Authentication Policy.
- In the Basic section, enter the Name and Display a Description of the policy in the corresponding fields.
- Click Save.

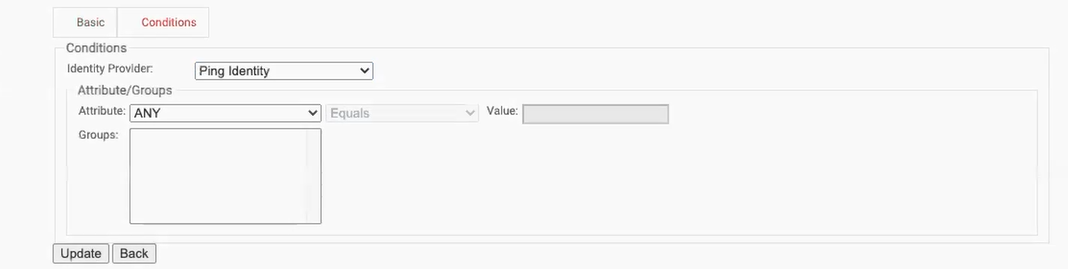
- Click the Conditions tab. From the Profile, drop-down list, select the profile.
- Click Update.
- Click the Settings tab. From the Identity Provider drop-down list, select the Ping IDP created earlier.
- Click Update.


Creating a Role Policy
- Navigate to Policy Management > Roles and click Add Role.

- On the displayed page, In the Basic section, enter the Name and Description of the Role policy in the corresponding fields.
- Click Save.
- On the displayed page, click the Conditions tab.

- From the Identity Provider drop-down list, select the Ping IDP created earlier.
- Click Update.

Creating an Enrollment Policy
- Go to Policy Management > Enrollment.
- Click Add Enrollment Policy.
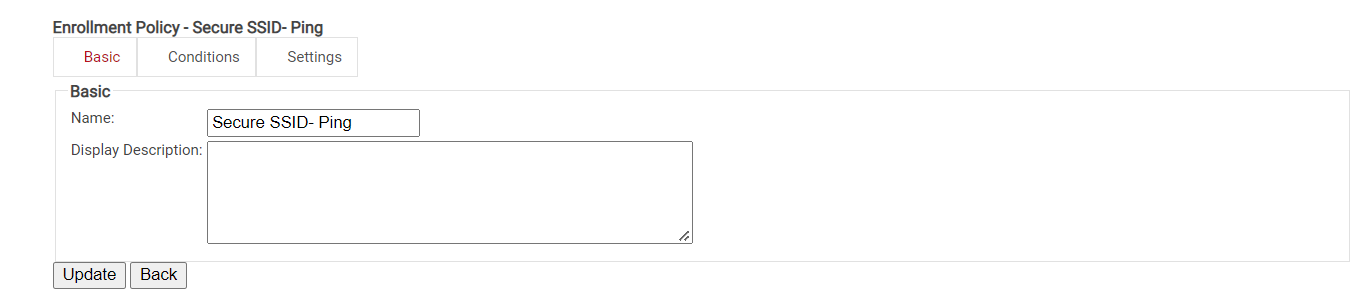
- On the displayed page, enter the Name and Description of the policy in the corresponding fields.
- Click Save.

- On the displayed page, click the Conditions
- From the Role list, select the role created earlier.

- From the Device Role list, select DEFAULT DEVICE ROLE POLICY.
- Click Update.

After creating the Role and Enrollment policies, we have to republish the Secure SSID profile in the Network Profiles page.
Testing Certificate Enrollment
- Go to Device Onboarding > Network Profiles.
- In the Network Profiles table, select created and click Republish.


NOTE: After you modify a profile, republish the profile anytime for the changes to be effective.
- Navigate to the Republish Network Profile window in the Name field.
- Enter a name and click OK.
- After republishing the profile, click View.
The Landing Page is displayed.
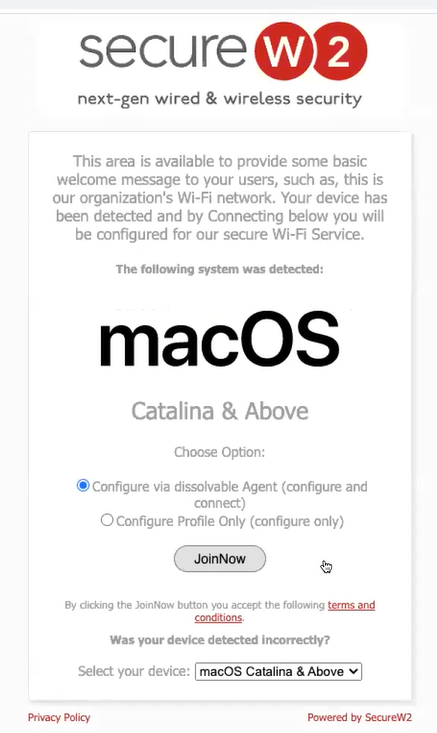
- Click the JoinNow button. A dissolvable client will run depending on the operating system of the device.
Once the client runs, users will be redirected to the PingIdentity SAML app and prompted for their credentials.

After the credentials are verified, the SecureW2 client will proceed to enroll the device for a certificate.
Passwordless Ping Authentication with SecureW2
As we have seen, SecureW2 can smoothly integrate with PingId to provide secure Wi-Fi access. Furthermore, our turnkey Managed PKI, with 802.1x onboarding, provides a superior user experience and allows you to smoothly configure secure certificate-based authentication with your existing directory.
Secure W2 also has a fantastic support team that’s ready to assist you with any help you may need. We work with all cloud-based SAML providers to eliminate any headaches traditionally associated with integration. With SecureW2, your organization can deploy a top-of-a-line, RADIUS-backed network that is fully functional in a matter of hours.
If you’d like to see exactly how your network would look with SecureW2, we’d be happy to demonstrate. Set up a free demo with our team to see firsthand how easygoing passwordless can be.