Key Points
- Despite macOS's reputation for security, Mac users are still vulnerable to cyberattacks, data breaches, and unreliable performance due poorly configured Wi-Fi network settings.
- Users and IT administrators can enhance network security by adhering to best practices, such as using WPA3 Personal encryption, configuring consistent Wi-Fi network names (SSIDs), and enabling automatic updates for all network devices.
- SecureW2 simplifies and automates the management of these security settings, especially in enterprise environments.
In a world driven by digital connection, safeguarding the security of our Wi-Fi networks is critical, especially for Mac users. Despite its strong standing, the macOS environment is not immune to cyberattacks. There’s always a risk of identity theft or data breaches using insecure Wi-Fi networks. The attack surface has increased due to the widespread usage of smart devices and IoT (Internet of Things) technology. Thus, users must strengthen their defenses.
This post explores the top Wi-Fi security configurations made especially for macOS devices. By arming users with the knowledge they need to secure their Wi-Fi network, we aim to reduce the probability of cyberattacks and prevent sensitive information from getting into the wrong hands.
Password Protect Your Wi-Fi Routers on Mac
Identifying the model of your router should be your first step. Examine it in person and take note of its name. Access the router’s settings. You should first navigate to your Wi-Fi router’s Settings page. The majority of routers at the consumer level have a standard IP address. Put it in your browser, then –
Enter 192.168.1.1 into your browser’s address bar. You might try 192.168.0.1 as an alternate IP address.
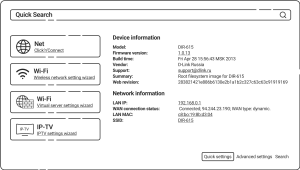
You’ll now be asked to enter your router’s username and password. If you can’t recall the model of your router and its default password, you may Google it. The default credentials are likely to be admin and 12345789. A router settings page looks like this, for example.

Assign the Same SSID for Each Band
Different wireless technologies communicate across different frequency bands. The most often utilized frequency bands are 2.4GHz, 5GHz, and 6GHz.
Rather than giving each band a separate Wi-Fi network name, Apple suggests giving each one the same name or SSID (Service Set Identifier). The manufacturer warns that disregarding this norm may cause devices to become unreliable in connecting to all available bands, thus hindering and slowing down wireless performance.
Make sure your name is exclusive to your network. Avoid default or widely used names like Linksys, Netgear, Dlink, Wireless, or 2wire. If not, when a device connects to your Wi-Fi network, it is more likely to come across other networks with the same name and attempt to connect to them automatically.
Set Security to WPA3 Personal in Wi-Fi Settings
The Wi-Fi Alliance started certifying products for WPA3 use in 2018, so it’s time to upgrade if you still use the older WPA2 standard. WPA3 Personal, the latest wireless encryption standard, provides a more secure Wi-Fi connection but may not be compatible with some older devices that can only support the WPA2 protocol.
To strengthen your wireless network’s security, ensure your laptops, tablets, and smartphones are compatible with Wi-Fi 6, commonly known as 802.11ax. Then, turn on the update on your Wi-Fi router and access points.
If you must stick with WPA2 to maintain compatibility with outdated devices you cannot replace or upgrade, see if your Wi-Fi router supports WPA2/WPA3 Transitional. Also known as WPA3 Transitional or WPA3 Transition Mode, these mixed radio mode settings help you connect older devices while allowing newer ones to take advantage of the more secure, more advanced technology.
Weak Security System Settings to Avoid on Your Router
Avoid setting up or connecting to wireless networks that use outdated security methods. They make your device display a security alert, lower network performance, and reliability, and are no longer secure:
- WPA/WPA2 mixed modes
- WPA Personal
- WEP, including WEP Open, WEP Shared, WEP Transitional Security Network, or Dynamic WEP (WEP with 802.1X)
- TKIP, including any security setting with TKIP in the name
It’s also highly discouraged to use Wi-Fi settings like None, Open, or Unsecured, which disable security. If you turn off security, anyone can connect to your wireless network, use your internet connection, access shared resources (such as printers, computers, and smart devices), monitor websites you visit, and access other data transmitted over your network or internet connection. Authentication and encryption are also disabled. Even if security is temporarily disabled or only applied to guest networks, there is still a risk.
Do Not Enable Hidden Wi Fi Network
A Wi-Fi router or access point network name (SSID) can still be easily found even if configured to hide it. This means the SSID does not deter unauthorized access or successfully avoid discovery. In actuality, hackers tend to find a hidden network more interesting since they could suggest that there is valuable content on that network.
To help secure Wi-Fi access, Apple advises disabling Hidden Network settings and switching to WPA3 Personal. Connecting to hidden networks may also result in privacy warnings.
Disable Mac Filtering
Apple forbids devices from connecting unless it accepts specified media access control addresses unique to each device.
For several reasons, such as the ease with which malicious users might spoof MAC addresses, authorizing only known MAC addresses does not shield users from detection, surveillance, or attack of network data. Once more, Apple advises utilizing the best security settings—WPA3 Personal- if possible.
Enable Automatic Updates
Previously, IT consultants desired control over downloading and installing new security updates and performance patches on different computers and network components. Those times are gone.
The best recommendation is to apply firmware and software upgrades as soon as they become available. Apple advises people to do just that: Set up their access points and Wi-Fi routers so that upgrades are processed automatically. This best practice guarantees that Wi-Fi equipment runs on the newest software, which promotes more dependable and secure wireless networking.
Set the Channel to Auto
Like traffic lanes on the street, each band of your router is separated into many independent communication channels. When configured for automatic channel selection, your router chooses the optimal Wi-Fi channel.
If your router does not support the automated channel selection feature, choose the best channel for your network. That channel changes based on the Wi-Fi interference in your network environment, which may come from devices and routers using the same channel. If you have more than one router, set each one up to utilize a distinct channel, especially if they are nearby.
Don’t Forget the Channel Width
Channel width defines the size of the “pipe” available for data flow. Although wider channels are quicker, they are also more prone to interference and could cause problems for other devices.
- The 2.4GHz band’s 20MHz helps prevent problems with performance and reliability, particularly when used in close proximity to other Wi-Fi networks and 2.4GHz devices, such as Bluetooth ones.
- For the 5GHz and 6GHz bands, auto or all channel widths guarantee optimal performance and device compatibility. In these bands, wireless interference is less of an issue.
Set DHCP to Enabled
Let your Wi-Fi router handle network addressing duties unless there’s a server on your local area network that does that function. Network addressing is when devices request and subsequently get important network addresses, Domain Name Services, and default gateway information.
Avoid manually configuring IP addresses or allowing many devices to act as network addressing authority for Dynamic Host Control Protocol. Attempts like this will not work out well since you will probably run into problems and find it difficult to utilize your device correctly on other available networks. There should only be one DHCP server on your network, and your Wi-Fi router should typically handle this role.
Set DHCP Lease Time
For networks in homes or offices, set it to 8 hours; for hotspots or guest networks, set it to 1 hour.
The period of time allotted to a device during which its IP address is reserved for it is known as the DHCP lease time.
Wi-Fi routers can only assign a certain number of IP addresses to devices in a network. If that number is exhausted, the router cannot assign IP addresses to new devices, which prevents such devices from interacting with other devices on the network and the Internet. The router can recover and redistribute unused IP addresses more rapidly by shortening the DHCP lease period.
Enable Location Services For Wi Fi Connections
Apple advises turning on Location Services for Wi-Fi networking since the capability helps devices connect consistently, even in diverse areas where conventional Wi-Fi channels and signal levels change. Location Services also helps features that rely on Wi-Fi for some portion of their functioning, such as AirPlay, function properly.
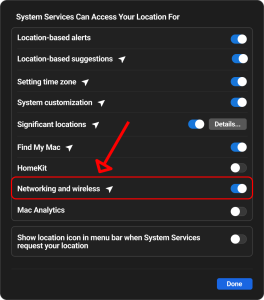
Although the procedure varies depending on the device on macOS Ventura, you can verify the Wi Fi settings by going to System Settings, selecting Privacy & Security, Location Services, and then System Services Details. Make sure the Networking and Wireless radio button is turned on, as illustrated below.
 Set NAT to Enabled
If your router is the sole device on the network offering NAT, set it to Enabled.
Translating addresses on the internet to addresses on your network is called network address translation, or NAT. To comprehend NAT, picture a company’s postal department, where deliveries sent to workers at the business’ street address are forwarded to employee offices inside the structure.
Generally speaking, merely turn on NAT on your router. Devices may experience “double NAT,” which occurs when NAT is activated on several devices—for example, your cable modem and router—which might prevent them from accessing specific network or internet services.
Set Wi Fi Multimedia to Enabled
Multimedia over Wi-Fi helps prioritize network communications. By prioritizing voice and video calls on a wireless network, for instance, the technology contributes to preserving voice and video quality. The function should be enabled on any Wi-Fi router that supports Wi-Fi 4 and later; according to Apple, doing so will improve network reliability and performance.
Safeguarding Your MacOS WiFi with SecureW2
Keeping your macOS devices secure with robust Wi-Fi settings is becoming more than just a suggestion—it’s a need. As cyber threats evolve, it is critical to prioritize the safety of your sensitive data and devices. Encryption, turning off weak features like WPS, and regularly updating firmware may greatly decrease cyber attacks.
Nevertheless, maintaining WiFi settings for security may be challenging, especially in business settings. Here’s where the onboarding solution from SecureW2 comes into play. The auto-revocation policy for users of Jamf and Intune, as well as native interaction with popular MDMs like JAMF and Mosyle, make Wi-Fi security management for macOS devices easier with SecureW2. Make the Most of JoinNow MultiOS, our self-service onboarding solution, to guarantee smooth configuration and strong defense against any attacks.
Contact us now to find out more and rapidly strengthen your Wi-Fi security.
