Key Points
- 802.1X authentication uses supplicants, authenticators, and a RADIUS server to validate devices and users, improving network security through strict authentication, authorization, and access controls.
- To configure 802.1X on Ubiquiti UniFi devices, set up a RADIUS server, create profiles, and secure wireless networks with WPA2-Enterprise.
- JoinNow Cloud RADIUS from SecureW2 provides passwordless authentication for modern cloud-based networks, improving resilience and efficiency.
- Follow our guide for step-by-step UniFi and SecureW2 configuration instructions.
The Ubiquiti UniFi platform provides UniFied and easily controlled network infrastructure, such as routers, switches, and Ubiquiti access points, as well as UniFi RADIUS servers. UniFi products are commonly used and come with many benefits, including integrations with common third-party solutions for network security.
Using 802.1X authentication with UniFi and a Cloud RADIUS server makes the network even safer by ensuring that only authorized devices and people can connect.
How Does Ubiquiti UniFi 802.1X Authentication With RADIUS Work?
802.1X is an IEEE standard and a key part of network security. It verifies the identity of people or devices before they gain access, protecting your network from people who aren’t supposed to be there
In a Ubiquiti UniFi setup, 802.1X works together with a RADIUS (Remote Authentication Dial-In User Service) server. Users can choose between the built-in UniFi RADIUS server or an external one.
Here are the steps to connect:
- A client device (the supplicant) attempts to connect to a UniFi Wi-Fi network or switch port.
- The UniFi access point or switch (the authenticator) blocks full network access and forwards the client’s credentials to the RADIUS server.
- The RADIUS server verifies the client’s identity (using username/password, digital certificates, or other methods) and tells the UniFi device whether to allow access.
- If authentication is successful, the user’s device gains network access, often with dynamic virtual LAN (VLAN) assignment or other RADIUS policies applied.
This approach greatly improves security by preventing unauthorized access, making it ideal for environments with sensitive data.
Built-In UniFi RADIUS Server vs. External RADIUS: Which Should I Choose?
UniFi gateways feature a built-in RADIUS server — but is it the right choice for all use cases?
With limited integrations, password-based authentication, and decentralized accounting, the default UniFi RADIUS server is fine for small deployments. However, enterprise or high-security environments require robust integration, secure certificate-based authentication, and simple, reliable accounting, which the default server won’t provide.
To authenticate properly and at scale, and to fit seamlessly into existing infrastructure, most organizations will prefer a cloud RADIUS provider that:
- Integrates with cloud identity providers (IdPs) such as Microsoft Entra ID, Okta, and Google Workspace
- Supports Extensible Authentication Protocol-Transport Layer Security (EAP-TLS) for scalable certificate-based authentication
- Simplifies access controls for easy network segmentation and security
- Automates accounting for reliable authentication logs
JoinNow Cloud RADIUS offers all these features and more.
Benefits of Implementing 802.1X With a RADIUS Server for UniFi
There are many perks for UniFi network managers using 802.1X with a RADIUS server, including:
- Ensuring that only verified and authorized devices can access the network, reducing the risk of security threats and unauthorized access
- Giving administrators greater control over network access by assigning different permissions and roles to specific devices or user groups
- Simplifying network management and helping support regulatory compliance requirements
- Providing a flexible and scalable security solution that can adapt to evolving network technologies and emerging security threats
How to Set up a RADIUS Server for Ubiquiti UniFi
RADIUS adds an extra layer of identity verification to Ubiquiti UniFi, making networks safer by centralizing the authentication of people or devices trying to connect.
Here’s how to set up a RADIUS server for Ubiquiti UniFi.
Phase 1: Install and Configure RADIUS Server Software
Install and set up the RADIUS server software before using the Ubiquiti UniFi RADIUS login. Ubiquiti UniFi works with multiple kinds of RADIUS servers, such as the UniFi RADIUS server, on-prem, or third-party cloud RADIUS options.
While Microsoft Network Policy Server (NPS) is one of the most commonly used, its downsides include configuration challenges, scalability issues, and installation complexity.
Before selecting a RADIUS server for UniFi, administrators should consider other RADIUS servers that better meet network needs and avoid NPS constraints.
Phase 2: Establish Communication Between Ubiquiti UniFi and a RADIUS Server
Once the RADIUS server is configured, the next critical step is to ensure that Ubiquiti UniFi devices and the cloud RADIUS service communicate effectively. To do this, follow these instructions:
- Make sure to set up RADIUS clients using the UniFi Network dashboard (sometimes called the UniFi Controller, though that’s not the official name).
- Ensure UniFi devices are correctly connected to the network and that the cloud RADIUS server is operational and accessible.
- Check that other requirements for authentication, such as EAP-TLS, are supported and set up correctly on both ends.
- Configure advanced features and settings as needed, including dynamic VLANs for network segmentation or MAC-based authentication for wired and IoT devices that don’t support credential inputs or 802.1X.
The complexity of this process can vary depending on your choice of RADIUS server. With SecureW2 Cloud RADIUS, the entire process is simplified and user-friendly.
Now, we’ll provide step-by-step instructions to configure 802.1X for your UniFi RADIUS Server using Cloud RADIUS.
Phase 3: Configure 802.1X on a Ubiquiti UniFi Access Point With Cloud RADIUS
Configuring 802.1X on Ubiquiti UniFi access points (APs) enables certificate-based authentication to prevent unauthorized access. Let’s look at how to configure SecureW2 Cloud RADIUS with 802.1X on the Ubiquiti UniFi access point.
Step 1: Configure UniFi AP for Certificate-Based RADIUS Authentication
You can enable EAP-TLS authentication on your existing Ubiquiti infrastructure by creating a new RADIUS profile using the SecureW2 Cloud RADIUS service.
- Go to Settings > Profiles in your UniFi access point.
- Click Create New RADIUS Profile.
- For Profile Name, enter the relevant profile name.
- For VLAN Support, check the box for Enable RADIUS assigned VLAN for wireless network.
- Open a new browser tab/window, and log into your SecureW2 Management Portal.
- Go to RADIUS Management > RADIUS Configuration.
- Copy the information for Primary IP Address, Port, and Shared Secret (to your clipboard or somewhere handy), and paste respectively into the Create New Radius Profile form for IP Address, Port, and Password/Shared Secret.

- Click Save.

Step 2: Set up an Open SSID on UniFi
With Cloud RADIUS, we will set up an open onboarding SSID that redirects users to a bring-your-own-device (BYOD) self-enrollment portal. It helps to issue certificates automatically to the connected devices.
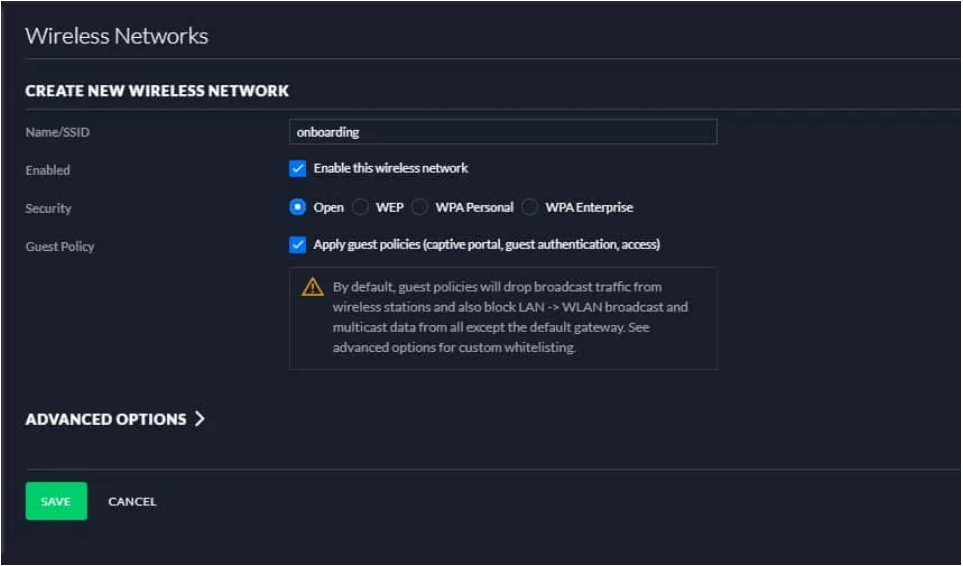
- Navigate to Settings > Wireless Networks > Create New Wireless Network.
- Enter the name of the SSID in the NAME/SSID section.
- Under Enabled, check the box to Enable this wireless network.
- Under Security, select the radio button for Open.
- Under Guest Policy, select the box Apply guest policies (captive portal, guest authentication, access).
- Click Save.
If Ubiquiti does not support the URL’s sub-domains, we recommend you set up a local webserver with a rewritten URL that redirects users to the SecureW2 landing page.
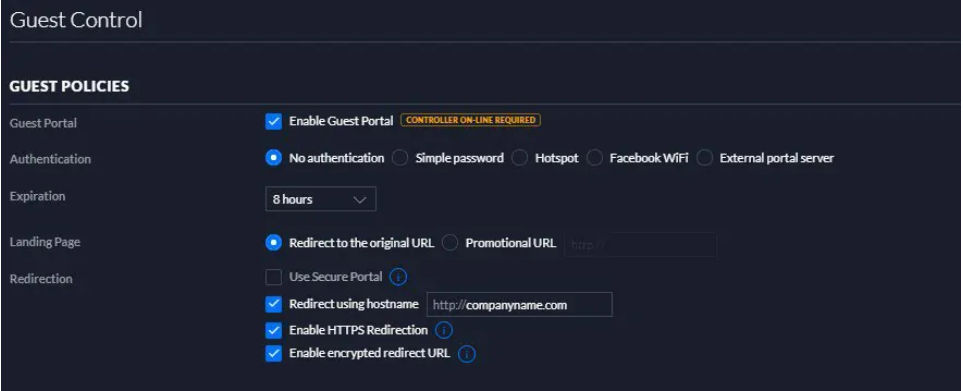
Step 3: Add the Webserver URL to “Redirect using hostname”
- Navigate to Settings > Guest Control > Guest Policies.
- Check the box to Enable Guest Portal.
- Under Authentication, choose No authentication.
- Check the box Redirect using hostname.
- Click Save.
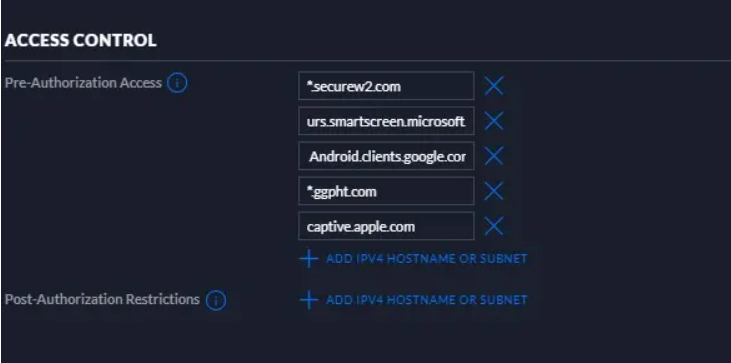
Step 4: Add the ACLs to Restrict Network Access
Next, the user needs to limit this SSID so it can be used only for self-service certificate enrollment and device network access configuration.
- Navigate to Settings > Guest Control > Guest Policies.
- Check the Box Enable Guest Portal.
- Under Access Control → Pre-Authorization, add the ACLs (hostname or IPV4).
- Click on Apply.
For more information about SSID, contact our expert support engineers.
Step 5: Create a Secure SSID
You must create a new wireless network connection in the UniFi network console and set the security to WPA2-Enterprise. After setting up the new RADIUS profile in the network, you can enjoy the benefits of better security and enhanced user experience.
- From your UniFi Network console, go to Settings > Wireless Networks.
- Click Create New Wireless Network (or edit an existing network).
- For Name/SSID, enter the name of the SSID.
- For Enabled, check the box for Enable this wireless network.
- For Security, select the radio button for WPA-Enterprise.
- For RADIUS Profile, click the dropdown and select the RADIUS profile you created.
- Click Save.
Optional: How to Configure MAC-Based Authentication for Your UniFi RADIUS Server With SecureW2
MAC authentication allows RADIUS clients that don’t support certificate-based authentication (such as some IoT devices) to authenticate user devices using their MAC addresses instead. It’s also known as MAC Address Bypass or MAC Authorization Bypass (MAB). However, MAC addresses are easily spoofed during MAC spoofing attacks, so use 802.1X whenever possible.
You can create and configure your identity provider for MAC authentication in two ways: through UniFi settings or through the JoinNow MultiOS Management Portal.
Option 1: Configure in UniFi Note
Here’s how to set up MAC-based authentication within UniFi:
- Log in to the UniFi Portal.
- On the left pane, select Profiles.
- Click Create New RADIUS Profile.
- In the New RADIUS Profile page, for the Name field, enter the name of your RADIUS profile.
- Under the RADIUS Assigned VLAN Support section, select the Enable checkbox for Wireless Networks.
- In the RADIUS Settings section, for Authentication Servers, enter the IP Address, Port, and Shared Secret.
- In a separate window, log in to the JoinNow Management Portal and navigate to RADIUS > RADIUS Configuration. Copy the details from the fields IP Address, Authentication Port, Accounting Port, and Shared Secret. Now, back in UniFi, paste each of those details into the appropriate fields.
NOTE: Be sure the details of the RADIUS profile match the Organization in which the MAC-based authentication IDP was created (see Creating a Core Provider in SecureW2).
- After entering the RADIUS details, click Add.
- Click Apply Changes.
Option 2: Configure in JoinNow Management Portal
- Log in to the JoinNow MultiOS Management Portal.
- Go to Identity Management > Identity Providers.
- Click Add Identity Provider.
- In the Field name, enter the name of your identity provider.
- In the Description field, enter a description of your identity provider.
- From the Type drop-down list, select MAC Authentication.
- Click Save; the page will refresh.
- Select the Conditions tab.
- Click Add Device.
- In the MAC Address field, type the MAC address of the device you need to authenticate.
- Click Save and Update.
Troubleshooting UniFi RADIUS Server Authentication
Here’s what to do if you encounter these common UniFi RADIUS server configuration issues:
Shared Secret Mismatch
If your shared secret doesn’t match in both the UniFi Network and RADIUS server platform, the server will deny authentication requests. In your UniFi Network, go to Settings > Profiles > RADIUS and confirm the Shared Secret value matches the one on your RADIUS server.
UDP Port 1812/1813 Blocked by Firewall
RADIUS uses UDP port 1812 for authentication and UDP port 1813 for accounting. Check firewalls for any blocked traffic on these ports.
Certificate Trust Chain Discrepancies
To avoid rejected certificates on EAP-TLS deployments, use your mobile device management (MDM) system or group policy to deploy your certificate authority (CA) certificate to endpoints. This ensures that client devices trust your CA, preventing server certificate rejection.
Unknown Rejections
Not sure why access was denied?
- In the UniFi Network, go to System Logs and filter for “Authentication failed” entries.
- On your RADIUS server platform, analyze “Access-Reject” messages.
Rejection packets contain details that help you identify and fix the root cause, whether it’s a credential mismatch, unknown user, or certificate validation error.
Modernizing Ubiquiti UniFi: Elevating Security With SecureW2 Cloud RADIUS
Ubiquiti hardware comes with its own UniFi RADIUS server. That option provides authentication, authorization, and accounting (AAA) benefits, but may fall short in some situations. Solutions like Cloud RADIUS from SecureW2 offer full integration capabilities and strong protection against cyberattacks that lead to credential theft. Cloud RADIUS delivers modern network security and integrates seamlessly with Ubiquiti UniFi to enable stronger, certificate-based authentication.
Unlike traditional RADIUS setups, Cloud RADIUS reduces risks from legacy methods by replacing passwords with digital certificates. Certificates verify both user and device context in real time, aligning with Zero Trust Network Security and continuous-trust principles. This passwordless framework eliminates reliance on LDAP/AD servers and supports direct integration with Azure AD (Microsoft Entra ID), Okta, and Google Workspace, integrating with existing policies for secure authentication.
Cloud RADIUS delivers more secure, efficient, and user-friendly network access, addressing the challenges of modern security without the overhead of on-premises infrastructure.
Ready to eliminate passwords and modernize your Ubiquiti UniFi RADIUS server and other aspects of network security? Request a demo today to see how passwordless solutions from SecureW2 can transform your network authentication.
Frequently Asked Questions
What is RADIUS?
Remote Authentication Dial-In User Service (RADIUS) is a client-server network security protocol that authenticates and authorizes users and devices before granting network access. RADIUS also includes accounting: tracking and logging network activities.
A RADIUS server, also called an authentication, authorization, and accounting (AAA) server, is any physical or virtual server configured to perform RADIUS functions.
Are RADIUS servers still used?
Yes, RADIUS servers are still a common and smart choice for network access security today. That's because they offer all-in-one authentication, authorization, and accounting services with advanced protocols, enterprise-grade extensibility, and endless customization. Choose between on-premises or cloud-based RADIUS servers to suit your needs.
Is RADIUS the same as LDAP?
No. RADIUS and LDAP (Lightweight Directory Access Protocol) serve different purposes in authentication and access management.
RADIUS is designed for AAA functions and supports both credential-based and certificate-based authentication. It also offers stronger security features like mutual authentication and encrypted credential exchanges.
LDAP is primarily a directory access protocol used for managing and validating user credentials. While it supports authentication and authorization, it does not provide accounting features and is typically used in on-premises directory environments.
In general, RADIUS is considered the more robust option for secure network authentication, especially in environments requiring advanced security and centralized access control.
What is 802.1X?
802.1X is an authentication method to verify the identity of individual devices and users before granting access to a network. Network administrators can choose from a variety of authentication protocols for secure data transmission; EAP-TLS is the most secure certificate-based protocol.
What are the key components of 802.1X authentication?
Three main components make 802.1X authentication work: supplicants (clients or devices), authenticators (access points), and servers (gateways like RADIUS).
RADIUS facilitates a safe and centralized authentication method by linking the authenticator and the supplicant. It manages the verification process to improve network security, serving as the guardian of user credentials.
Organizations may track user access, enforce regulations, and keep a centralized database of user data by utilizing RADIUS with 802.1X. Supplicants, authenticators, and servers work together to make a strong authentication system that takes network security to a whole new level.
Does UniFi have a RADIUS server?
Yes, UniFi comes with a built-in RADIUS server supporting 802.1X authentication. However, users can configure a third-party RADIUS server to leverage enhanced security options, such as certificate-based authentication with EAP-TLS.