Key Points
- A RADIUS server acts as a network guard by providing a centralized framework for authenticating and authorizing a user's access to the network.
- A Windows RADIUS Server, commonly known as NPS (Network Policy Server), is configured by adding the Roles through the server manager and configuring it as a RADIUS server.
- Since NPS is an on-premise server, it is compatible only with Active Directory and does not work with Cloud IDPs like Azure, Okta, etc.
- This can be easily overcome by using our Cloud RADIUS, which is compatible with Entra ID and all other major cloud Identity Providers.
The term “RADIUS server” will probably be mentioned at some point in any conversation regarding wired or wireless authentication. Within a WPA-2 Enterprise network, RADIUS (also referred to as a “AAA server”), performs the crucial tasks of Authentication, Accounting, and Authorization. As you might anticipate, Microsoft has made improvements to its RADIUS server over time to satisfy the demands of its vast customer base for authentication.
Since the release of the Windows 2003 server, Microsoft has proactively updated its RADIUS servers. In our past blogs, we went into great detail on configuring Windows 2008/12/16 servers. In this blog post, we’ll help you set up Windows 2019, the ninth edition of the venerable Windows RADIUS server.
Before configuring the Windows Server 2019, ensure that you meet the following requirements for successfully configuring the Windows 2019 server.
Prerequisites for Windows RADIUS Server 2019:
System Requirements:
- Processor: You need a processor of at least 1.4 GHz clock frequency for x64 processors.
- RAM: The minimum requirement of RAM is 512 MB. However, Microsoft recommends using 2GHz for smooth functioning and servers with a Desktop Experience installation option.
- Disk space: You need a minimum disk space of 32 GB or more, but Microsoft usually recommends using 40 GB or more disk space. Also, the disk space requirements vary with the processor and RAM used in the system.
Active Directory Setup:
You must update the Active Directory environment before adding the domain controller.
Server Core Installation:
Unlike Windows Server 2008, the admin does not need to select the Full Installation or Server Core Installation option beforehand in Windows Server 2012/16/19.
These features are merged in the 2012/16/19 version to give three optional features that the admin can install or uninstall at will.
Network adapter requirements:
- An Ethernet adapter with a minimum throughput of 1 Gigabit per second.
- An Ethernet adapter that conforms to the PCI Express architectural standard.
Miscellaneous Requirements:
- System and firmware that is based on UEFI 2.3.1c and support secure boot.
- A graphics card and a display with at least Super VGA (1024 x 768) resolution.
- Turn off your antivirus software, as the installation process can be hampered by virus protection software. For instance, checking each file copied locally to your computer might significantly slow the installation.
- Ensure that the Windows Firewall is enabled by default.
- Ensure that all the relevant data and information are appropriately backed up before the configuration.
Overview of Windows RADIUS Server 2019 Configuration
- Install and set up Windows Server 2019.
- Install Active Directory Domain Services (ADDS) to configure the new domain.
- Install Certificate Authorities (CA) with Active Directory Certificate Services (ADCS).
- Install NPS ( Network Policy Server).
- Configure Certificate Authorities (CA), i.e., Active Directory Certificate Services (ADCS) for Certificates.
- Configure NPS ( Network Policy Server) for the authentication protocol.
- Configure RADIUS.
- Define Network policies for users/devices.
- Configure Access Point.
- Set up zero clients, and select 802.1x authentication.
- Configure Wireless Connection Request.
Configure Windows 2019 RADIUS Server
Now we will see each step involved in configuring Windows 2019 server in detail.
Install and Configure AD DS
For configuring ADDS, follow the given instructions:
- Navigate to Windows Server 2019.
- Click Start.
- Click Server Manager.
- Navigate to Role Summary.
- Click Add Roles and Features.
- Select Role-based or Feature-based installation.
- Navigate to the Before You Begin page and click Next.
- Navigate to the Select Server Roles page.
- Select the Active Directory Domain Services.
- Click Next.
- Click Install on the Confirm Installation Selections.
- Navigate to the Installation Results page and click Close.
ADDS is installed.
Install AD CS and NPS
For configuring ADDS, follow the given instructions:
- Navigate to Server Manager.
- Select Roles and Click Add Roles.
- Click Next on the Before you Begin page.
- Select Active Directory Certificate Services (AD CS) and Network Policy and Access Services.
- Click Next.
- Click Next on Network Policy and Access Services
- Navigate to Role Services and select Network Policy Server.
- Click Next.
- Select Create a self-signed certificate for SSL encryption and click Next.
- Click Next on the Introduction to Active Directory Certificate Services
- Select Certification Authority on the Select Role Services page and click Next.
- Select Enterprise on Specify Setup Page and Click Next.
- Select Root CA on Specify CA Type Page and Click Next.
- Select Create a new private key on the Set Up Private Key Page and Click Next.
- Click Next on Configure Cryptography for CA.
- Enter details on Configure CA Name page and click Next.
- Enter the validity period on the Set Validity Period page and click Next.
- Click Next on Configure Certificate Database page.
- Click Next on the Web Server (IIS) page.
- Click Next on the Select Role Services page.
- Click Install on the Confirm Installation Selection page.
- Click Close.
Now the AD CS (Active Directory Certificate Services), Web Server (IIS), and NPS are installed successfully.
Configure Windows NPS as a RADIUS Server for 802.1X
- Click on the Start button and select Administrative tools.
- Click NPS on the Network Policy Server.
- Select Register Server in Active Directory and click OK.
- Click OK.
- On the NPS (Local) page, select RADIUS server for 802.1x Wireless or Wired Connections.
- Click Configure 802.1x.
- Select Secure Wireless connections on the Configure 802.1x page.
- Type Name and click Next.
- Add RADIUS clients on the Configure 802.1x page and click Next.
- Type the following details on the New RADIUS Client page.
- Name
- IP Address
- Shared Secret (Manual)
- Click OK and click Next.
- Select Microsoft Protected EAP (PEAP) on the Configure 802.1x
- Click Configure.
- Select Secured password on the Edit Protected EAP Properties page and click Edit.
- Enter the Number of authentication retries and click OK and click Next.
- Select Groups and click Next.
- Click Next again and click Finish.
- Restart NPS again.
Define Network Policies for users/devices
You can follow the given steps for Defining the network policies.
- Navigate to the NPS console and click NPS (local).
- Click and expand Policies.
- Select Network Policies.
- Click New.
- Enter a Policy Name.
- Select the Type of Network Access Server to Unspecified while using Netscaler or RCdevs OpenLDAP while using OTP.
- Click Add in Specify Conditions
- Select Windows Groups and click Add.
- Click Add Groups and click OK.
- Select NAS Identifier in the Select Conditions
- Enter a Name and select Next to continue.
- Select Access Granted in Specify Access Permission
- Under Configure Authentication Method, select MS-CHAP v2 for maximum security.
- Click Next.
- Select RADIUS attributes as Standard in Configure Settings.
- Click Add.
- Enter the attribute value in String and click OK.
- Click Next and click Finish.
You can use the Network Policy Wizard to create and add new conditions, constraints, and setting to the network policies.
 Administrators can define and implement a wide range of policies using our Cloud RADIUS, including lookup policies applied at the moment of authentication. For instance, depending on the time of day, you can decide whether to accept or reject people and devices. You may also restrict access to devices running a specific operating system.
Set up Zero Clients, and Select 802.1x Authentication
- Navigate to the Control panel and open the Network and Sharing center.
- Click Change adapter settings.
- Select Local Area Connection and click Properties.
- Select Authentication and click Enable IEEE 802.1x authentication.
- Select the desired protocol in the dropdown button.


Configure Wireless Connection Request
- Navigate to the Control panel and open the Network and Sharing center.
- Click Manage Wireless Networks.
- Select Manually Create a network profile.
- Enter your SSID in Network Name and click Next.
- Click Change Connection settings.
- Select Security and click Settings.
- Select the Trusted Root CA and click OK.
- Navigate to Advanced Settings.
- Select Specify Authentication Mode and click OK.
What On-Premise NPS with Cloud-Facing Architecture Looks Like
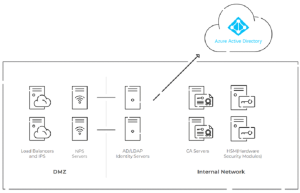
In the diagram above, you can see one possibility for the overall layout of your authentication infrastructure if you’re using on-premise NPS with cloud-based Azure AD and digital certificates for passwordless authentication.
The self-managed RADIUS architecture shown above requires hosting infrastructure in local data centers or cloud providers, using a DMZ for security, PKI/CAs, and HSMs for passwordless authentication — all of which may become difficult and expensive.
The setup for this type of infrastructure is costly and complex, and using a managed cloud-based RADIUS solution like Cloud RADIUS makes the transition to the cloud simpler.
Why Windows NPS Is Not Compatible with Cloud Identity Providers
NPS’s primary drawback is that it is designed to be an on-premise RADIUS solution for Active Directory environments. Cloud integration of NPS also has other significant downsides, even with other Microsoft-owned cloud-based solutions like Azure AD (Microsoft Entra ID). If you want to use Azure with NPS, you will require a separate authentication server or proxy to achieve cloud authentication. These operations are not only challenging to configure and maintain but time-consuming and relatively expensive.
Furthermore, traditional RADIUS servers installed on-site are prone to several security issues and vulnerabilities. Windows RADIUS servers have a number of vulnerabilities of their own that hackers frequently exploit in zero-day attacks. In addition, they require a lot of time and expertise to set up and maintain.
Due to its physical accessibility, the NPS server’s on-premise presence makes it vulnerable to various physical security threats, from intruders to disasters – or just power outages. Given the costs of maintaining highly-secure physical locations, there’s rarely a circumstance in which on-prem works out to be cheaper than cloud RADIUS.
Cloud RADIUS: The Modern Alternative to Windows NPS
For years, network administrators have relied on Windows Server for network authentication, but due to modern-day technological advancements, it is difficult to ignore its shortcomings.
There are several advantages to moving to the cloud over staying in an on-premises system, and no product exemplifies those benefits more than our revolutionary Cloud RADIUS. You can avoid the shortcoming of on-premise authentication by utilizing a cloud-based NAC like SecureW2’s Cloud RADIUS.

With our Cloud RADIUS, you may restrict or enable access to users depending on various factors, including user/device characteristics, time of day, and more. Additionally, you may use our Cloud RADIUS with any IDP because it is built for vendor neutrality. An industry-unique feature is the ability to enforce policies using real-time user lookups against Azure, Okta, and Google Workspace.
Integrating with Securew2 gives you more customization options through our many innovative features like Azure MFA auth, Intune auto revocation, Windows Hello for Business login, and many more. Besides not needing lengthy setups, Cloud RADIUS is resistant to on-site risks like outages and burglars. It doesn’t need to be installed at each location of your company because it is hosted in the cloud and has built-in redundancy.
If you are interested in taking that first step towards security for your organization, look no further and click here to inquire about pricing.
Frequently Asked Questions
What is the difference between NPS and RADIUS on Windows Server 2019?
NPS (Network Policy Server) is Microsoft's built-in implementation of the RADIUS protocol on Windows Server. RADIUS is the open-standard protocol for centralized AAA (Authentication, Authorization, and Accounting). On Windows Server 2019, NPS is the RADIUS server, you install the NPS role to get RADIUS functionality. The terms are often used interchangeably in Windows environments.
Can Windows Server 2019 NPS work with Azure Active Directory (Entra ID)?
Not natively. NPS is designed for on-premises Active Directory. To use Azure AD (Entra ID) with NPS, you must deploy the Azure MFA NPS Extension as a proxy, which adds complexity, latency, and additional maintenance overhead. For fully cloud-native RADIUS authentication with Entra ID, a Cloud RADIUS solution is a far simpler approach.
What is the shared secret in RADIUS/NPS configuration?
The shared secret is a password configured on both the NPS server and each RADIUS client (access point, VPN gateway, switch). It's used to authenticate the communication between NPS and network devices, not end users. Use a strong, randomly generated shared secret of at least 22 characters, and store it in a password manager.
What is a good alternative to Windows NPS for cloud environments?
For organizations using Azure Entra ID, Okta, or Google Workspace, a Cloud RADIUS solution eliminates the need for on-premises NPS entirely. SecureW2's Cloud RADIUS supports real-time user lookups against cloud IDPs, EAP-TLS certificate authentication, and has no on-site infrastructure requirements.
How do I configure RADIUS clients in Windows NPS?
In the NPS console, go to RADIUS Clients and Servers → RADIUS Clients → New. Enter a friendly name, the IP address of the network device (access point, VPN server, or switch), and the shared secret. Every device that forwards authentication requests to NPS must be added as a RADIUS client.