3.1 Creating an Intermediate CA for Google SCEP Integration
As a best practice, SecureW2 recommends having a new intermediate CA for SCEP-based enrollments. To create a new intermediate CA:
- Log in to the JoinNow MultiOS Management Portal.
- Navigate to Dynamic PKI > Certificate Authorities.
- Click Add Certificate Authority.
- In the Basic section, from the Generate CA For drop-down list, select the Device and User Authentication option to authenticate devices and users.
- From the Type drop-down list, select Intermediate CA.
- From the Certificate Authority drop-down list, select the default Root CA that comes with your organization.
- In the Common Name field, enter a common name for the CA certificate. SecureW2 recommends a name that is easily identifiable for your organization. E.g. “Google SCEP Intermediate CA”.
- From the Key Size drop-down list, select a key pair size from below options:
a. 2048
b. 4096 - From the Signature Algorithm drop-down list, select the signature algorithm for the certificate signing request. The option available is SHA-256.
- In the Validity Period (in years) field, enter the validity period of the CA certificate.
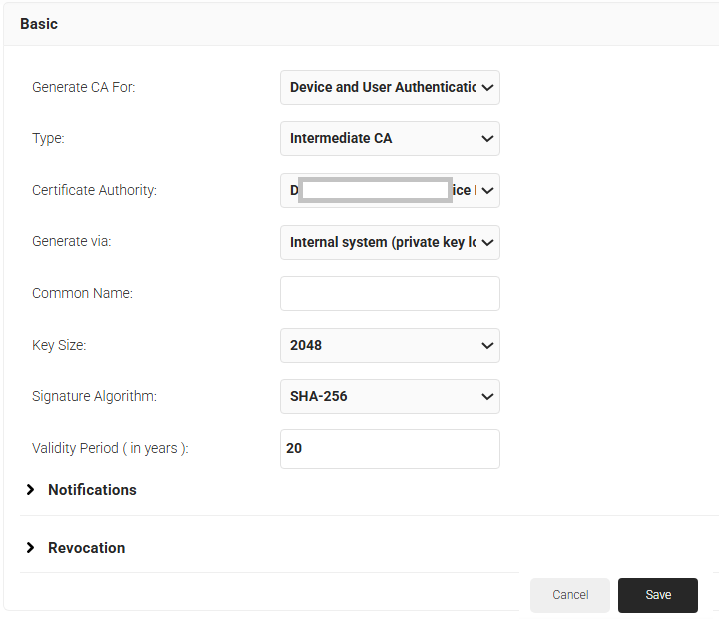
- Click Save. The new intermediate CA is generated.
3.2 Creating a Certificate Template for Google
Certificate Template helps in configuring the appropriate fields in the client certificates and also, mentions from where should the values of those fields to be sourced from. To create a Certificate Template:
- Navigate to Dynamic PKI > Certificate Authorities.
- Click Add Certificate Template.
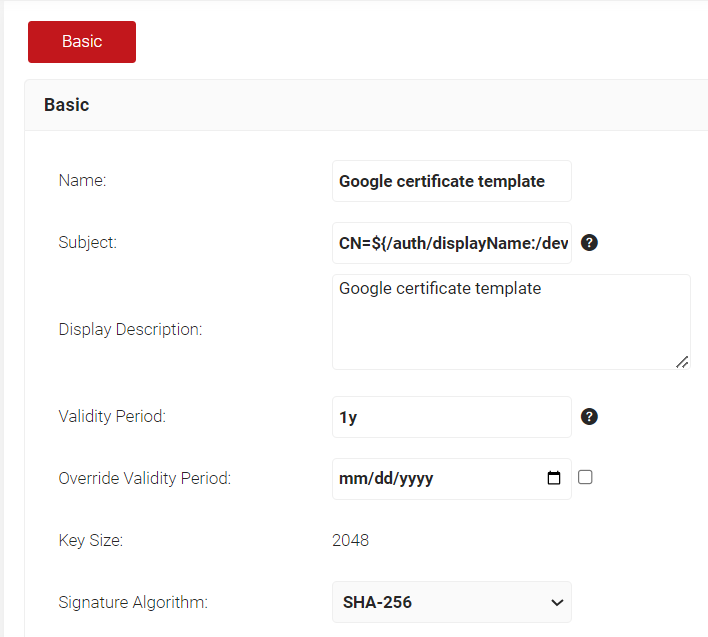
- In the Basic section, for the Name field, enter an appropriate name of the certificate template for easy identification.
- In the Subject field, enter
CN=${/auth/displayName:/device/identity:/csr/subject/commonname} - In the Display Description field, enter a suitable description for the certificate template.
- In the Validity Period field, type the validity period of the certificate (based on the organization’s requirement).
- From the Signature Algorithm drop-down list, select the signature algorithm for the certificate signing request. The option available is SHA-256.
- In the SAN section:
a. In the Other Name field, enter
${/auth/upn:/device/identity:/csr/san/othername}
b. In the RFC822 field, enter ${/auth/email:/device/identity:/csr/san/rfc822name}
c. In the DNS field, enter
${/device/computerIdentity:/device/buildModel:/csr/san/dnsname}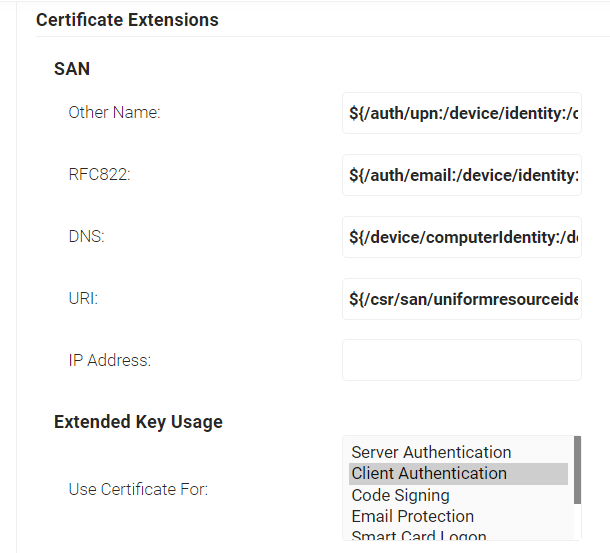
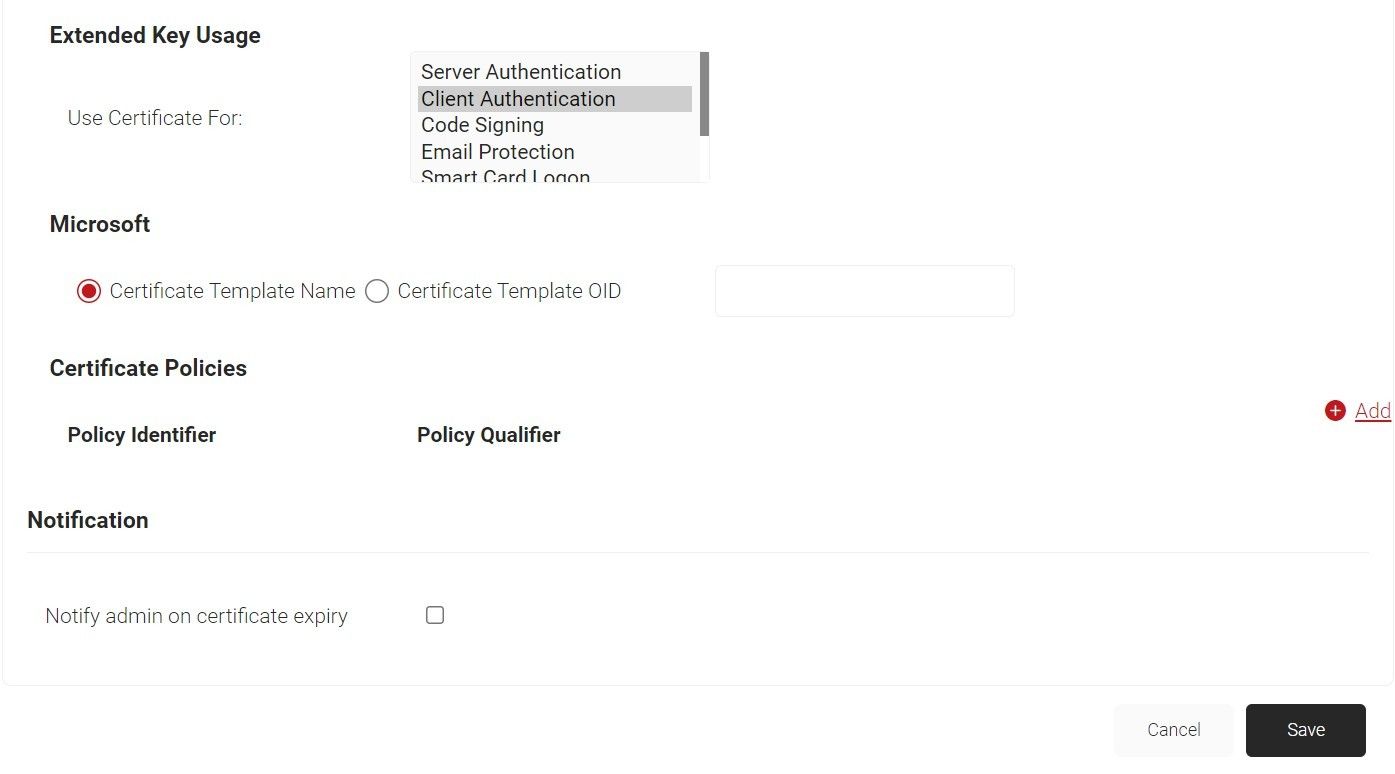
- In the Extended Key Usage section, from the Use Certificate For list, select Client Authentication.
- Click Save.
4.1 Uploading Intermediate CA in Google Console
- Log in to the JoinNow MultiOS Management Portal.
- Go to PKI > Certificate Authorities.
- In the Certificate Authorities section, click the Download link for the Intermediate CA created earlier (see the Creating an Intermediate CA for Google SCEP Gateway Integration section). This certificate needs to be imported into Google Trusted.
- Login to Google Admin Console and navigate to Devices > Networks > Certificates section
- Click ADD CERTIFICATE.
- In the Name field, enter a name for the Certificate Authority.
- Click Upload. Choose the Intermediate CA certificate downloaded earlier in step 3.

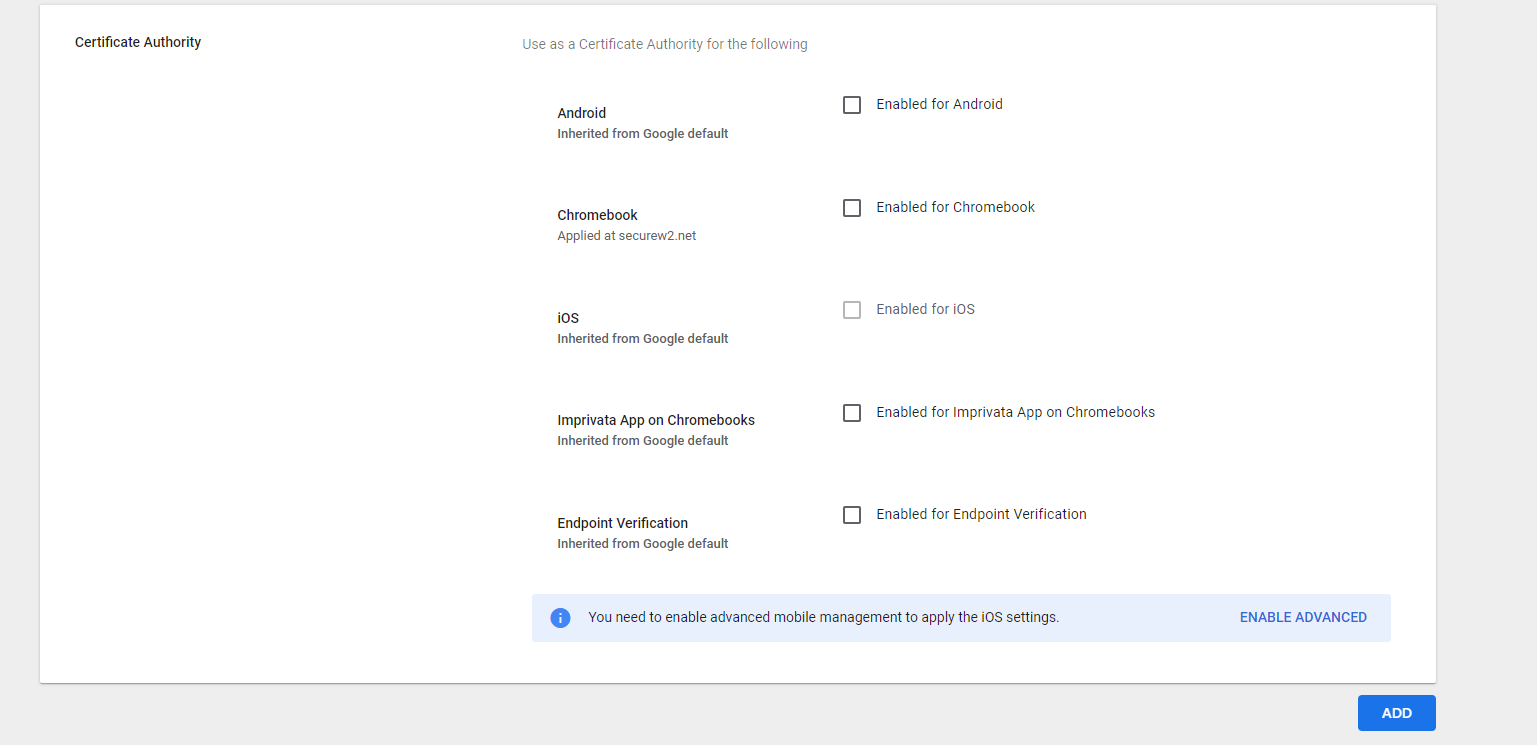
- Select the Enabled for Chromebook option.
- Click ADD.
4.2 Uploading RADIUS Server CA in Google Console
Uploading the Root CA of the RADIUS Server Certificate in Google requires downloading the “Digicert Global Root G3” certificate from the Digicert Root certificate webpage.
Post downloading the above-mentioned certificate, this Root CA must be uploaded to the Google Admin Console to form a chain of trust. To upload the Root CA certificate:
- Login to Google Admin Console and navigate to Devices > Networks > Certificates section
- Click ADD CERTIFICATE.
- In the Name field, enter a name for the certificate authority.
- Click Upload.
- Choose the Root CA downloaded earlier in this section and upload.
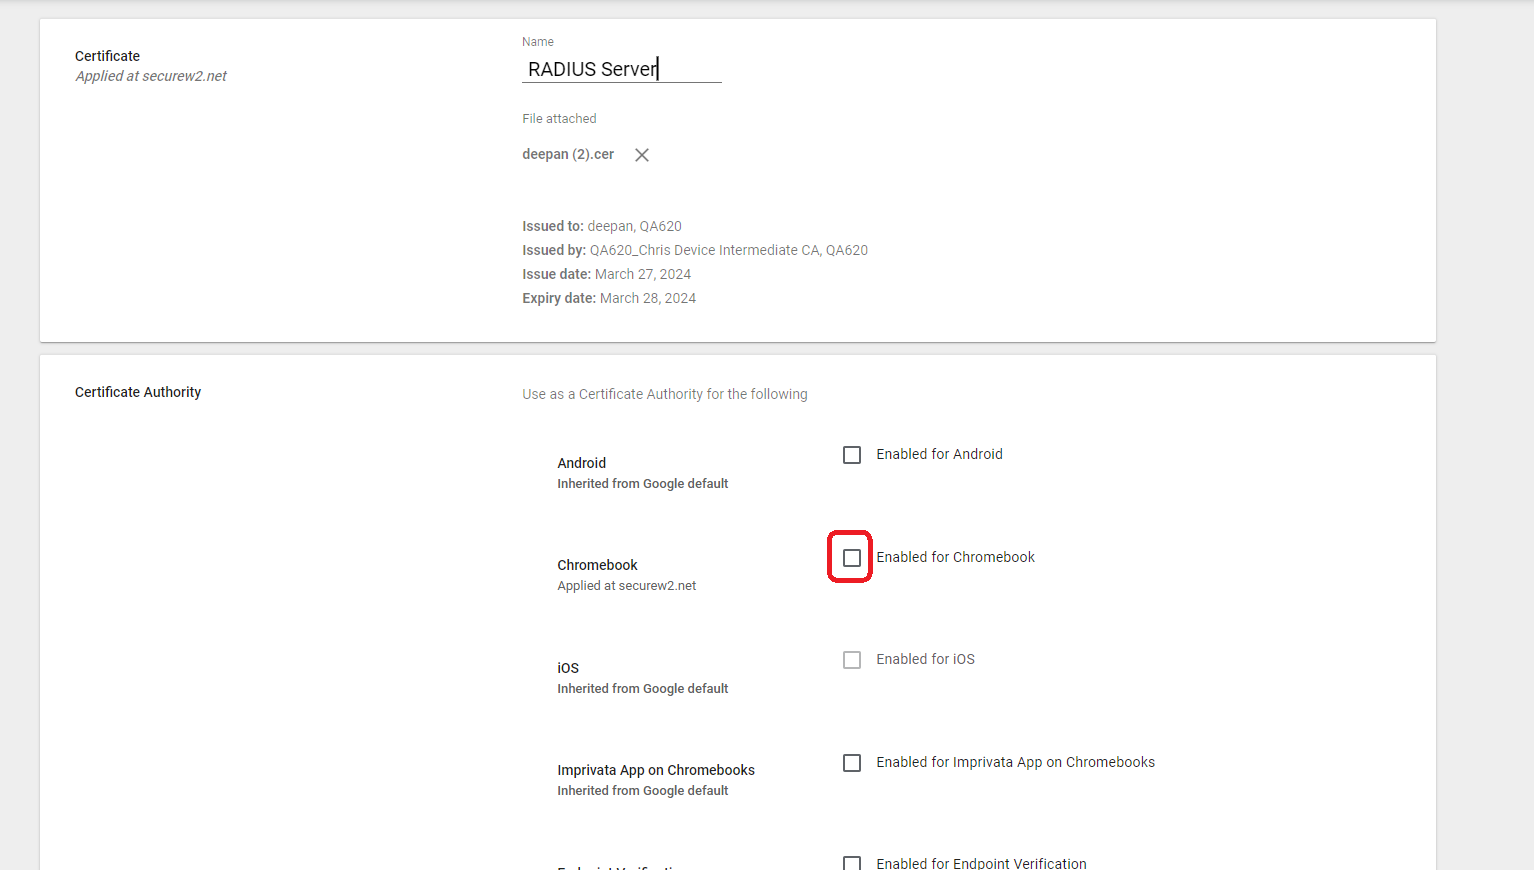
- Select the Enabled for Chromebook option.
- Click ADD.
4.3 Configuring SCEP for Certificate Enrollment
To configure the SCEP profile for certificate enrollment, create the SCEP URL in the JoinNow Management Portal and configure it in the Google Admin Console. The Google Admin Console will then generate JSON and key files, which must be uploaded to the JoinNow Management Portal. These files contain the necessary information to authenticate SecureW2’s API requests to Google for handling the Certificate Signing Requests (CSRs).
To generate the SCEP enrollment URL from the JoinNow Management portal:
- Log in to the JoinNow Management Portal.
- Navigate to Integrations Hub > Device Management Platforms.
- Click Add.
- In the Basic section, in the Name field, enter a name for the Google SCEP IDP.
- From the Type drop-down, select Google SCEP.
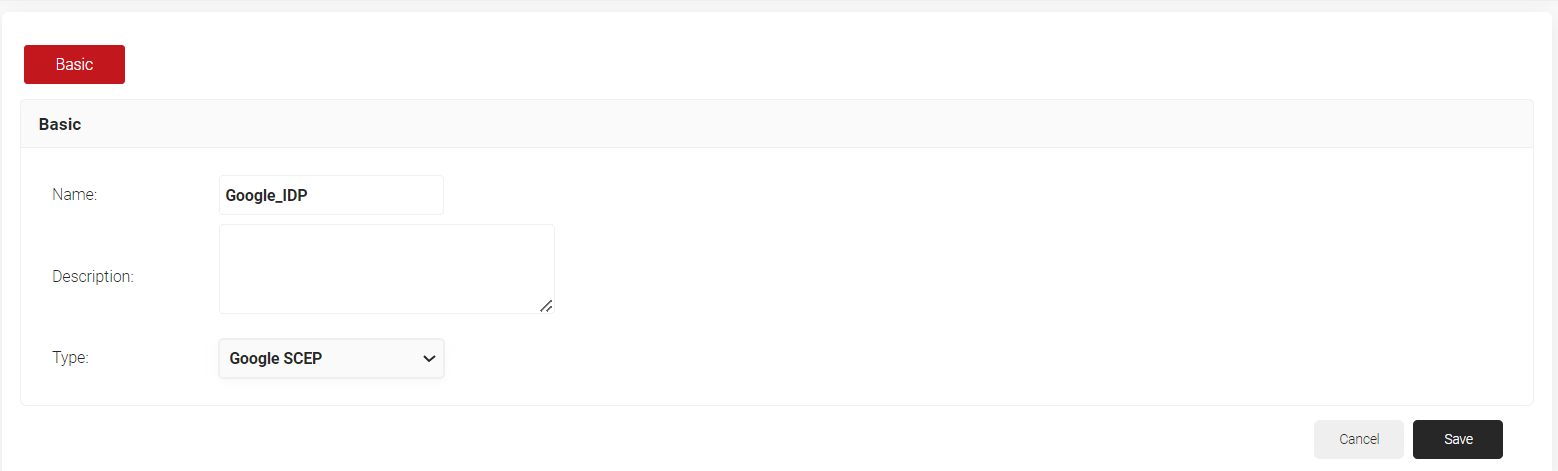
- Click Save. The page refreshes with a Configuration tab. Click on the Configuration tab. Click on the copy button for the displayed Enrollment URL for SCEP.
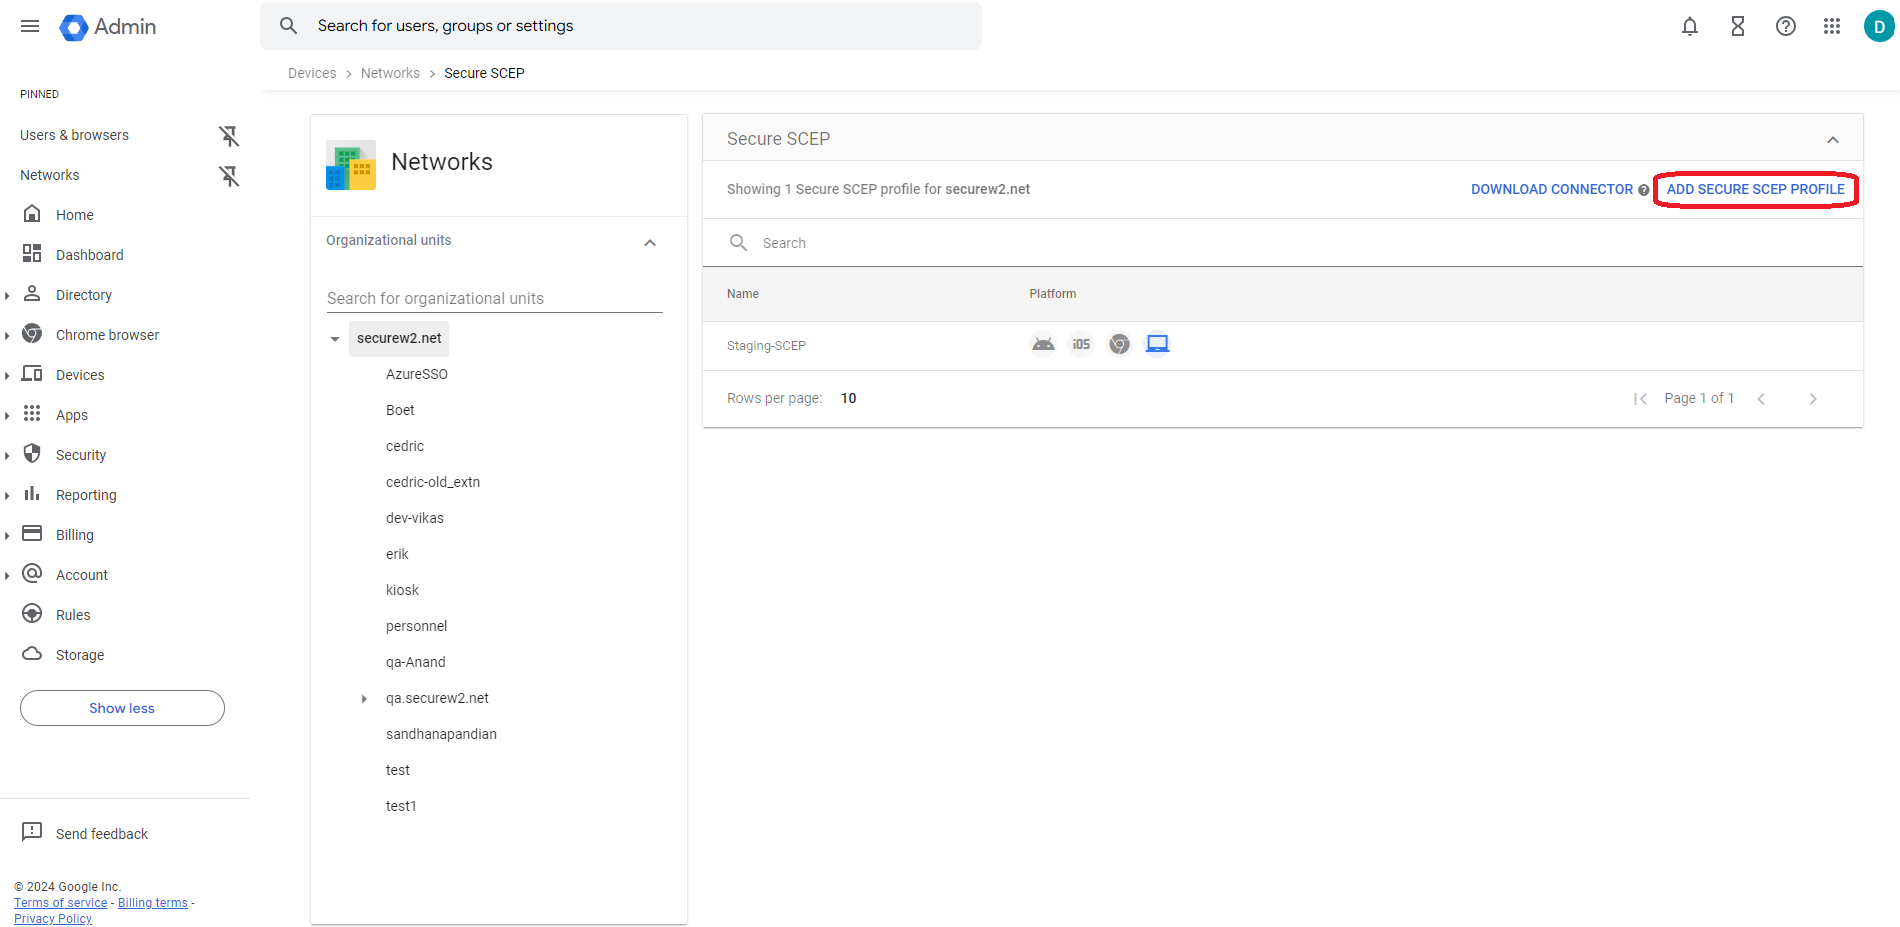
- Navigate back to the Google Admin Console. Click Devices > Networks.
- Click Create SCEP Profile after selecting the organization.
- Click Add Secure SCEP Profile.
- In the Device Platforms section, select Chromebook (Device).
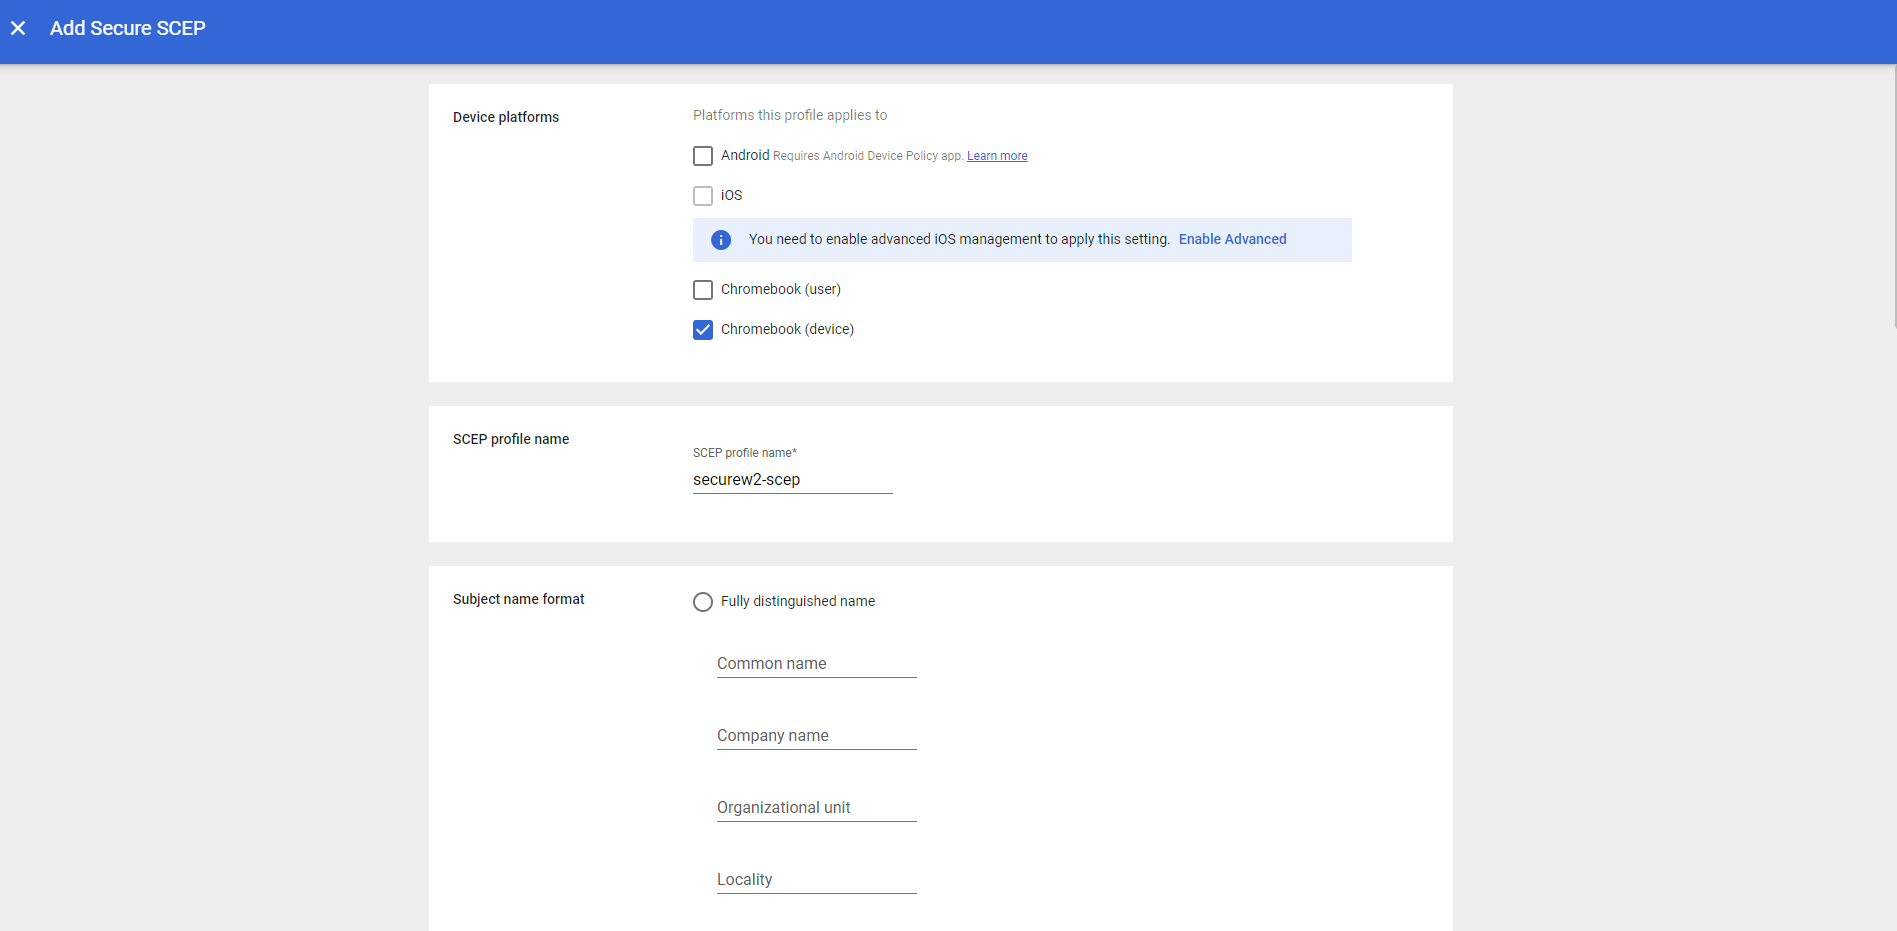
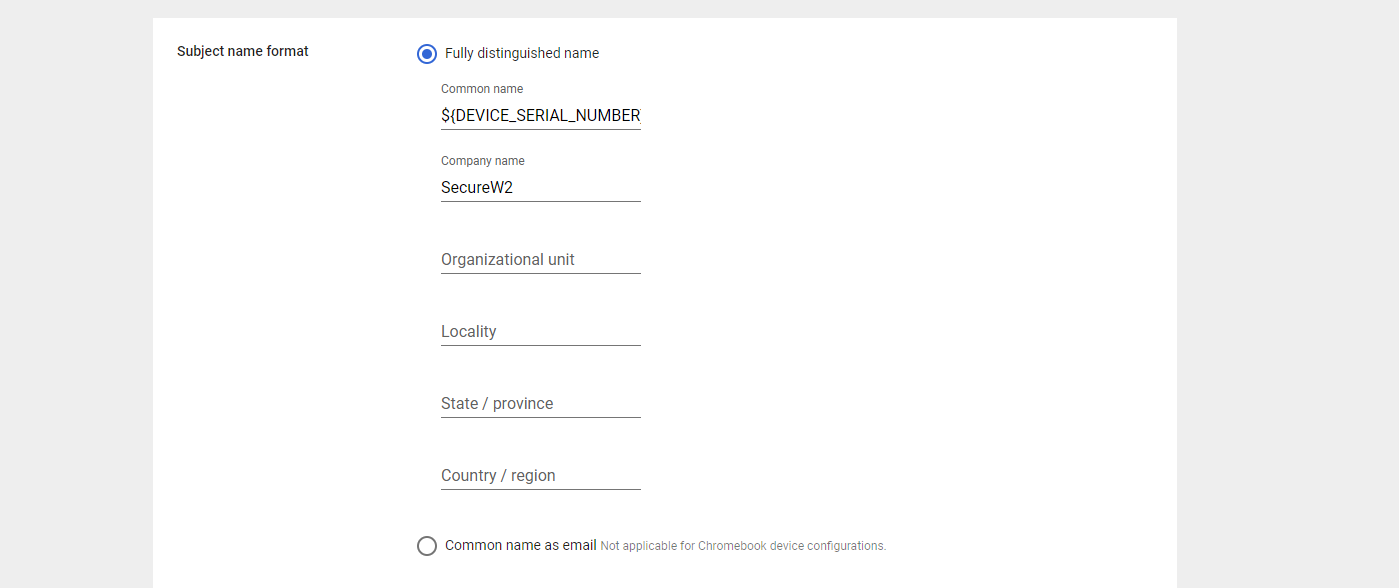
- In the Subject name format section, click on the Fully distinguished name radio button.
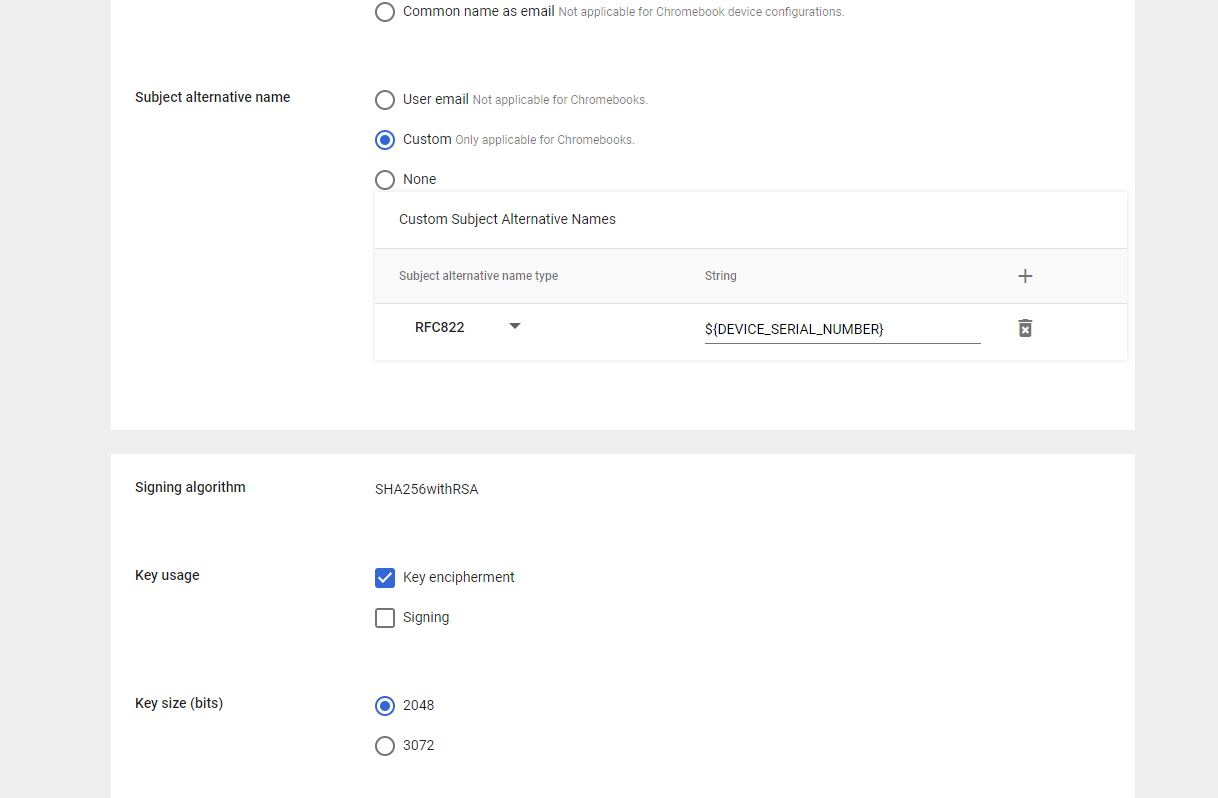
- In the Common name field, enter ${DEVICE_SERIAL_NUMBER}
- In the Subject alternative name field, choose Custom.
- From the Subject alternative name type drop-down, select RFC822. In the adjacent field, enter ${DEVICE_SERIAL_NUMBER}.
- In the Key Usage field, select Key Encipherment.
- In the Key size (bits), select 2048.
- In the Security section, select Strict.
- In the SCEP server URL field, copy and paste the Enrollment URL created in the JoinNow portal (Refer to step 6).
- In the Extended key usage field, select Client authentication.
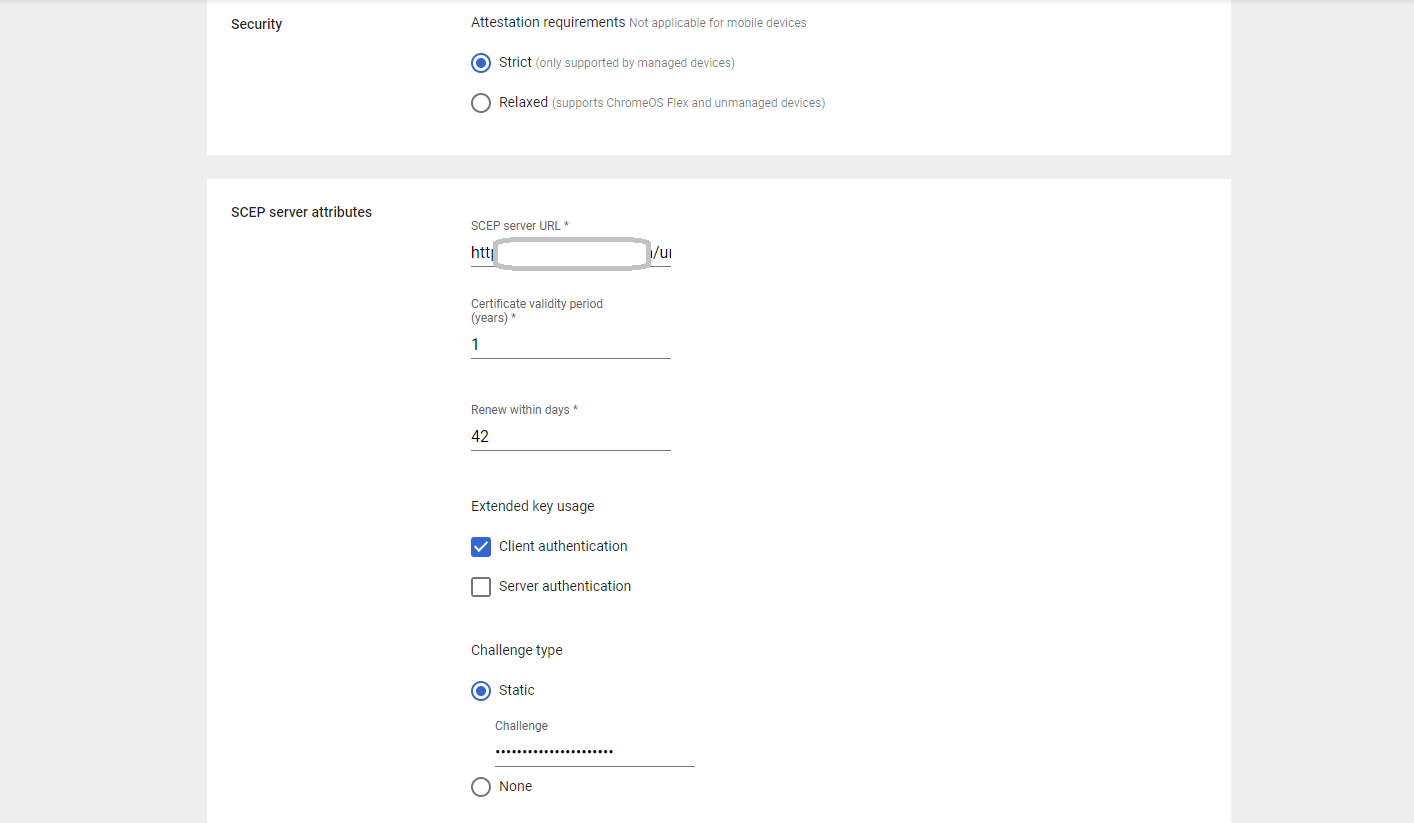
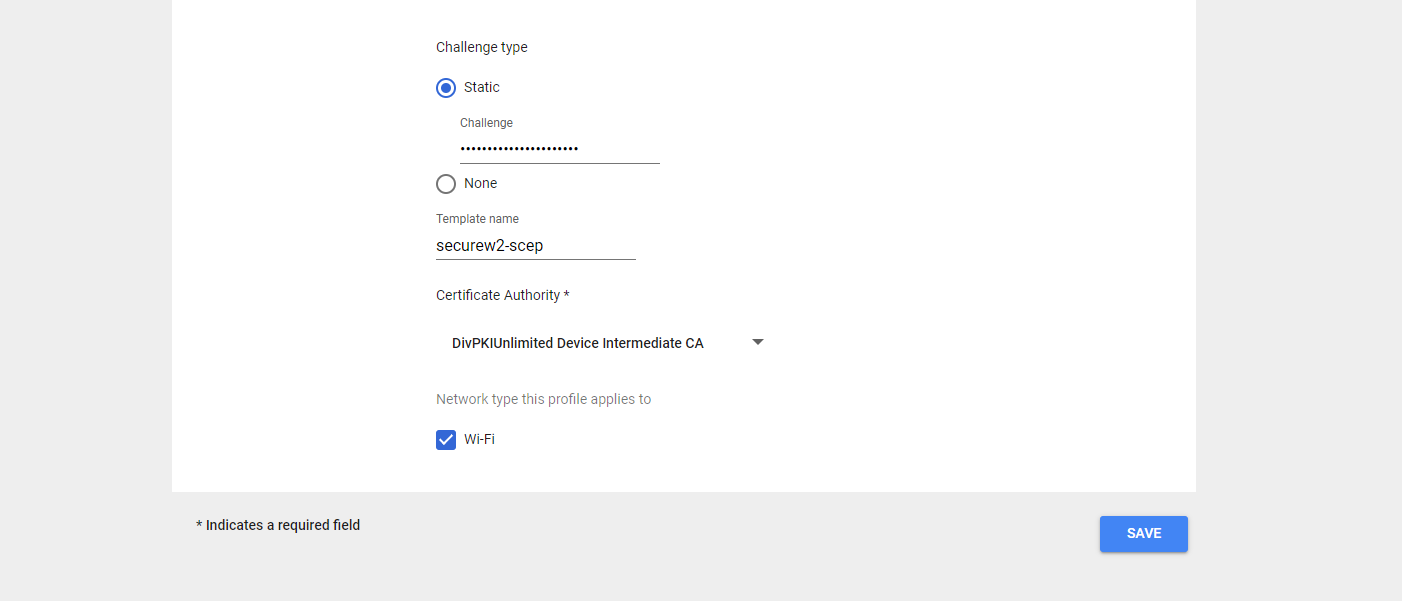
- In the Template name field, enter a name for the SCEP template.
- From the Certificate Authority drop-down, select the certificate authority created for this SCEP organization.
- Check the Wi-Fi option for the Network type this profile applies to field.
- Click Save.
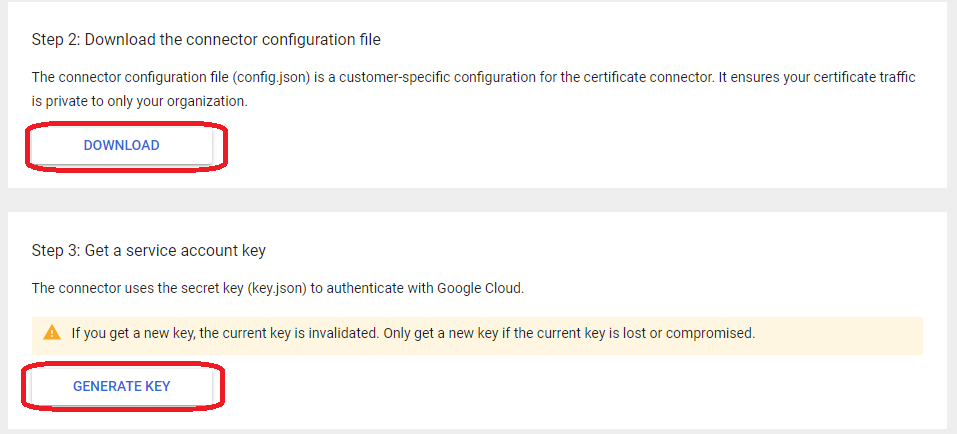
- On the home page, click Download Connector. Click Download in the Download connector configuration file section. The “config.json” file downloads.
- Navigate to the Get a Service Account key section, and click on the Generate key. The “key.json” file downloads.
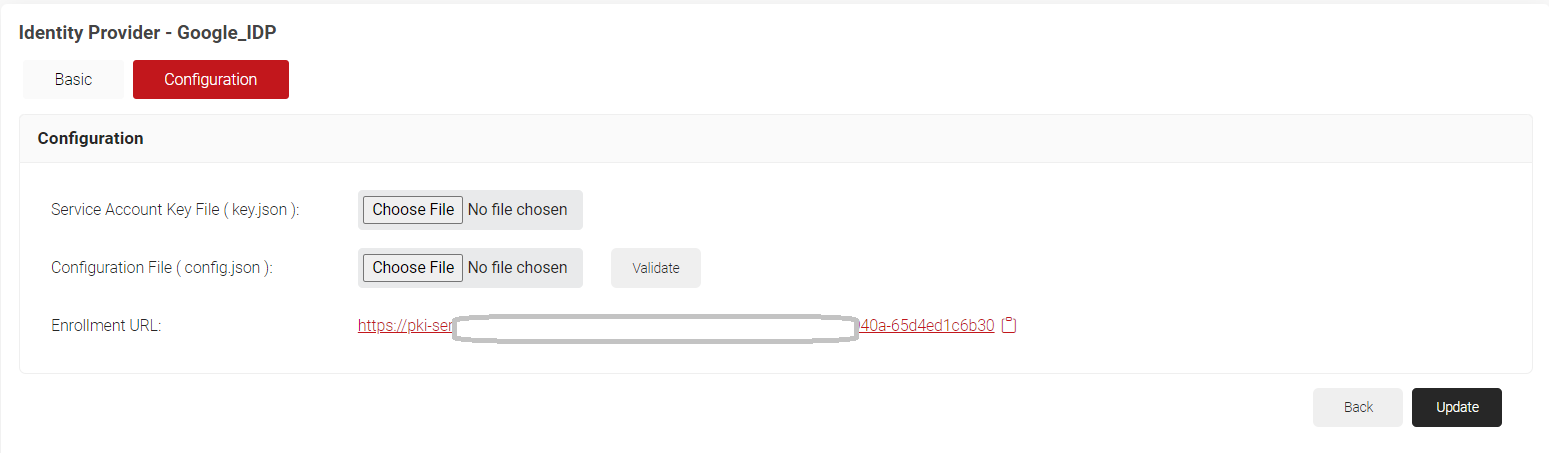
- Navigate back to the Configuration tab in the Identity Providers menu (JoinNow Management Portal > Identity Management > Identity Providers).
- Click Choose File to upload the Service Account Key File and Configuration File. Click Update.
4.4.1 Configuring a Policy Workflow
To configure a Policy Engine Workflow in the JoinNow Management Portal:
- Navigate to Policy Management > Policy Workflows.
- Click Add Policy Workflow.
- In the Basic section, enter the name of the policy engine workflow in the Name field.
- In the Display Description field, enter a suitable description for the role policy.

- Click Save.4
- The page refreshes, and the Conditions tab is displayed. Select the Conditions tab.
- From the Identity Provider drop-down list, select the Identity Provider created in 4.3 Configuring SCEP for Certificate Enrollment section.
- In the Attributes/Groups section, for the Attribute field, retain ANY.

- Click Update.
4.4.2 Creating Enrollment Policy
To add an Enrollment Policy, perform the following steps:
- Navigate to Policy Management > Enrollment.
- Click Add Enrollment Policy.
- Under the Basic section, in the Name field, enter the name of the enrollment policy.
- In the Display Description field, enter a suitable description for the enrollment policy.
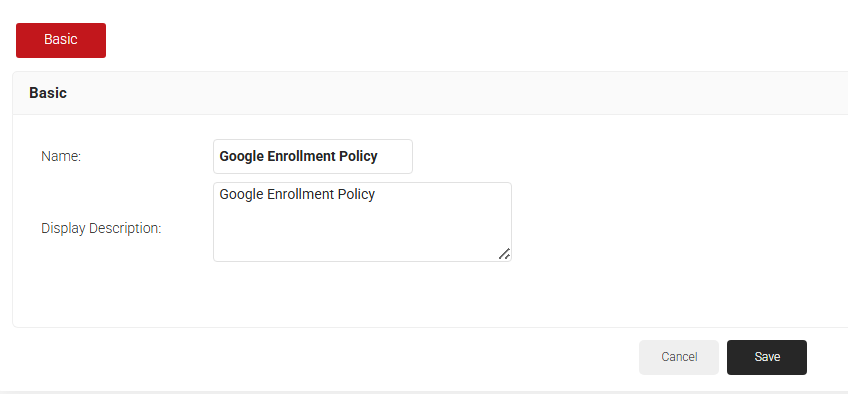
- Click Save.
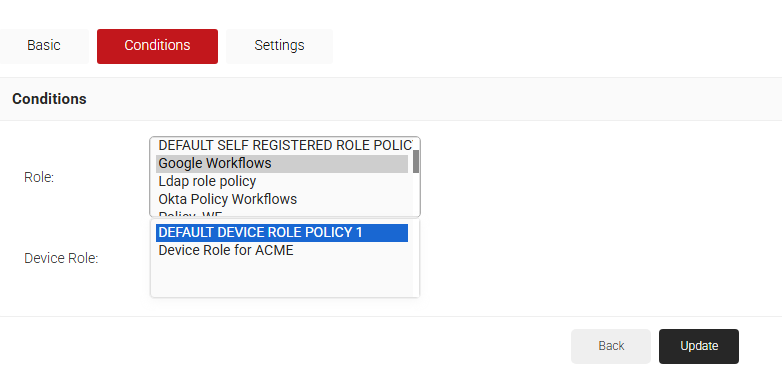
- The page refreshes, and the Conditions and Settings tabs are displayed.
- Select the Conditions tab.
- In the Conditions section, from the Role drop-down list, select the role policy you created earlier (see the Policy Engine Workflow section).
- From the Device Role drop-down list, select DEFAULT DEVICE ROLE POLICY.
- Select the Settings tab.
- In the Settings section, from the Use Certificate Authority drop-down list, select the intermediate CA you created earlier (see the Creating an Intermediate CA for Google SCEP Gateway Integration section).
- From the Use Certificate Template drop-down list, select the certificate template created for Google SCEP in 3.2 Creating a Google Certificate Template .
- In the other settings, retain the default values.
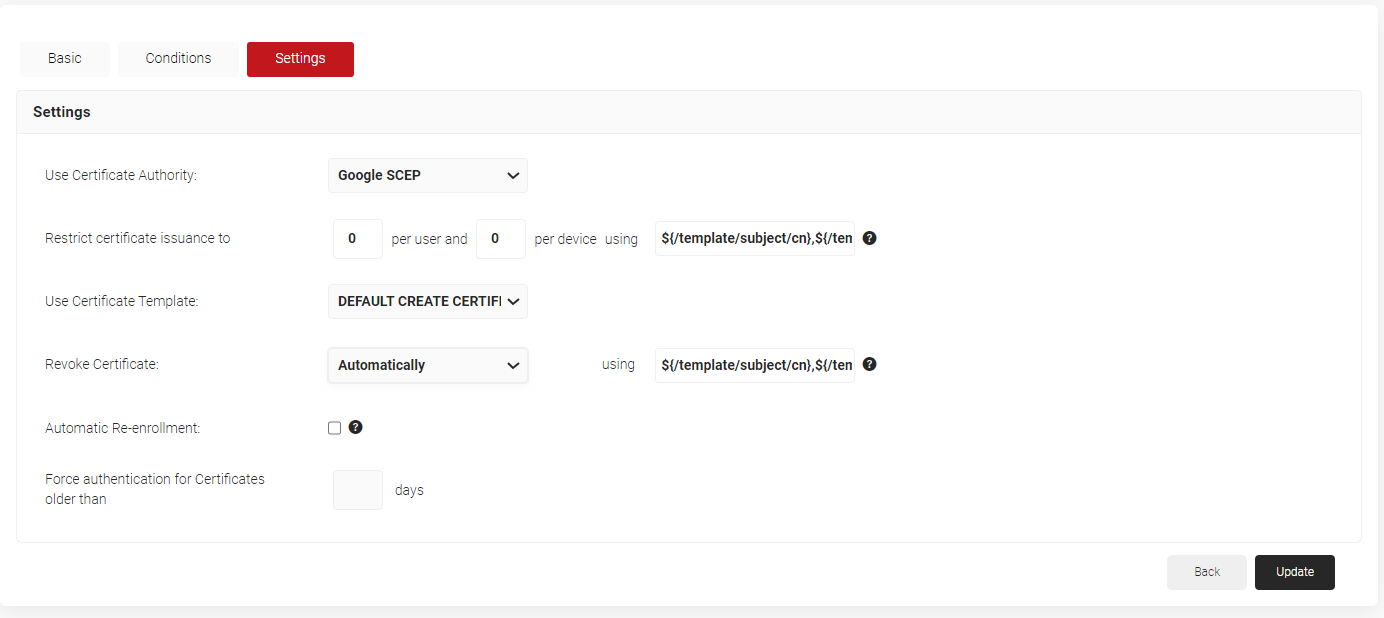
- Click Update.
4.4.3 Configuring Network Policy
To configure network policy:
- Go to Policy Management > Network.
- Click Add Network Policy.
- In the Basic section, enter the name of the network policy in the Name field.
- In the Display Description field, enter a suitable description for the network policy.
- Click Save.
- Select the Conditions tab.
- Select Match All or Match Any based on your requirements to set authentication criteria.
- Click Add rule.

- Expand Identity and click Select adjacent to the Role option.
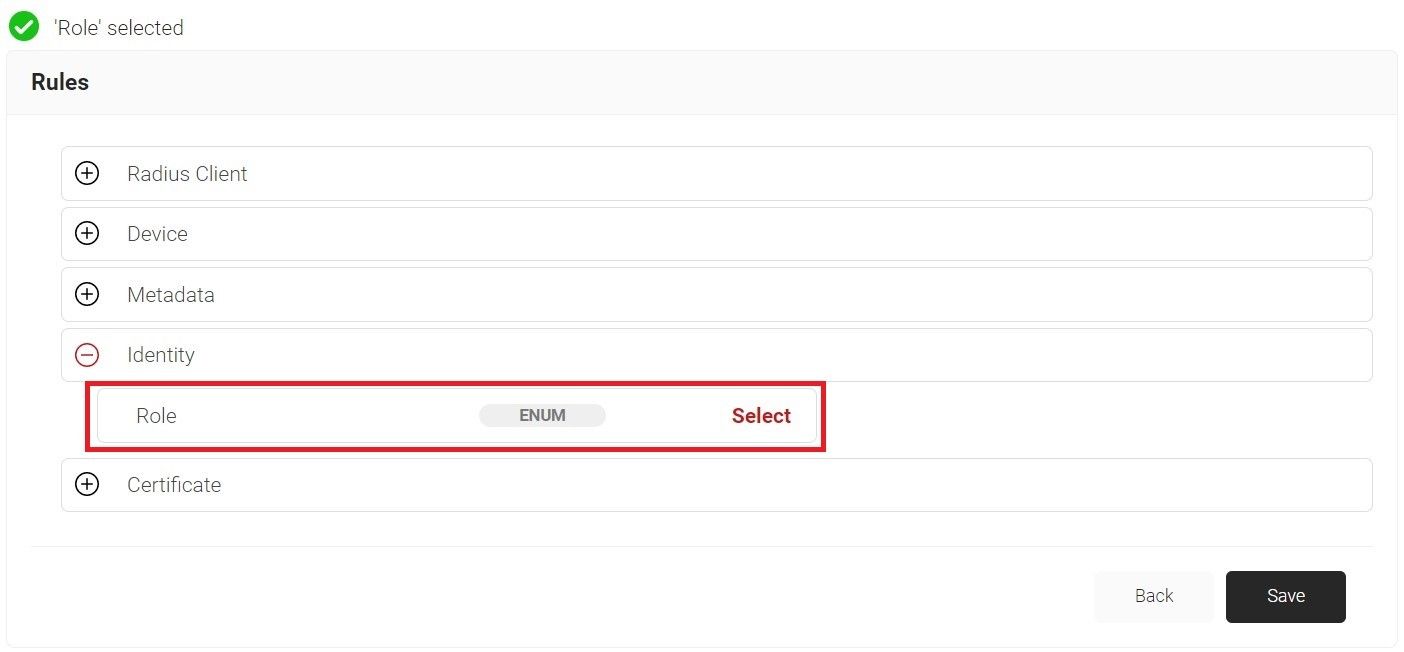
- Click Save.
- The Role option appears under the Conditions tab.
- From the Role Equals drop-down list, select the role policy you created earlier (see the Configuring a Policy Engine Workflow section).
- Select the Settings tab.
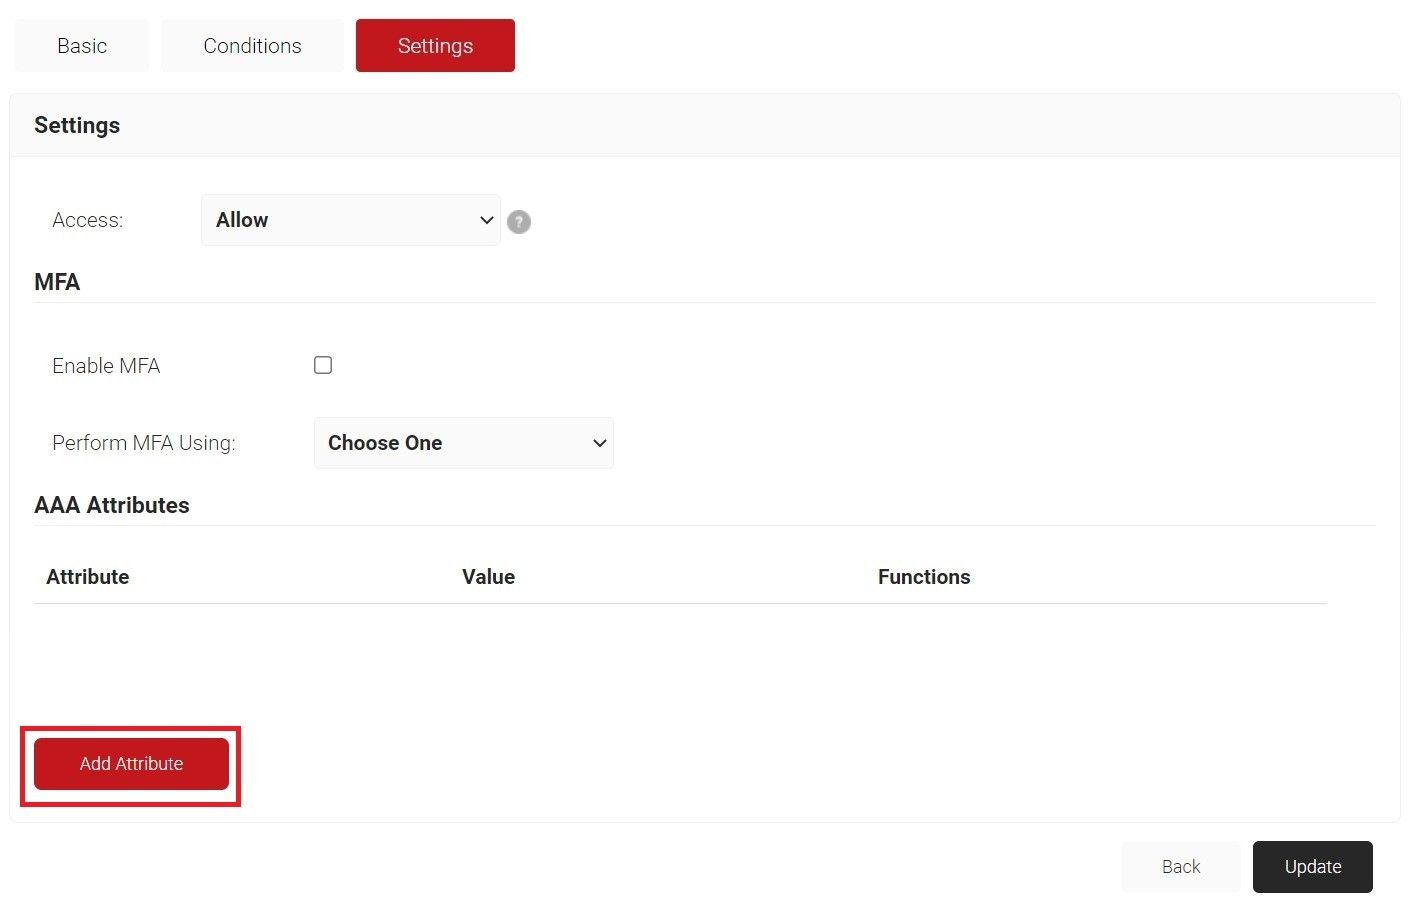
- Click Add Attribute.
- From the Dictionary drop-down list, select Radius: IETF or Custom.
- From the Attribute drop-down list, select an option.
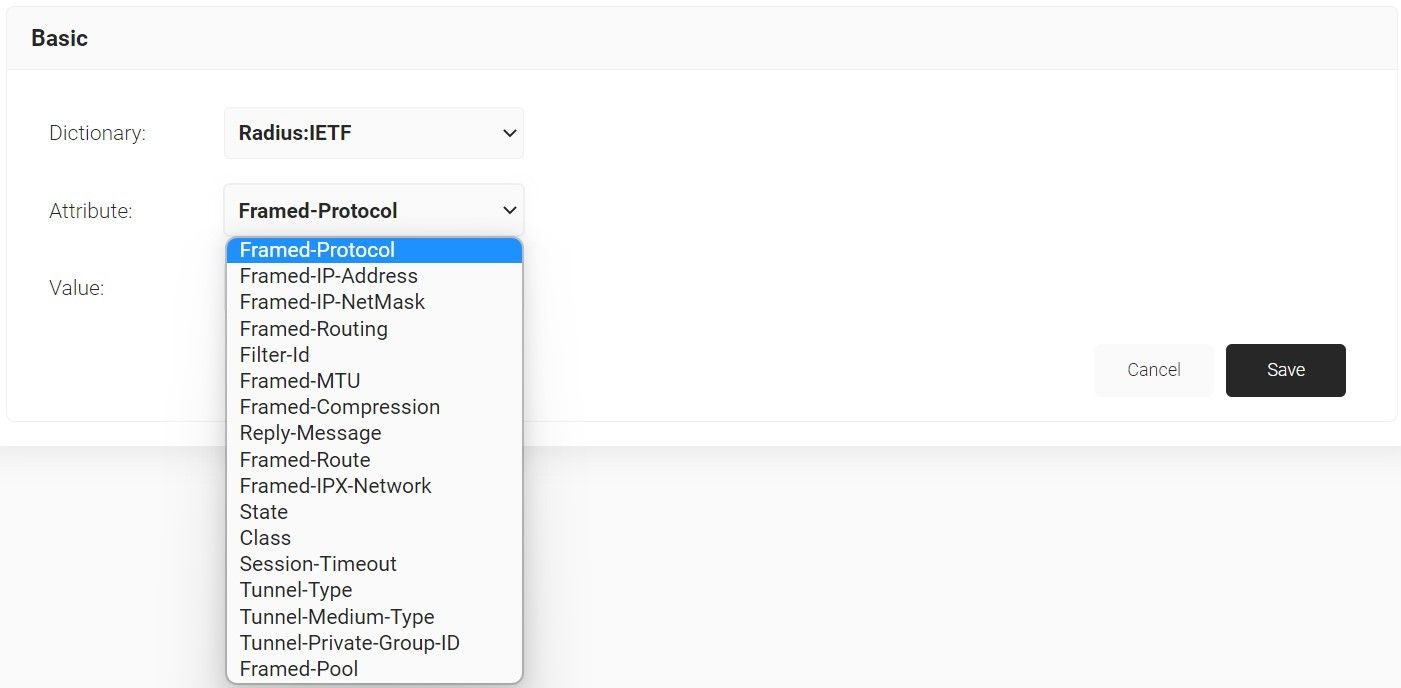
- In the Value text box, enter a value for the attribute.
- Click Save.
4.5 Configure 802.1X Wi-Fi for Certificate-Based Authentication on Chromebook
The last step is to configure the network settings that will be pushed to Chromebooks so that they will authenticate to the secure SSID using SecureW2 for certificate-based Wi-Fi authentication.
- Navigate to Devices > Networks > Wi-Fi > Add Wi-Fi
- Under Platform access, select Enabled for Chromebooks (by device) option.
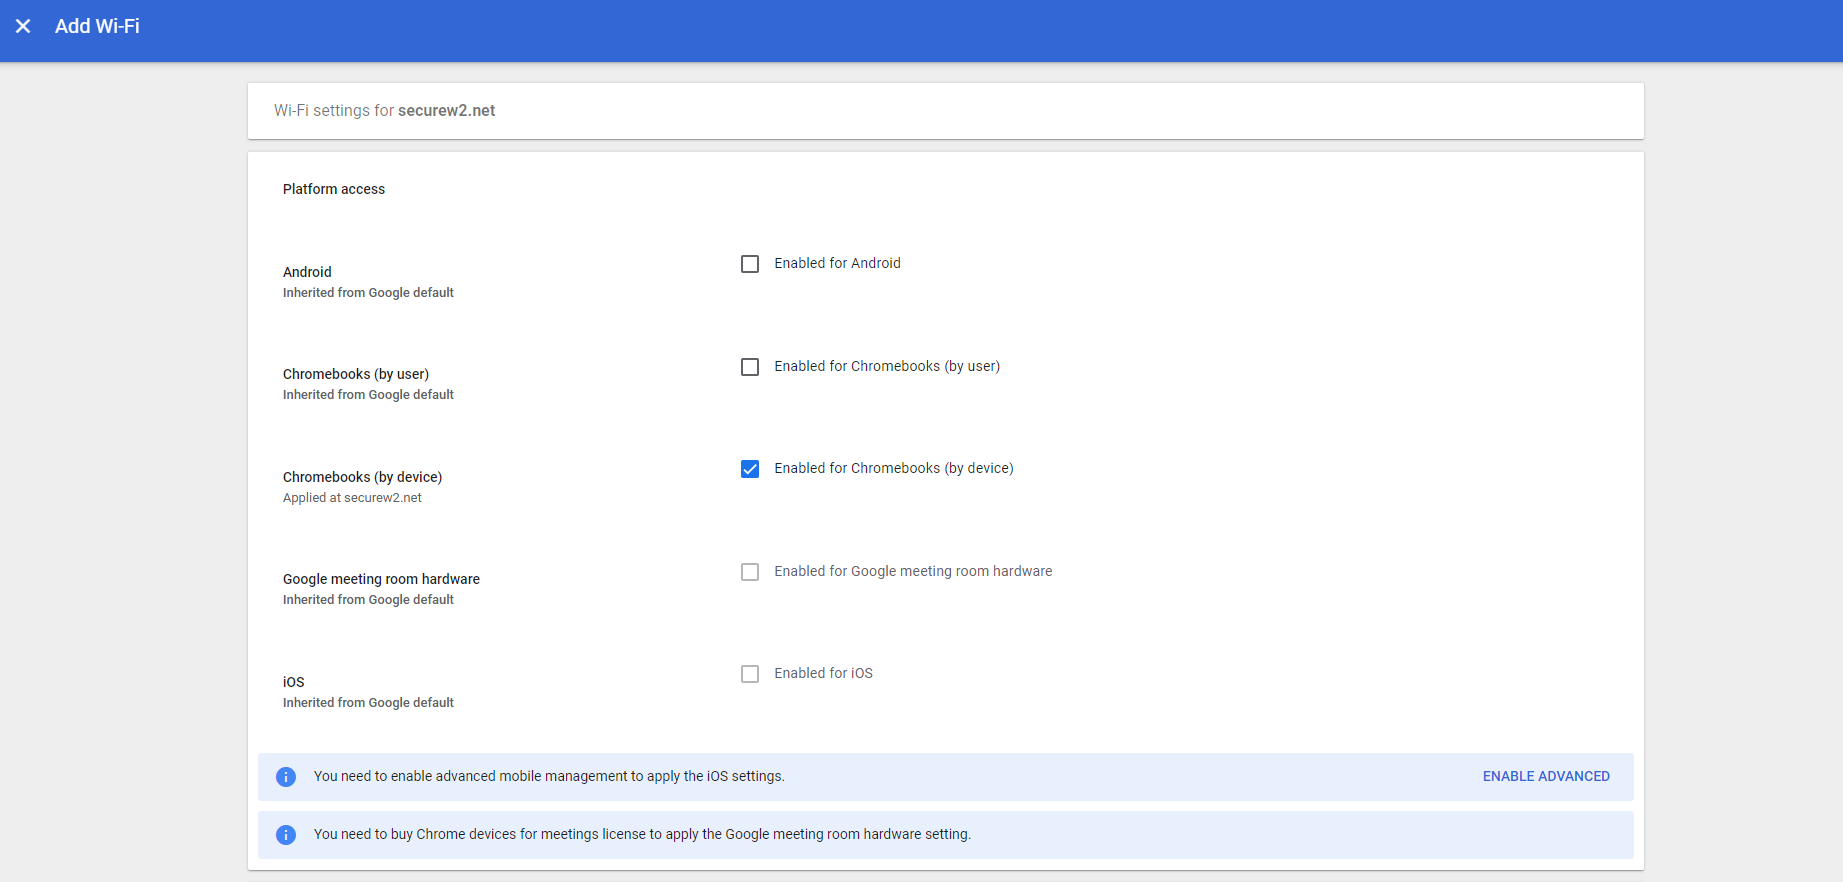
- In the Name field, enter a name for your Wifi.
- In the SSID field, enter a name for your broadcasting SSID.
- Enable the Automatically Connect option.
- From the Security type drop-down, select WPA/WPA2-Enterprise (802.1X).
- Set the Extensible Authentication Protocol to EAP-TLS. Select Maximum TLS Version as 1.2.
- For the Username field, enter ${CERT_SAN_EMAIL} or ${CERT_SAN_UPN}.
- From the Server Certificate Authority drop-down, select the RADIUS Server Certificate’s Issuer CA chain you uploaded earlier.
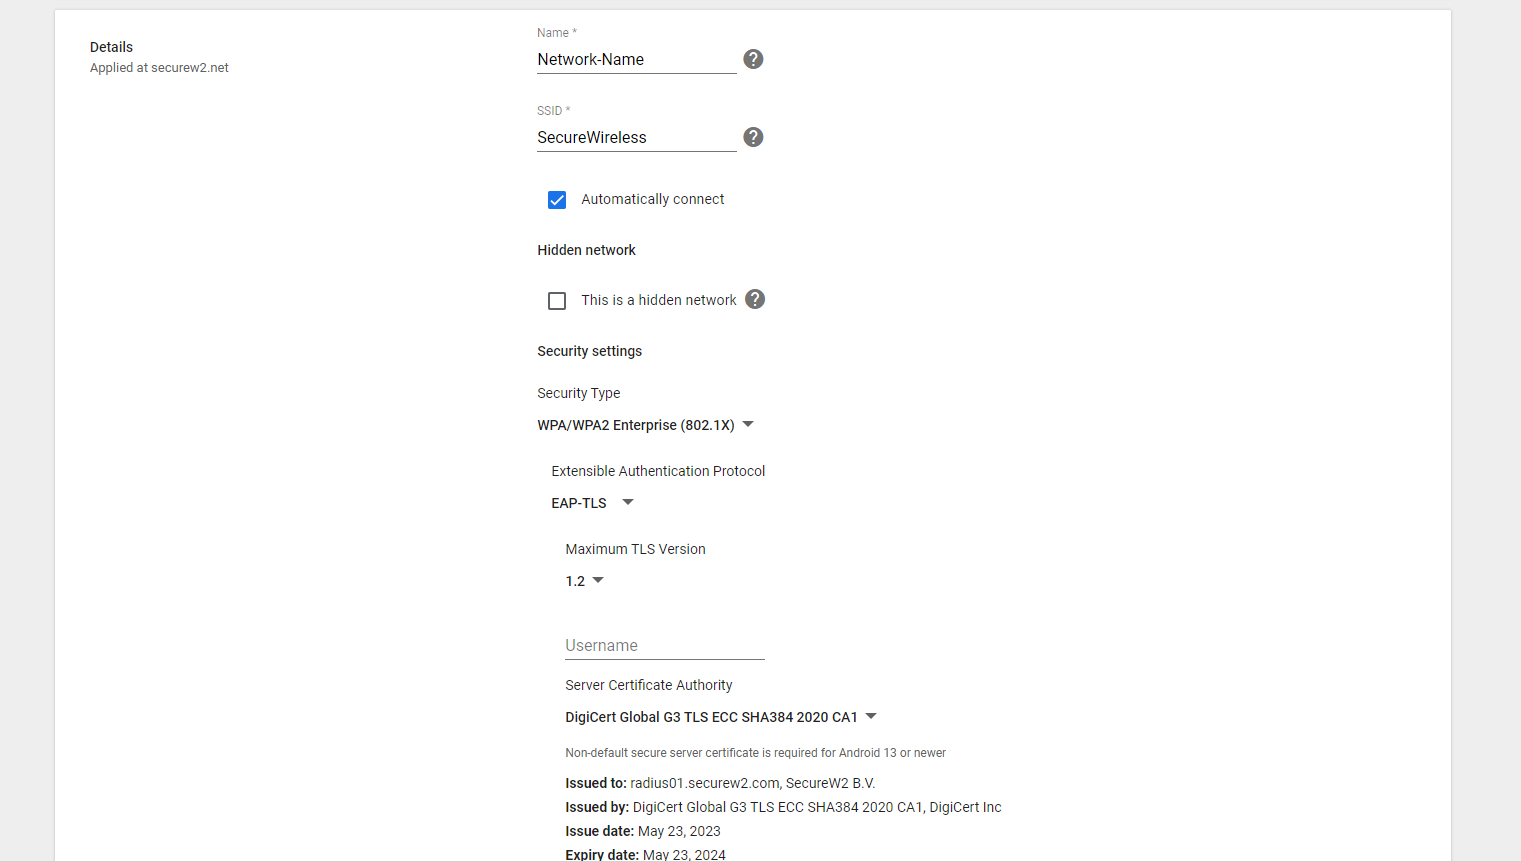
- From the SCEP profile drop-down, select the SCEP profile created in the earlier step.
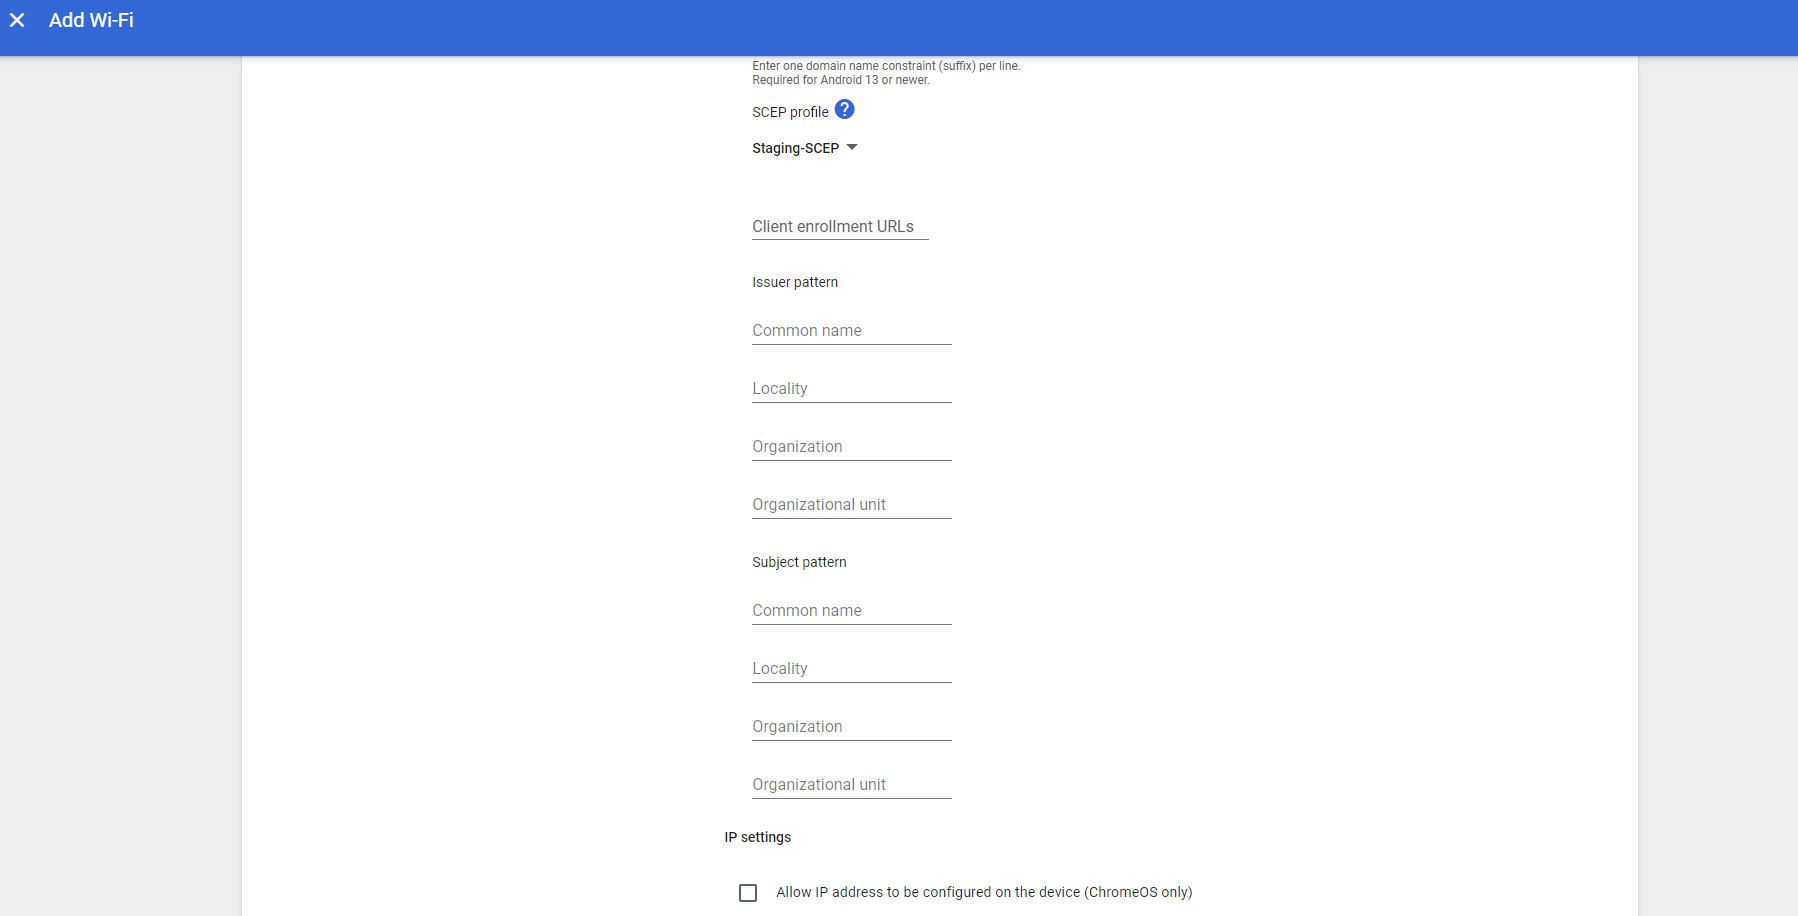
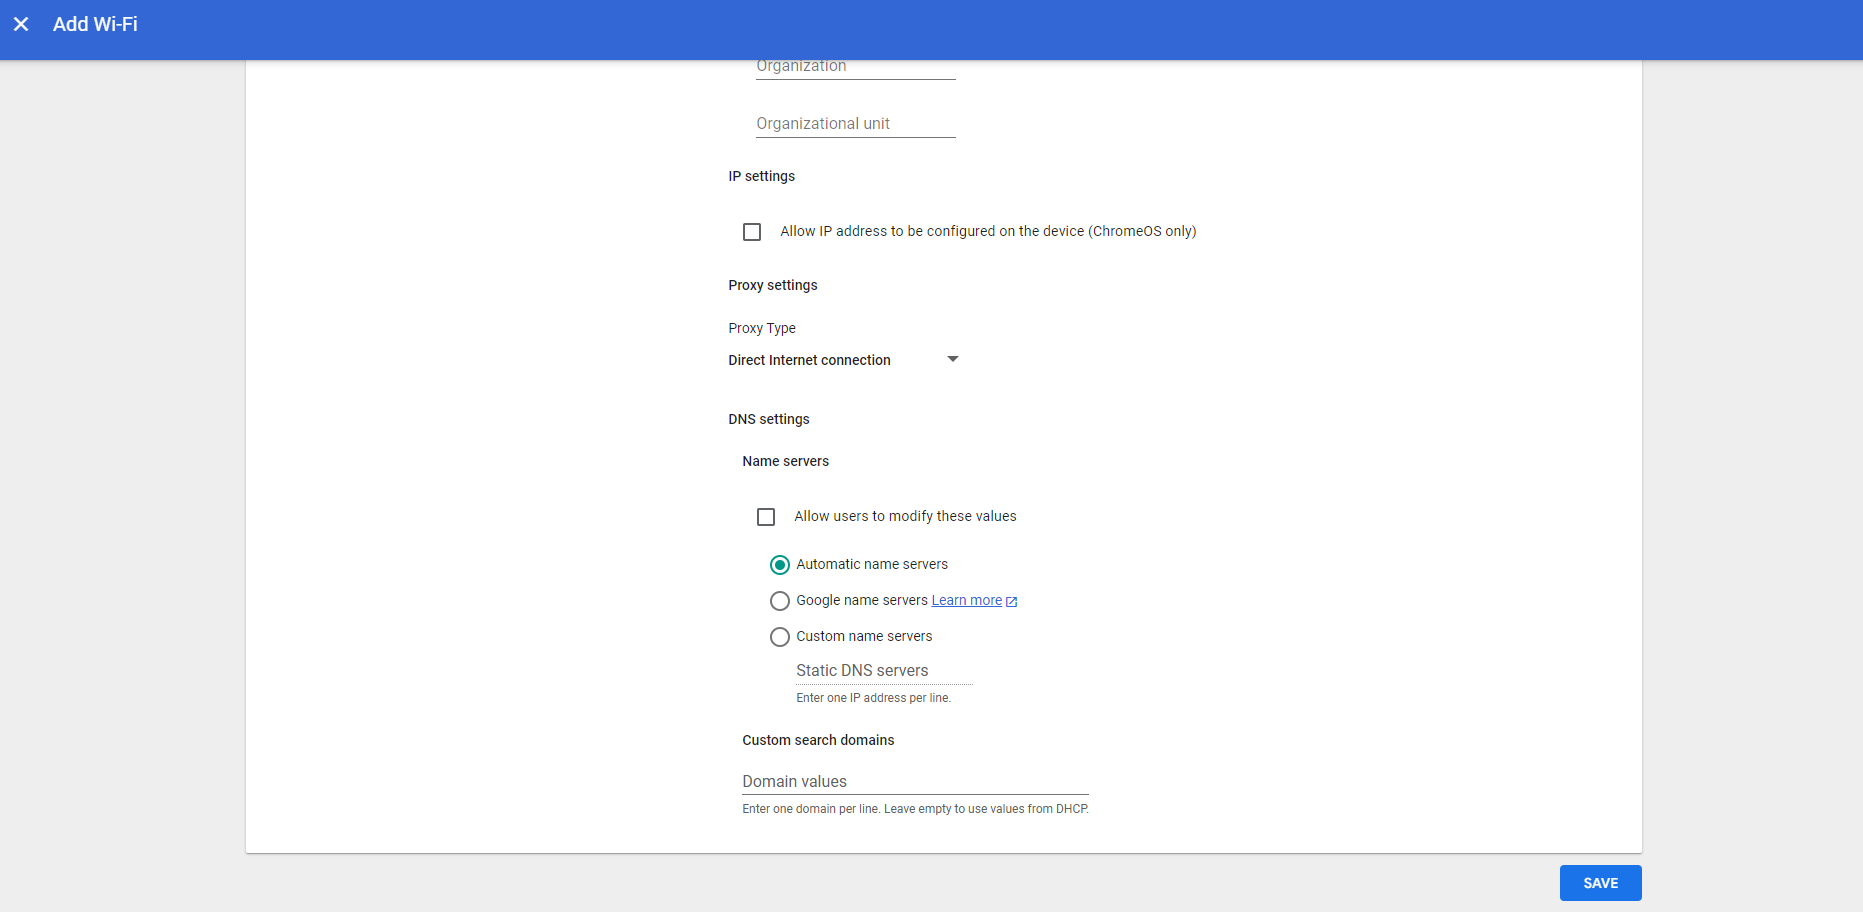
- Under the DNS settings section, select Automatic name servers.
- Click Save. This completes the configuration.
Chromebooks for your organization are ready to be enrolled in Google.
Now, SecureW2 CloudConnector starts reaching out to Google for any certificate requests from the client devices. If available, CloudConnector validates these requests and returns an appropriate certificate to Google. Google deploys them in the corresponding devices.
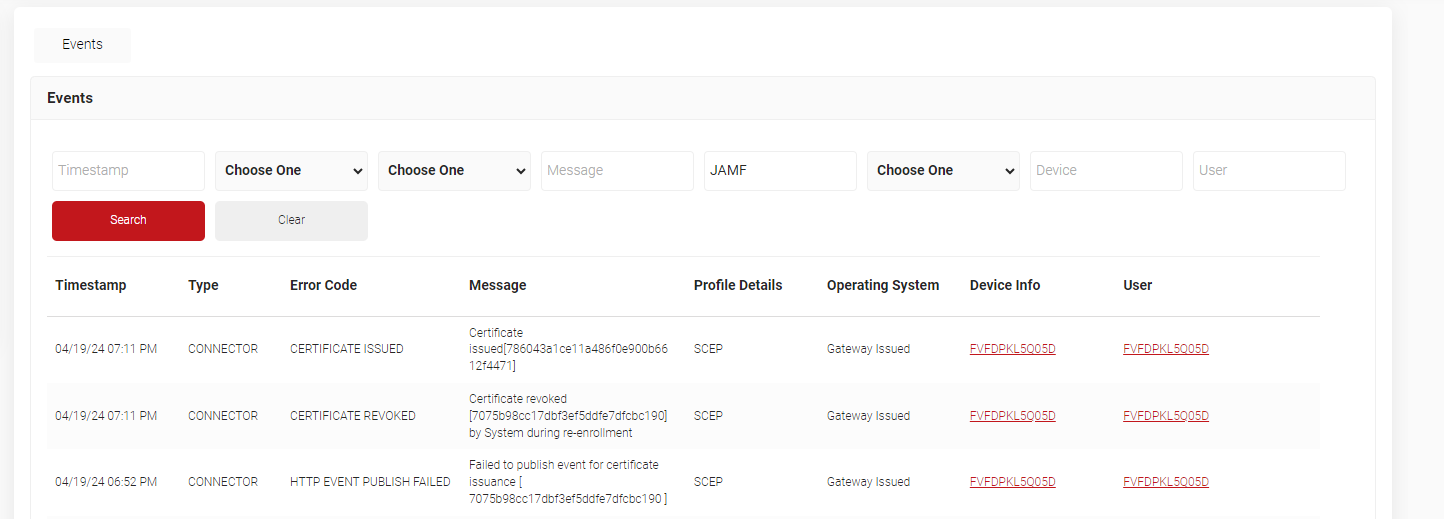
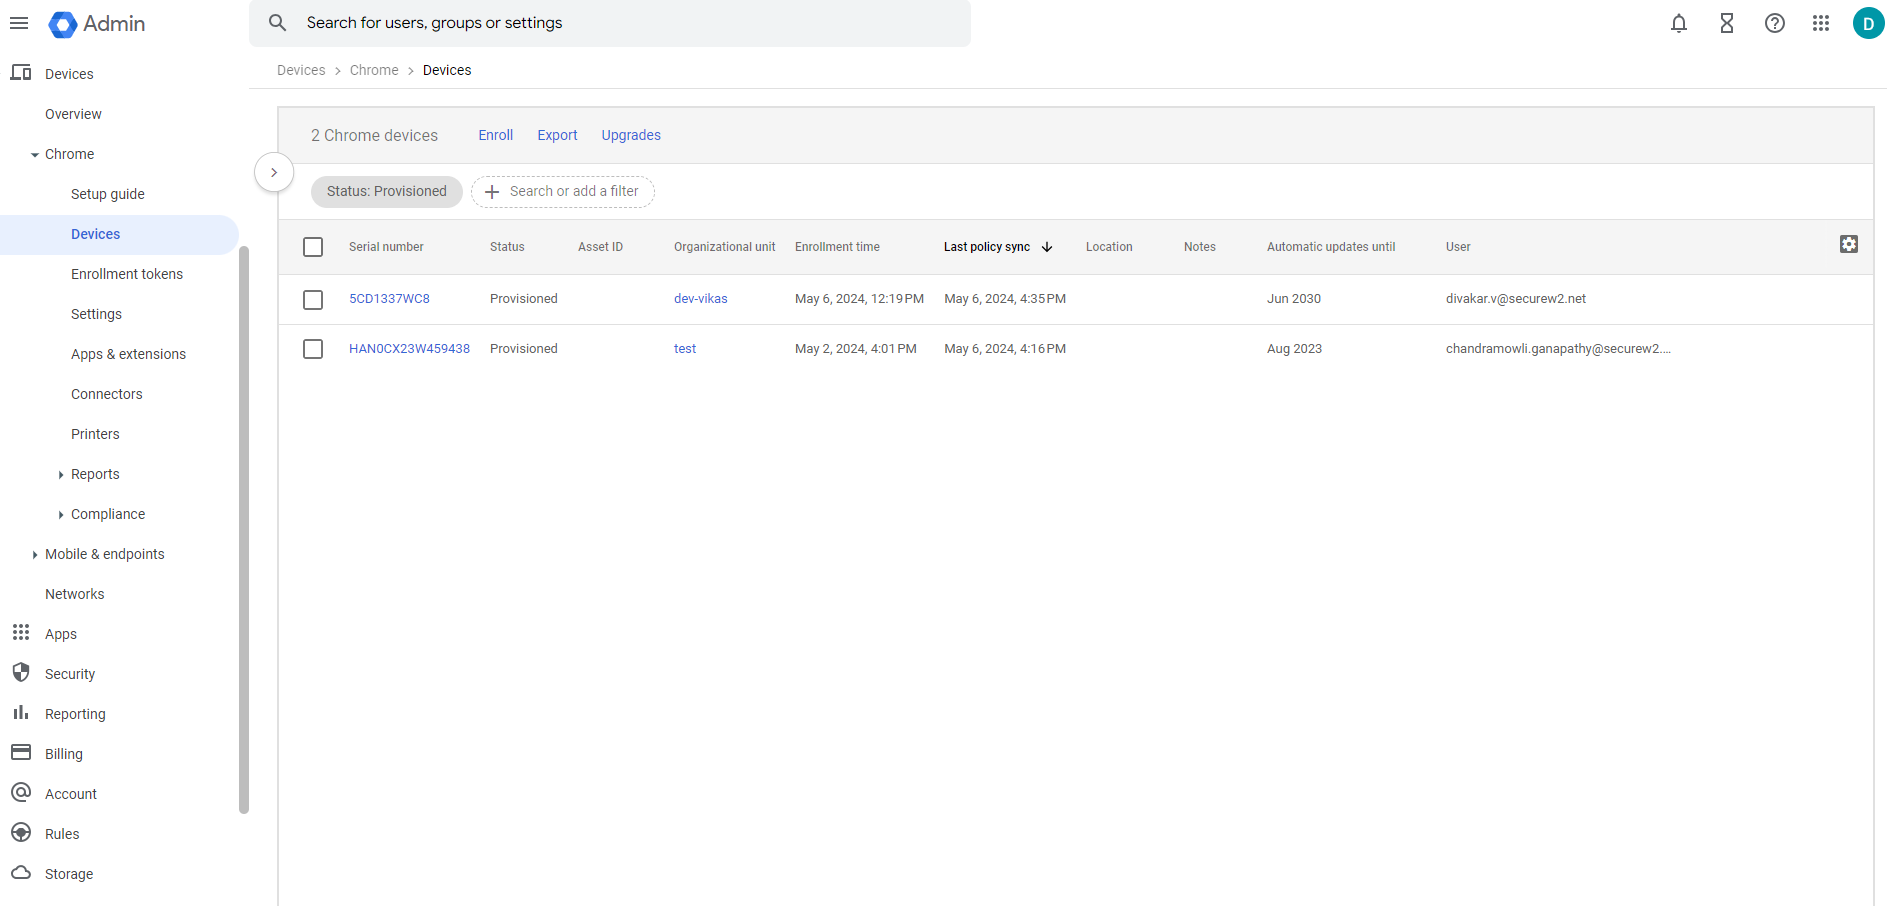
These successful device enrollments are logged in the Google Admin Console under Devices > Chrome > Devices.
Similarly, Admins can also check for successful certificate enrollment in JoinNow Management Portal under Data and Monitoring > General Events. A Certificate Issued message would be displayed for the enrolled Chrome devices.