1. Introduction
SecureW2 offers RadSec functionality – RADIUS over TLS, facilitating the transmission of RADIUS messages through a TLS-encrypted channel to distant RADIUS servers. RadSec ensures mutual authentication between the RADIUS client and server before establishing the encrypted channel. This feature serves as an enhancement to the RADIUS solution, offering added security for the secure transmission of RADIUS Authentication and Accounting messages while passing through the internet. SecureW2 RadSec solution works with Meraki, Aruba, and Unifi Access Points. This can also be configured to work with RadSec Proxy.
This document guides the users to integrate the SecureW2 RadSec solution in the Meraki Access Point, Aruba controller and Unifi.
2. Prerequisites
The following are the prerequisites to set up CloudRADIUS RadSec:
- Active subscription with CloudRADIUS.
- Active subscription with JoinNow MultiOS, CLOUD CONNECTOR, and Dynamic RADIUS.
- Active subscription with Cisco Meraki access point. The RadSec support applies only to the MR firmware 30. X version.
- Active subscription with Aruba access point.
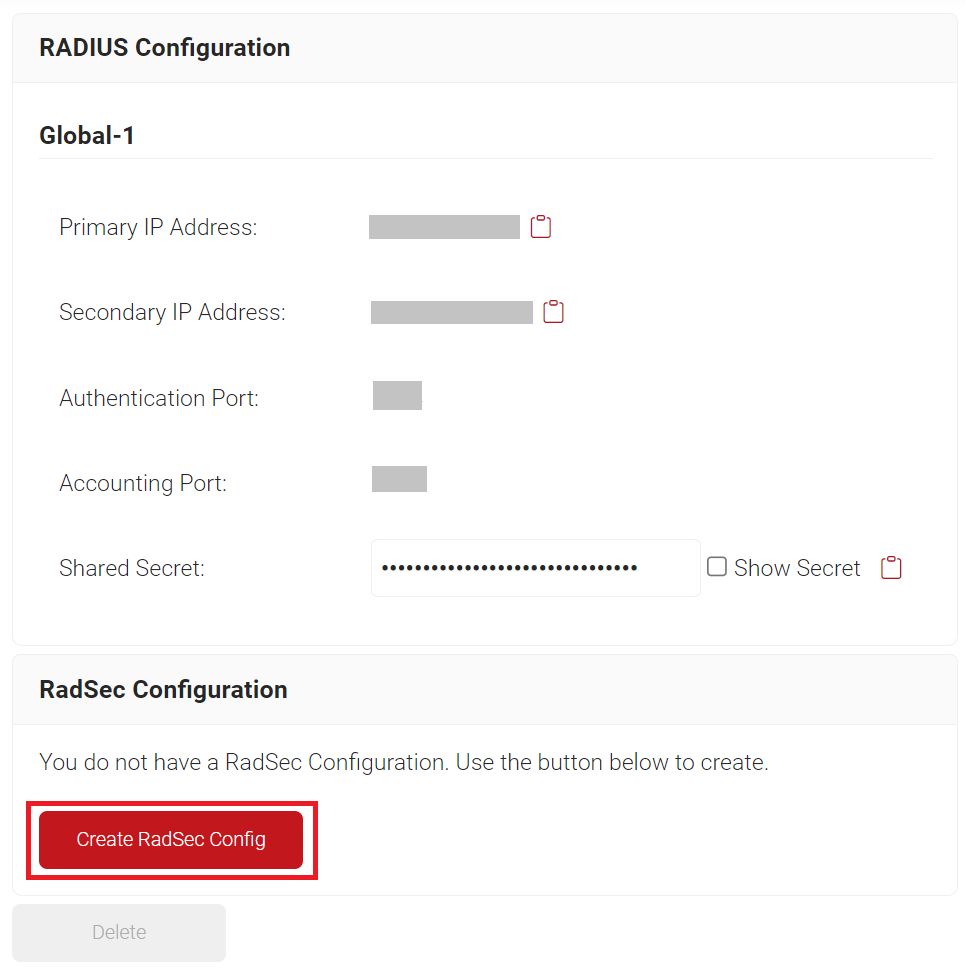
3. Exporting the SecureW2 Cloud RADIUS Root CA
To integrate with any Controller/AP, SecureW2 RadSec Server Root CA needs to be installed in the AP. Similarly, the Root CA from the AP needs to be uploaded to the JoinNow Management Portal. This establishes the trusted chain of certificates and helps create a TLS tunnel for passing the RADIUS messages.
To export the Cloud RADIUS Root CA from the JoinNow Management Portal, perform the following steps:
- Log in to the JoinNow Management Portal.
- Navigate to RADIUS > RADIUS Configuration.
- Scroll to the RadSec Configuration section and click the Create RadSec Config button.

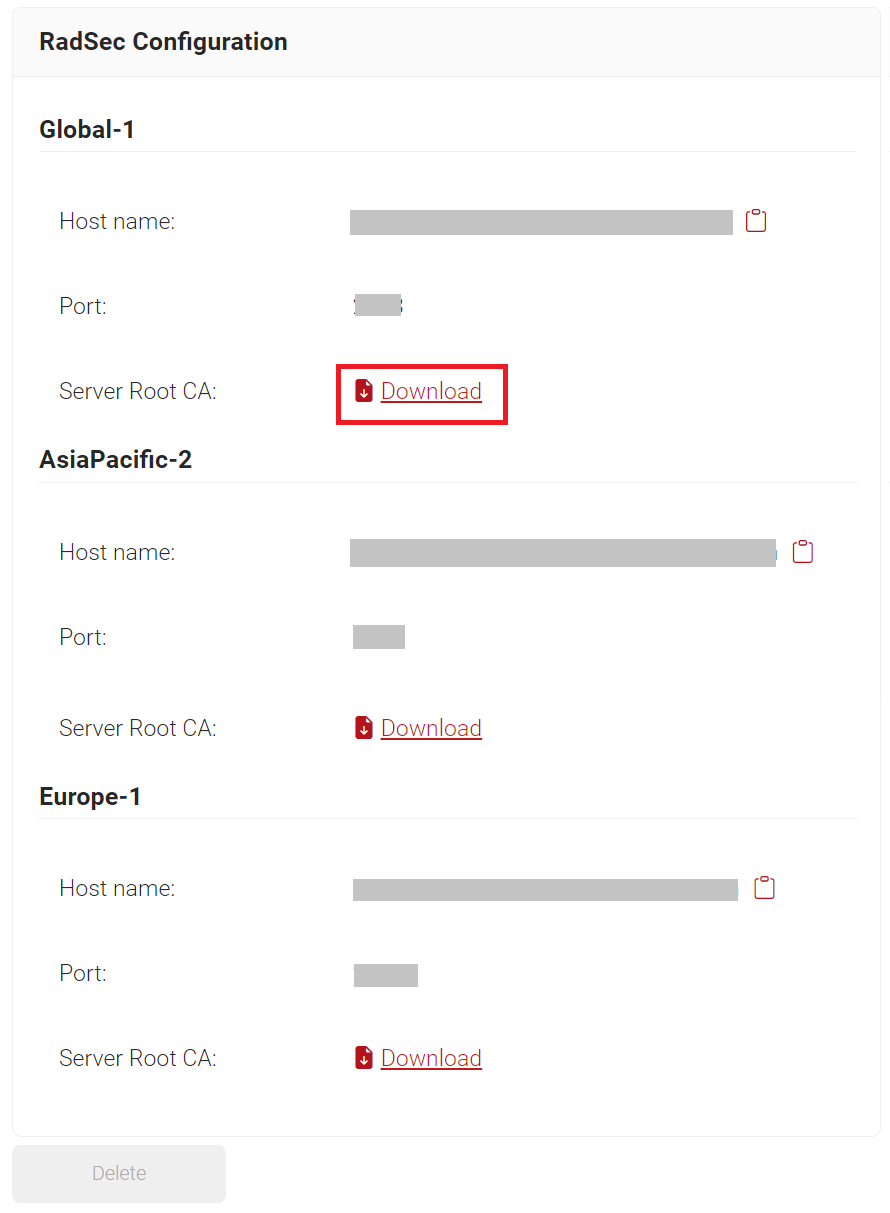
- In the RadSec Configuration section, click the Download link to obtain the RadSec Root CA.

- Copy the Host name and Port values. These values are required to configure the RADIUS Server in Meraki, Aruba, and Unifi.
4. Meraki Integration
Meraki offers its certificate chain. To establish a TLS tunnel with Meraki, export the RadSec AP certificate from Meraki and install it into the JoinNow Management Portal, for transmitting RADIUS messages.
The following sections detail how to integrate SecureW2 RADIUS Server with Meraki.
4.1 Configuring SecureW2 RadSec Root CA in Meraki
To configure a RadSec Root CA, perform the following steps:
- Log in to the Cisco Meraki portal.
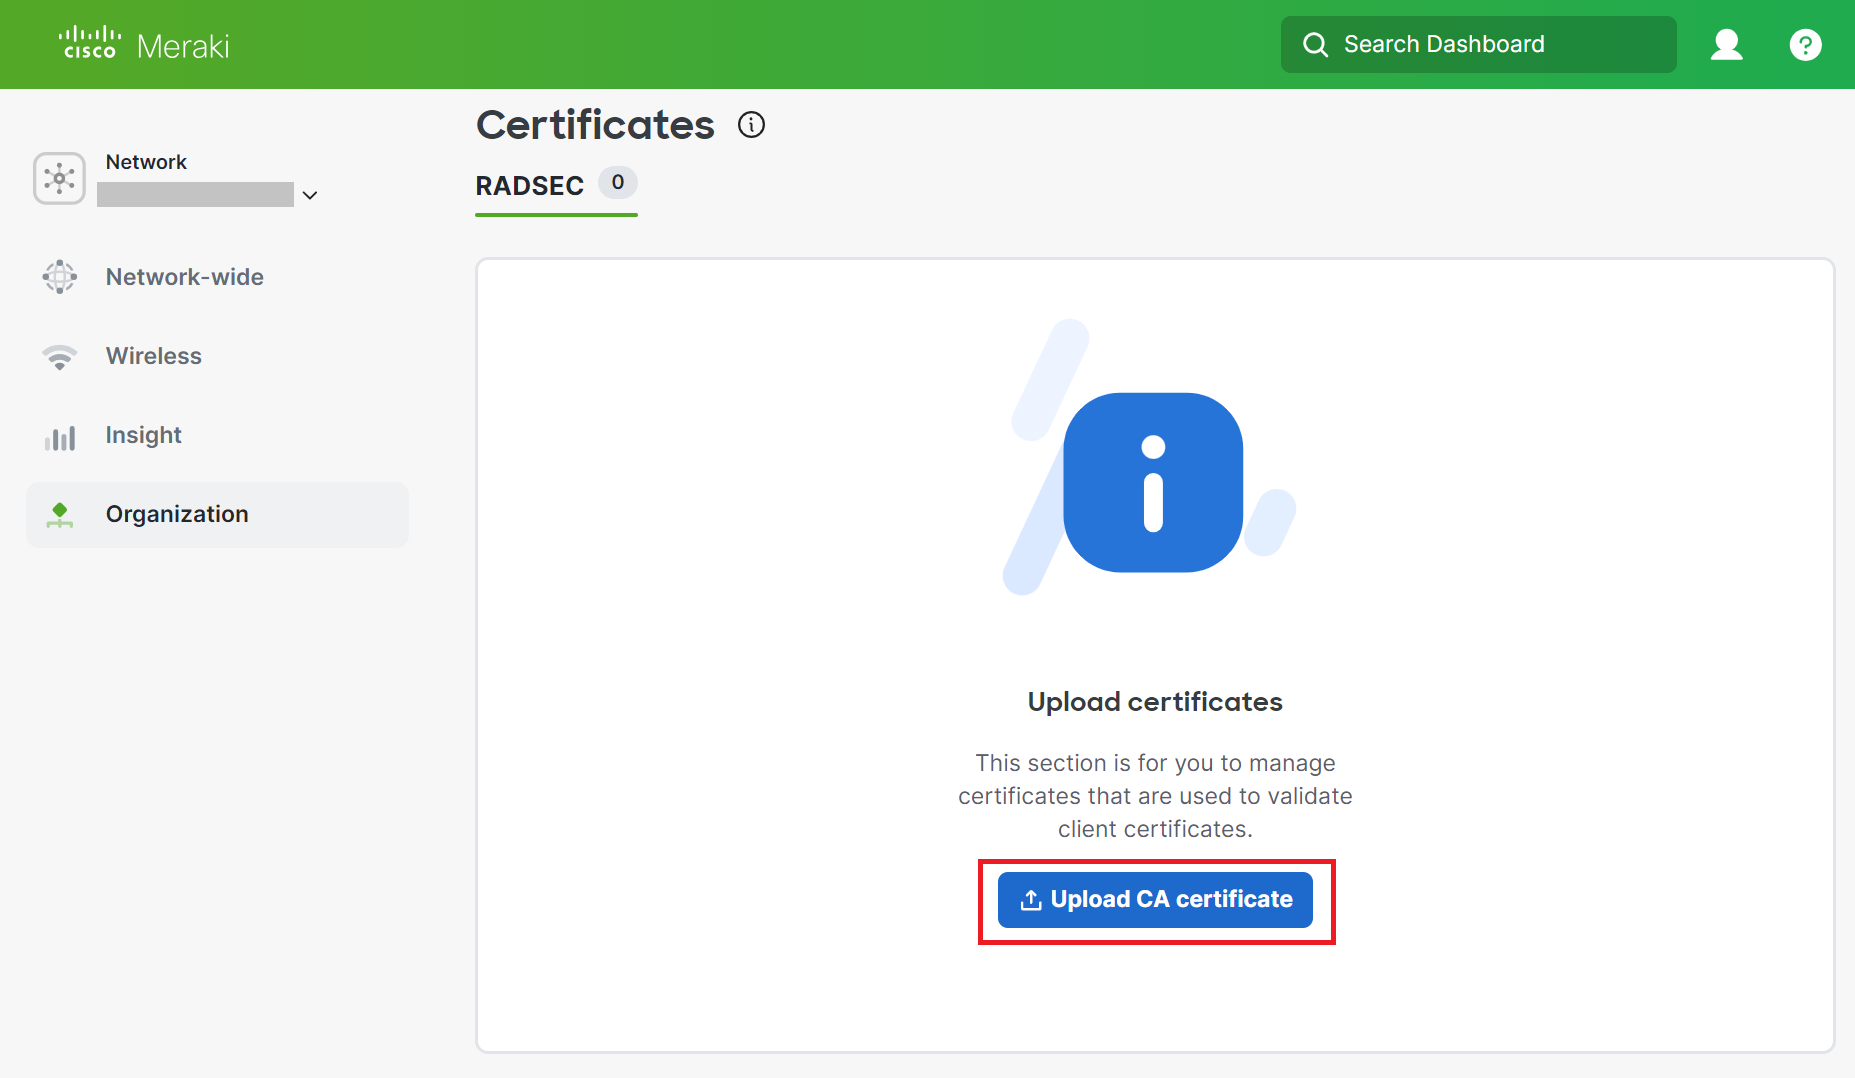
- Navigate to Organization > Configure > Certificates.

- On the Certificates page, click the Upload CA certificate button to import the root CA obtained from the JoinNow Management Portal (refer to the Exporting the SecureW2 Cloud RADIUS Root CA section).

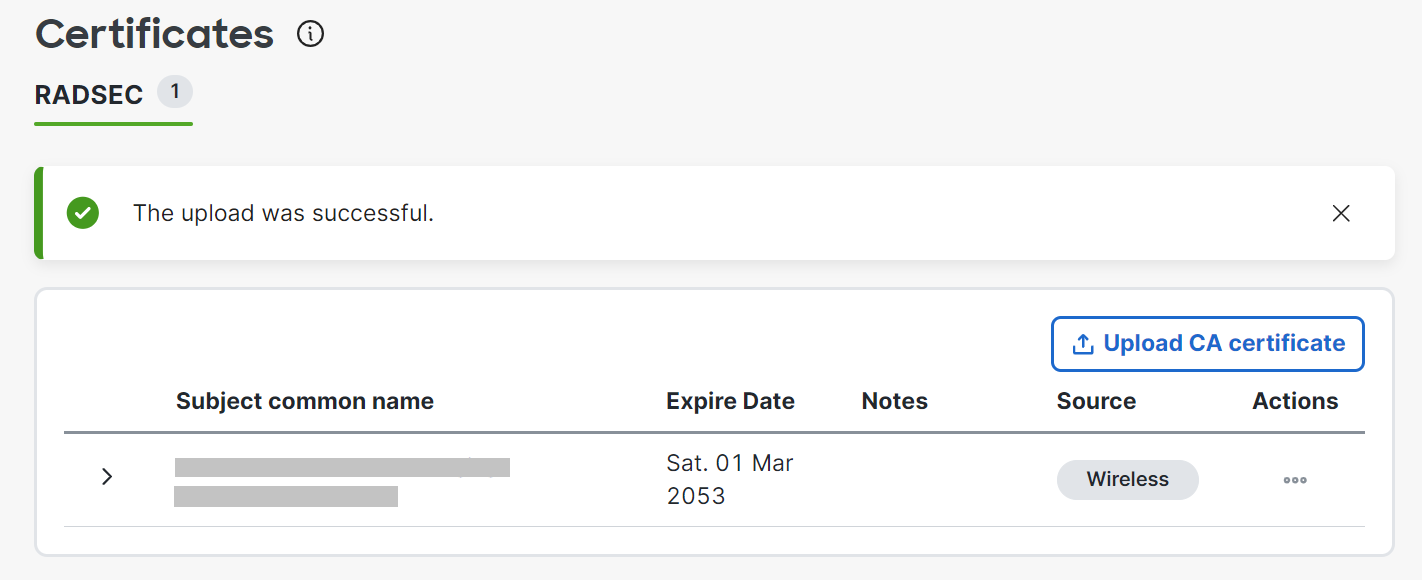
- The uploaded certificate is displayed in the RADSEC section.

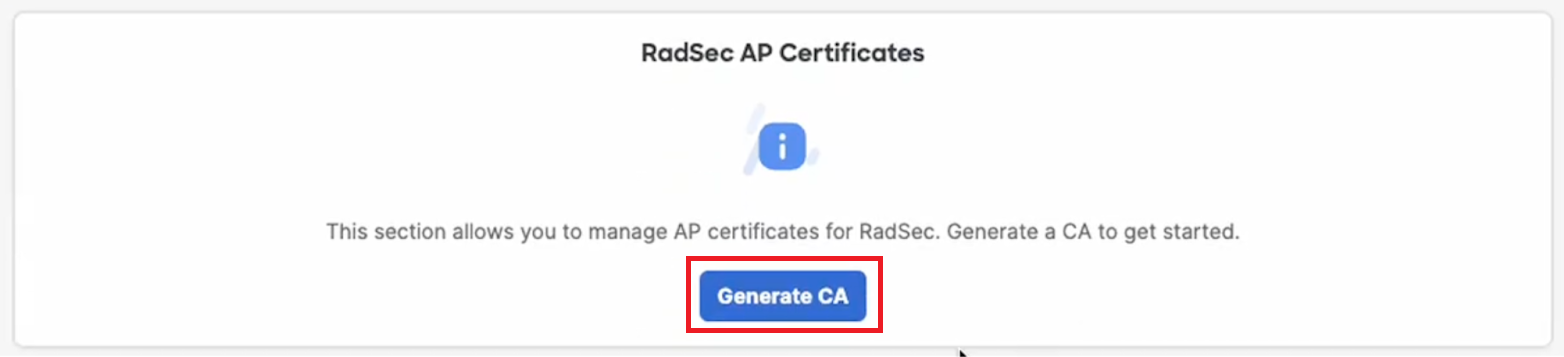
- Scroll to the RadSec AP Certificates section.
- In the RadSec AP Certificates section, click the Generate CA button to create a RadSec AP Certificate. This should be added to the SecureW2 RadSec Server to establish trust (refer to the Integrating Meraki RadSec AP Certificate with SecureW2 section).

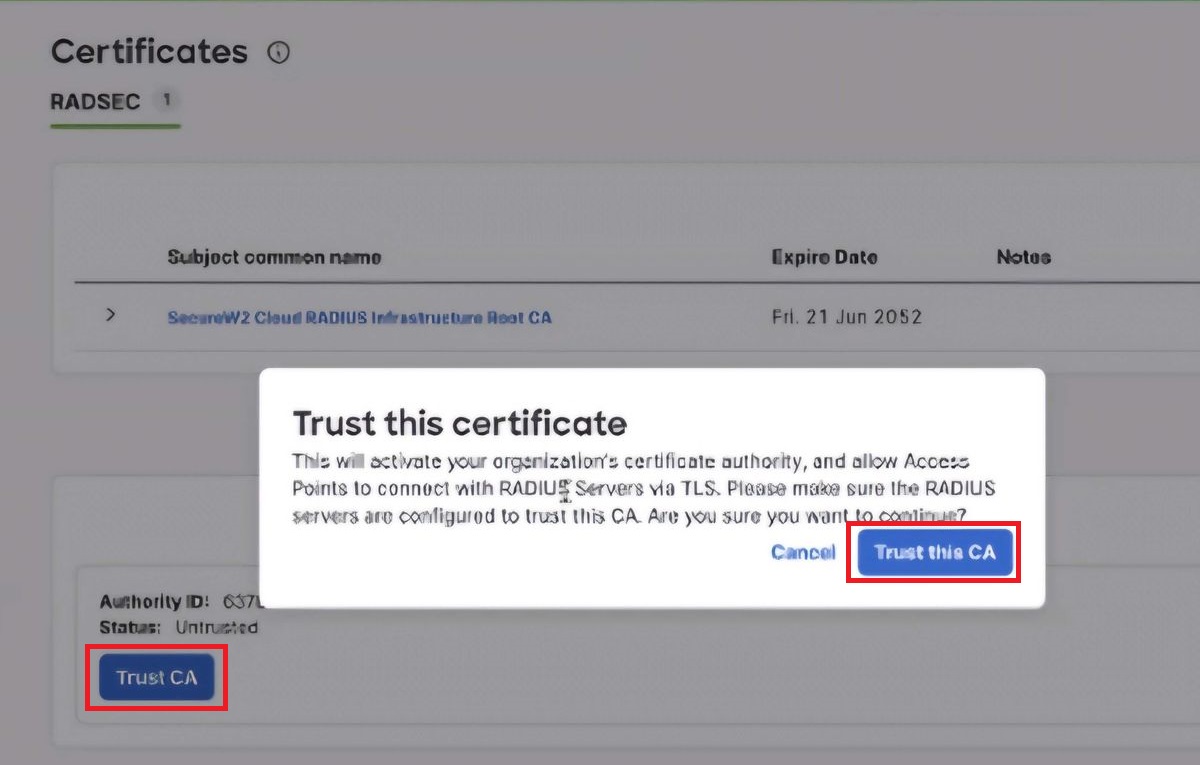
NOTE: Meraki allocates one CA per Meraki organization. - Click the Trust CA button.
- On the Trust this certificate pop-up window, click the Trust this CA button. This is necessary to verify the RADIUS Server Certificate during the authentication.


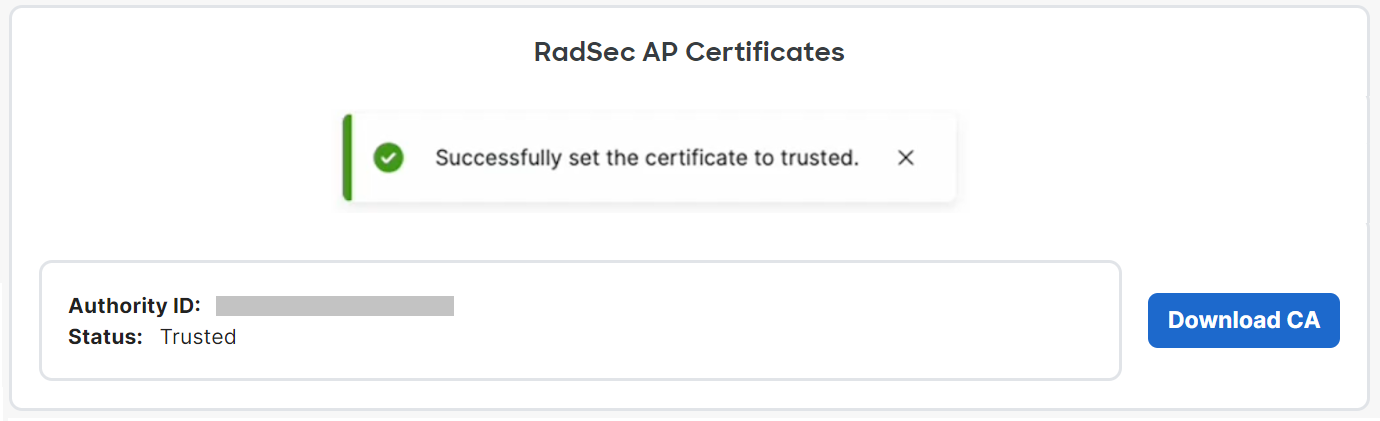
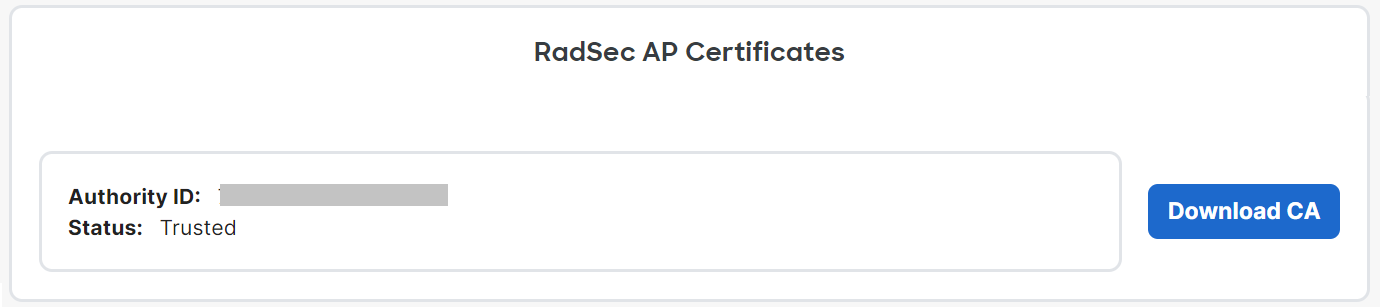
- Click the Download CA button to obtain the RadSec AP Certificate. This CA should be uploaded in the JoinNow Management Portal to establish trust with the Meraki Controller (refer to the Integrating Meraki RadSec AP Certificate with SecureW2 section).


4.2 Integrating Meraki RadSec AP Certificate with SecureW2
To upload the RadSec AP Certificate in the JoinNow Management portal, perform the following steps:
- Log in to the JoinNow Management Portal.
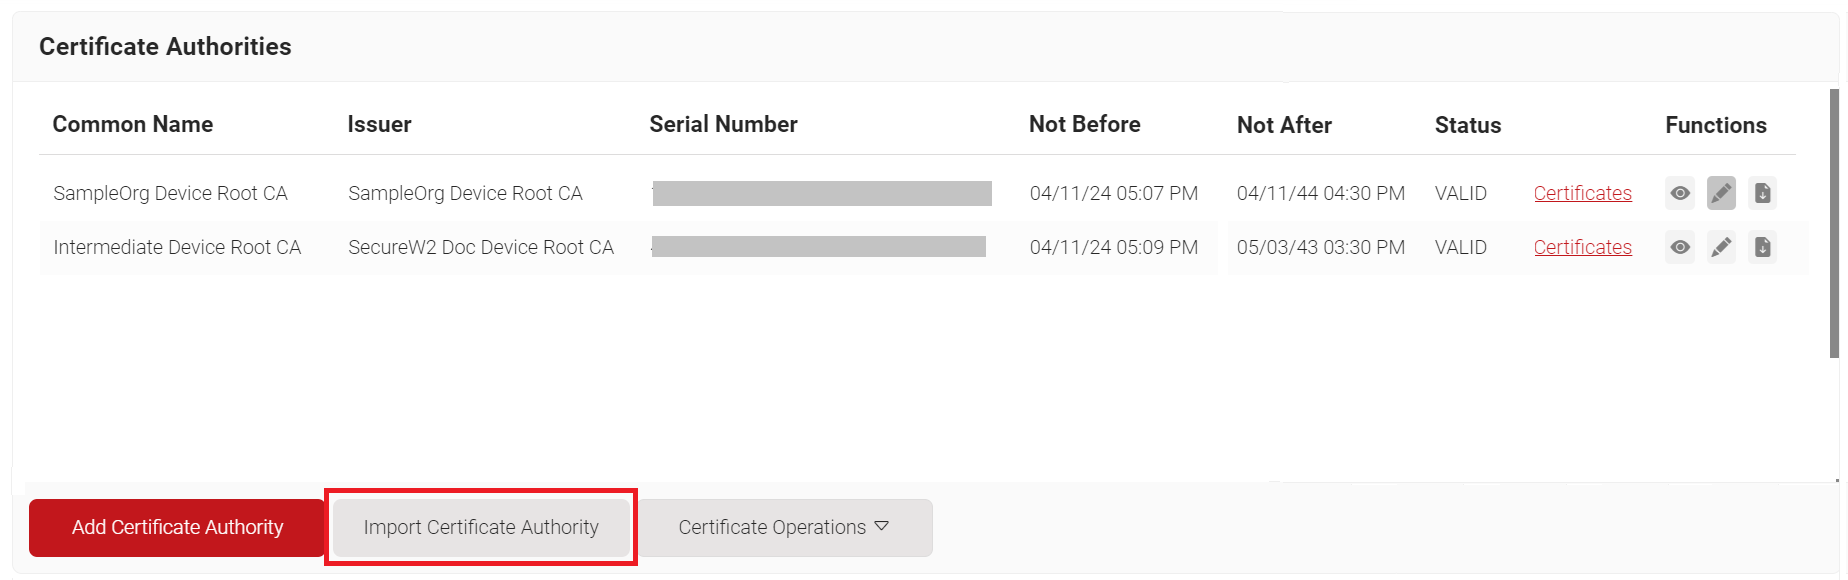
- Navigate to Dynamic PKI > Certificate Authorities.
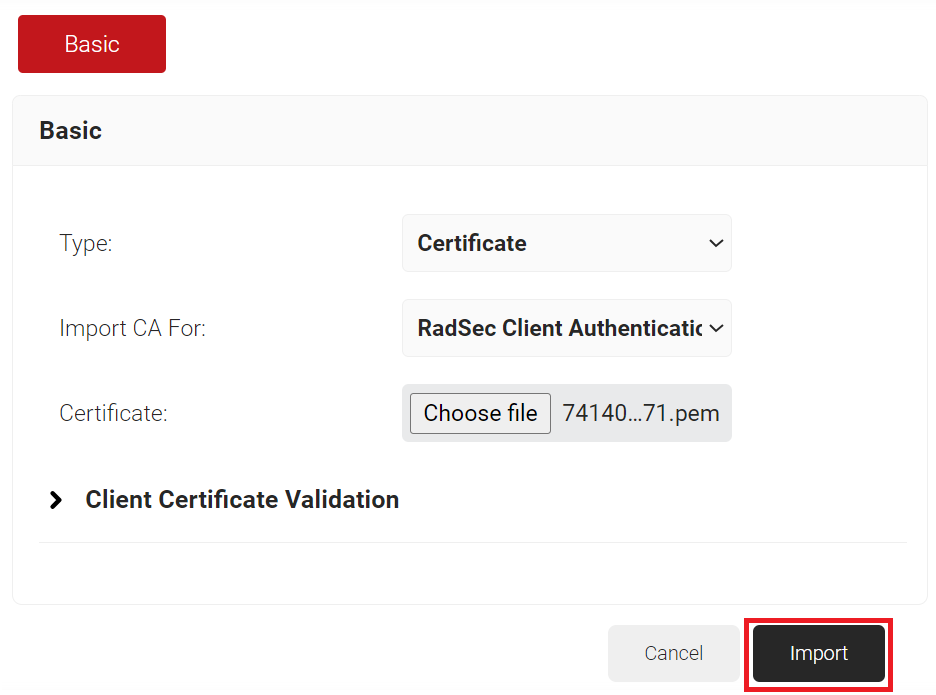
- On the Certificate Authorities page, click the Import Certificate Authority button to upload the Meraki RadSec AP Certificate.

- On the Basic page, from the Type drop-down list, select the Certificate option.
- From the Import CA For drop-down list, select the RadSec Client Authentication option to authenticate the access point (Meraki).
- In the Certificate field, click the Choose file button to upload the Meraki RadSec AP Certificate.

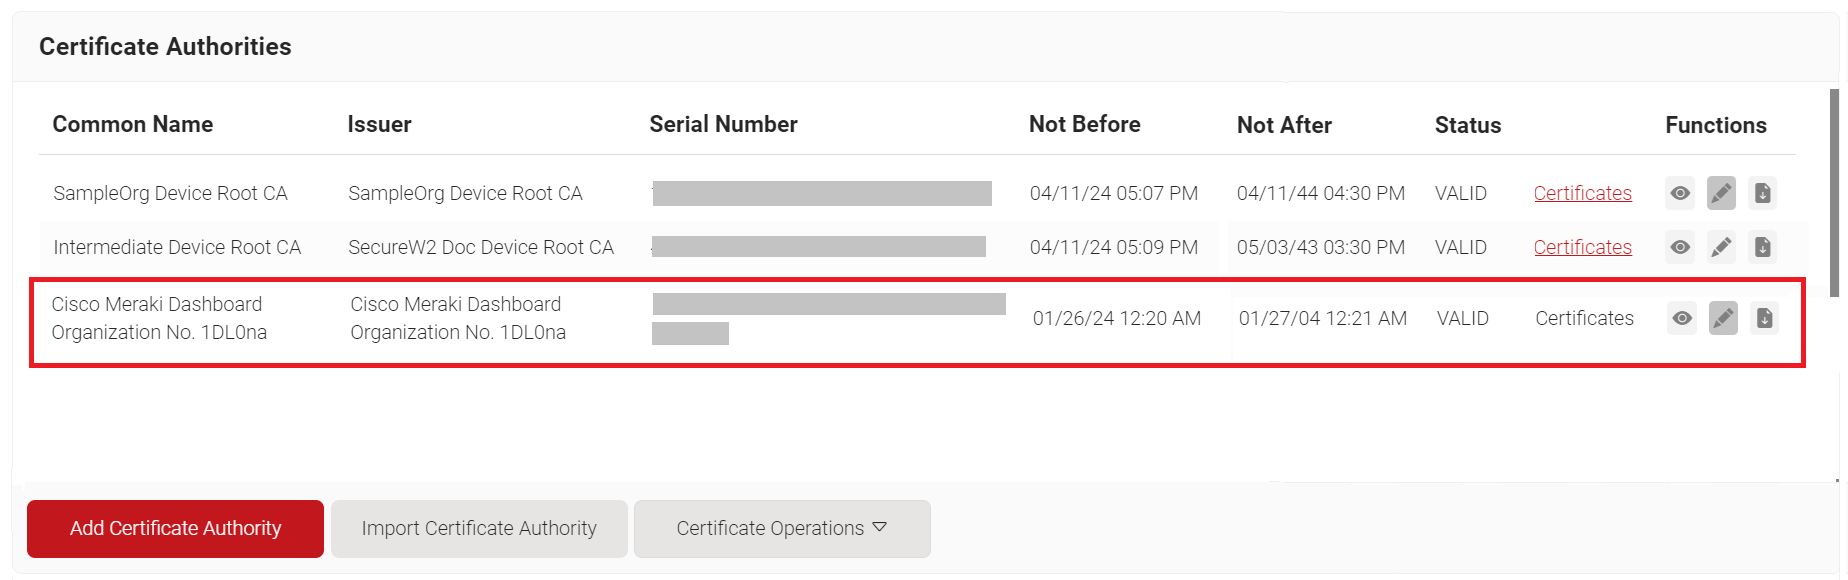
- Click the Import button. The Meraki RadSec AP Certificate is displayed on the Certificate Authorities page.
4.3 Configuring a RADIUS Server in Meraki
For authentication, the broadcasting SSID must be configured with the RADIUS server address.
To set up a RADIUS server:
- Log in to the Cisco Meraki portal.
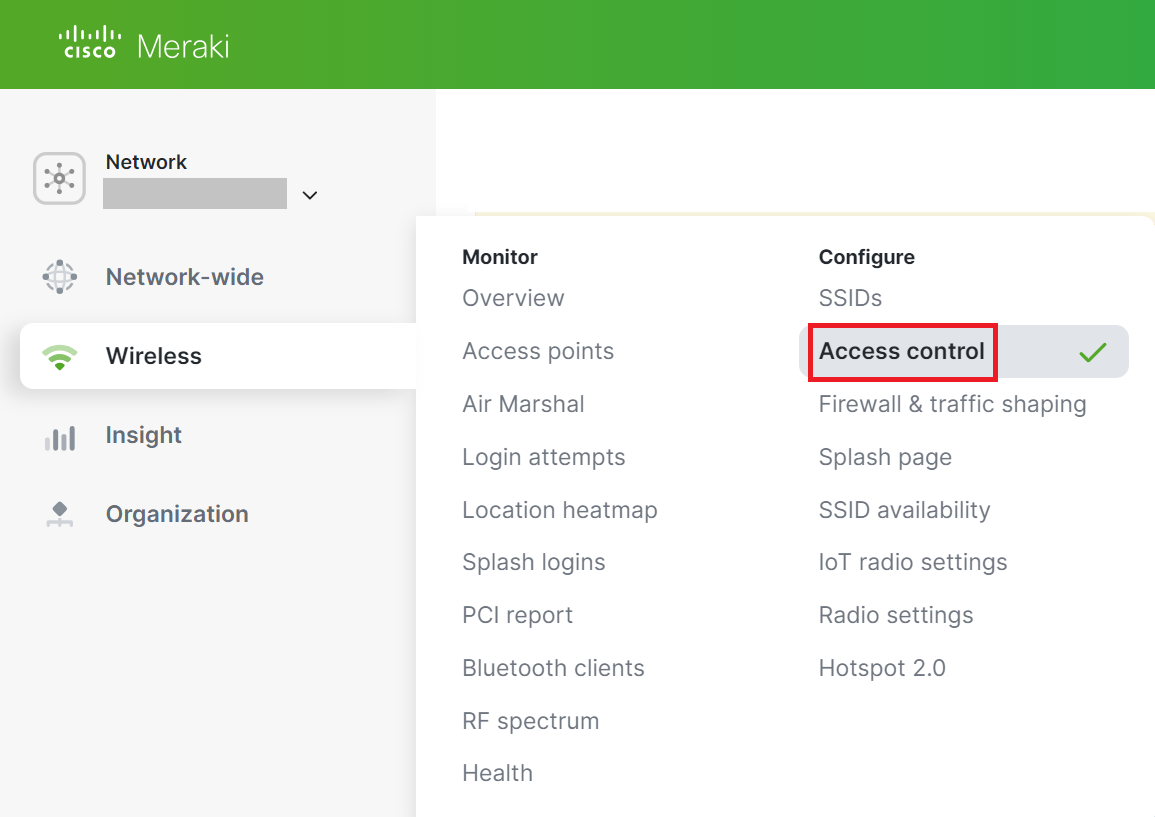
- Navigate to Wireless > Configure > Access Control.

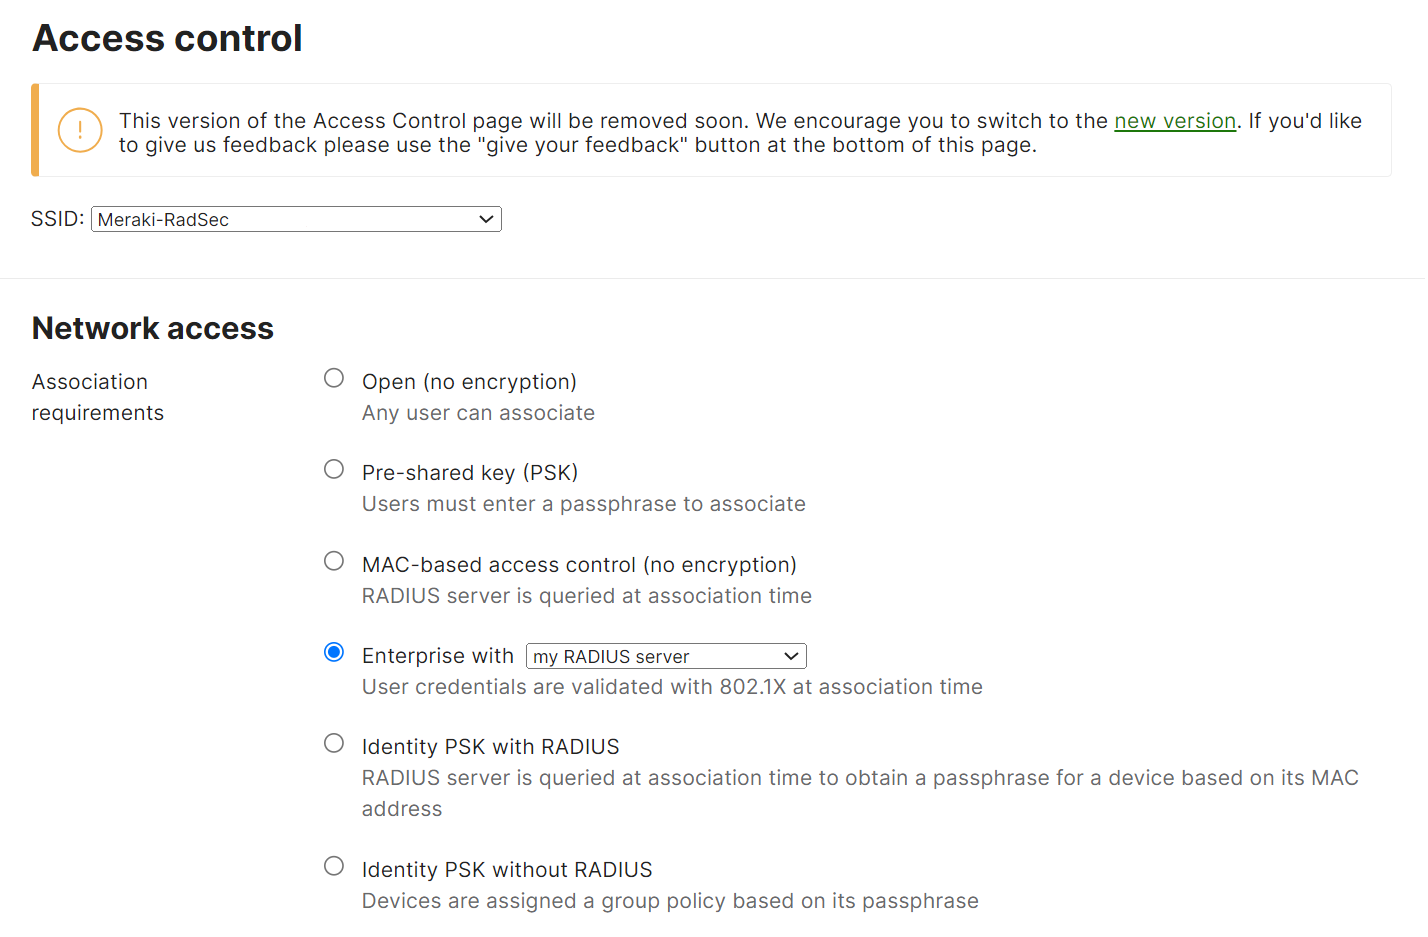
- From the SSID drop-down list, select the required SSID.
- In the Network access section, click the Enterprise with radio button and select the my RADIUS server option from the drop-down list.

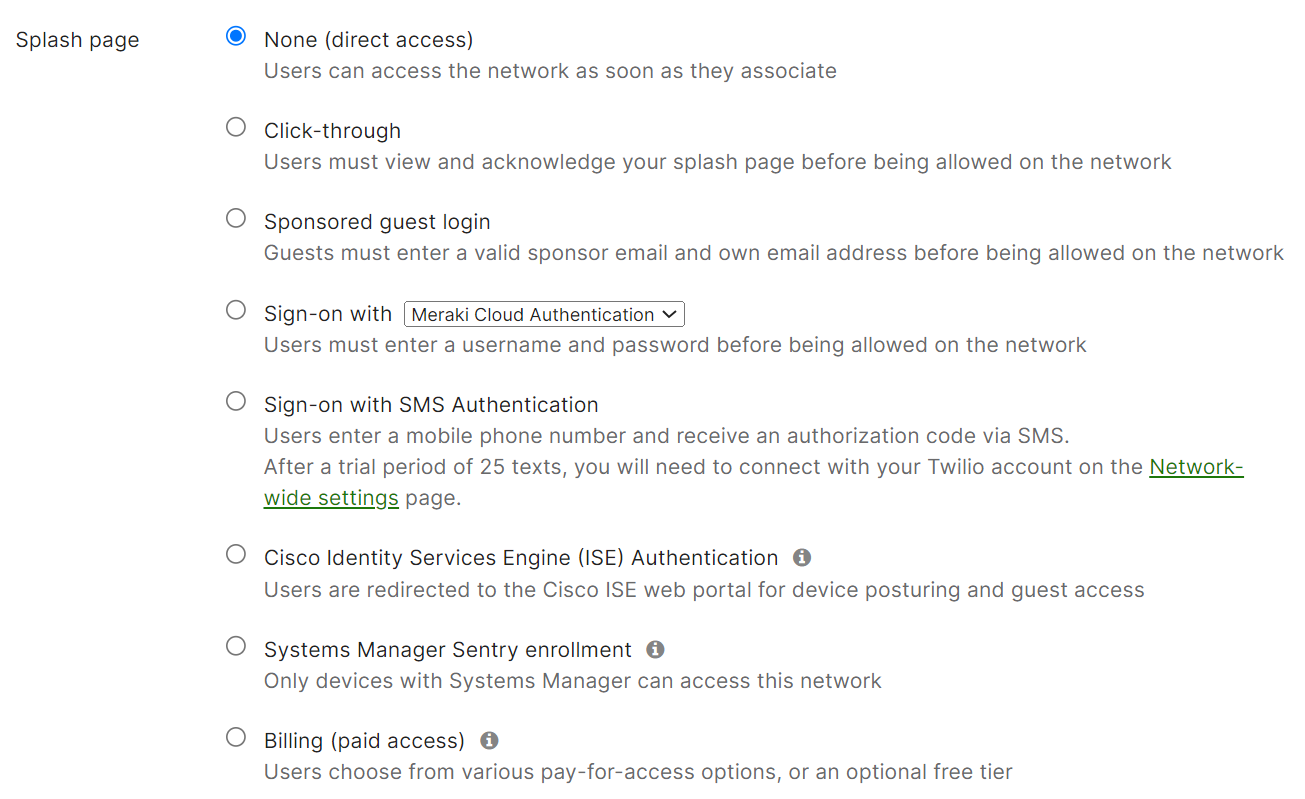
- Select the None (direct access) radio button in the Splash page section.

- Scroll to the RADIUS servers section and click the Add a server link.

- In the Host field, enter the Hostname you obtained from the JoinNow Management Portal (refer to the Exporting the SecureW2 Cloud RADIUS Root CA section, step 5).
- In the Port field, enter the Port value you obtained from the JoinNow Management Portal (refer to the Exporting the SecureW2 Cloud RADIUS Root CA section, step 5).
- In the Secret field, enter the secret value as “radsec” and enable the RadSec checkbox.

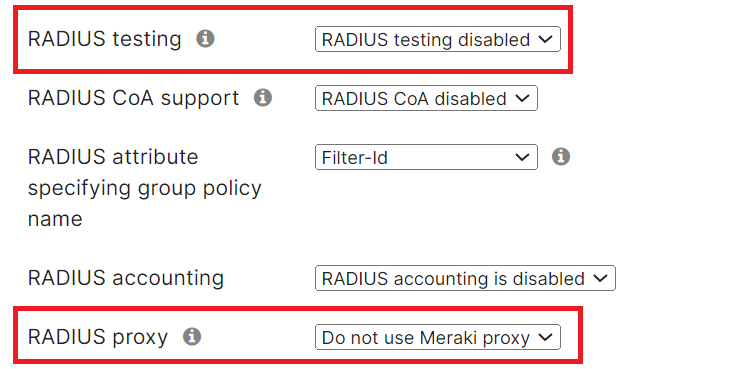
- From the RADIUS testing drop-down list, select the RADIUS testing disabled option to prevent Meraki devices from periodically sending the Access-Request messages to ensure the reachability of the specified RADIUS servers.
- From the RADIUS proxy drop-down list, select the Do not use Meraki proxy option to disable the Meraki devices from sending the Access-Request and Accounting messages via a Meraki proxy to the specified RADIUS servers.

- Scroll to the bottom of the page and click Save Changes.


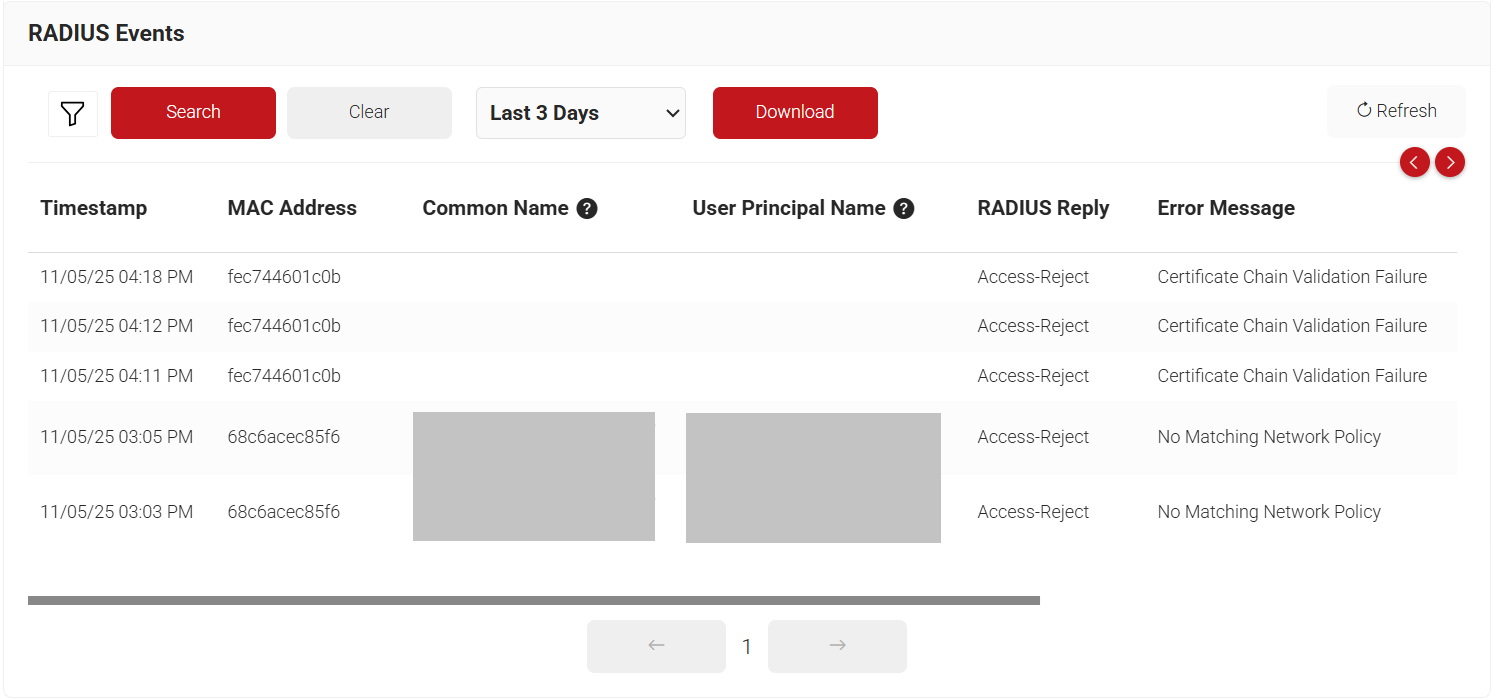
With the above successful configuration, the setup is ready for RADIUS authentication. The RADIUS authentication requests from the devices are logged on the RADIUS Events page. To access the RADIUS Events page, log in to the JoinNow Management Portal and navigate to Data and Monitoring > RADIUS Events.
5. Aruba Integration
Aruba Controller needs a Client Certificate and its corresponding Root CA to establish the RadSec tunnel with the SecureW2 RadSec Server. These certificates can be generated from the JoinNow Management Portal and installed in the Controller.
The following sections detail how to integrate the SecureW2 RADIUS Server with the Aruba controller
5.1 Creating RadSec Root CA in SecureW2
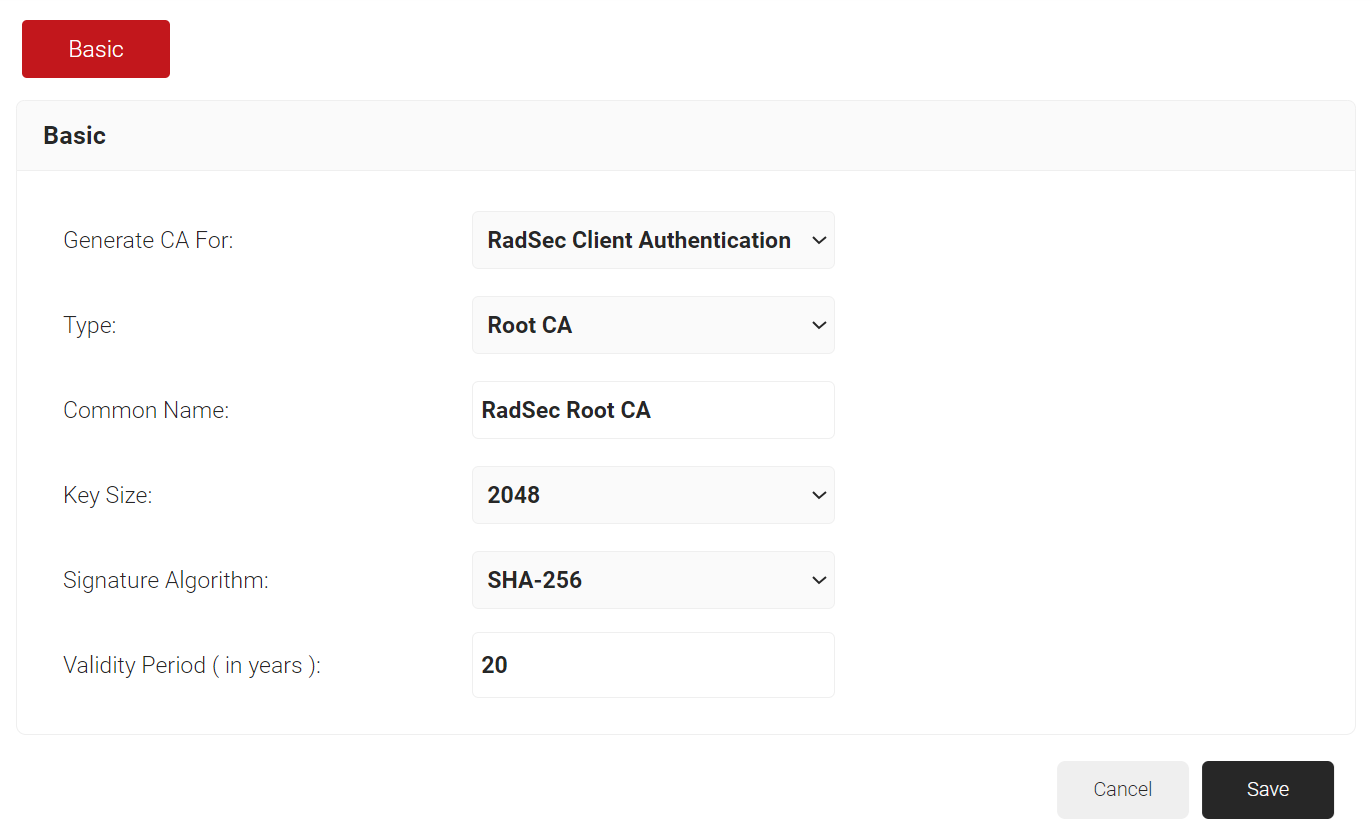
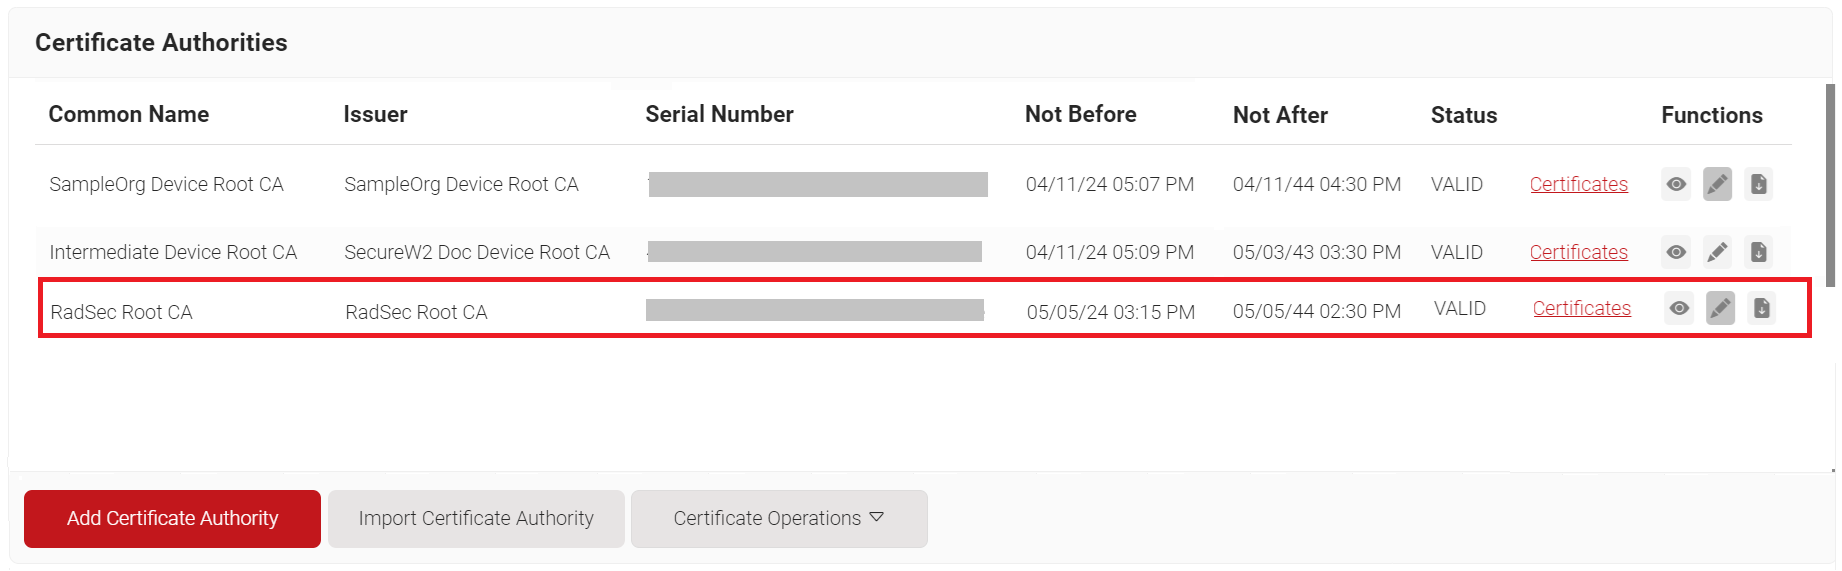
To generate a RadSec Client Certificate, a new Root CA and Intermediate CA must be created. To create a RadSec Root CA, perform the following steps:
- Log in to the JoinNow Management Portal.
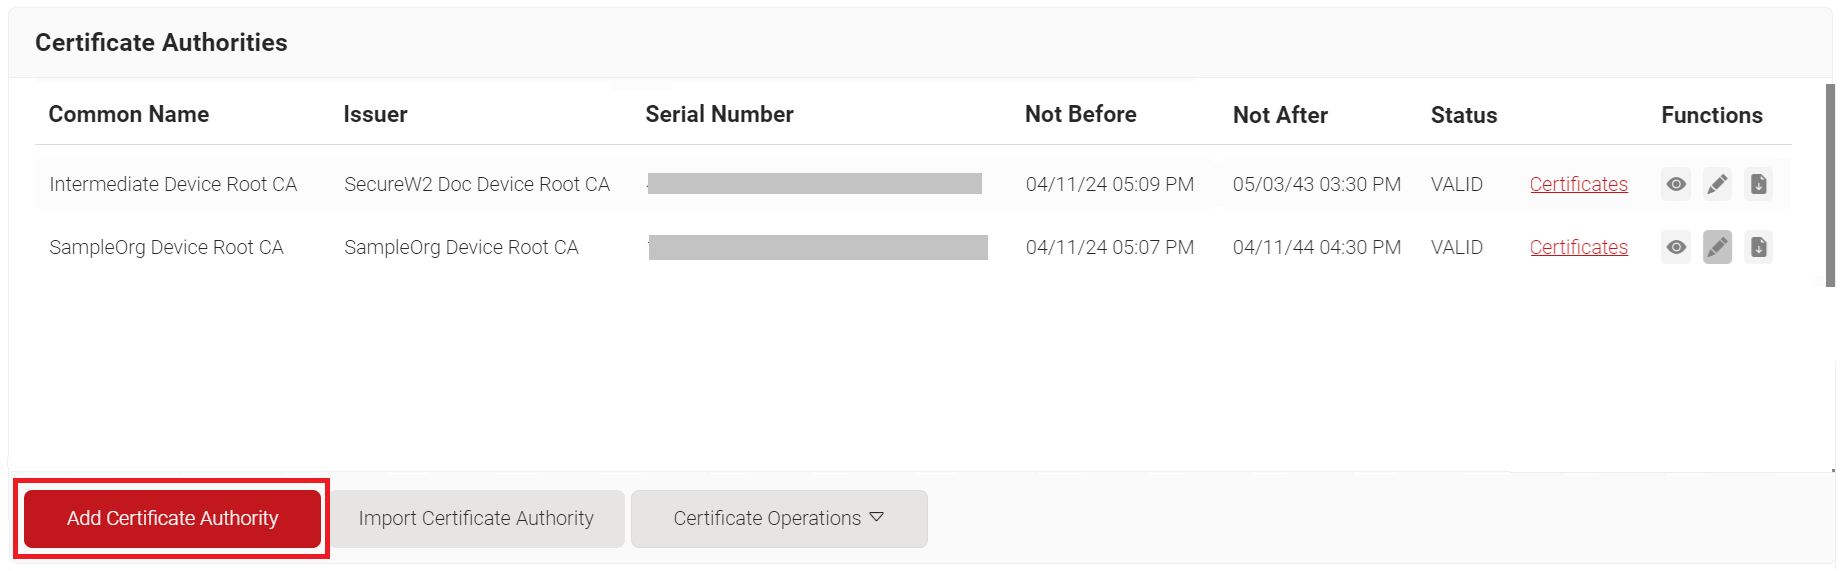
- Navigate to Dynamic PKI > Certificate Authorities.
- Click the Add Certificate Authority button.

- In the Basic section, from the Generate CA For drop-down list, select the RadSec Client Authentication option to authenticate the access point (Aruba).
- From the Type drop-down list, select the Root CA option.
- In the Common Name field, enter the Common Name for the CA certificate.
- In the Key Size field, enter the key size value.
- From the Signature Algorithm drop-down list, select SHA-256 for the certificate signing request.
- In the Validity Period (in years) field, enter the validity period of the certificate.

- Click Save.
5.2 Creating RadSec Intermediate CA in SecureW2
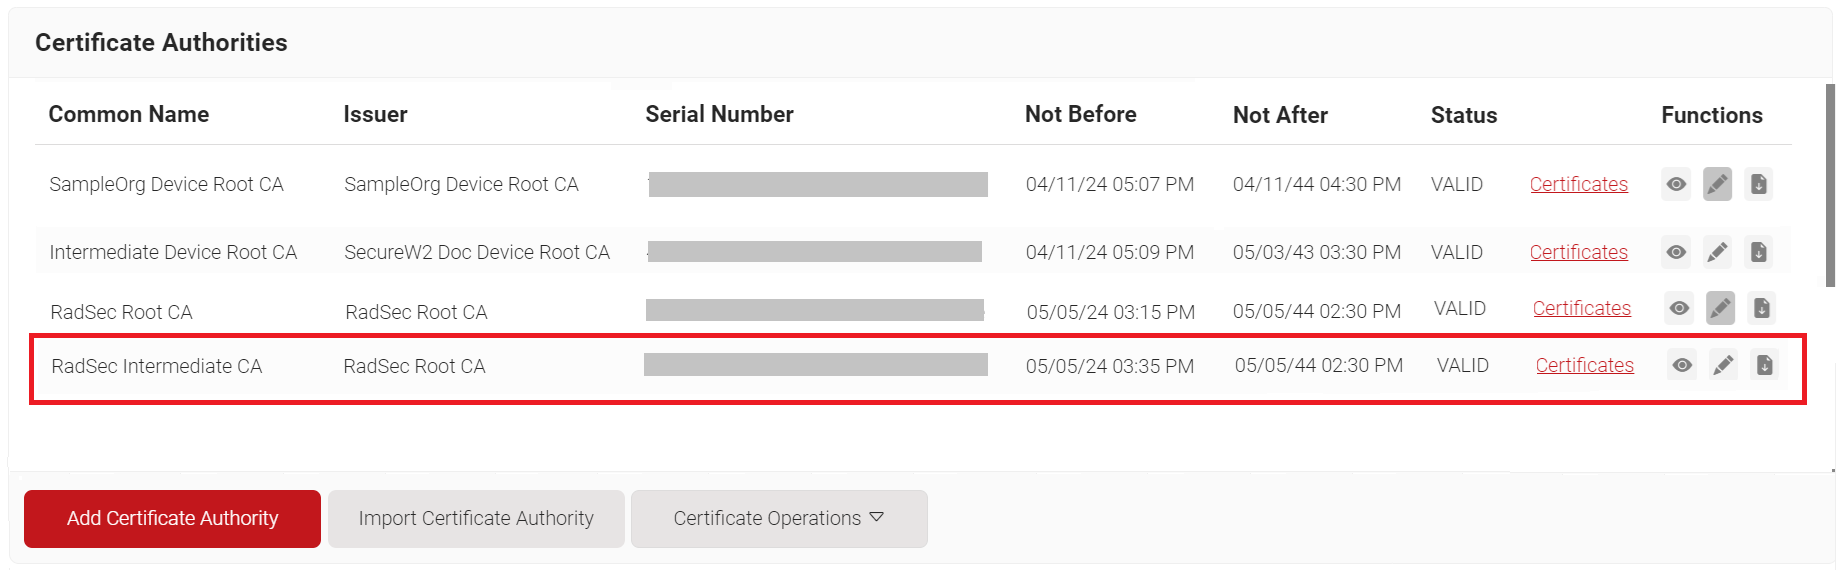
To create a RadSec Intermediate CA, perform the following steps:
- Log in to the JoinNow Management Portal.
- Navigate to Dynamic PKI > Certificate Authorities.
- Click the Add Certificate Authority button.
- In the Basic section, from the Generate CA For drop-down list, select the RadSec Client Authentication option to generate the Radsec client certificate.
- From the Type drop-down list, select the Intermediate CA option.
- From the Certificate Authority drop-down list, select the root CA created earlier ( refer to the Creating RadSec Root CA in SecureW2 section).
- From the Generate via drop-down list, retain the default option.
- In the Common Name field, enter the Common Name for the CA certificate.
- In the Key Size field, enter the key size value.
- From the Signature Algorithm drop-down list, select SHA-256 for the certificate signing request.
- In the Validity Period (in years) field, enter the validity period of the certificate.

- Click Save.

5.3 Creating a RadSec Client Certificate in SecureW2
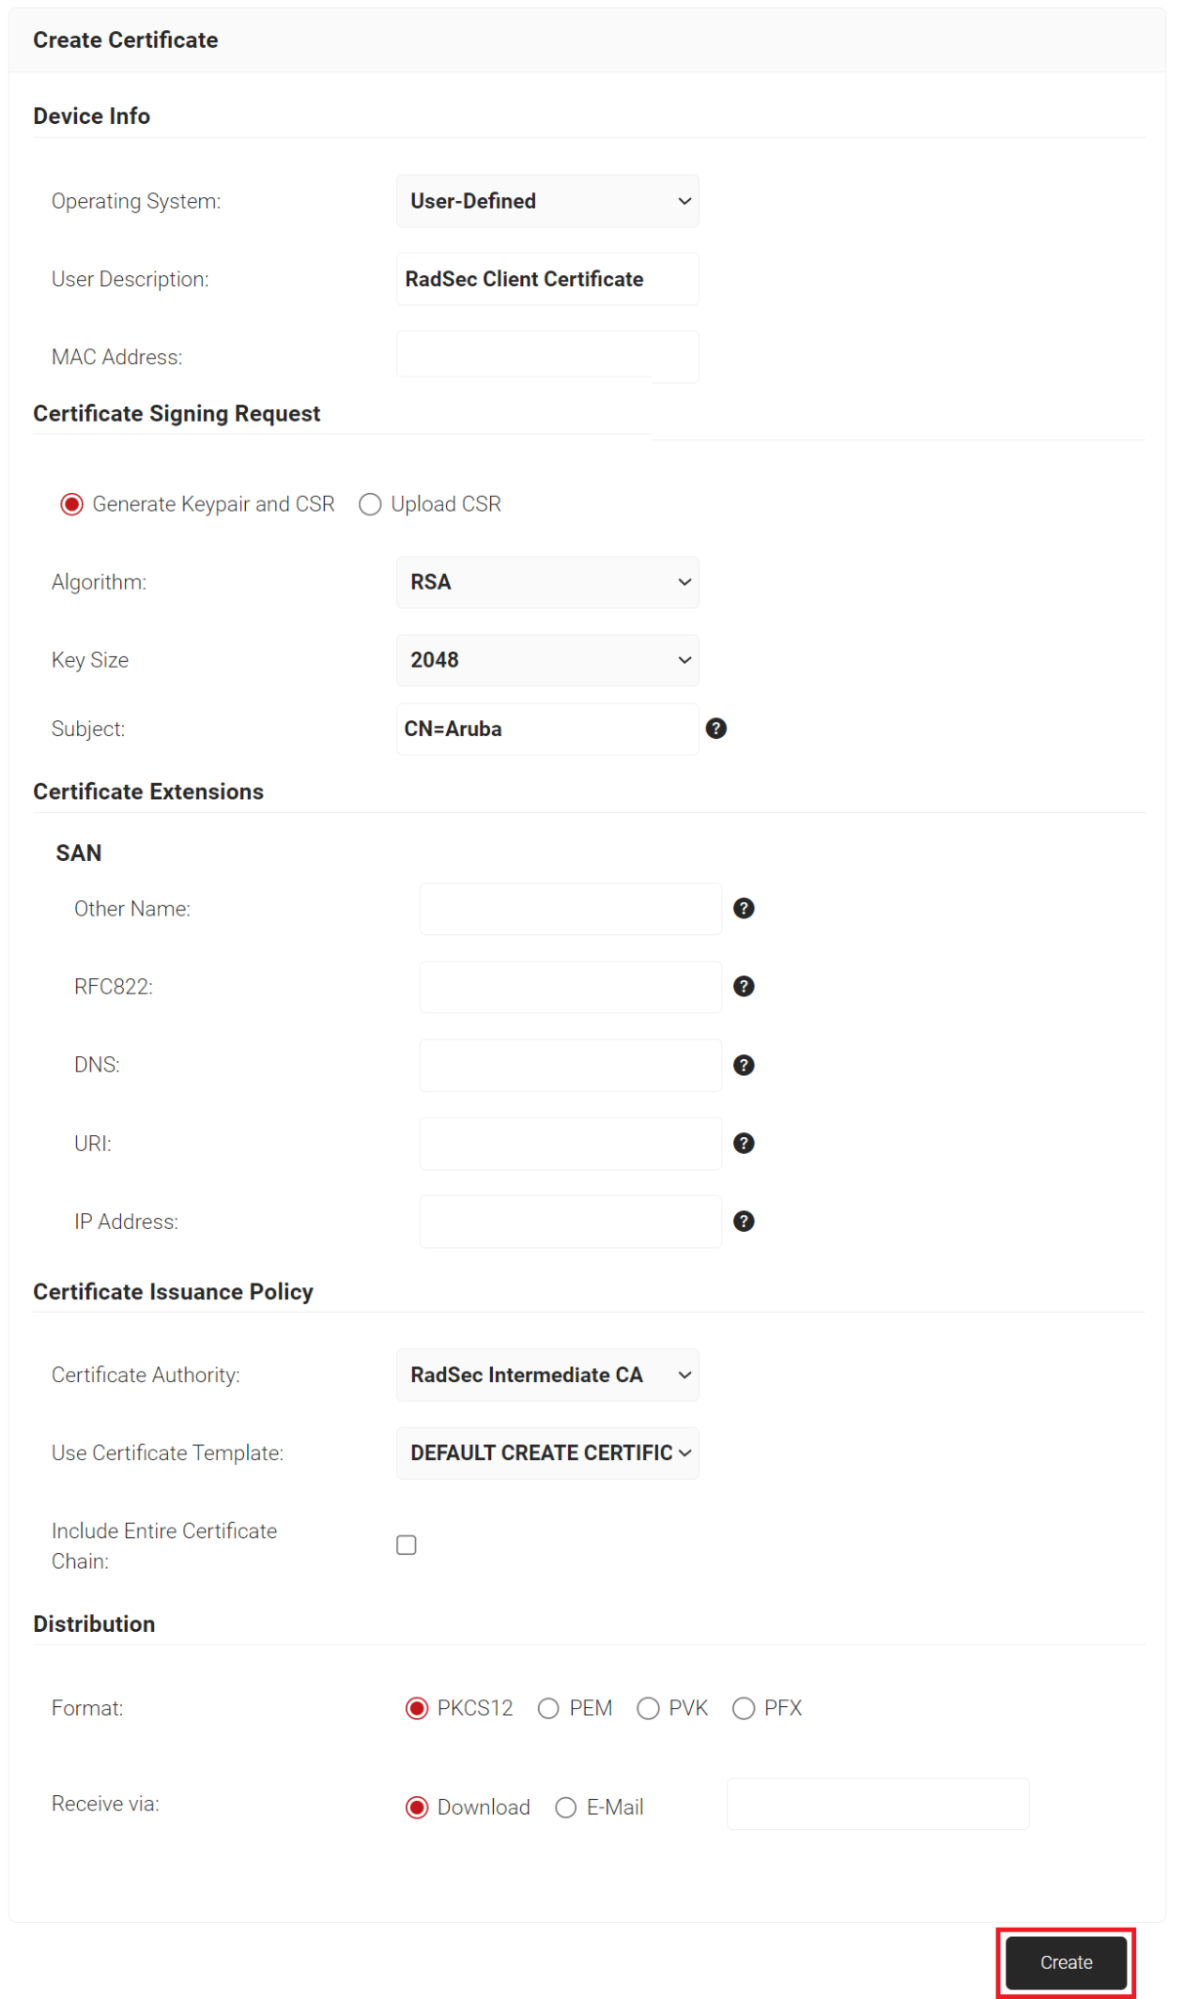
To create a RadSec Client Certificate, perform the following steps:
- Log in to the JoinNow Management Portal.
- Navigate to Dynamic PKI > Create Certificate.
- In the Device Info section, from the Operating System drop-down list, select an operating system.
- In the Subject field, enter the subject of the certificate. The supported attributes are:
- CN – Common Name (mandatory)
- E – Email
- OU – Organizational Unit
- L – Locality
- ST – State or Province
- C – Country Code
- From the Certificate Authority drop-down list, select the Intermediate CA created earlier (refer to the Creating RadSec Intermediate CA in SecureW2 section).
- Click the Create button and a Password for private key pop-up window opens. Enter the password for the certificate file.


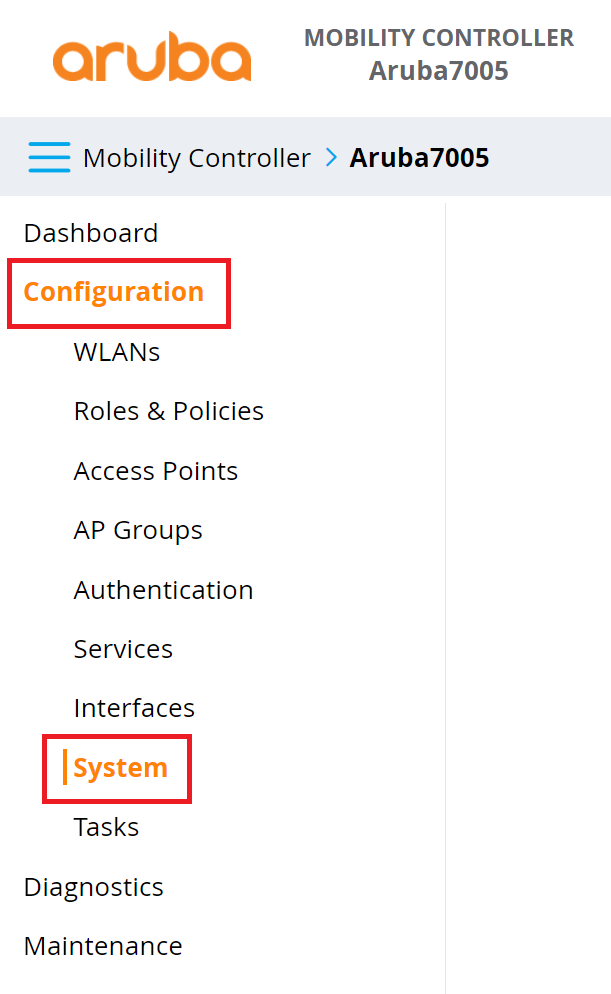
5.4 Configuring SecureW2 RadSec Authentication Server in Aruba Controller
To configure the Radsec Authentication server in the Aruba controller, perform the following steps:
- Log in to the Aruba portal.
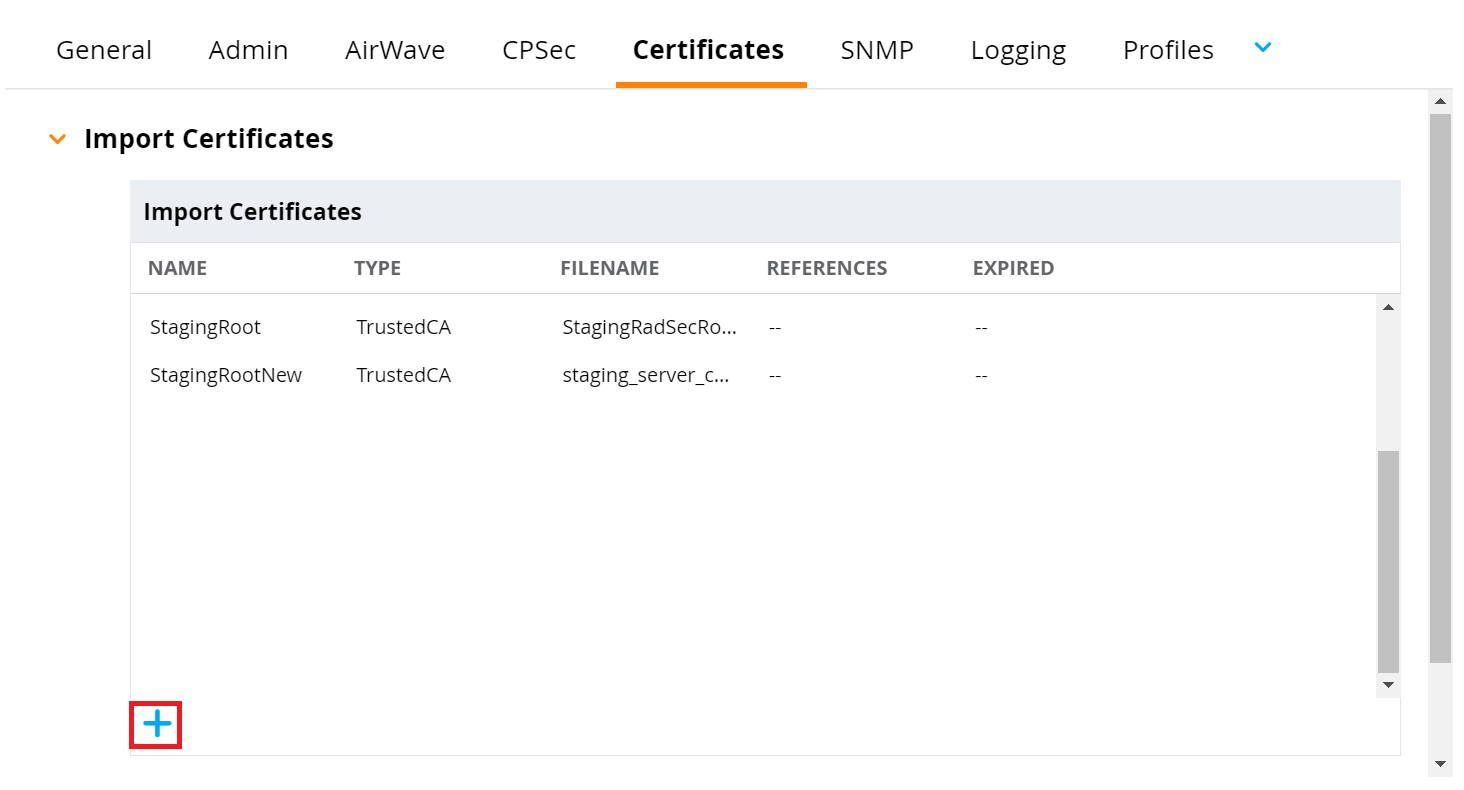
- On the left pane, navigate to Configuration > System.

- Click the Certificates tab.
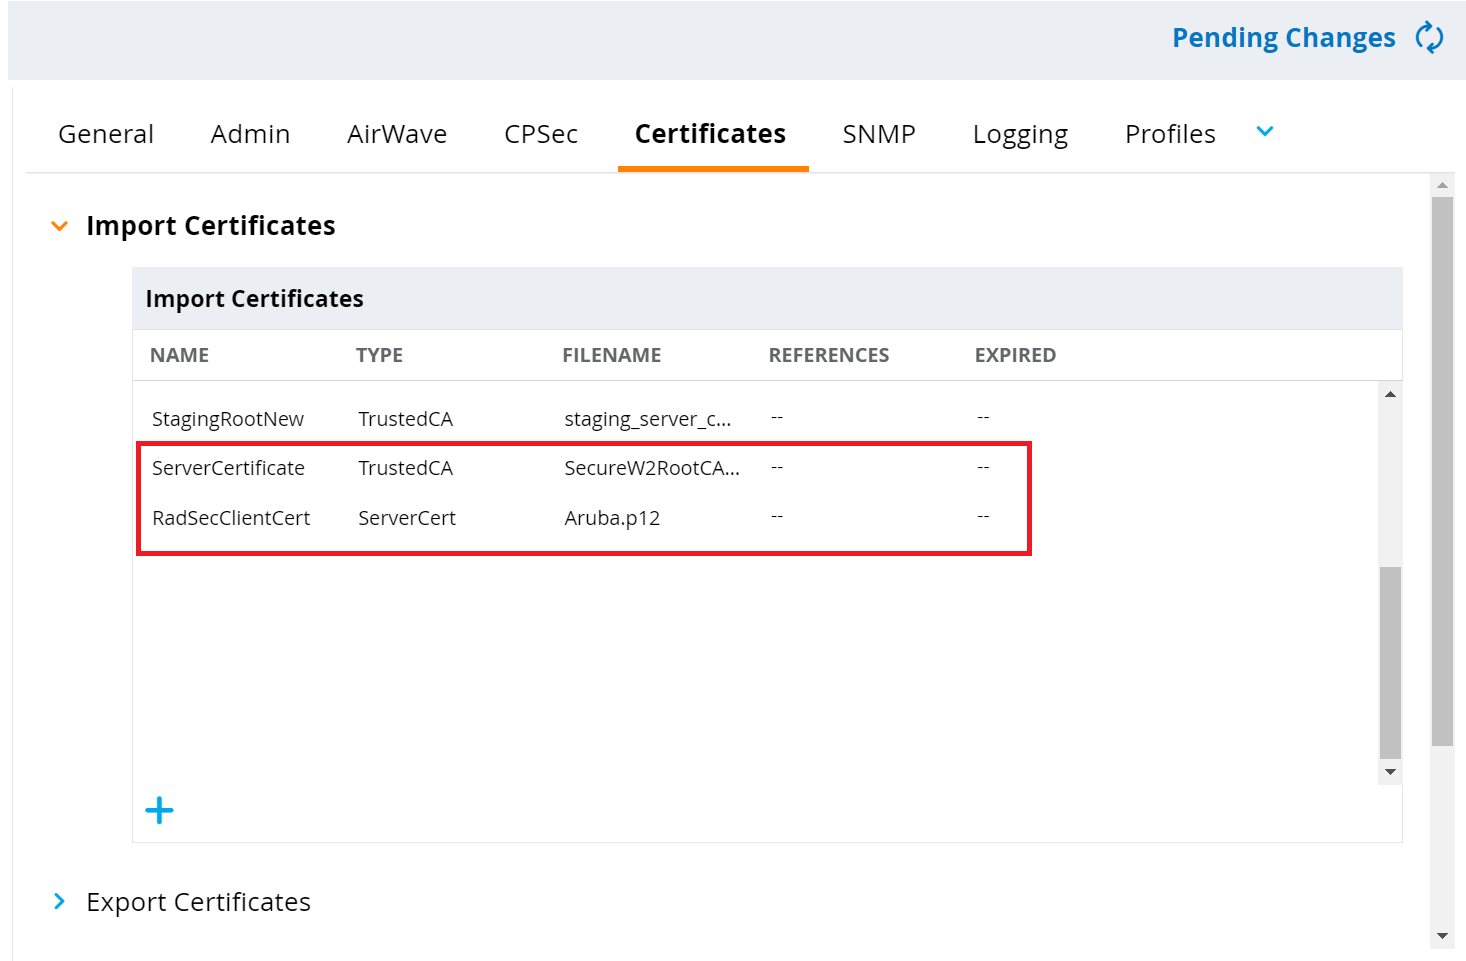
- In the Import Certificates section, click + to import a new certificate.

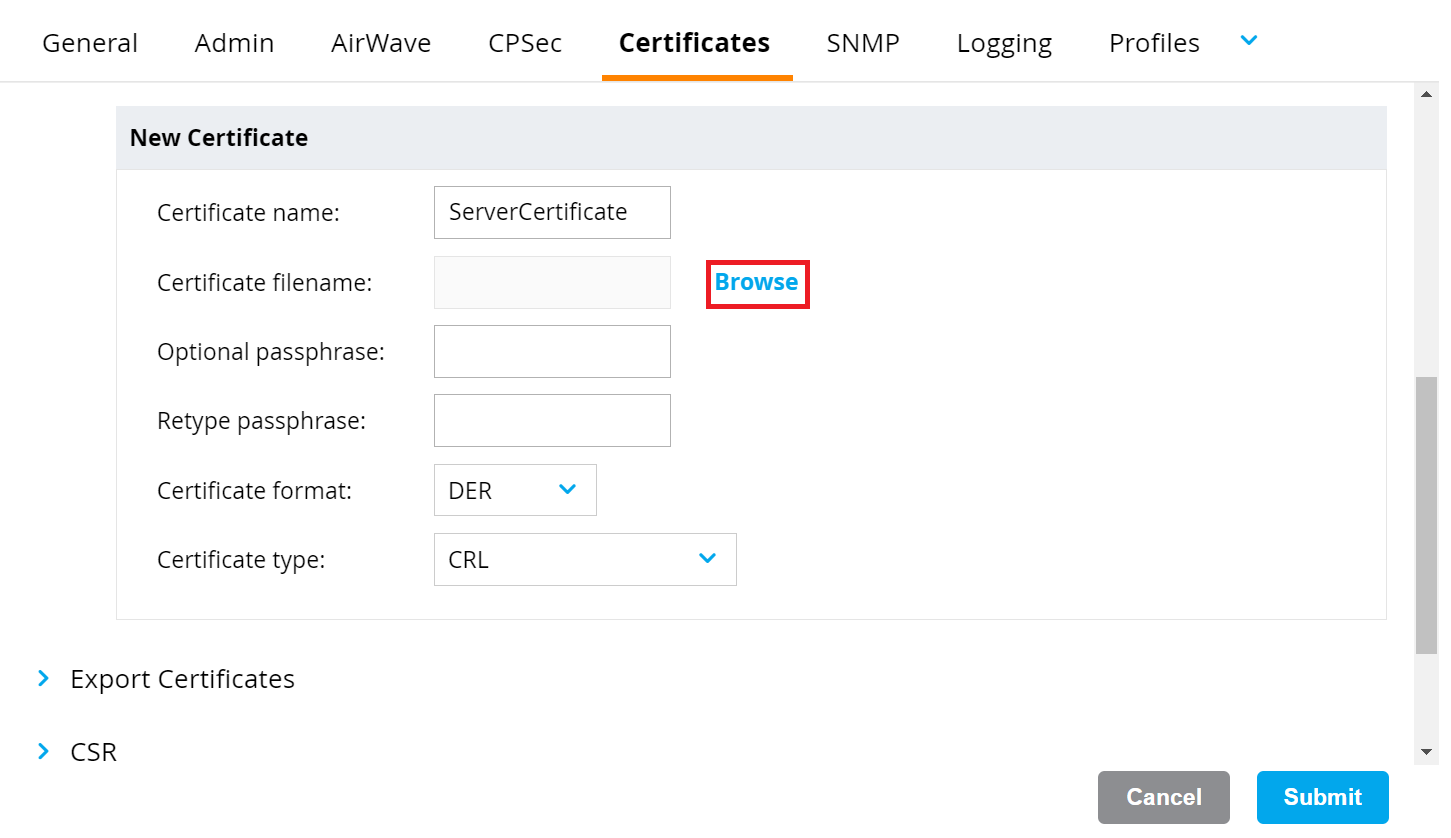
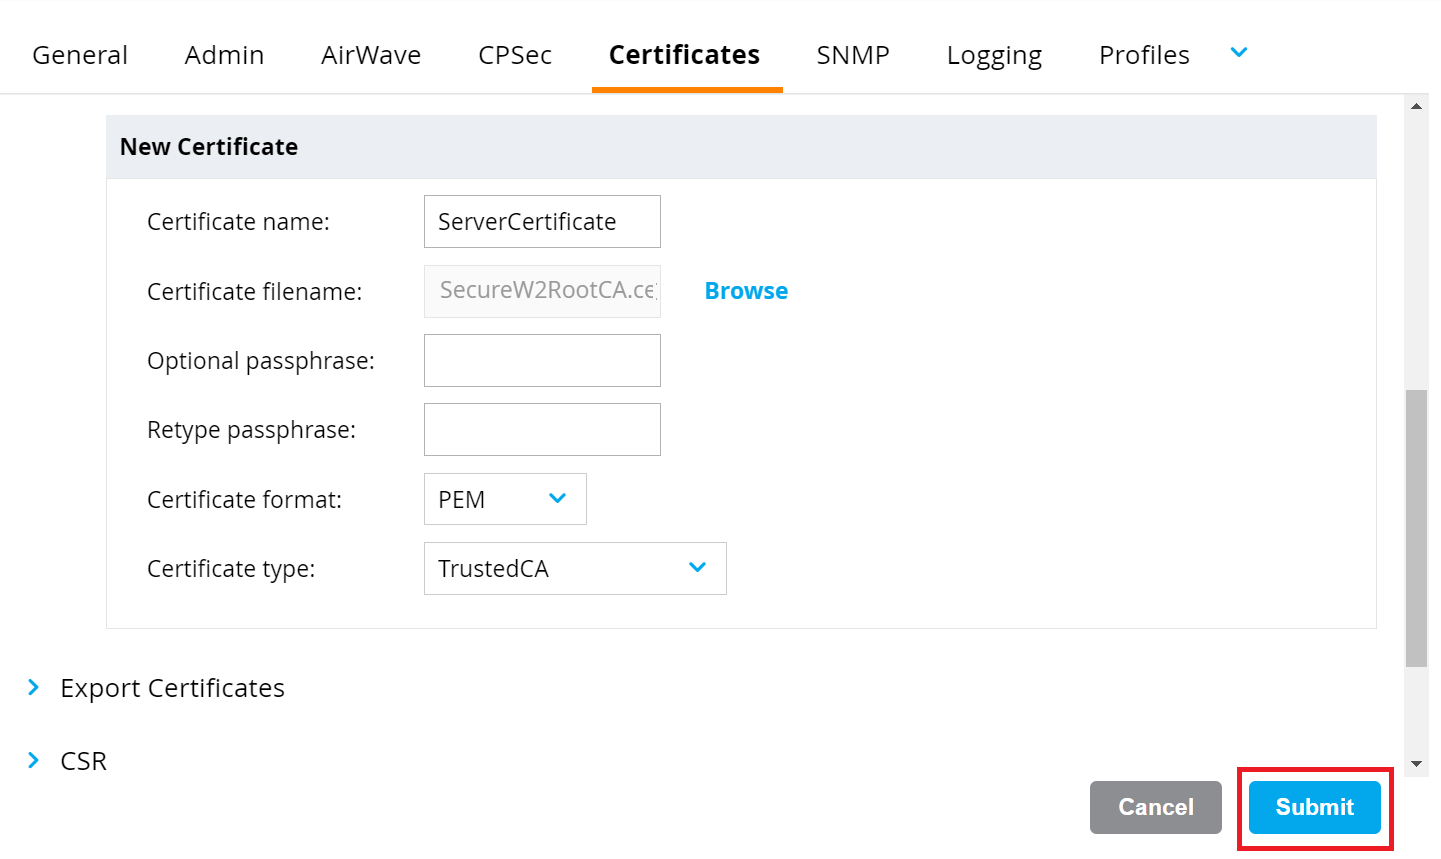
- To set up a RadSec Server Certificate, perform the following steps:
- In the New Certificate section, in the Certificate name field, enter the name of the certificate.
- Click the Browse button and upload the SecureW2 RadSec Root CA obtained earlier (refer to the Exporting the SecureW2 Cloud RADIUS Root CA section).

c. From the Certificate format drop-down list, select PEM.
d. From the Certificate type drop-down list, select TrustedCA.

e. Click Submit.
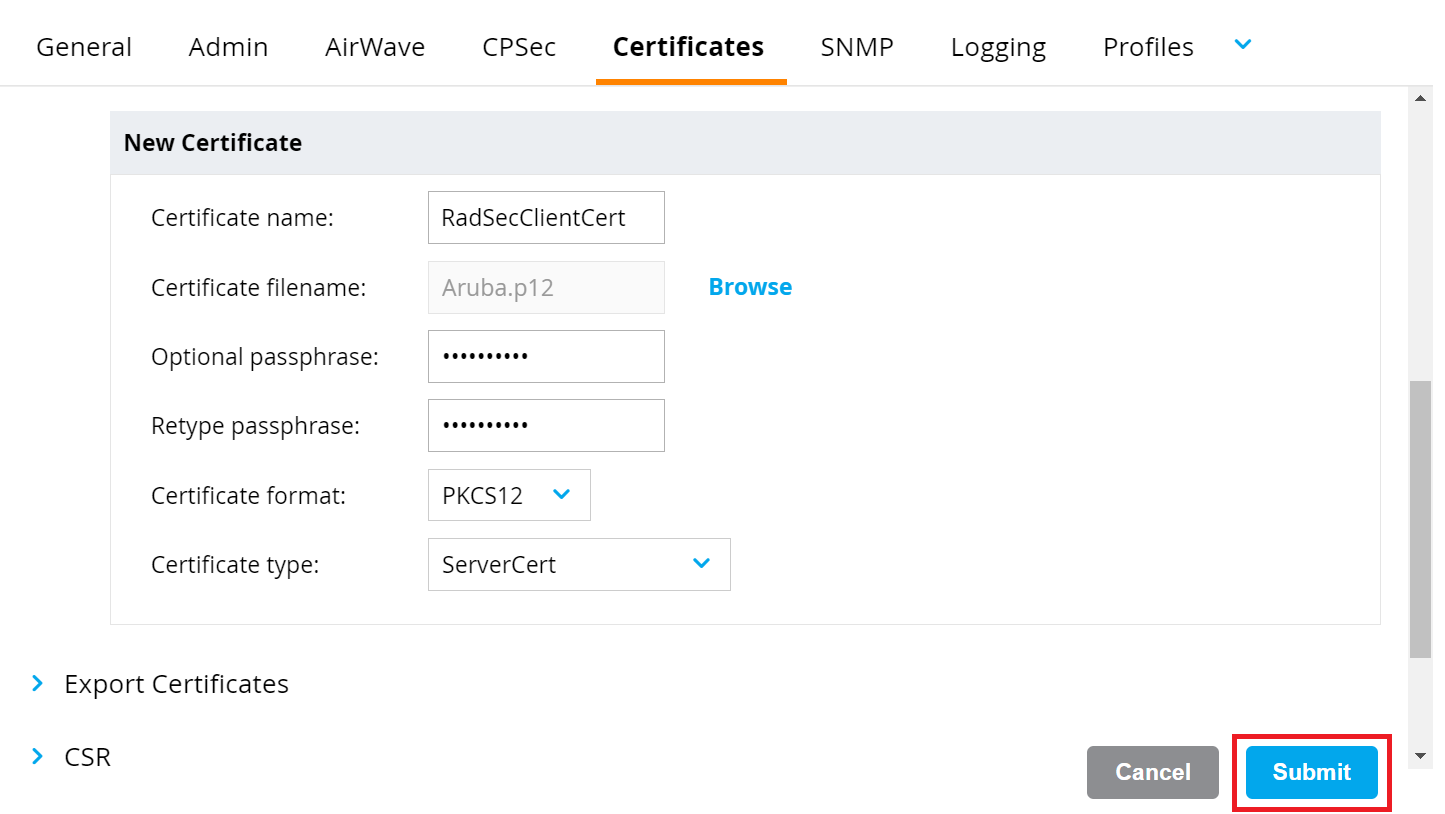
- To set up a RadSec Client Certificate, perform the following steps:
- In the New Certificate section, in the Certificate name field, enter the name of the certificate.
- Click the Browse button and upload the SecureW2 RadSec Client Certificate created earlier (refer to the Creating a RadSec Client Certificate in SecureW2 section).
- In the Optional passphrase field, enter the password that was used during the creation of the Client Certificate (refer to the Creating a RadSec Client Certificate in SecureW2 section, step 6).
- To validate the password in the Retype passphrase field, enter the same password as the one in the Optional passphrase field.
- From the Certificate format drop-down list, select PKCS12.
- From the Certificate type drop-down list, select ServerCert.

- Click Submit.

5.5 Configuring RadSec Authentication Server Using Command-Line Interface
Currently, Aruba supports the CLI configuration to create the RadSec Authentication server.
To create the RadSec Authentication server, run the following command:
(config) # aaa authentication-server radius RadiusSec
(Auth Server "name") #
(Auth Server "name") # radsec-client-cert RadSecClientCert
(Auth Server "name") # radsec-trusted-cacert-name ServerCertificate
(Auth Server "name") # radsec-port 2083
(Auth Server "name") # host global1-radius.securew2.com
(Auth Server "name") # enable-radsec
(Auth Server "name") #
(Auth Server "name") # exit
(config) # exit
(Auth Server "name") # write memory
The following section describes how to disable the configured RadSec Authentication server, if necessary.
(config) # aaa authentication-server radius RadiusSec
(Auth Server "name") #
(Auth Server "name") # radsec-client-cert RadSecClientCert
(Auth Server "name") # radsec-trusted-cacert-name ServerCertificate
(Auth Server "name") # radsec-port 2083
(Auth Server "name") # host global1-radius.securew2.com
(Auth Server "name") # no enable-radsec
(Auth Server "name") #
(Auth Server "name") # exit
(config) # exit
(Auth Server "name") # write memory
5.6 Creating the Secure SSID with RadSec Authentication Server
The following steps describe how to create a Secure SSID and configure it with the SecureW2 RadSec Authentication Server, which helps in forwarding the incoming authentication requests to the RadSec Authentication Server.
To map the RadSec Authentication server in the SSID, perform the following steps:
- Log in to the Aruba portal.
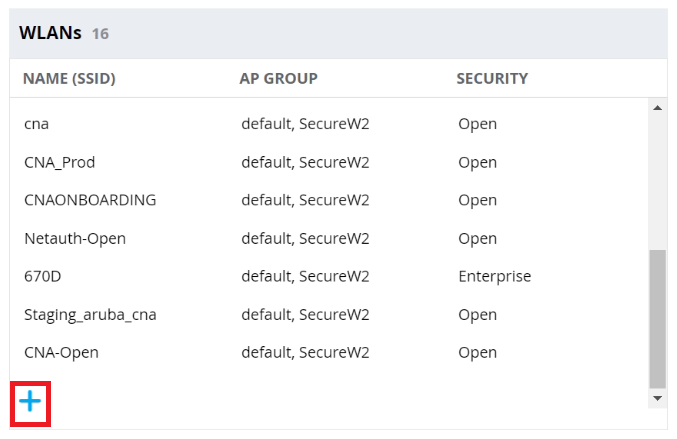
- On the left pane, navigate to Configuration > WLANs and click +.

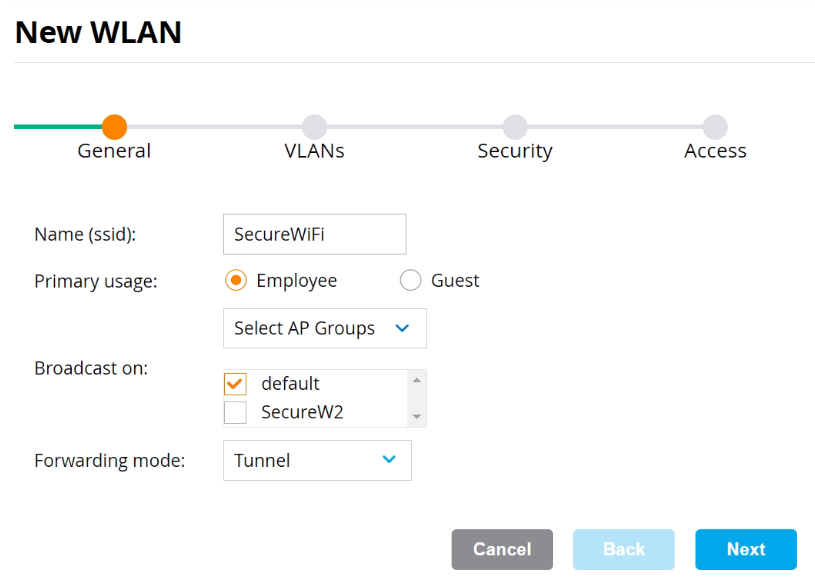
- On the General tab:
- In the Name (SSID) field, enter a name for the SSID.
- For Primary usage, select the Employee option.
- Select the Select AP Groups option from the drop-down list and choose an option in the Broadcast on list box.
- From the Forwarding Mode drop-down list, select an option.

- Click Next.
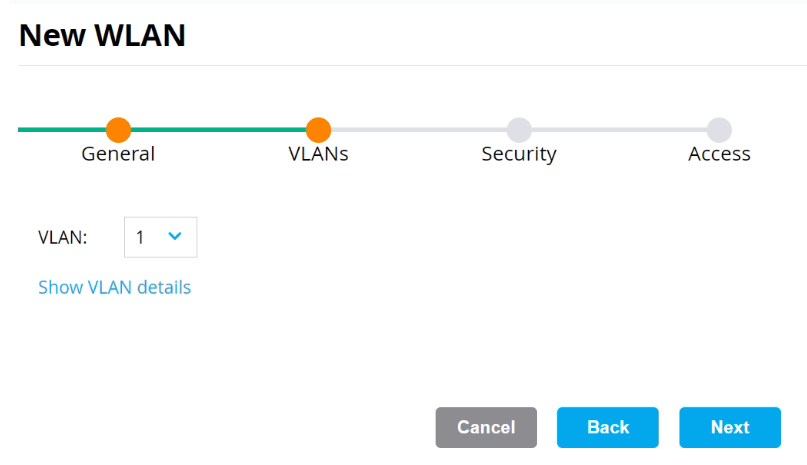
- On the VLANs tab, select your VLAN ID.

- Click Next.
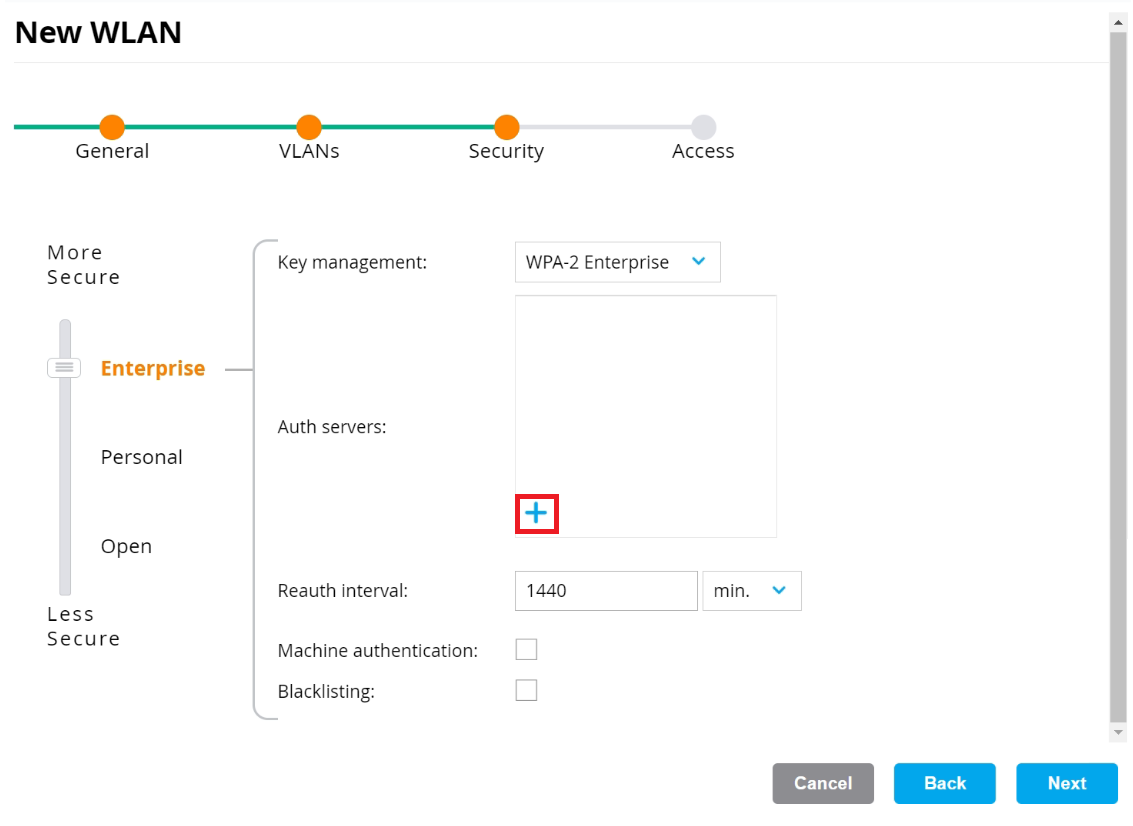
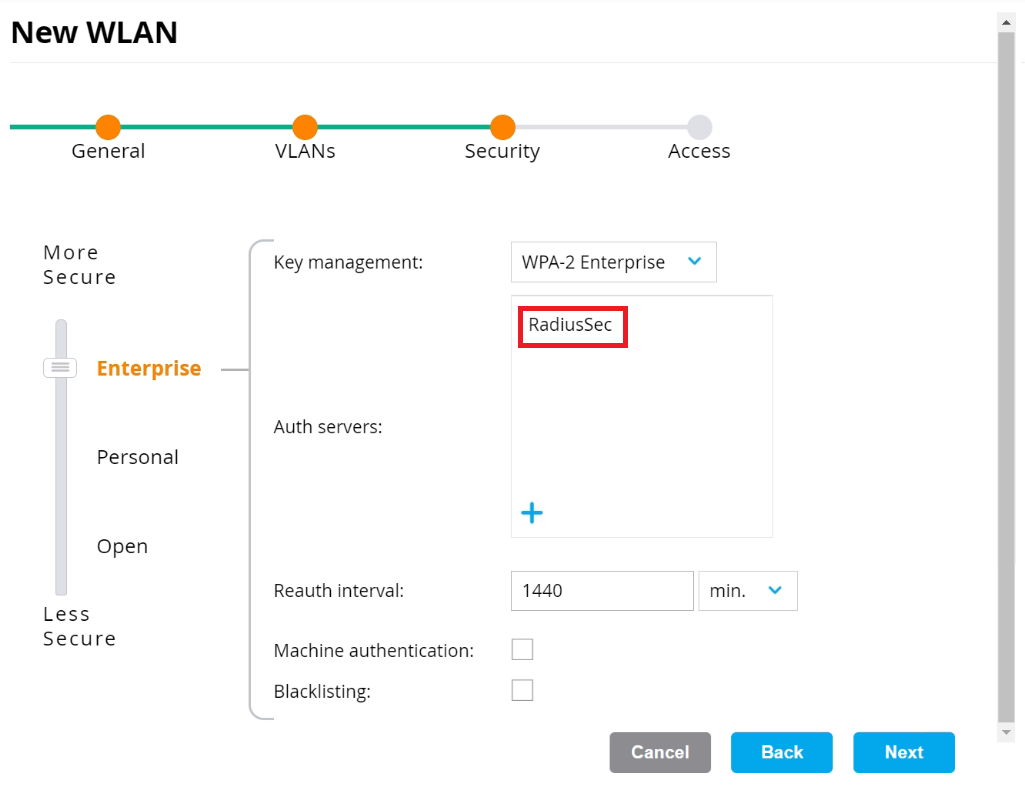
- On the Security tab:
- Ensure that the dial is at Enterprise (default value).
- From the Key management drop-down list, select WPA-2 Enterprise.

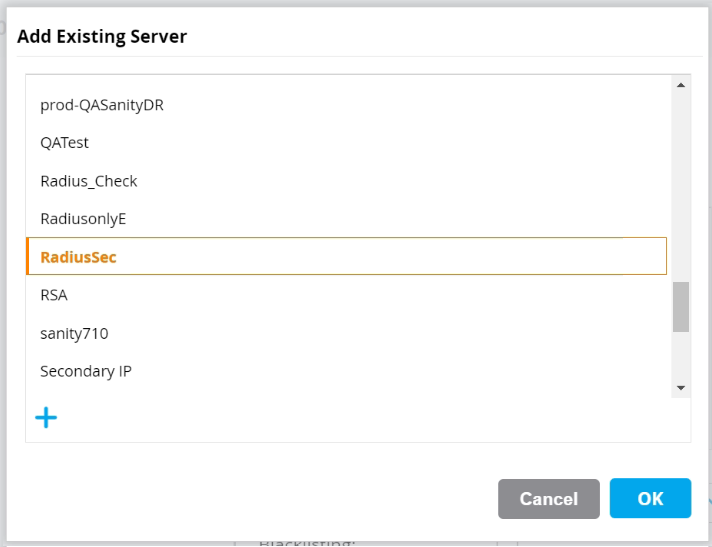
- In the Auth servers section, click +.

- Select the RadSec Authentication server created earlier (refer to the Configuring RadSec Authentication Server Using Command-Line Interface section) and click OK.

- Click Next.
- On the Access tab:
- From the Default role drop-down list, select an option.

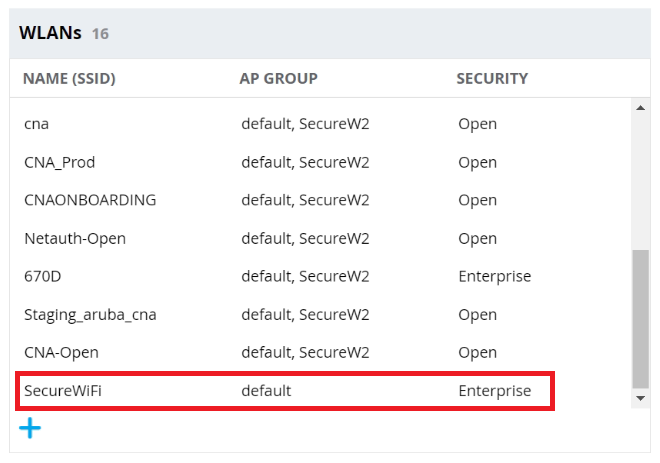
- Click Finish. The new SSID appears in the WLANs section.

- From the Default role drop-down list, select an option.
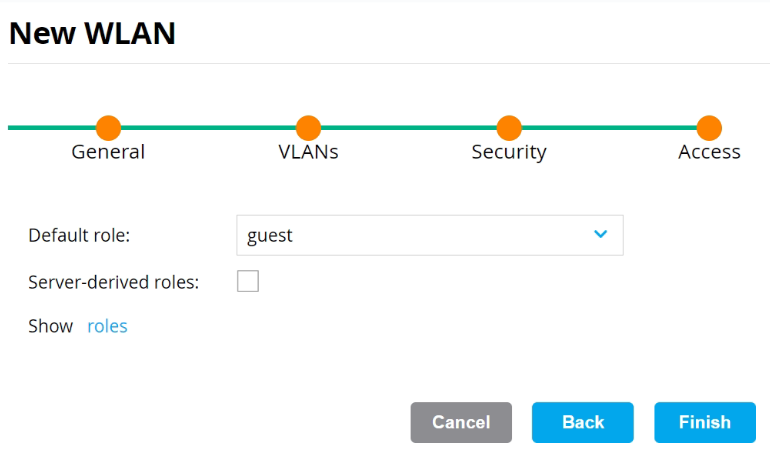
The above step completes the configuration of the RadSec Authentication Server in the Aruba Controller. When devices attempt WiFi authentication, their authentication requests are logged on the RADIUS Events page. To access the RADIUS Events page, log in to the JoinNow Management Portal and navigate to Data and Monitoring > RADIUS Events.
6. Unifi Integration
UniFi devices include a built-in RADIUS server that supports 802.1X, enabling secure authentication for VPNs and network access. SecureW2’s RadSec Server provides an additional security layer by establishing a RADIUS connection via TLS.
This guide outlines the steps to integrate the UniFi Controller with the SecureW2 RadSec Server.
6.1 Configuring a Certificate for RadSec Authentication
A RadSec server certificate must be exported from the JoinNow Management Portal to establish a chain of trust between the organization’s Unifi Controller and the SecureW2 RadSec Server for a successful TLS handshake.
UniFi requires the RadSec client certificate and private key to be uploaded separately to the controller. To facilitate this, select the PEM format when downloading the enrolled client certificate, which provides the certificate and private key as separate files.
To create a certificate in PEM format, follow the configurations below:
- Creating RadSec Root CA
- Creating RadSec Intermediate CA
- Configuring Certificate Template
- Creating RadSec Client Certificate
6.1.1 Creating RadSec Root CA
A RadSec Root CA serves as the trust anchor for all certificates used in RadSec authentication. All Intermediate CAs and client certificates are chained to this Root CA, ensuring a secure and trusted certificate chain between the SecureW2 RadSec Server and the UniFi controller.
To create a RadSec Root CA, perform the following steps:
- Log in to the JoinNow Management Portal.
- Navigate to Dynamic PKI > Certificate Authorities.
- Click the Add Certificate Authority button.
- In the Basic section, from the Generate CA For drop-down list, select the RadSec Client Authentication option to authenticate the Unifi controller.
- From the Type drop-down list, select Root CA.
- In the Common Name field, enter the Common Name for the CA certificate.
- In the Key Size field, enter the key size value.
- From the Signature Algorithm drop-down list, select SHA-256 for the certificate signing request.
- In the Validity Period (in years) field, enter the validity period of the certificate.
- Click Save.
6.1.2 Creating RadSec Intermediate CA
A RadSec Intermediate CA issues client certificates for RadSec authentication. This intermediate CA is chained to the RadSec Root CA and is required to establish a secure, trusted certificate chain between the SecureW2 RadSec Server and the UniFi controller.
To create a RadSec Intermediate CA, perform the following steps:
- Navigate to Dynamic PKI > Certificate Authorities.
- Click the Add Certificate Authority button.
- In the Basic section, from the Generate CA For drop-down list, select the RadSec Client Authentication option to generate the RadSec client certificate.
- From the Type drop-down list, select Intermediate CA.
- From the Certificate Authority drop-down list, select the root CA created earlier ( refer to the Creating RadSec Root CA section).
- From the Generate via drop-down list, retain the default option.
- In the Common Name field, enter the Common Name for the CA certificate.
- In the Key Size field, enter the key size value.
- From the Signature Algorithm drop-down list, select SHA-256 for the certificate signing request.
- In the Validity Period (in years) field, enter the validity period of the certificate.
- Click Save.
6.1.3 Configuring Certificate Template
The DEFAULT CREATE CERTIFICATE TEMPLATE is used to generate a certificate via the Create Certificate section.
- Navigate to Dynamic PKI > Certificate Authorities.
- Under the Certificate Templates section, click edit for DEFAULT CREATE CERTIFICATE TEMPLATE.
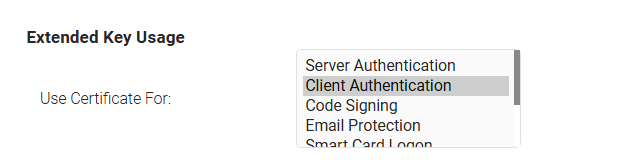
- Ensure the Client Authentication is selected under the Extended Key Usage section.

- Click Update after making the necessary changes.
6.1.4 Creating RadSec Client Certificate
A RadSec Client Certificate is a digital certificate issued to controllers that must securely authenticate when establishing RadSec connections with SecureW2’s RadSec Server.
To create a RadSec Client Certificate, perform the following steps:
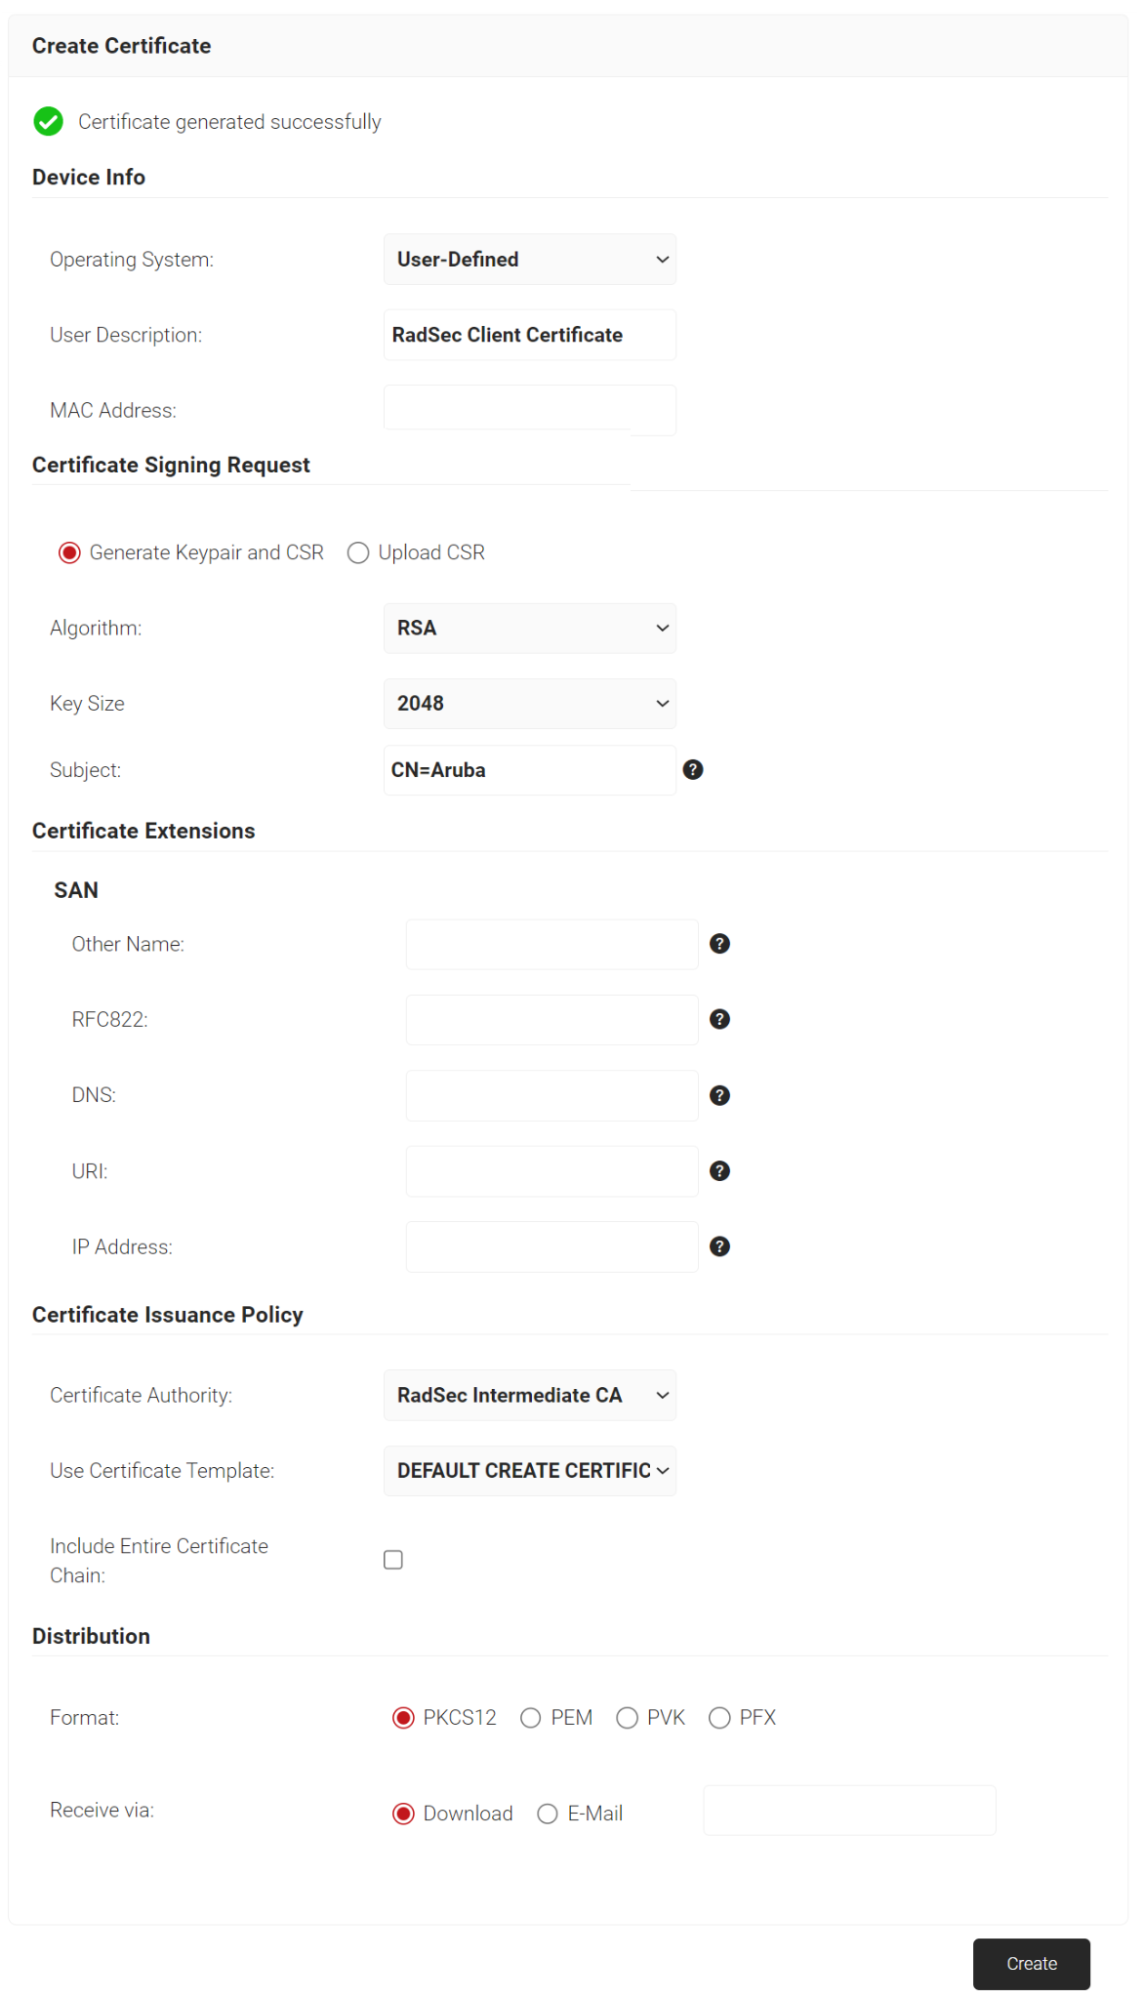
- Navigate to Dynamic PKI > Create Certificate.
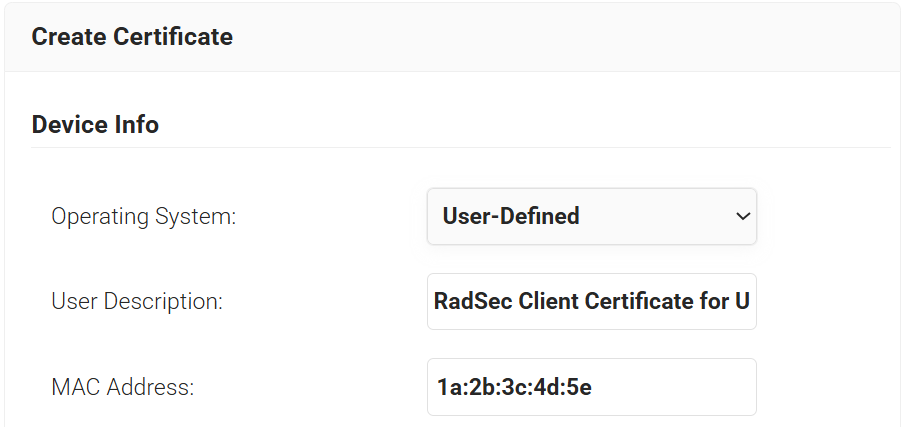
- In the Device Info section, from the Operating System drop-down list, select an operating system.
- For User Description, enter a suitable description.
- For MAC Address, enter a unique MAC address.

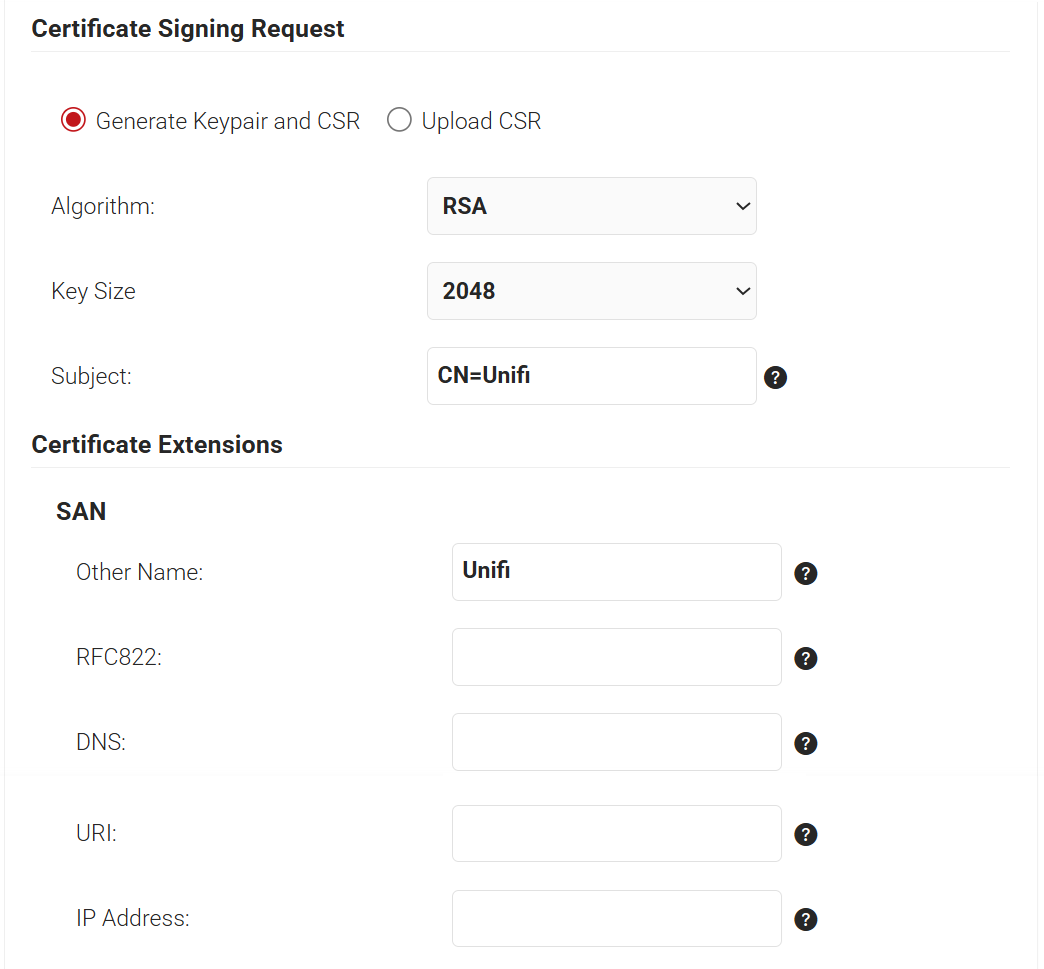
- In the Certificate Signing Request section, select the Generate Keypair and CSR option to generate a keypair and CSR file, and create client certificates.
- From the Algorithm drop-down list, select RSA.
- From the Key Size drop-down, select 2048.
- For the Subject field, enter the common name
- In the Other Name field, enter the same value as in the Subject field(without “CN=”).

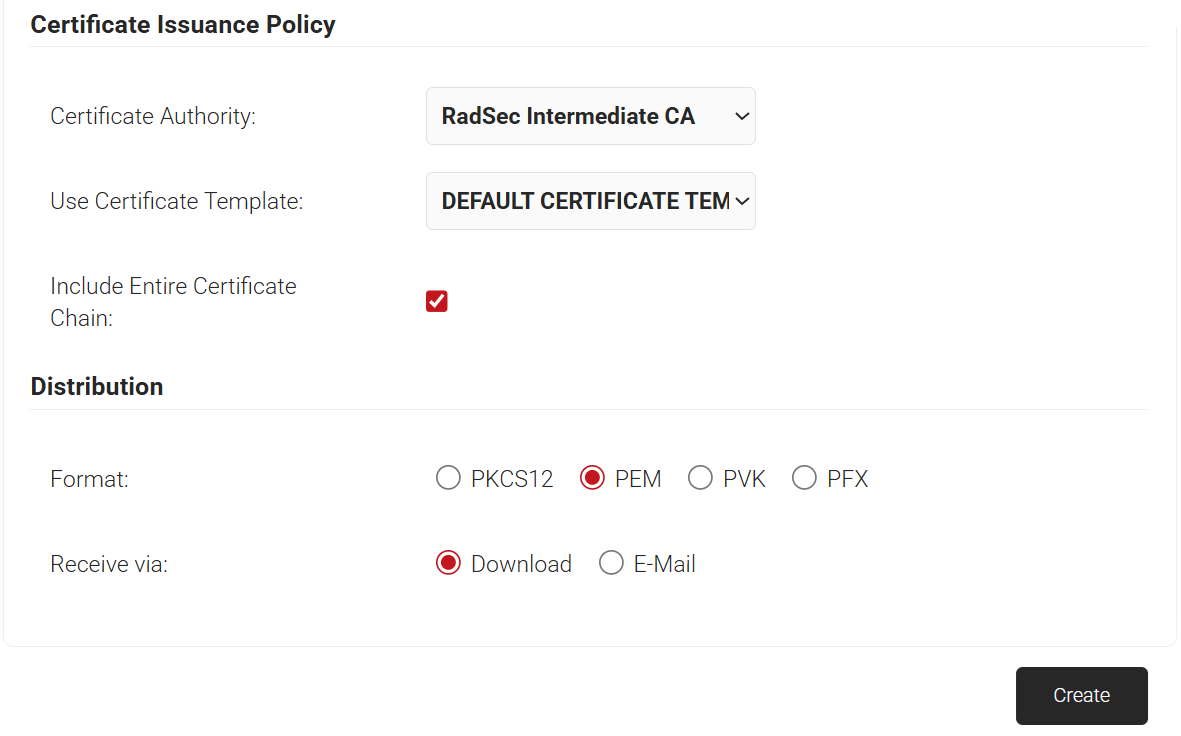
- In the Certificate Issuance Policy section, from the Certificate Authority drop-down list, select the intermediate CA created in the Creating RadSec Intermediate CA section.
- From the Use Certificate Template drop-down list, select DEFAULT CREATE CERTIFICATE TEMPLATE. This template is configured with Client Authentication as the default Extended Key Usage use case.
- Select the Include Entire Certificate Chain checkbox. This is mandatory.
- In the Distribution section, for the Format field, select PEM (recommended format).
- In the Receive via field, select Download.

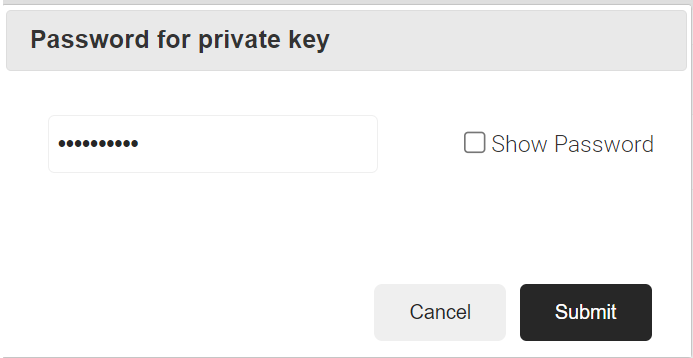
- Click Create, and a pop-up window opens. Enter the password for the certificate file as shown on the following page.
- A zipped folder is downloaded containing the certificate and private key as separate files.
NOTE: If the enrolled certificate is in PKCS12 format, the downloaded client certificate will be in P12 format. Use the OpenSSL commands below to extract the certificate and private key.
- To extract the certificate:
openssl pkcs12 -in <yourcert.p12> -clcerts -nokeys -out Cert.pem - To extract the private key:
openssl pkcs12 -in <yourcert.p12> -out Key.pem -nodes -nocerts
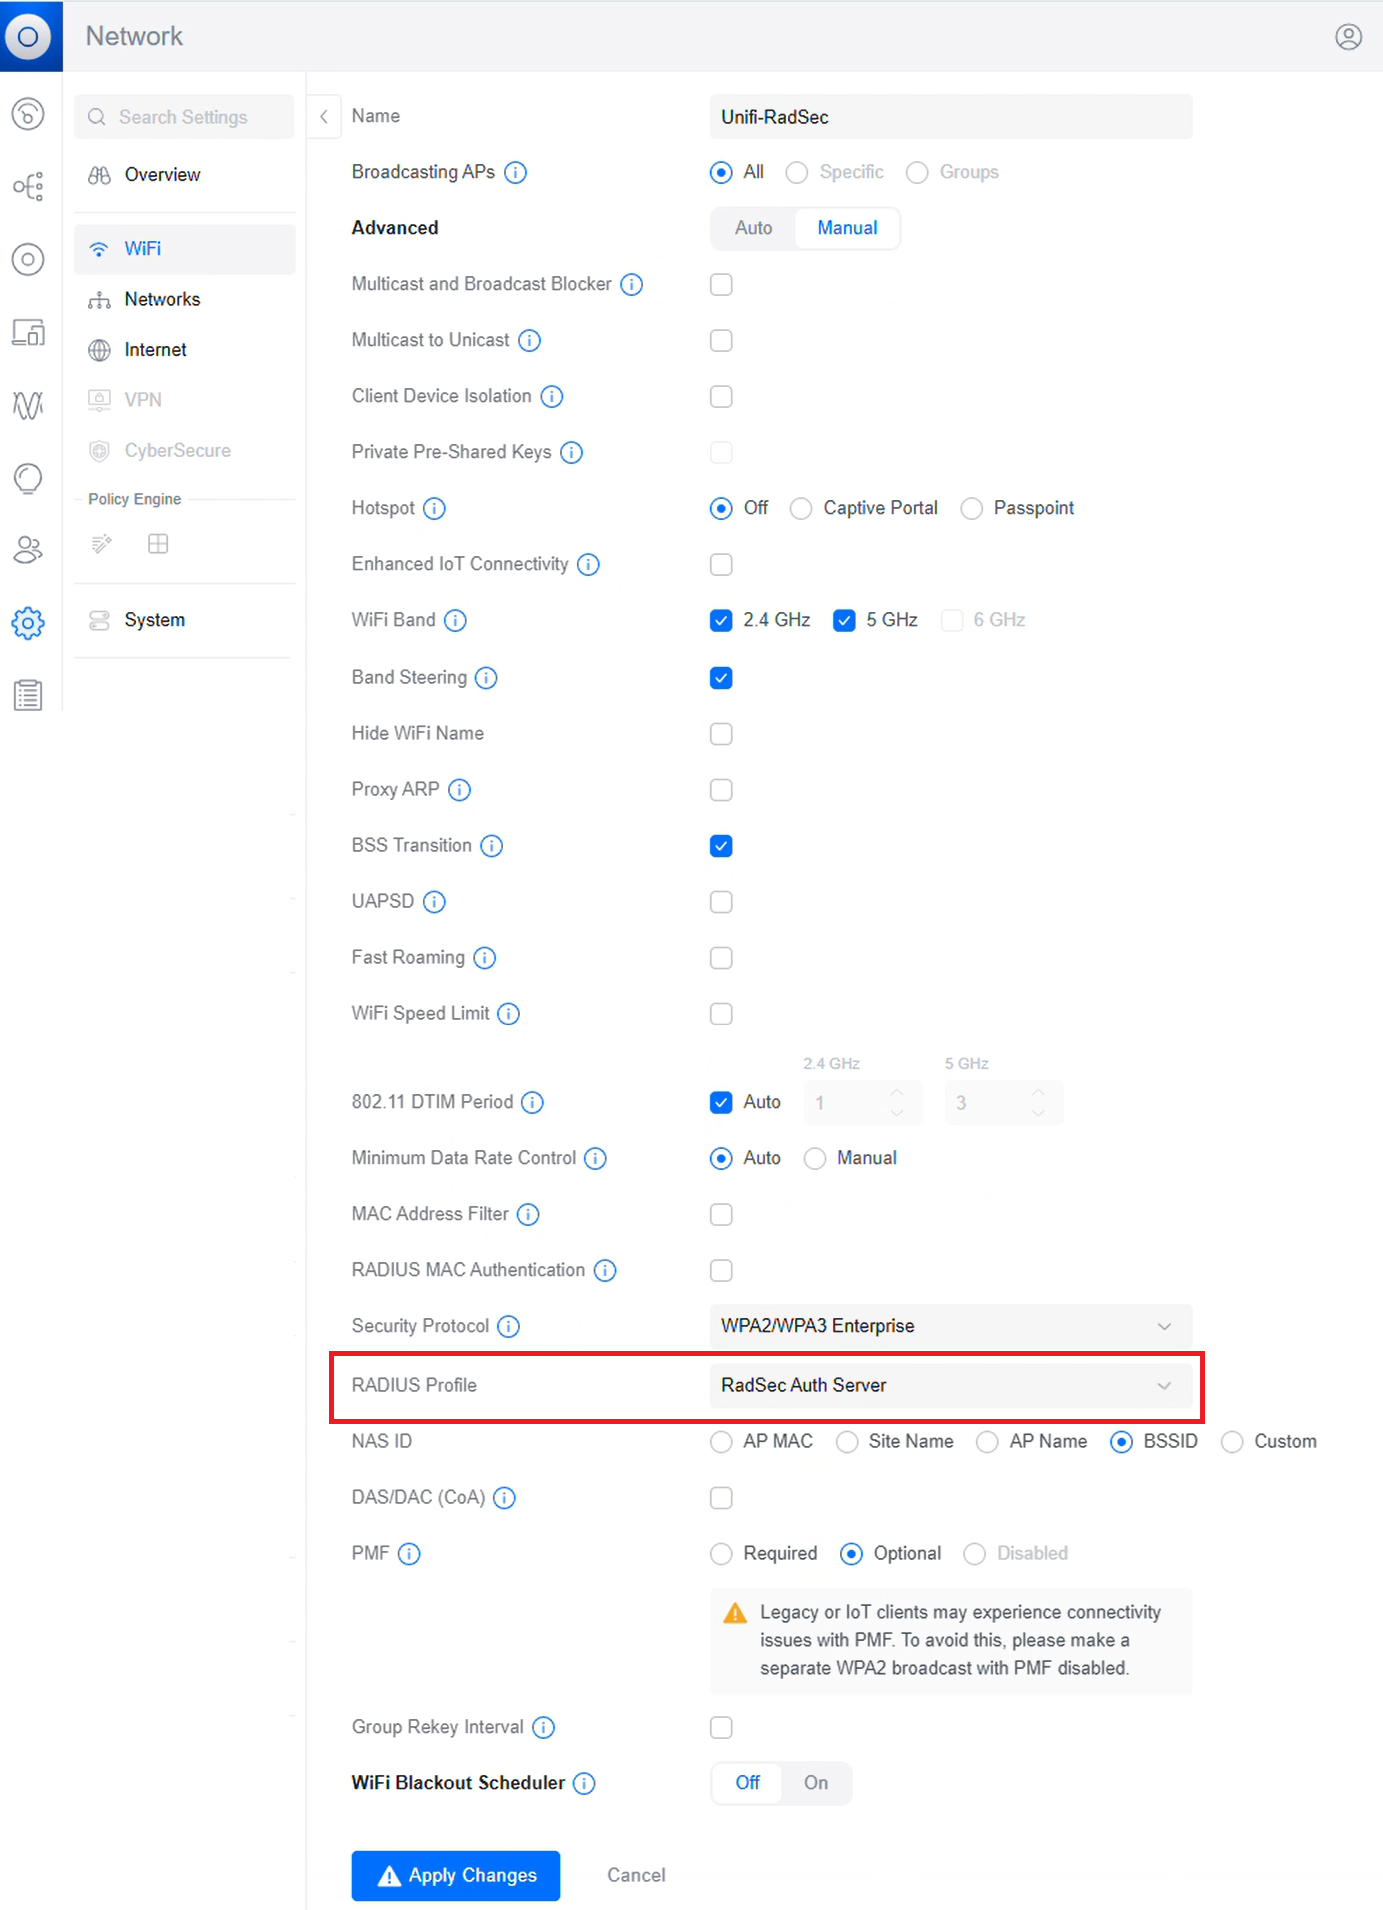
6.2 Integrating SecureW2 RadSec Authentication Server in Unifi Controller
To configure the Radsec Authentication server in the Unifi controller, perform the following steps:
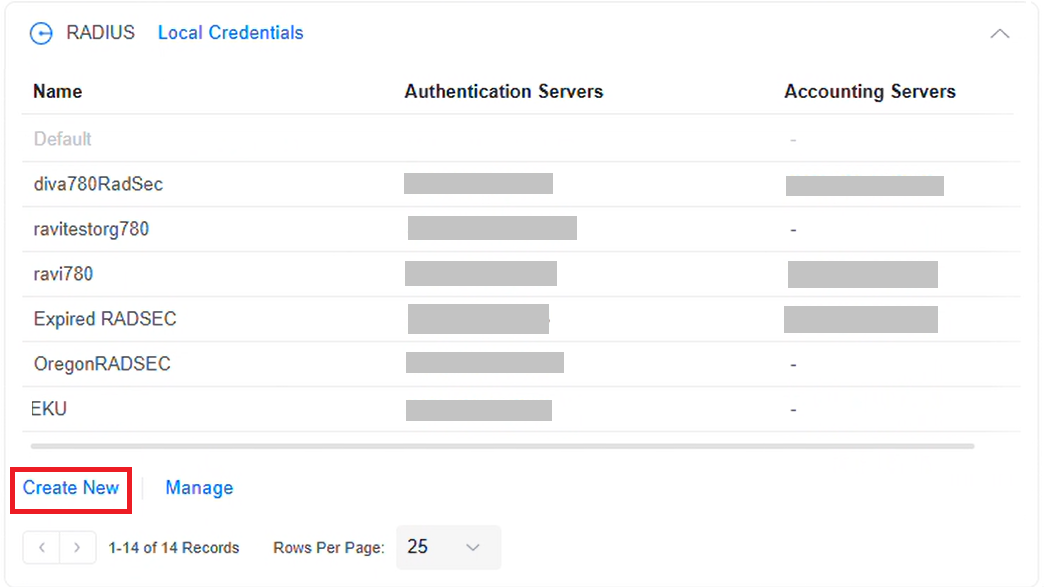
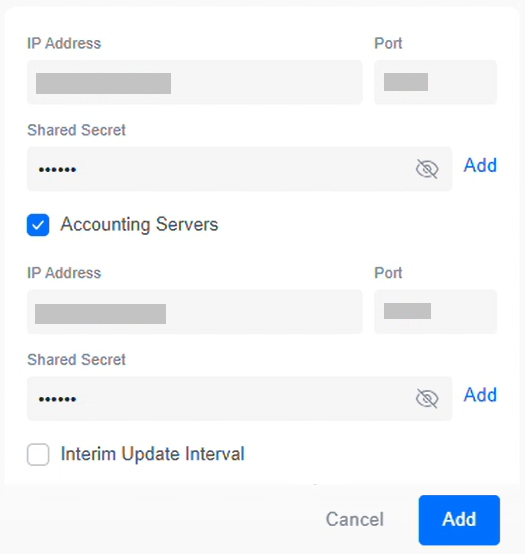
- Log in to the Unifi Controller.
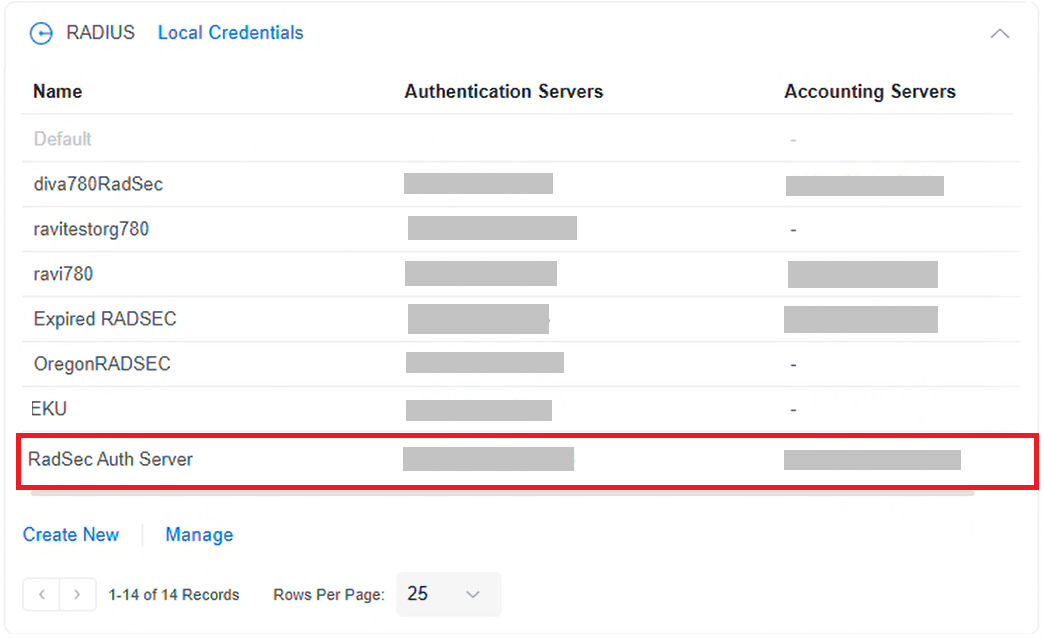
- Navigate to Settings > RADIUS.
- Click Create New to create a new profile.

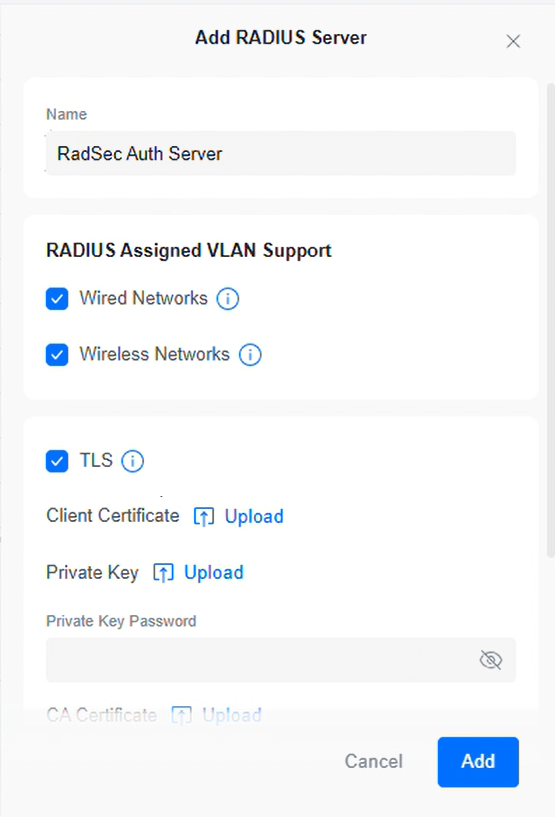
- In the Name field, enter the name of the Unifi RADIUS server.
- Enable the TLS checkbox.

- TLS section:
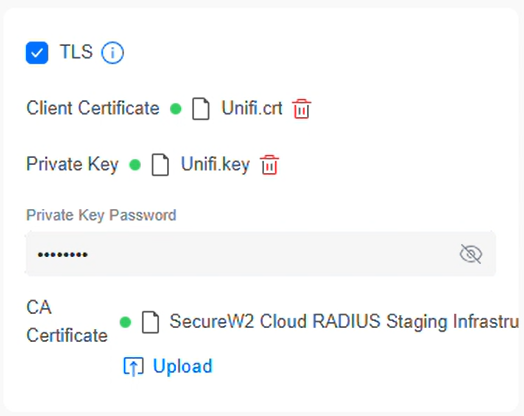
- In Client Certificate, click Upload and select the RadSec client certificate obtained from the Creating RadSec Client Certificate section.
- In Private Key, click Upload and select the corresponding private key obtained from the Creating RadSec Client Certificate section.
- In the Private Key Password field, enter the client cert password.
- In the CA Certificate field, upload the RadSec server root certificate obtained from the Exporting the SecureW2 Cloud RADIUS Root CA section.

- In the Authentication Servers section, enter the IP address and Port values (obtained from the Exporting the SecureW2 Cloud RADIUS Root CA section) that correspond to the DNS name of the region where RADIUS authentication will be performed.
- In the Shared Secret field, enter “radsec” as the client authentication secret.
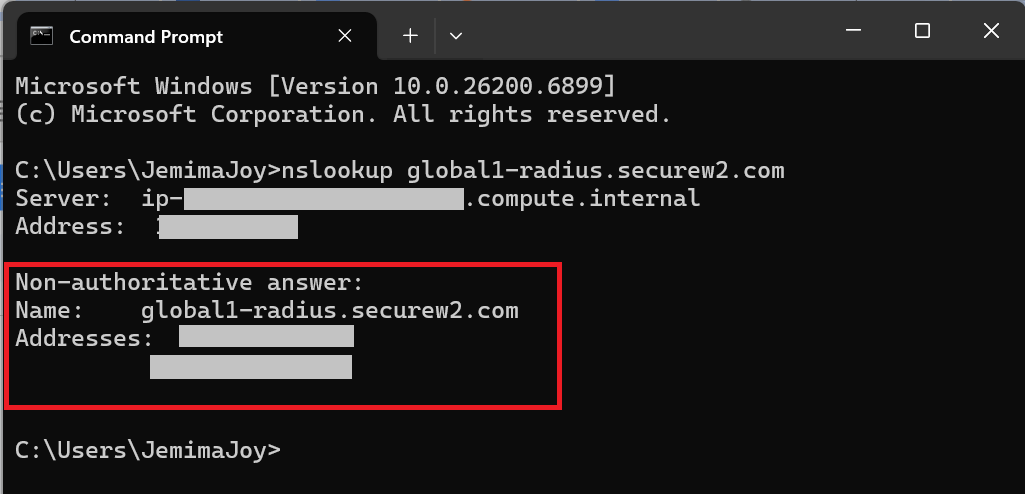
- The UniFi Network Controller doesn’t support using the RadSec Fully Qualified Domain Name (FQDN) global1-radius.securew2.com when you configure the authentication server. To obtain the corresponding IP address, follow these steps:
- Open Command Prompt (Windows) or Terminal (macOS/Linux).
- Run the following command: nslookup global1-radius.securew2.com
- In the output, locate the IP address(es) under the Non-authoritative answer or Address section. Use one of these IP addresses in the UniFi Controller’s RADIUS configuration settings.

- For Accounting Servers, enable the checkbox and enter the same details used in the Authentication Servers section.

- Click Add to save the AAA profile and map it to the SSID.