Issuing SCEP Certificates with Meraki MDM

If you manage devices using Meraki MDM (Mobile Device Management), you may improve network security by pushing certificates to them via a Meraki SCEP (Simple Certificate Enrollment Protocol) CA certificate. SCEP is a protocol that automates the issuing of digital certificates to managed devices, which can be used to replace credentials in different uses, including for Wi-Fi, VPN, and application security. This setup dramatically improves network security and user experience. However, adopting Meraki’s default certification settings may expose your network to threats such as credential theft.

In this article, we’ll show you how to configure certificates in Meraki Systems Manager to build a robust and secure network environment. You can automate certificate deployment across all major operating systems, including Windows, iOS, and Linux, using Cisco Meraki Solutions and engineering Meraki technologies. The setup process includes generating an onboarding SSID, setting the SCEP server, and pushing certificates to endpoints managed by the Meraki Systems Manager. This solution protects your wireless LAN networks from unauthorized access, offering a solid security layer for your implementation.

Meraki Systems Manager can efficiently manage certificates by carefully configuring and deploying them, improving security for all connected devices in your network. This method strengthens your network and simplifies the process of ensuring safe access to controlled devices.

Using Meraki’s Default SCEP CA is a Security Risk

Meraki Systems Manager offers users a free trial that enables them to download certificates immediately. This situation is due to Meraki’s default settings, which means the RADIUS server is configured to accept any device with access to the Meraki CA.
 
Utilizing default Meraki Systems Manager settings is not recommended due to the risk of credential theft. Meraki’s default settings don’t utilize certificate signing requests (CSR), enabling the CA to approve certificates on your network. Without CSR, your RADIUS server will accept any Meraki Systems Manager device. To gain access, all that is needed for a rogue device is to avail itself of Meraki’s free trial, download a Meraki certificate, and configure the device to access the network.

EAP-TLS and Meraki Integrations with SecureW2

EAP-TLS (Extensible Authentication Protocol-Transport Layer Security) is safe since it authenticates users and devices through digital certificates. This solution avoids the hazards associated with password-based authentication, including credential theft and brute force attacks. Digital certificates issued by a trustworthy Certificate Authority (CA) ensure that only authorized devices may access the network, adding extra protection.
 
In addition to better security, EAP-TLS provides the benefit of reciprocal authentication. This implies that the client and server verify one another, guaranteeing that devices only connect to valid network resources. This reciprocal trust considerably lowers the likelihood of man-in-the-middle attacks. EAP-TLS further improves the user experience by eliminating the need to memorize complicated passwords; their devices automatically authenticate using the loaded certificates.
 
SecureW2’s integration possibilities go beyond just providing certificates. We also enable a seamless connection with Meraki Access Points, which offers a complete network security solution. Integrating SecureW2 with Meraki Access Points ensures safe and efficient network access throughout your organization. Our JoinNow Management Portal simplifies distributing and managing certificates, allowing you to maintain a strong security posture. SecureW2’s solutions are adaptable and can interact with various suppliers, ensuring your network is safe and efficient.
 
Using Meraki’s default SCEP CA for certification might cause security concerns owing to its setup, which allows any device access to the Meraki CA. This configuration might result in unauthorized network access if a rogue device receives a Meraki certificate via the free trial. To reduce this risk, we’ll walk you through setting up the SecureW2 PKI and RADIUS server and connecting it with your Meraki MDM (Mobile Device Management) configuration. This technique will allow you to maintain certificates reliably and securely while protecting your network from attacks.

Configuring the SecureW2 PKI and RADIUS Server

 To configure a wireless network profile, perform the following steps:
  1. Log in to the JoinNow Management Portal.
  2. Navigate to Device Onboarding > Getting Started.
  3. On the Quickstart Network Profile generator page, from the Generate Profile for drop-down list, select Internal User Authentication.
  4. From the Profile Type drop-down list, select Wireless.
  5. In the SSID field, enter the name of a profile.
  6. From the Security Type drop-down list, select WPA2-Enterprise.
  7. From the EAP Method drop-down list, choose EAP-TLS.
  8. From the Policy drop-down field, retain DEFAULT.
  9. From the Wireless Vendor drop-down list, choose Cisco Meraki.
  10. From the RADIUS Vendor drop-down list, select a RADIUS vendor.
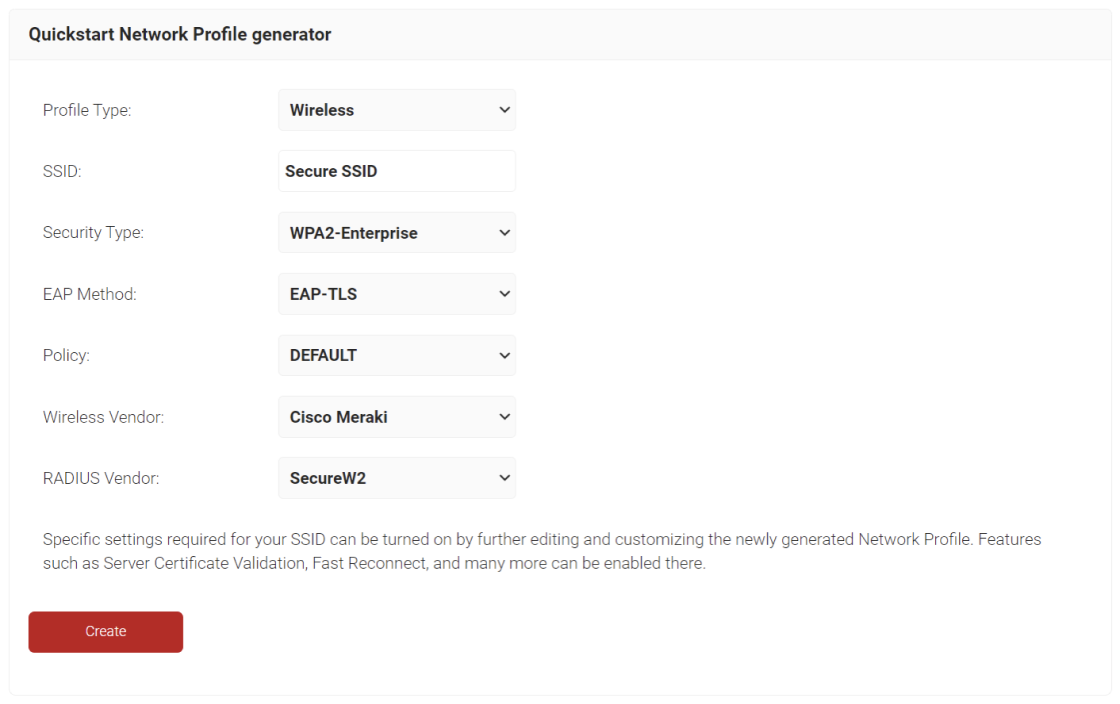
  11. Click Create.

NOTE: The Getting Started wizard typically takes 60-90 seconds to create the profile.

To access the RADIUS details, follow the steps below.

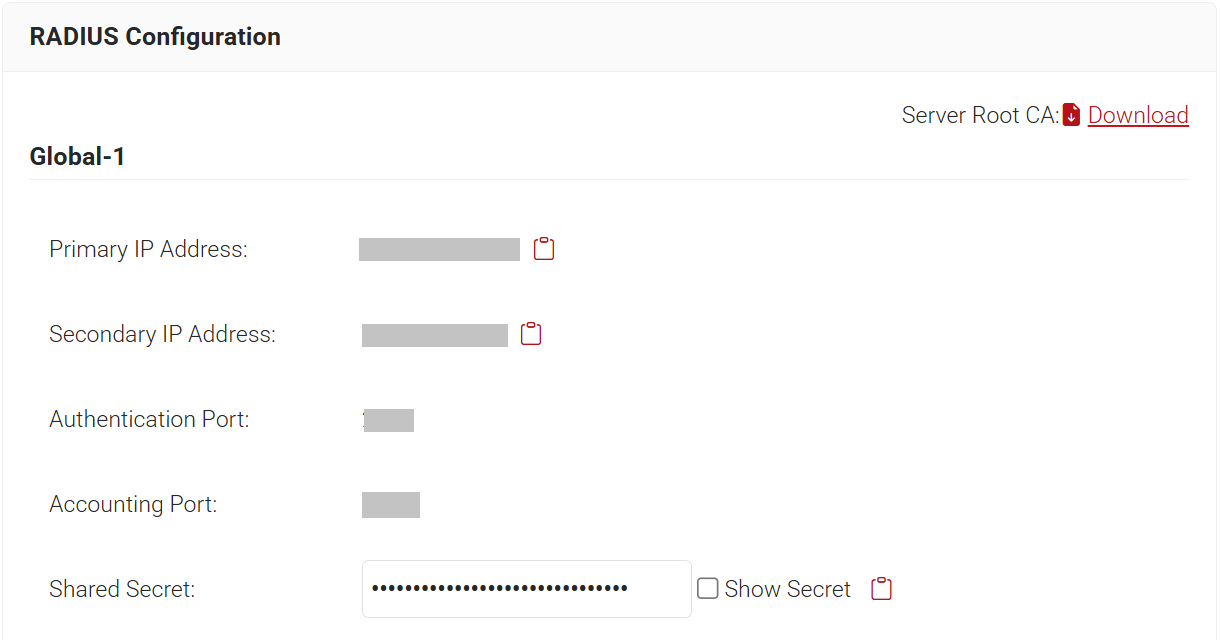
    1. Navigate to RADIUS > RADIUS Configuration.
    2. Copy the Primary IP Address, Authentication Port, and Shared Secret of your subscribed region to your console.

Setting Up SecureW2 as a RADIUS Server in Meraki

Follow the steps below to configure the RADIUS server in Cisco Meraki.

  1. Log in to the Meraki Dashboard.
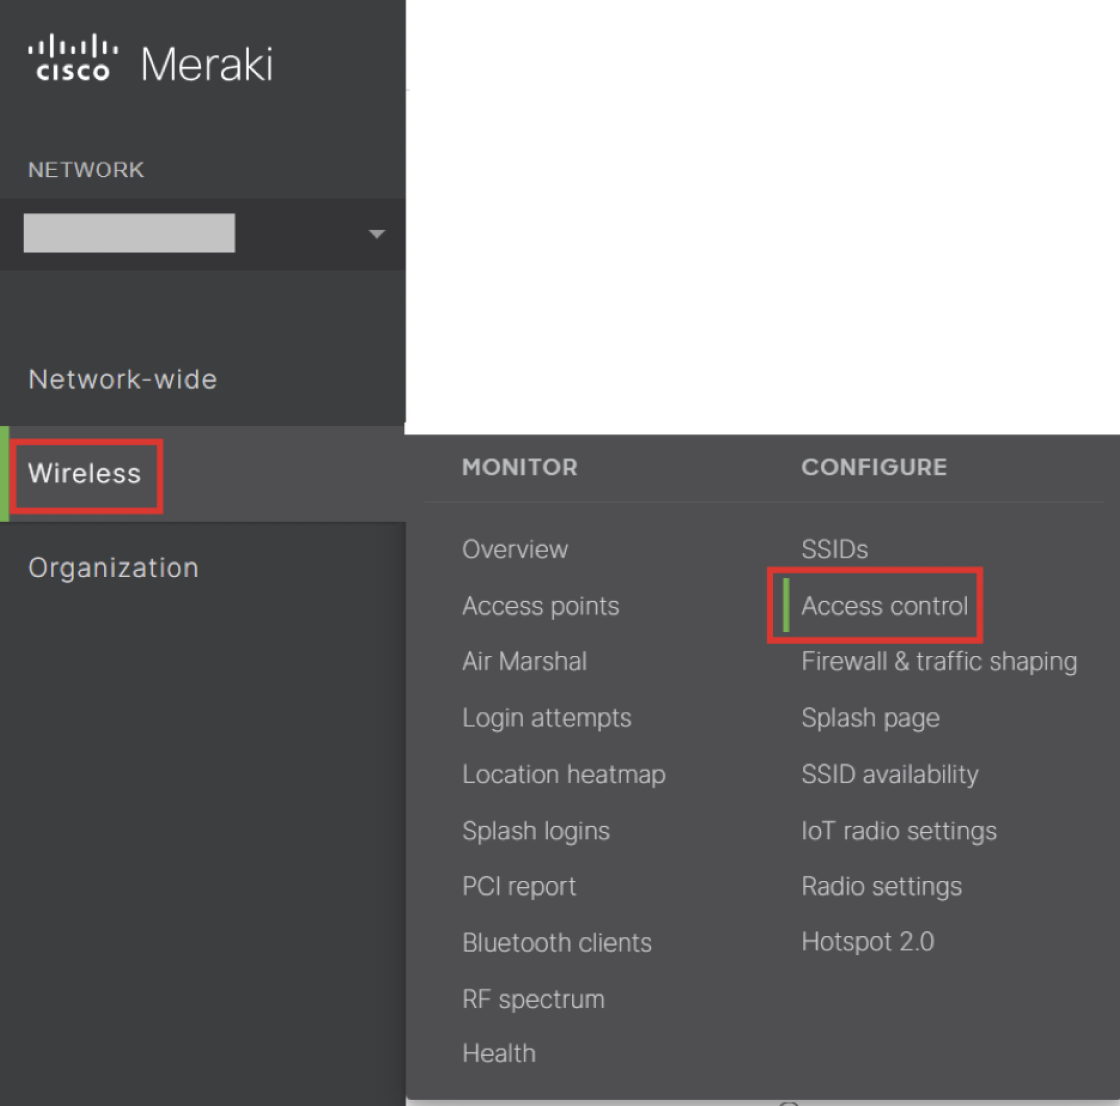
  2. Navigate to Wireless > Access control.
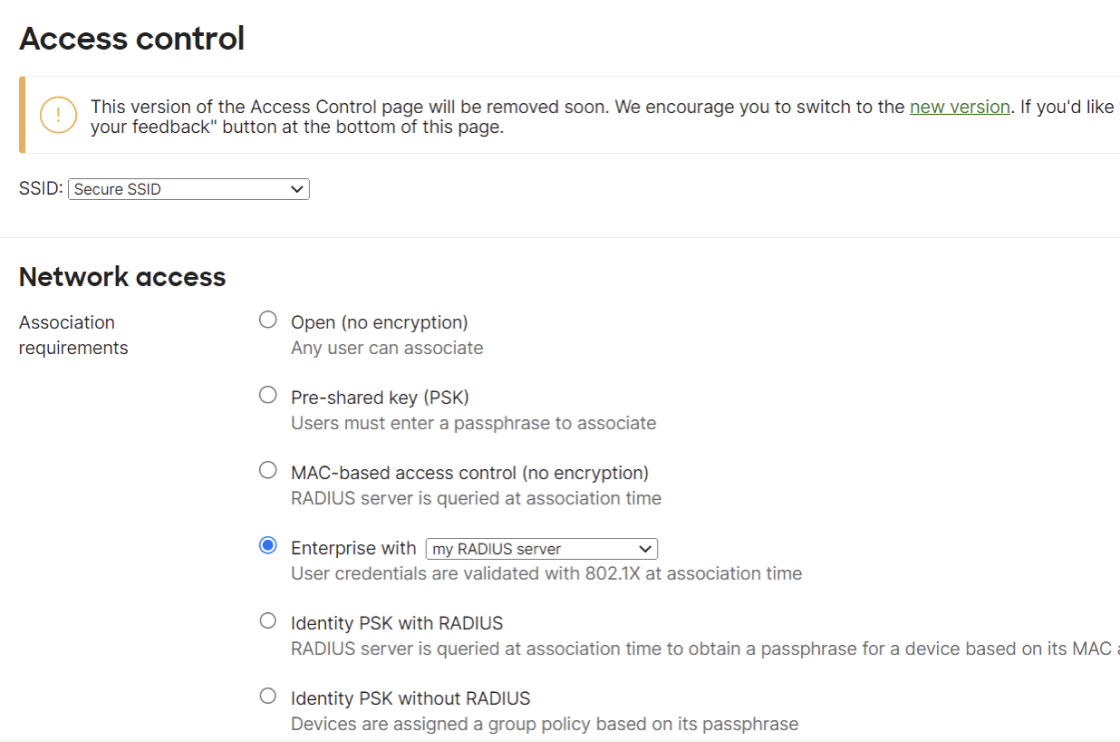
  3. In the Network access section, for Association requirements, from the Enterprise with a drop-down list, select my RADIUS server.
  4. From the WPA encryption mode drop-down list, select WPA2 only (recommended for most deployments).
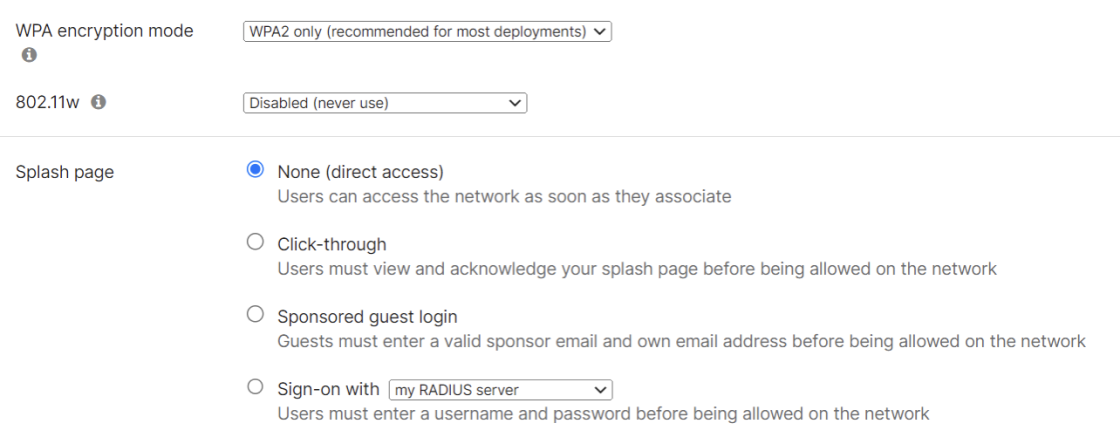
  5. Under the Splash page, select None (direct access).
  6. In the RADIUS servers section, click Add a server.
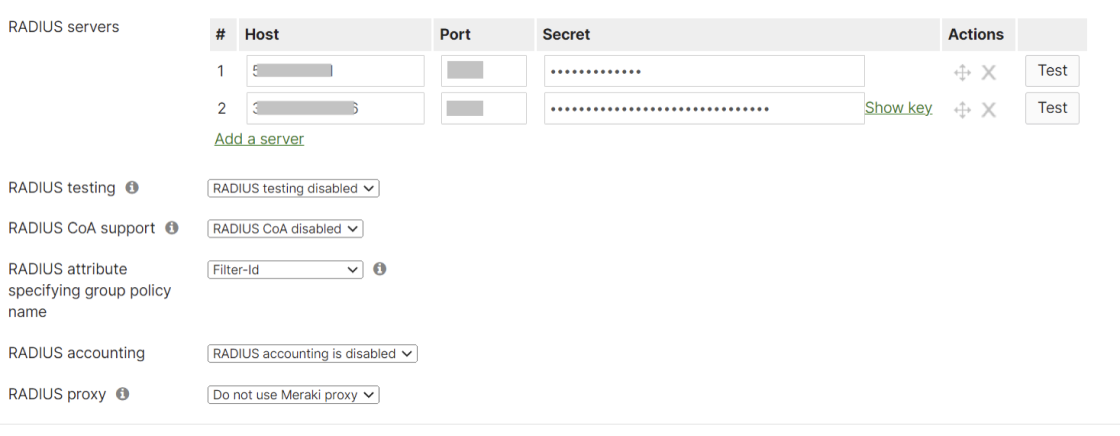
  7. From the JoinNow Management Portal, navigate to RADIUS > RADIUS Configuration. Copy the Primary IP Address, Authentication Port, and Shared Secret, and then paste them into the Host, Port, and Secret fields in Meraki.

  8. In the RADIUS servers section, click Add a server again.
  9. From the JoinNow Management Portal, navigate to RADIUS > RADIUS Configuration. Copy the Secondary IP Address, Authentication Port, and Shared Secret, and then paste them into the Host, Port, and Secret fields in the Meraki.
  10. Click Save Changes.

Configure Access Point to use Splash Page

Follow the steps below to configure the access point.

  1. Log in to the Meraki Dashboard.
  2. Navigate to Wireless > Access Control.
  3. Under Network access, select Open (no encryption) in the Association requirements section.
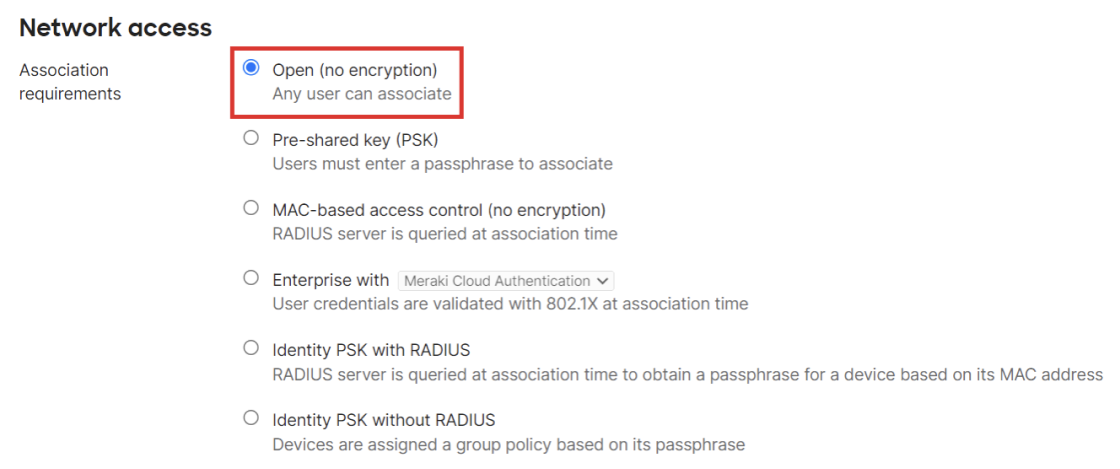
  4. Under Splash page, select Click-through.

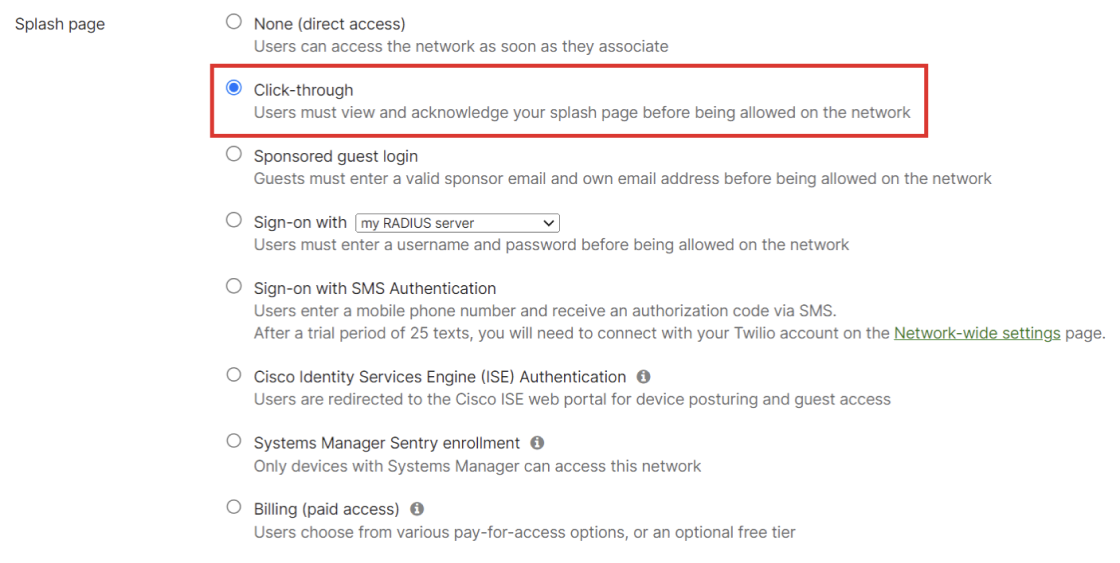
This process redirects to the SecureW2 landing page.

Creating a Certificate Authority with a Meraki Certificate Signing Request

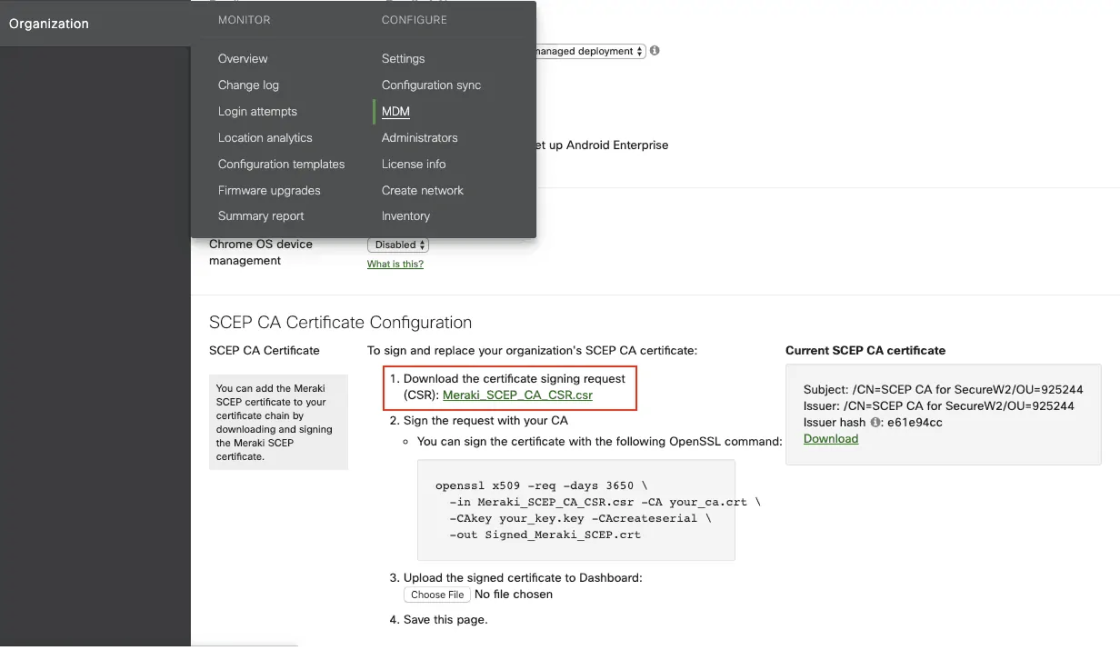
  1. To set up your own CA, open the System Manager.
  2. Click MDM under Organization.
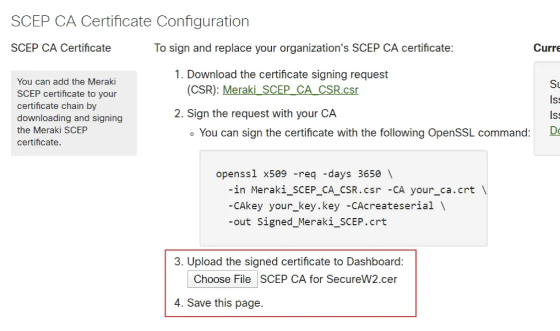
  3. Scroll down to the SCEP CA Certificate Configuration section.
  4. Download the Certificate Signing Request (CSR).

You can now use the downloaded CSR file to generate a custom CA. We did this by using SecureW2’s Management Portal to create a new certificate authority using Meraki’s CSR and generate a new certificate authority.

To create a Custom CA with a Certificate Signing Request (CSR) in SecureW2, follow these steps:

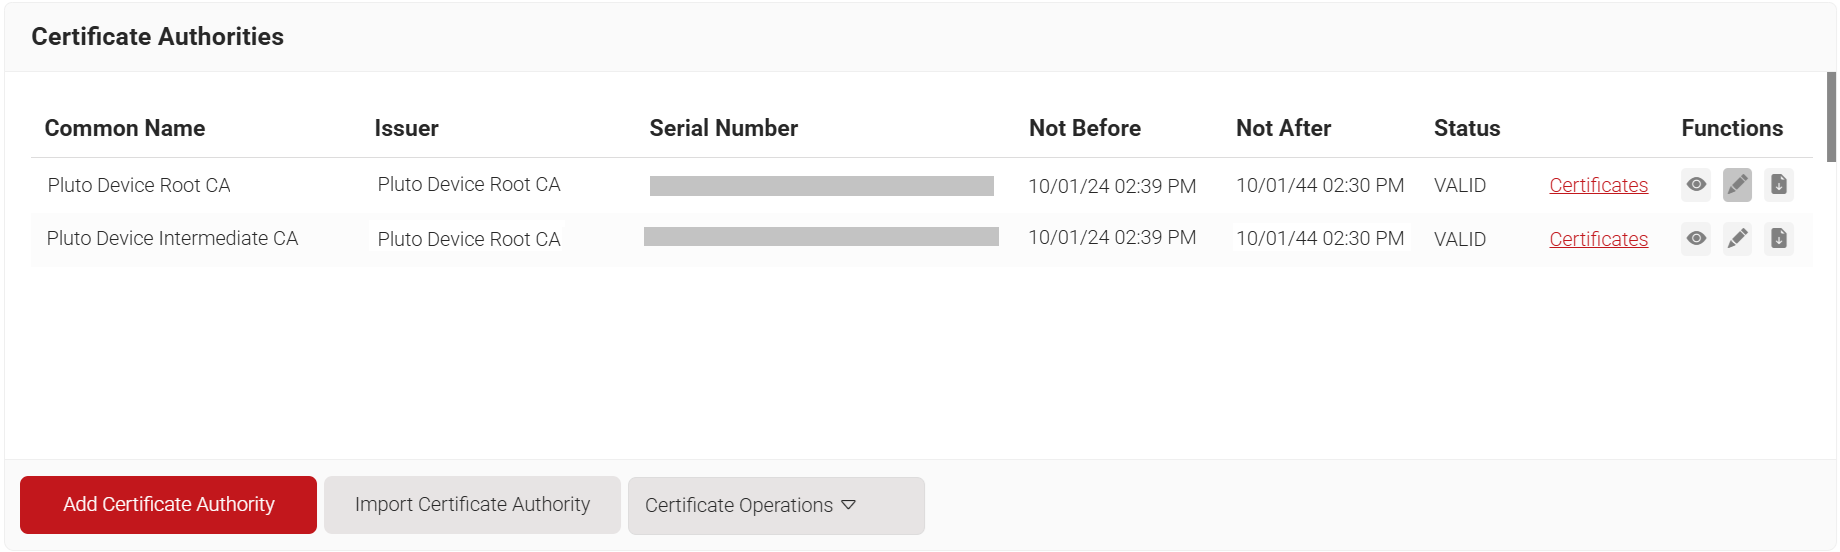
  1. Navigate to Dynamic PKI > Certificate Authorities.
  2. Click Add Certificate Authority.

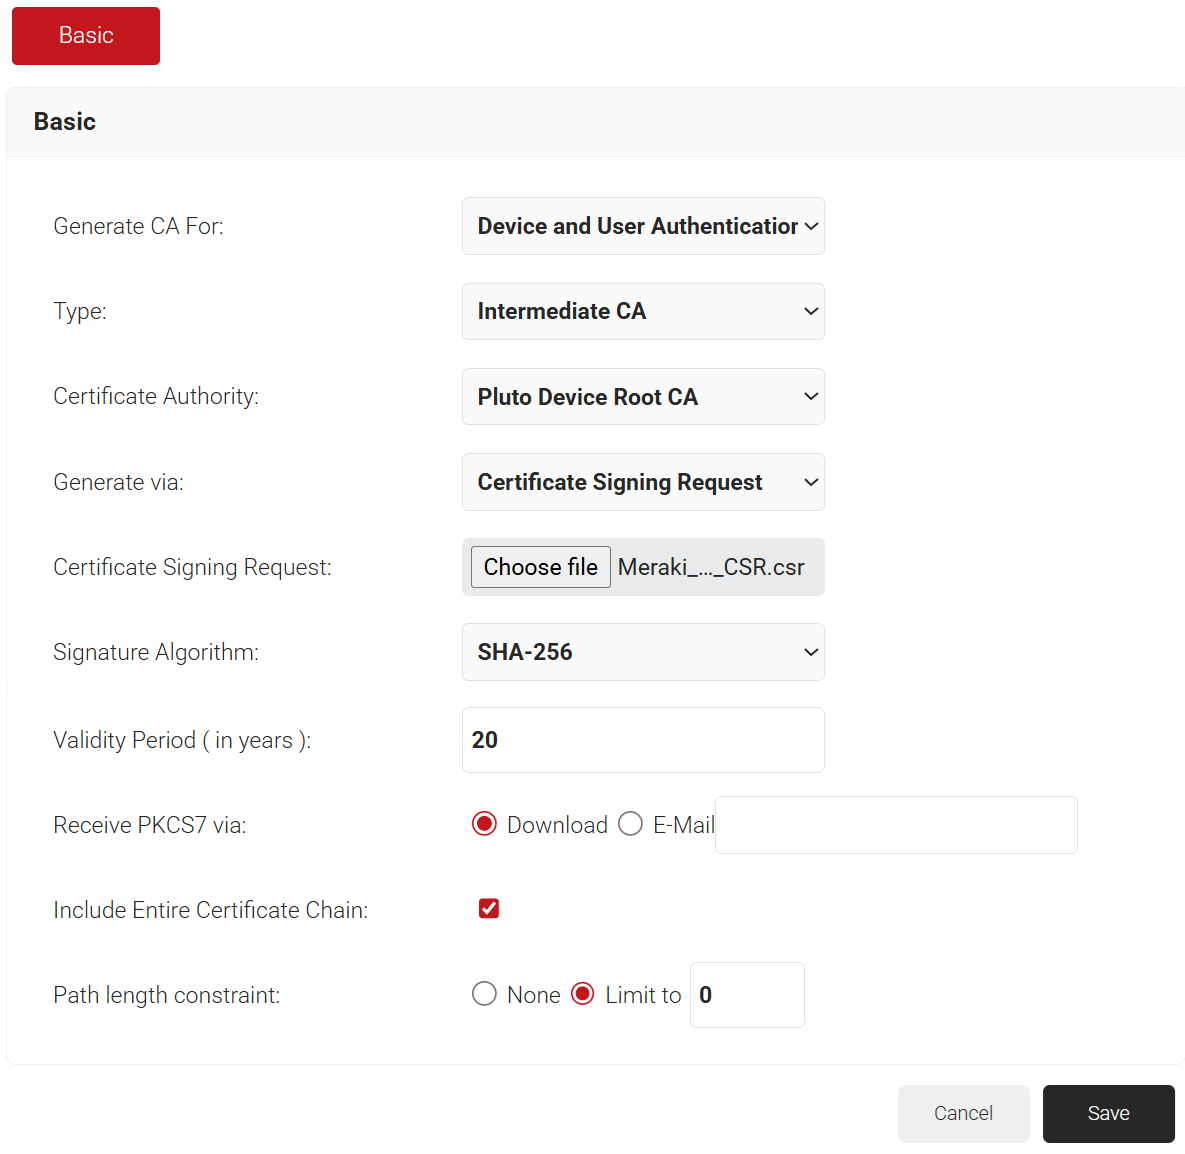
  3. In the Basic section, from the Generate CA For drop-down list, select Device and User Authentication to authenticate devices and users
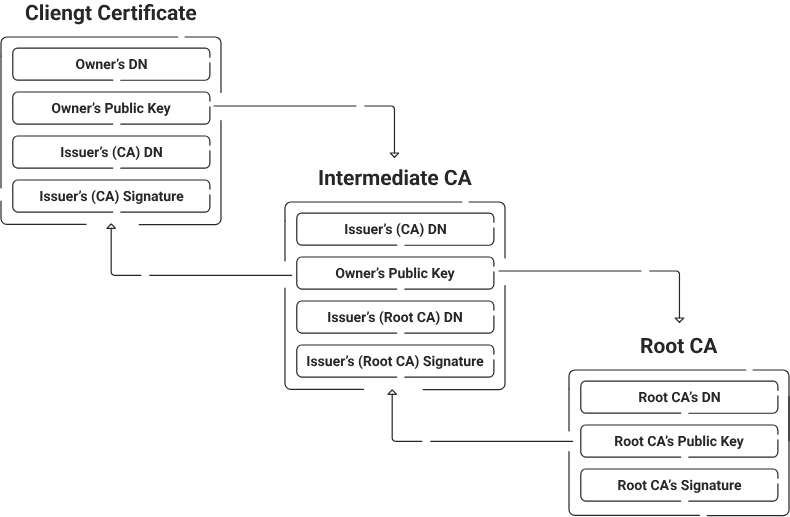
  4. From the Type drop-down list, select Intermediate CA.
  5. From the Certificate Authority drop-down list, select the default Root CA that comes with your organization.
  6. From the Generate via drop-down list, select Certificate Signing Request.
  7. From the Certificate Signing Request drop-down list, upload the CSR obtained from Meraki.
  8. Leave the other options at their default settings. You can now download the signed certificate after creating the Custom CA.
  9. Click Save.
  10. After creating your Custom CA, you can download the signed certificate:
    1. Go back to Certificate Authorities.
    2. Download your Custom CA certificate.
  11. Navigate to Meraki Systems Manager to upload your new certificate:
    1. Go back to SCEP settings under MDM.
    2. Upload the new signed certificate.
    3. Save the page.

How to Configure Cloud RADIUS for X.509 Certificate Authentication

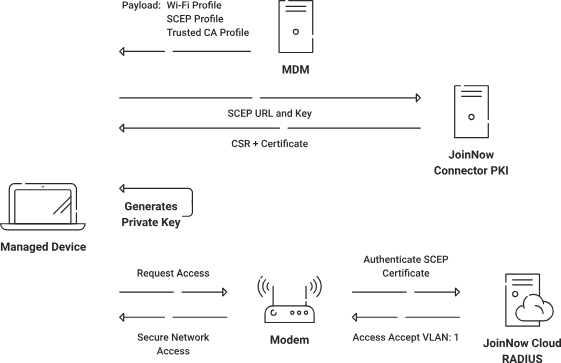
Configuring your managed devices for X.509 certificate authentication consists of three significant steps: integrating a Public Key Infrastructure (PKI), such as SecureW2, with your Identity Provider (IDP); using a Cloud RADIUS service that is linked to your infrastructure; and integrating your PKI with your Mobile Device Management (MDM) system. The process varies slightly based on your infrastructure, so in the example steps below, we’ll demonstrate how you can set this up if your organization uses Azure AD/Entra ID.


Step 1: Configure SecureW2 PKI Services and Certificate Attribute Mapping

Configure Attribute Mapping in SecureW2

In the SecureW2 Administration Portal, go to Integration Hub > Core Platforms. Here, you may map properties such as “upn,” “email,” and “displayName.” To set these properties, edit the core provider and navigate to the Attribute Mapping tab. Local and Remote groups can be mapped using Object ID values obtained from the Microsoft Azure Portal.

Update the profile policy in SecureW2

To amend the profile policy, navigate to Policy Management > Authentication on the Administration dashboard. Edit the policy settings and choose the Core Provider. After making your changes, click the Update button.

Update the User Role policy in SecureW2

Navigate to Policy Management > Policy Workflows. On the Conditions page of DEFAULT ROLE POLICY 1, select the desired Core Provider from the drop-down list and click Update to save the changes.

Create a User Role Policy in SecureW2

On the Policy Workflows page, click Add Policy Workflow, enter a name for the policy workflow, and save it. The page refreshes and displays the Conditions tab. Click the Conditions tab, select a Core Provider from the drop-down list, and click Update to create the new policy workflow.

Create an Enrollment Policy in SecureW2

On the Enrollment page, click Add Enrollment Policy, enter a name for the enrollment policy, and save it. The page refreshes and displays the Conditions tab. Click the Conditions tab, select the relevant Policy Workflow and Device Role policies, and click Update.

Republish your network profile

Navigate to Device Onboarding > Profiles, and click Publish or Republish next to the profile you want to modify. Wait approximately 60–90 seconds for the changes to take effect.

To access the Wi-Fi wrapper package, click Open landing page and then click the JoinNow button. Download and run the file, sign in with your Azure credentials, and verify that the registration and connection are successful.

Step 2: Integrate With Your Identity Provider (IDP) by Creating an App in Azure for RADIUS Lookup

SecureW2 interacts seamlessly with various SAML and LDAP Core Providers, including Azure AD. Here’s how to set it up if you’re using Azure AD.

New App Registration

In Azure, navigate to App Registrations and create a new app. Fill out the required information for the latest app registration.

Create a client secret

In the Manage menu, select Certificates & Secrets. Create a new client secret, provide a name, choose an expiry date, and add it. Then, record the client secret value.

Create a Provider URL and Client ID

The Application (Client) ID and Provider URL are available on the Azure Overview page. Note your Tenant ID and replace it in the URL syntax: https://login.microsoftonline.com/{tenantID}

API Permissions

In the Manage tab, select API Permissions to grant the app access to your Azure directory. Add the required permissions and provide admin consent for your organization.

Step 3: Enroll Users for Certificates

Create an onboarding SSID

Use SecureW2’s JoinNow suite to generate an Open SSID for onboarding managed devices.

Apply Gateway APIs for Managed Devices

Use SecureW2’s Managed Device Gateway APIs to automate the certificate enrollment process for managed devices. These APIs integrate smoothly with typical MDM applications for registering machine and user certificates.

Install intermediate and root CA certificates on a RADIUS Server

Install the Root and Intermediate CA certificates from SecureW2’s PKI on the RADIUS server. Set up a secure SSID using certificate authentication and WPA2-Enterprise. Integrate SecureW2’s PKI with the RADIUS server by including the Root and Intermediate CA certificates in the trusted list. On the RADIUS server, define the authentication protocol (EAP-TLS) and set up permission policies.

Fast SCEP Certificate Issuance to All Your Meraki MDM Endpoints

Implementing a secure Meraki MDM system that includes SecureW2’s PKI and RADIUS server improves network security and guarantees that only authorized devices can access your resources. By avoiding the problems of Meraki’s default certification settings and implementing SecureW2’s comprehensive solutions, you can safeguard your network from possible attacks while improving the overall user experience. SecureW2 provides cost-effective, simple-to-implement solutions that interact smoothly with Meraki MDM and other vendors, resulting in a holistic approach to network security.

Contact us today to learn more or get started.