Managing devices through Mobile Device Management (MDM) systems has become a foundational part of most security environments. The ability to manage devices remotely saves tons of time, and the ability to monitor devices and keep them compliant has become an essential security operation. Now, organizations can factor in Device Trust, the ability to ensure a device is a trusted, managed device, into their security decisions.
However, not all organizations understand how to factor this Device Trust into their network authentication and authorization. The most common way is to use certificate-based 802.1x authentication, which is what we will configure in this guide using SecureW2’s JoinNow Connector PKI.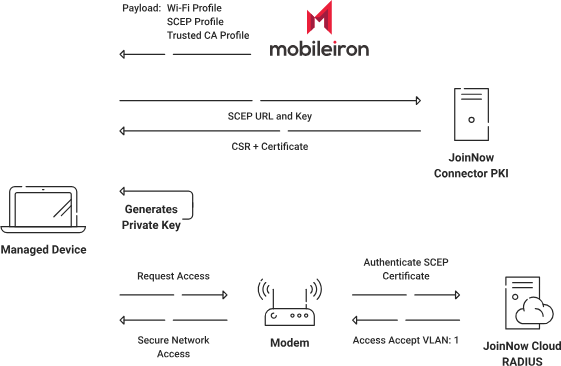
The above diagram shows a high-level overview of how the JoinNow Connector PKI solution works. We will configure an SCEP Gateway so that our MobileIron-managed devices can use to auto-enroll themselves for certificates, once MobileIron sends out the SCEP Profile. Once our device has certificates, it will then use a Wi-Fi profile that is pushed by our MDM to authenticate to the network using that certificate. Now, every managed device will have a unique and identifiable network connection that can be segmented away from untrusted devices.
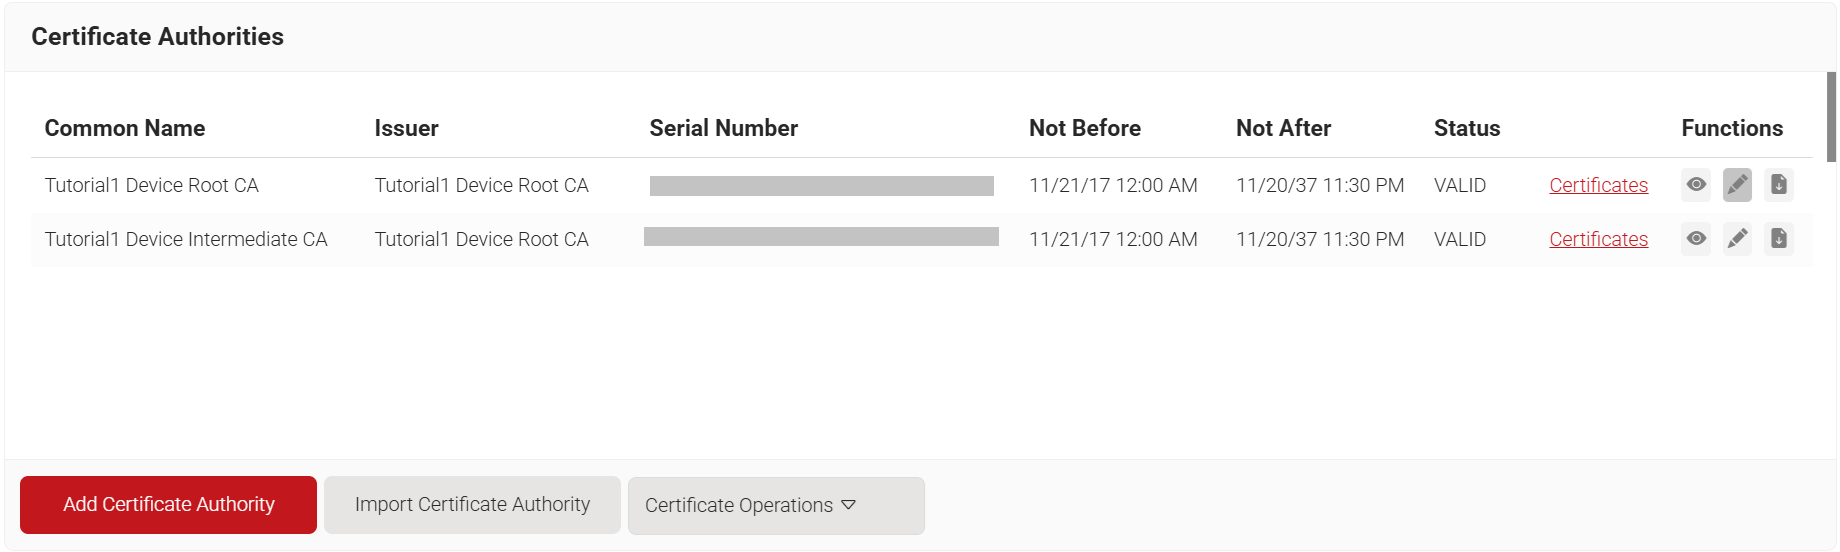
As a best practice, SecureW2 recommends having a new intermediate CA for JoinNow SCEP (Simple Certificate Enrollment Protocol) Gateway integration with MobileIron. The CA issuing certificates to BYOD devices should be separate from the CA issuing certificates to managed devices, because managed devices do not require email notifications. You can disable email notifications for the dedicated CA certificates for MobileIron-managed devices.
To create a new intermediate CA, perform the following steps:
- Navigate to Dynamic PKI > Certificate Authorities.
- Click Add Certificate Authority.
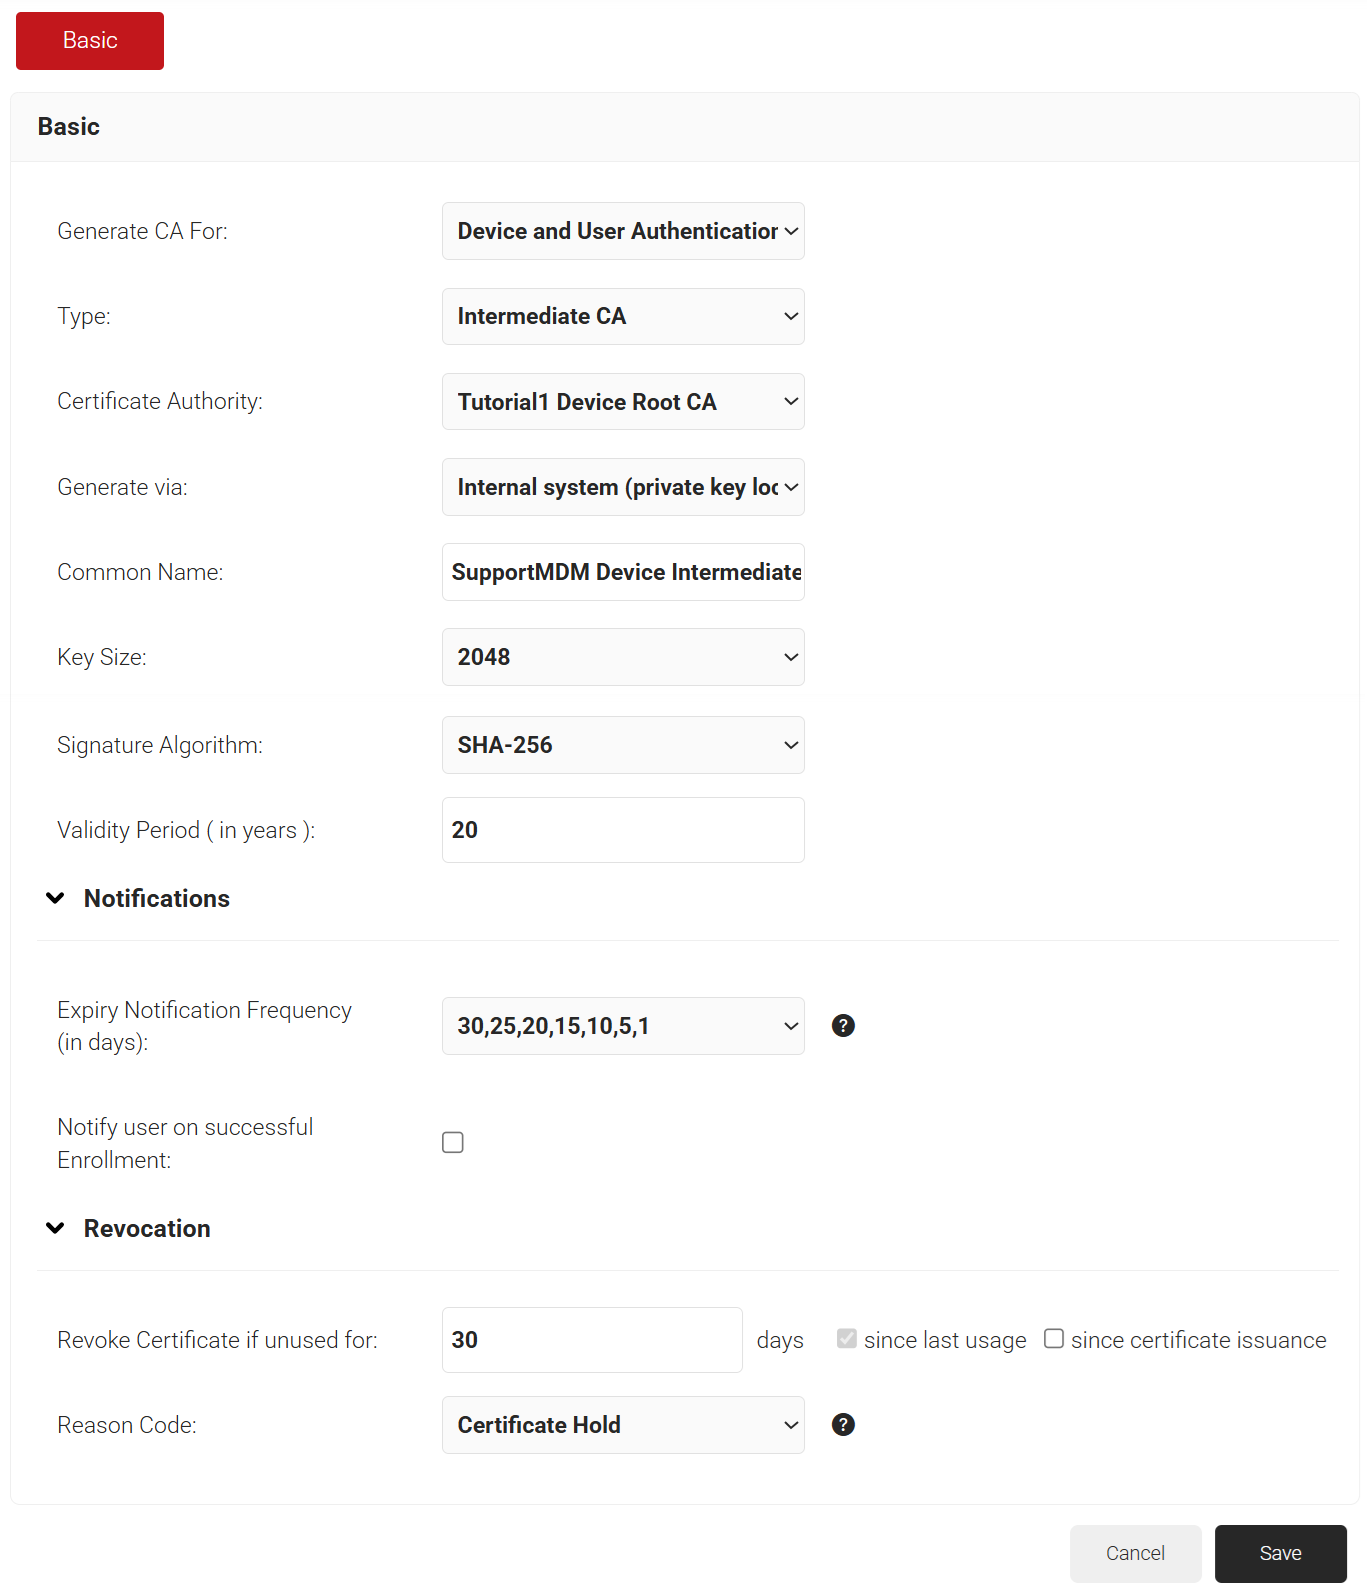
- In the Basic section, from the Generate CA For drop-down list, select Device and User Authentication to authenticate devices and users.
- From the Type drop-down list, select Intermediate CA.
- From the Certificate Authority drop-down list, select the default Root CA that comes with your organization.
- In the Common Name field, enter a common name for the CA certificate. SecureW2 recommends a name that includes “SCEP.”
- From the Key Size drop-down list, select 2048 for the CA certificate key pair.
- From the Signature Algorithm drop-down list, select the signature algorithm for the certificate signing request. The option available is SHA-256.
- In the Validity Period (in years) field, enter the validity period of the CA certificate.
- In the Notifications section:
- From the Expiry Notification Frequency (in days) drop-down list, select the frequency interval for which a certificate expiration notification should be sent to users.
- Select the Notify user on successful Enrollment check box to notify users after a successful enrollment.
- In the Revocation section:
- In the Revoke Certificate if unused for field, select the number of days after which an unused certificate can be revoked.
- Since last usage – Select this checkbox to revoke the certificate after a specified number of days if it remains unused.
- Since certificate issuance – Select this checkbox to revoke the certificate after a specified number of days after it is issued.
- From the Reason Code drop-down list, select any one of the following reasons for which the certificate is revoked.
- Certificate Hold
- AA Compromise
- Privilege Withdrawn
- Unspecified
- In the Revoke Certificate if unused for field, select the number of days after which an unused certificate can be revoked.
- Click Save. The new intermediate CA is generated.
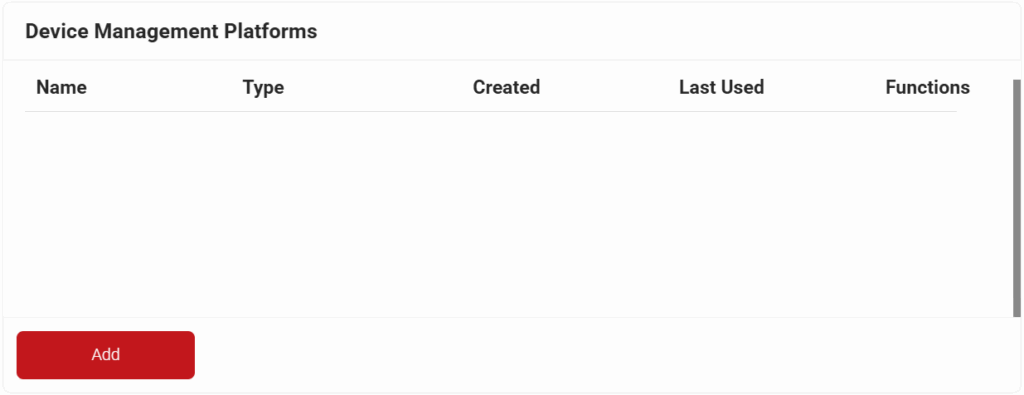
To create a Device Management Platform, perform the following steps:
- Navigate to Integration Hub > Device Management Platforms
- Click Add.
- In the Basic section, enter the name of the Device Management Platform in the Name field.
- In the Description field, enter a suitable description for the Device Management Platform.
- From the Type drop-down list, select SCEP (Multi-Vendor) Enrollment Token.
- From the Vendor drop-down list, select MobileIron.
- From the Certificate Authority drop-down list, select the intermediate CA you created earlier in the Creating an Intermediate CA for MobileIron SCEP Gateway Integration section. If you do not select a CA, the organization CA is chosen by default.
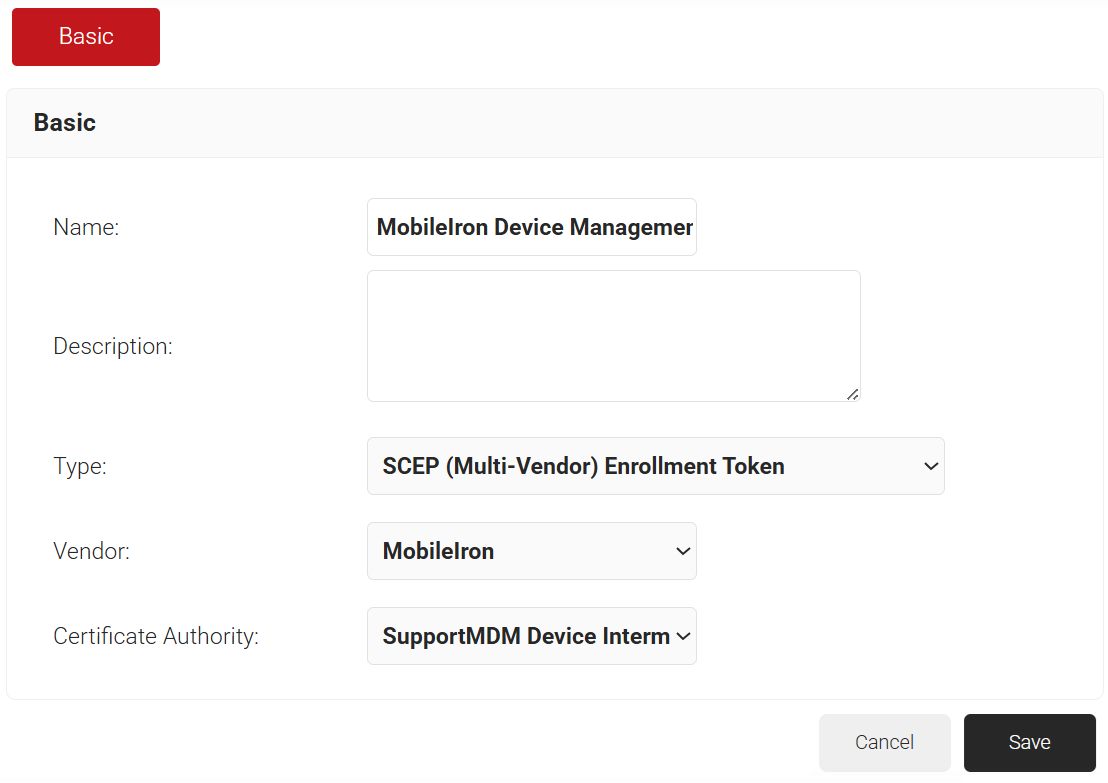
- Click Save. A .csv file containing the API Secret and Enrollment URL is downloaded. In addition, the Enrollment URL is displayed on the page.

NOTE: Save the file securely. This file is downloaded only once during token creation. If lost, the token and secret cannot be retrieved.
To create an SCEP certificate profile, perform the following steps:
- Log in to MobileIron.
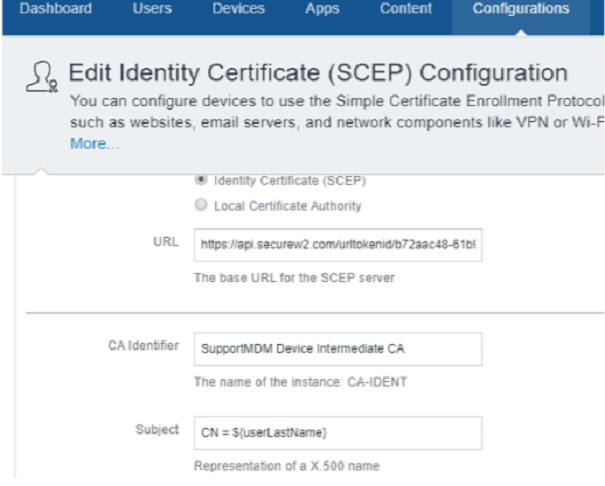
- Navigate to SCEP Configuration and click Add.
- Select Identity Certificate.
- Add a Name for Configuration Setup.
- Select SCEP Configuration > iOS Configuration.
- Select Identity Certificate (SCEP).
- In the URL field, enter the enrollment URL obtained from the Creating a Device Management Platform section.
- In the CA Identifier field, enter the name of the Intermediate CA created in the Creating an Intermediate CA for MobileIron SCEP Gateway Integration section.
- In the Subject field, enter CN=${<value>}. You can enter any desired value for <value>. For example, CN = ${userLastName}. Here is the URL to access the list of MobileIron variables: http://mi.extendedhelp.mobileiron.com/53/all/en/desktop/Variables.htm
- In the Subject Alternate Name Type field, select RFC 822 Name from the drop-down list.
- In the Subject Alternate Name Value field, enter any desired variables separated by a semicolon. For example:
${userFirstName};;${deviceWifiMacAddress};${userEmailAddress}NOTE: There are two semicolons at the beginning of the second variable.
- In the Challenge field, enter the pre-shared key that you received from the SecureW2 Management Portal along with the SCEP URL.

- Set the Key Size to 2048.
- Enable Digital Signature and use it as key encipherment.
- Click Next and choose how you want to distribute the profile.
This profile configures the device to connect to a secured SSID using the certificate for an EAP-TLS connection.
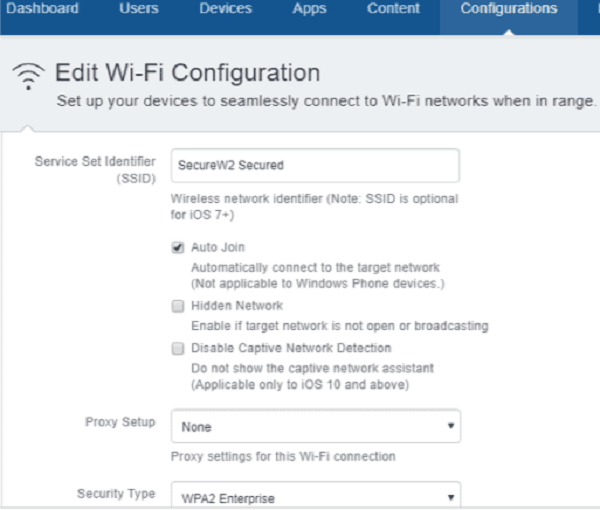
- Navigate to Configuration > Add > Wi-Fi.
- Enter a profile with a common name.
- In the Service Set Identifier (SSID) field, enter a secured/802.1x SSID name.
- Select the Auto Join checkbox.
- From the Security Type drop-down list, select WPA2-Enterprise.
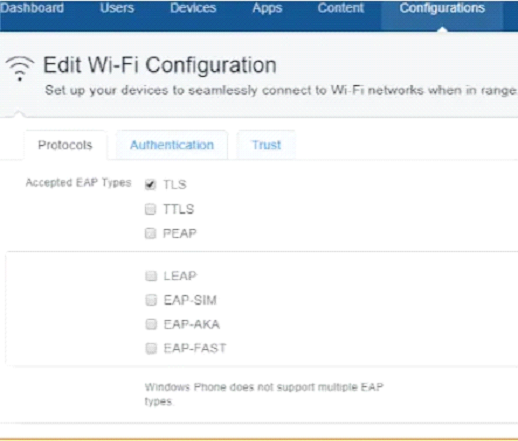
- Select the Protocols tab.
- Select TLS as the Accepted EAP Types.
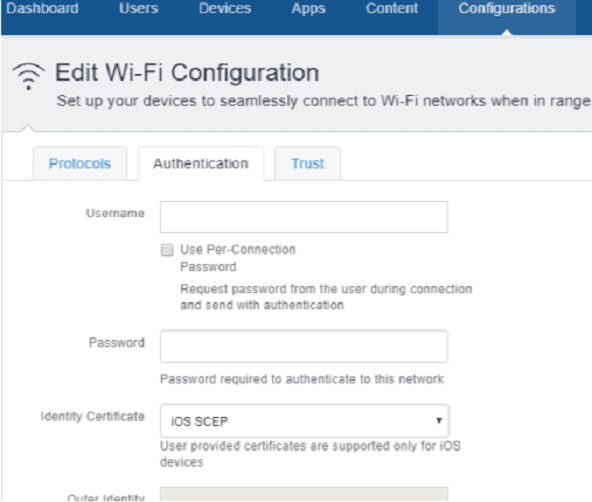
- Select the Authentication tab.
- From the Identity Certificate drop-down list, select the SCEP certificate profile name that you created in the Creating a SCEP Certificate Profile section.
- Select the Trust tab.
- From Trusted Certificates, select the certificate profile name that you created in the Creating a Certificate Profile section.
- In the Trusted Server Certificate Names field, enter *.securew2.com if you are using SecureW2’s Cloud Radius. This varies depending on the RADIUS server that is being used.
- Click Next.
- Choose how you want to distribute the profile.

Supported Attributes for Mobile Iron are listed at the following URL: http://mi.extendedhelp.mobileiron.com/53/all/en/desktop/Variables.htm
First, create an SCEP certificate profile that will communicate with the SecureW2 Mobileiron PKI so that the device can auto-enroll themselves for certificates using the SecureW2 PKI.
To create an SCEP certificate profile, perform the following configuration steps:
- Navigate to Policies & Config.
- Click Configuration.
- Click Add New.
- Select Certificate Enrollment.
- Click SCEP.
After creating the profile, populate the profile with information about the SecureW2 SCEP Gateway API.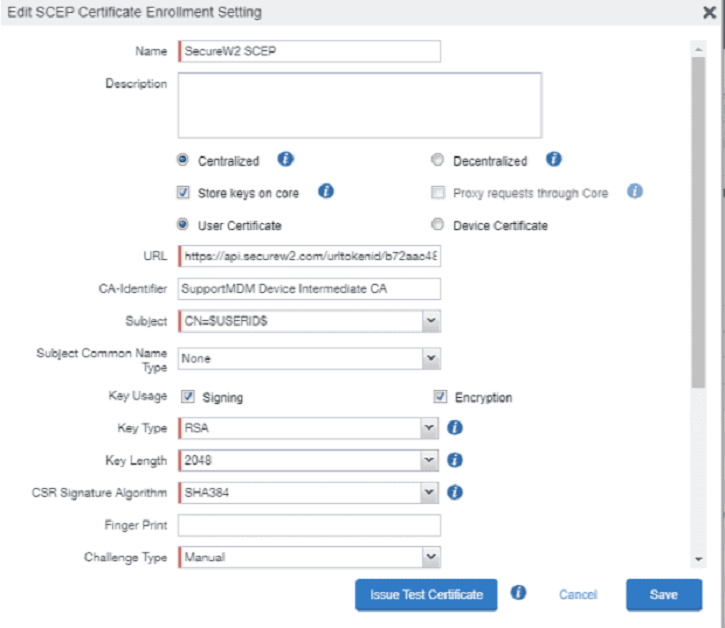
- In the Name field, enter a name for the SCEP Certificate Profile.
- In the URL field, enter the enrollment URL obtained from the Creating a Device Management Platform section.
- In the CA Identifier field, enter the name of the Intermediate CA created in the Creating an Intermediate CA for MobileIron SCEP Gateway Integration section.
- In the Subject field, enter CN=${<value>}. You can enter any desired value for <value>. For example, CN = $USERID$
- In the Key Usage field, select the Signing and Encryption checkboxes.
- From the Key Type drop-down list, select RSA.
- From the Key Length drop-down list, select 2048.
- From the CSR Signature Algorithm drop-down list, select SHA256.
- From the Challenge Type drop-down list, select Manual.
- From the Subject Alternate Name Type drop-down list, select RFC 822 Name, and choose the desired variables separated by semicolons. For example:
$FIRST_NAME$;$DEVICE_MAC$;$EMAIL$.
NOTE: There are two semicolons(;;) at the beginning of the second variable. - Enter the private keys received from SecureW2 while creating the Device Management Platform in the Creating a Device Management Platform section.
- Test the certificate, and then save the profile.
Next, create a Certificate Profile where you will add the Root CA of the RADIUS server certificate for trust.
- Navigate to Policies & Config.
- Click Configuration.
- Click Add New.
- Select Certificates.
Next, give the profile a name and upload the Root certificate of the RADIUS server. If you are using the SecureW2 cloud RADIUS server, then upload the DigiCert Global Root CA.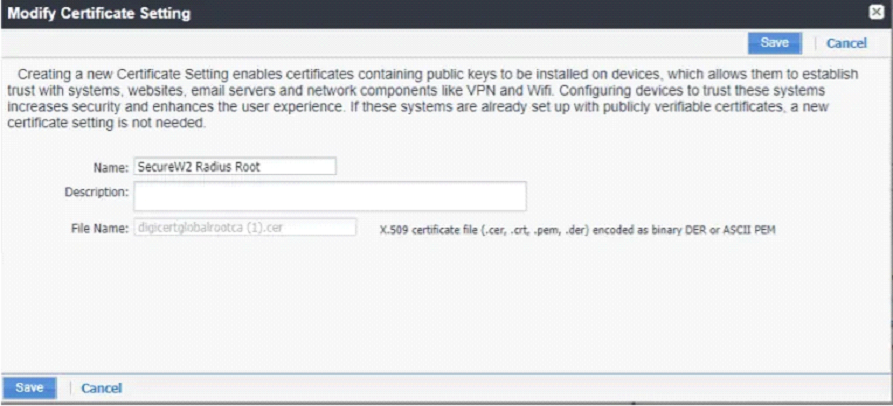
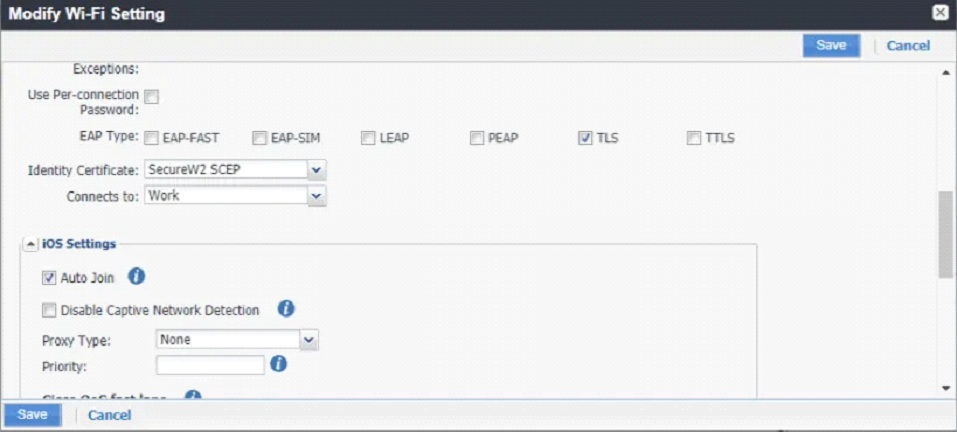
Next, create a new Wi-Fi profile that uses a SecureW2 SCEP certificate for EAP-TLS, a certificate-based authentication method. Here are the configuration steps:
- Navigate to Policies & Config.
- Select Configuration.
- Click Add New.
- Select Wi-Fi. The following screen appears:
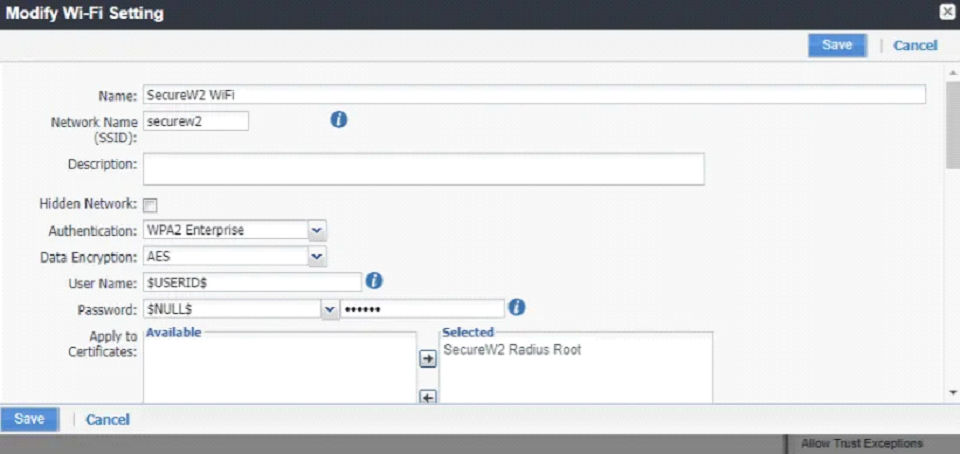
- In the Name field, enter a profile name.
- In the Network Name (SSID) field, enter a network name.
- From the Authentication drop-down list, select WPA2-Enterprise.
- From the Data Encryption drop-down list, select AES.
- In the Trusted Certificate Names field, enter the CN value of the RADIUS server certificate. For example, *.securew2.com if you are using SecureW2 Cloud RADIUS.
- Select TLS as the Extensible Authentication Protocol Type.
- From the Identity Certificate drop-down list, select the SCEP certificate profile name that you created in the Creating a SCEP Certificate Profile section.
- Select Auto Join under iOS Settings.