


Sectigo, formerly known as Comodo, is a leading provider of digital identity solutions. One of their main products are SSL/TLS certificates and Public Key Infrastructures (PKI), which allows the client to securely share an encryption key with a server so they can communicate in a secure and encrypted fashion.
SecureW2’s turnkey PKI services have quickly become a favorite among security teams, as it provides the tools to easily issue, manage and authenticate certificates while allowing users to easily enroll and configure their devices for certificate-based authentication..
In this article, we will be going over how to easily integrate Sectigo certificates and how to issue them to devices through SecureW2.
Configure SecureW2 to Issue Sectigo Certificates
- Log in to your SecureW2 management portal
- Click Certificate Authorities
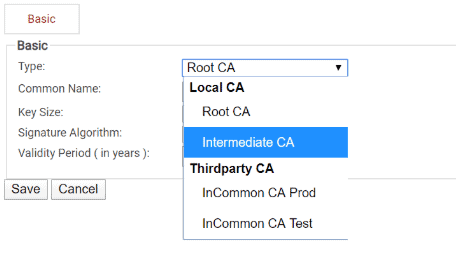
- Go to Add Certificate Authority
- Under Local CA use the drop down menu to find Intermediate CA
- Navigate to Generate via → Certificate Signing Request
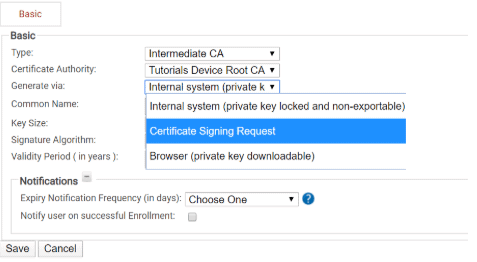
- Underneath, find Certificate Signing Request and locate your Sectigo Certificate file and upload it to SecureW2


This allows admins to leverage SecureW2’s best-in-class certificate issuance and management features. Sectigo completes the Certificate Signing Request (CSR) and gives full control to SecureW2, allowing you to deliver certificates through our intuitive onboarding software.
How to Issue Sectigo Certificates to Windows and Mac
Connecting your windows device is quick, simple, and only takes a few minutes. Here’s a guide to get your windows device configured.
- Connect to your WiFi
- Open your browser to be redirected to the onboarding client (For Mac, click Eduroam before being brought to the onboarding client) → Click JoinNow
- An application will be downloaded → Open the application
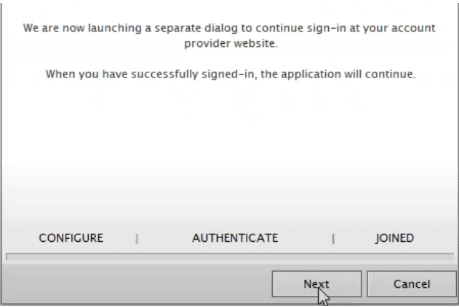
- A pop up will appear that will bring you to your account provider website to sign-in → Click Next
- Sign-in using your credentials
- Your device will automatically be enrolled, issued, authenticated, and connected in just a few seconds

How to Issue Sectigo Certificates to Chromebook
SecureW2’s certificate delivery platform allows you to issue Sectigo certificates to any Chromebook device, regardless of whether they are a BYOD or an organization-owned managed device. Here’s how a BYOD Chromebook would enroll themselves a certificate.
- Navigate to the SecureW2 JoinNow landing page
- On the bottom of the landing page, confirm that the OS is Chrome OS (device OS should be auto-detected)
- Click Install
- You will be taken to the Chrome plugin store for the JoinNow MultiOS → Click Add to Chrome

- A pop-up will appear asking to confirm to add the JoinNow MultiOS → Add extension
- After the extension is installed, go back to the landing page and enter your credentials
- The Chromebook will now enroll and install a unique client certificate

How to Issue Sectigo Certificates to Android
JoinNow MultiOS can easily get your devices enrolled for certificates in just a few minutes. Our software can connect with the native supplicant installed on a device, no matter the version, device type, or manufacturer. The user experience could not be simpler.
JoinNow also eliminates the complexity and challenges that comes with trying to manually configure your devices for WPA2-Enterprise and 802.1x, leaving no room for user error and misconfiguration. This allows organizations to configure devices for EAP-TLS, certificate-based Wi-Fi authentication all in one fell swoop.

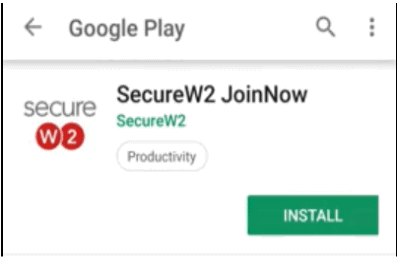
- Click JoinNow on the SecureW2 landing page, and click Download to navigate to the SecureW2 Android App
- From the Google play store, click Install
- Once installed, open the browser to the SecureW2 portal → Click Join Now
- After JoinNow automatically configures your device, a notification will appear prompting a separate dialogue box to sign in with your credentials → Click Next
- Using your credentials, sign in using a SSO that connects to your directory
- After a few moments you will be returned to the onboarding client and enrolled with a certificate

How to Issue Sectigo Certificates to iOS Devices
Unlike passwords, certificates offer a long life span, whereas passwords need to be reset constantly in order to keep your network secured. This can be a painful experience to everyone involved and can still leave room for potential threats.
Getting certificates onto iOS devices is simple with our onboarding software. End users will enter in their credentials, download a unique .mobileconfig file, and get their certificate enroll and installed in seconds. Here is a quick overview on how to issue certificates to iOS devices.
- On the SecureW2 JoinNow landing page,Click Sign in
- Users will be redirected to a single sign on page (that can be configured to use any SAML/LDAP Identity Provider) with their credentials
- Once credentials are verified, users will be sent back to the onboarding client
- A pop up will appear asking to open settings and show a configuration profile that they can easily download to install their new, unique, client certificate
- Open your WiFi settings and reconnect to your WiFi
How to Issue Sectigo Certificates to IoT Devices
With the rise of IoT devices, many remarkable and convenient applications have been invented and demonstrate the boundless potential of these devices. However, these devices are not just glitter and gold; they bring potential threats into otherwise secure networks. NETSCOUT’s Threat Intelligence Report says that it only takes 5 minutes for the IoT device to be attacked after being connected to the internet.
With SecureW2, you can create custom client certificates to issue to IoT devices. You can use any Root or intermediate CA with our managed PKI to generate a one-off certificate and install it on your IoT devices. If you’d like to learn more about how our IoT platform can auto-enroll devices with unique and lightweight protocols (such as Elliptic Curve Cryptography), contact us today to learn more.
Easily Issue Certificates From Your CA With SecureW2

SecureW2 makes issuing certificates to devices a breeze. Bring Your Own Devices (BYODs) are becoming more widely used in the business landscape and getting them all configured can turn into a pain. If left up to the end user, the device could be misconfigured and become a security risk. With SecureW2’s onboarding technology, users can issue themselves certificates in just a few clicks, and our clients will ensure they are installed in the right certificate store, configured as non-exportable.
Using SecureW2’s SCEP and WSTEP gateways, administrators will no longer have to deal with the costly and time consuming efforts of having to issue certificates through an MDM. Administrators can feel at ease as every device can be configured easily and accurately with no end user interaction.
Our Management portal also offers a robust feature set so that administrators have everything they need to revoke, manage, and troubleshoot issues that arise with certificates. Want to learn more about our PKI services? Contact us today for a Free Demo and one of our engineers will gladly show you how you can use SecureW2 to issue and manage certificates.
